
Mutation and Query In GraphQL Using Python/Django PART 1.
Previously, it was communication via XML-RPC to exchange information between computers across a network, really cool huh? but over time the REST technology came into existence and still is, but here is the future which is GraphQL and I think it is here to stay.
REST… Yes, No, Maybe?
So you have a web application and you need to make calls to about 5 different REST endpoint to render a page, that’s okay. What if you had 1000 clients making calls to the server for that page at the same time, it would be 1000 x 5 (5000) request to the the server. Great!
GraphQL…
Same web application here but in other to render that page you make one call to one endpoint and you specify what you want returned this time. So, if 1000 clients gets to make a call at the same time then only 1000 request is sent to the server( ideally with all other factors filtered out here).
Quick Comparison.
REST is not declarative as GraphQL, where you get to say I need alphabet A, G, H, J from alphabets A-Z, cool huh? Alright wait! we have not even started yet.
What’s going on here?
We are about to look at GraphQL and how to use it with an existing Python/Django project.
Here is the codebase will be referencing for this Blog.
Overview of what we want to achieve
- Have an existing Django App (may or may not have REST implemented, that’s fine)
- Understand GraphQL basics enough to get started.
- Set up GraphQL or just say add GraphQL to the existing app
- Create GraphQL query for REST equivalent of GET
- Create GraphQL mutation for REST equivalent of PUT, POST and DELETE
- Test your new feature !
So, if you don’t have an existing Django app you could get one up and running via this quick tutorial. That said, Let’s begin.
GraphQL SetUp
To use GraphQL we need to install the library, in your project directory run this shell command pip install graphene-django>=1.0.
Navigate to the settings.py file of your project and add this snippet to the file.
INSTALLED_APPS = [
    ...
    'graphene_django',
]

GRAPHENE = {
    'SCHEMA': 'bookmeapi.schema.schema', # Where your Graphene schema lives
    'MIDDLEWARE': (
        'graphene_django.debug.DjangoDebugMiddleware',
    )
}
Next, set up urls for the Django app, this will route all GraphQl calls to our GraphQL endpoint. Here I am referring to the urls.pyfile next to the settings.py file.
from graphene_django.views import GraphQLView

urlpatterns = [
    ...
    url(r'^graphql', GraphQLView.as_view(graphiql=True)),

]
From the snippet above, on line 5, where we are setting graphiql=True is simply telling Django to enable the interactive GraphQL server which you would see when you visit this route http://localhost:8000/graphqlwhile the server is running.

graphiql
Django-Server-Implementation(GraphQL)
Create Schema File.
What the heck is a Schema file? Well, the GraphQL schema file is what we use to tell the server to look through our database and create a really cool jsonrepresentation of the data we have before returning it to the client who needs it. Yeah, that’s just what it is in summary.
Just before we create a schema file, let’s consider this simple Django model representing books in a library
class Book(TimeStamp):

  """Book model defined here"""

  title = models.CharField(max_length=100)
  isbn = models.CharField(max_length=100)
  category = models.CharField(max_length=100)

  def __unicode__ (self):
    return "Book Title: {}" .format(self.title)
In other to represent this, in a really cool json format, where we get to tell the server what we want if not all the fields, we simply go ahead to create the schema.py file in the same directory, where your models.py live. Here, we will create the schema for the Book model.
# schema.py

import graphene

from graphene import relay, ObjectType
from graphene_django import DjangoObjectType

from graphene_django.filter import DjangoFilterConnectionField
from bookmeapi.models import Book

class BookNode(DjangoObjectType):

    class Meta:
        model = Book
        filter_fields = {
            'title': ['exact','istartswith'],
            'isbn':['exact'],
            'category':['exact', 'icontains','istartswith'],
            }

        interfaces = (relay.Node, )

class Query(ObjectType):
    books = relay.Node.Field(BookNode)
    all_books = DjangoFilterConnectionField(BookNode)

    def resolve_books(self):
        return Book.objects.all()

schema = graphene.Schema(query=Query,)
The DjangoObjectType is the class that handles the node creation for the Book model, You can call nodes in its simplest form as the representation of your model within graphQL, nodes are in general connected via edges, and with GraphQL, edgescan be seen as the relationship between Nodes.
Think of edges as how each model representation are interconnected or related. Here is a really good explanation of GraphQL connection. Don’t be in a haste to go through it.
DjangoFilterConnectionField is used to show a representation of all the instances of the model within the database.
The ObjectType here is used for the Schema Query creation, as this tells graphene to create a schema that will be used when the book model is queried and how it should prepare the data that will be returned from the database before sending to the calling client.
schema = graphene.Schema(query=Query,)
This sends the info to the graphene schema config we placed in the settings.py file.
GraphQL Query
Now, that we have created a simple query implementation for graphQL, let the query begin.
You can use your Django admin to populate the model briefly to query(get) what you have in it. For this example I will be querying the books model.
Run this command on your shell python manage.py runserver and go to url http://localhost:8000/graphql you should see this pop up on your browser

http://localhost:8000/graphql
To make a query to the server for all books we run this on the interactive console
query {
  allBooks {
    edges {
      node {
        id
        title
        isbn

      }
    }
  }
}query BookById($bookId: ID!){
  books(id:$bookId) {
    title
    category
  }
}
It looks like this on the console
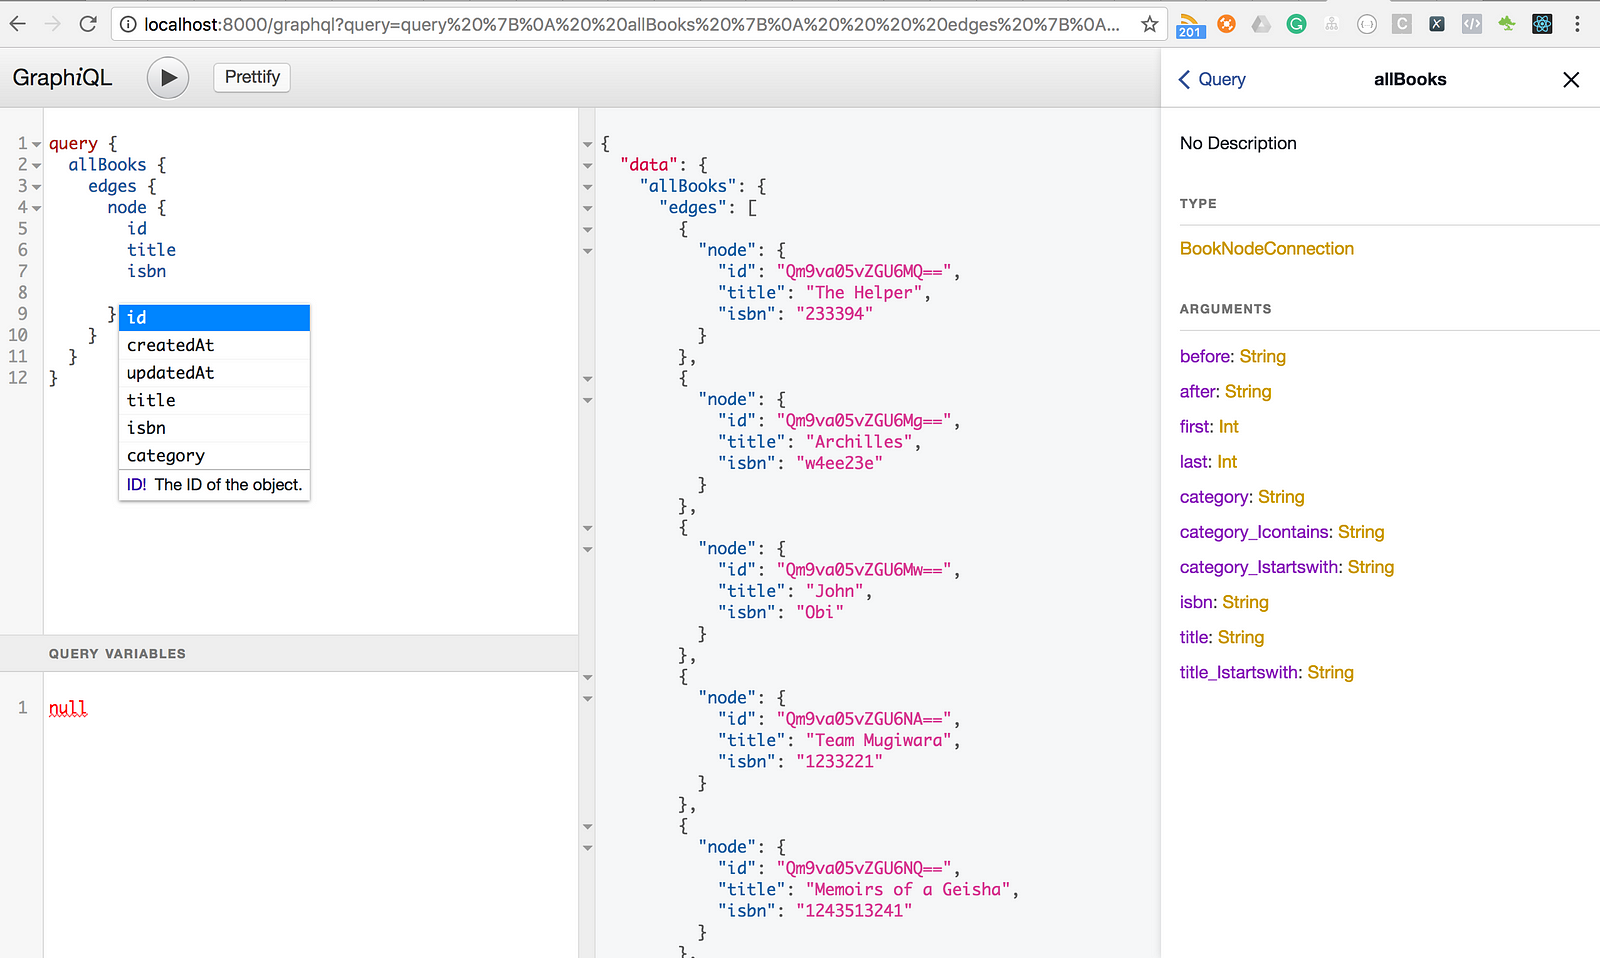
Here we get to specify what we want returned from the server.
Let’s try to query a book by id. Here is how it looks like on the console
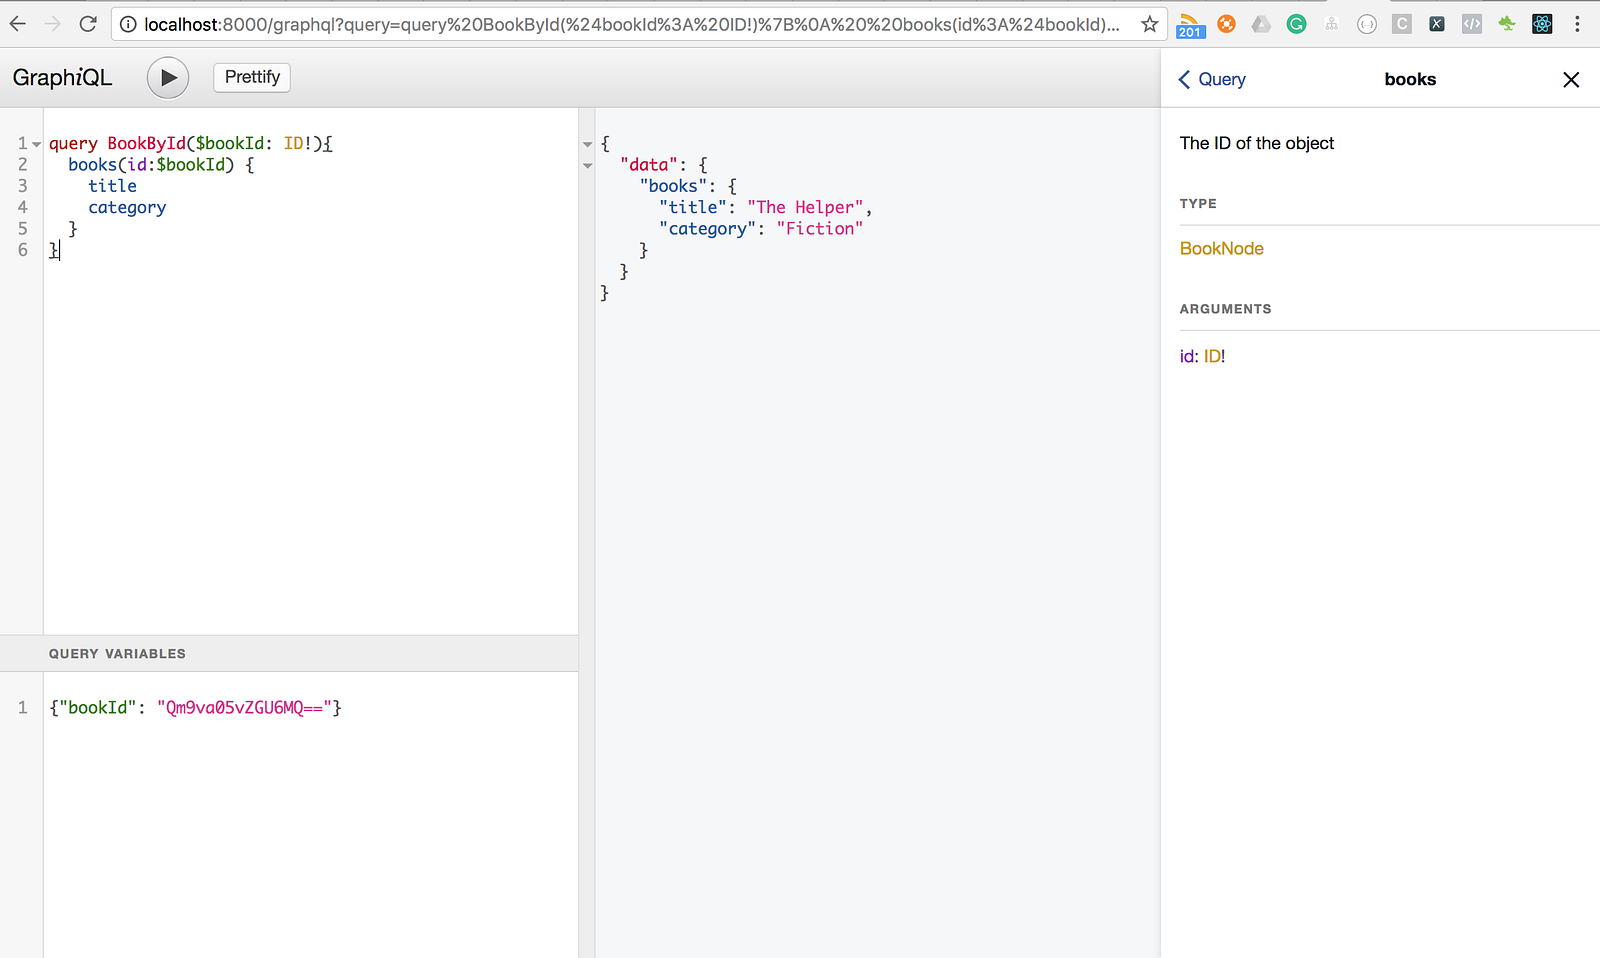
Quick explanation!
query BookById($bookId: ID!){
  books(id:$bookId) {
    title
    category
  }
}
The name “BookById” after the query keyword can be anything you choose to name it. Think of it as a way to identify the query. The “($bookId: ID!)” key: value pair is what we use to tell the query that we are going to pass in a bookId that is of type ID! (NOT NULLABLE).
On the second line we call the books query method defined in our query class and pass in the id defined by variable $bookId, this can also be found in the docs to the right of the console.
# Query variable
{"bookId": "Qm9va05vZGU6MQ=="}
Then we tell graphQL to return the title and category upon completion.
The result is what we get returned back to us as a very cool json
{
  "data": {
    "books": {
      "title": "The Helper",
      "category": "Fiction"
    }
  }
}
Are we done yet? No? well, maybe for now but we still have some more feats to cover in the next part where we will look into Mutation in GraphQL using Python/Django as usual.
Don’t forget to like and share if you find this helpful.