Welcome to Open-Source with Swift
Introduction.
About one year ago I wrote my first open-source project (Framer - framework which wraps working with frames with a nice chaining syntax). It was so exiting, I was trying to do it with all my heart in order people would like it.
After that I started the next project (Framezilla) - it’s a child of Framer, but written on Swift instead Objective-C. I already had little experience in open-source, so it was easier and better. There are many improvements: travis, carthage, good readme, release notes and so on.
Today I want to collect all my knowledge about open-source and present step by step tutorial how to create library for all platforms (Linux also), add Carthage, Cocoapods and Swift Package Manager(SPM) supports, write tests with Travis of course and so on. Let’s dive in!
Github.
First what we need is to create new repository on the Github of course. Generate repo with the README file, choose needed licence and add gitignore file. Don’t forget about new github’s feature - topics, after project creating:

Describe your library with some words — swift, UI, layout, ios and so on.
Add .DS_Store to_ .gitignore,_ because github don’t add it by default.
Implementation.
It’s time to create our library.
- Open Xcode > Create a new Xcode project > Choose “Cross-platform” and create Empty project.
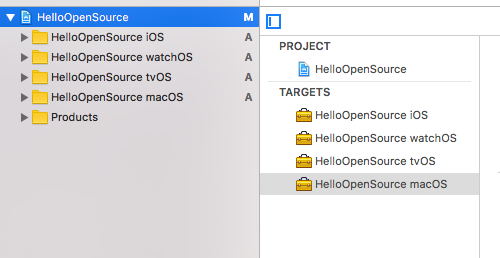
Now it should look so:

Then we need to create targets for all platforms: iOS, tvOS, macOS, watchOS. Press the “+” button under the TARGETS list at the bottom of IDE.
- Select platform > Find “Framework & Library” item > Choose “Framework” > Click “Next” button.
Add prefix for each of the platforms (iOS, watchOS, macOS, tvOS). Also don’t include Unit Tests, we will do that later manually. After this manipulation you should see the following:
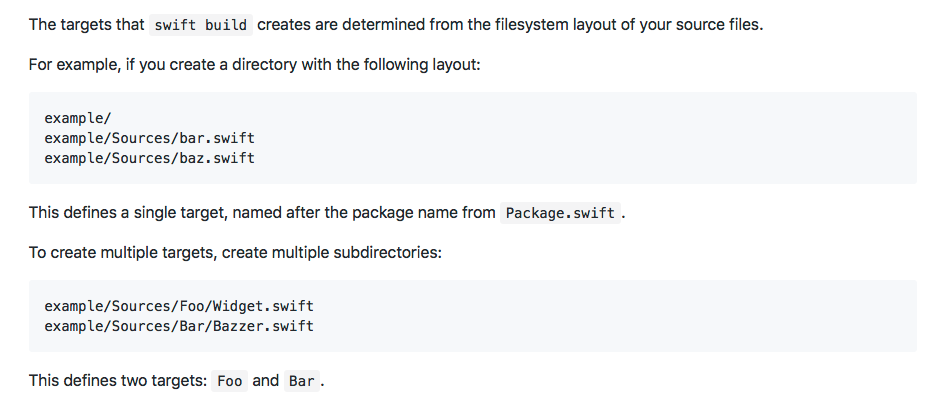
Since we want to support SPM, we need to create Sources and Tests folders in root directory of the project.

By convention, a package includes any source files located in the
Sources/directory.
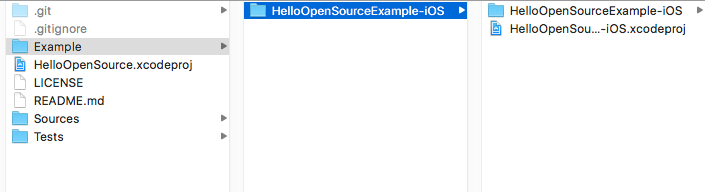
As you can see, we have many headers and plists for each target. Copy files from “HelloOpenSource iOS” and paste them in the Sources/HelloOpenSource/Supporting Files/ folder. Next remove all folders for each platform. You should get the following:

Want to note, that we’ve created HelloOpenSource subfolder - it’s our main target. A bit later we will create another one - executable target.
In our case all plists are the same, thus we remove them and leave the one only. You can leave all plists if you have some special configuration for each target. In this case don’t forget to add to each plist file special prefix - iOS, tvOS… It’s not necessary, but it’s a good practice.
Next we need to save the same folder structure only in the Xcode project. Remove all folders in project except Products and drag the Sources-Tests folders to the project. Don’t choose any of targets in the appeared popup dialog.
Now we need to change our header file. Open HelloOpenSource iOS.h and remove “iOS” prefix everywhere.
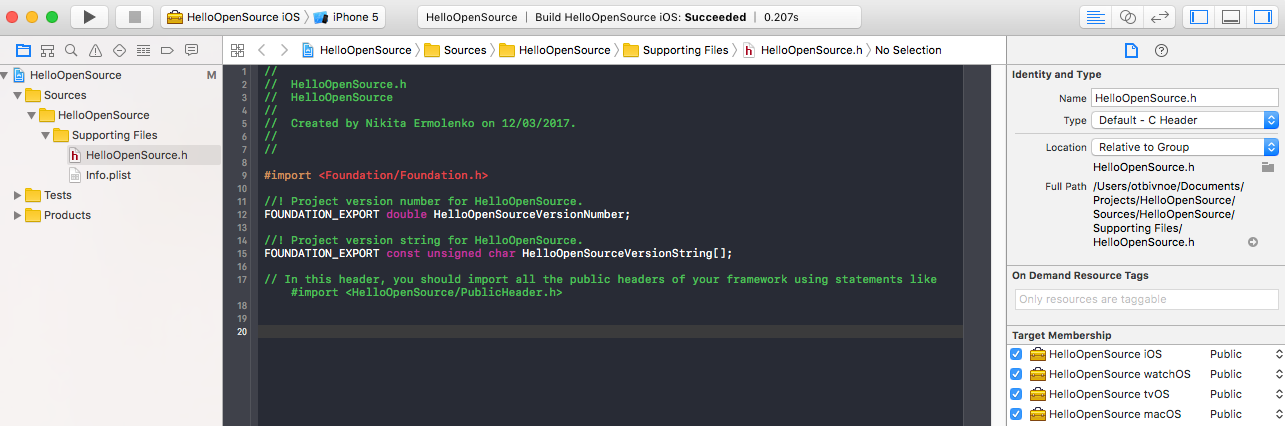
Don’t forget about Public in “Target Membership” for all platforms. Then let’s update “Build Settings” for each target:
- Build Settings > Product Name > Remove the appended prefix.
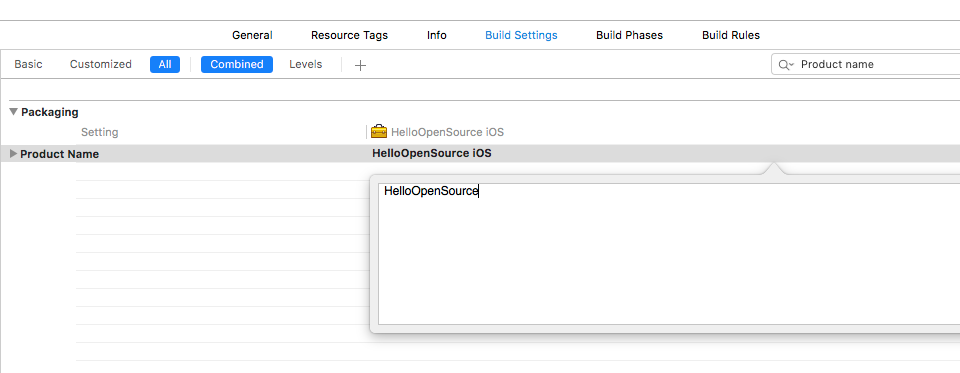
All platforms will have an identical name, so they are packaged as one product.
Since we changed our plists location, we need to change the paths to them.
- Build Settings > Packaking (Info.plist File) > Change the path to “Sources/HelloOpenSource/Supporting Files/Info.plist”.
I recommend to set “Require Only App-Extension-Safe API” to “Yes”. This will allow your framework to be used in extensions like the Today Widget.
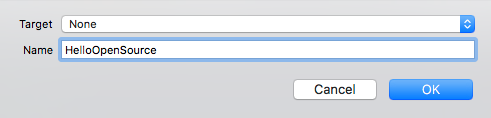
Now we have four targets and I don’t like to build their separately to see any warnings / errors. For this purpose we will add general scheme, that builds all targets at once.
- Click “New Scheme” > Set target to “None” and input the name > “Ok”.
- Press the “+” button on the bottom and choose all platforms.
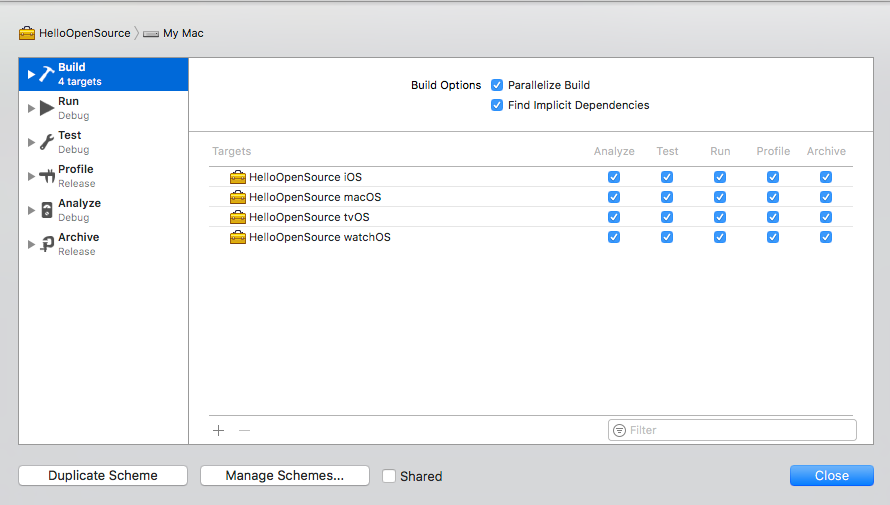
Now you can build this scheme and see all warnings / errors for all platforms right away!
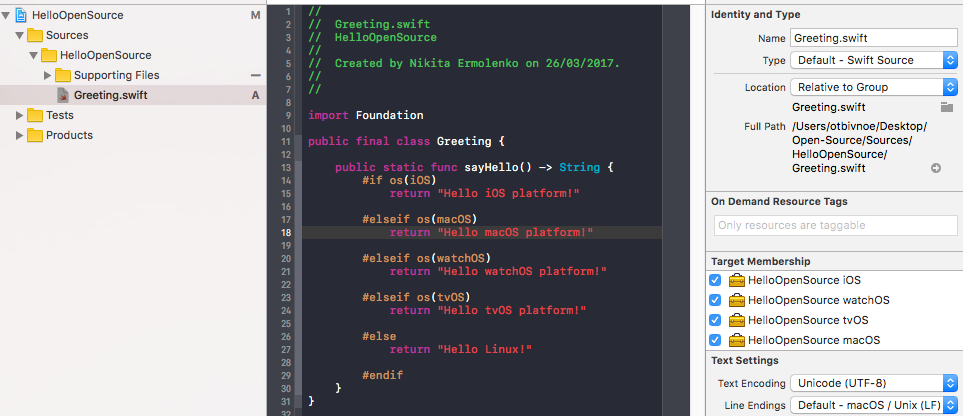
Let’s add some code! Create a new file - Greeting.swift and choose all platforms. I want to point out, that it’s important to specify correct access level! Since we want to use this code outside our library, we need to add public or open access level. Differences between them is that public you can inherit within module only unlike open. In our case public - is enough.
Tests time!
For SPM we need to create Tests folder, what we already did. Also have to add test target - HelloOpenSourceTests as subfolder.
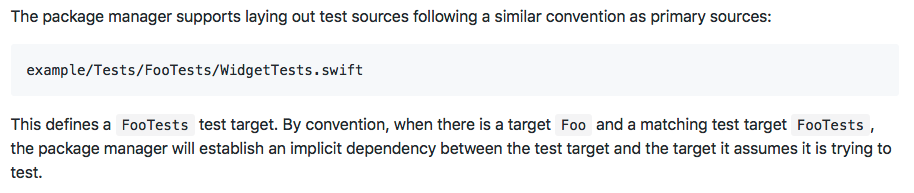
Then let’s add test targets within Xcode for all platforms. As you may notice, there is no watchOS test target, so you can’t test this by standard way. But you can use PivotalCoreKit for it - Watch Apps: How Do We Test Them? If you know better way, please, let me know. Ok, add iOS, tvOS and macOS test targets only.
As I mentioned early about usual targets, you also have to do the same things with the test targets. Finally you should get the following:

After that set correct plist paths for each test target.
- Tests/HelloOpenSourceTests/Info.plist
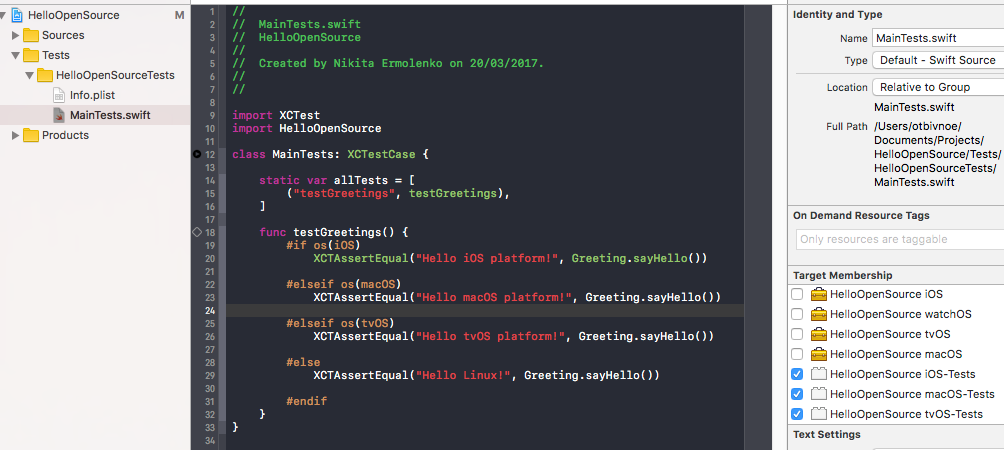
Add MainTests.swift file with simple test cases. Paying attention on “Target Membership”.
If you look into all schemes list, you will see here a few useless schemes (tests schemes) IMO. It’s time to delete them!
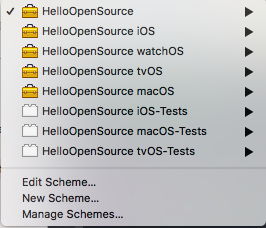
Click “Manage Schemes” and uncheck all test targets. Great, we cleaned up here, but how to run test targets now?
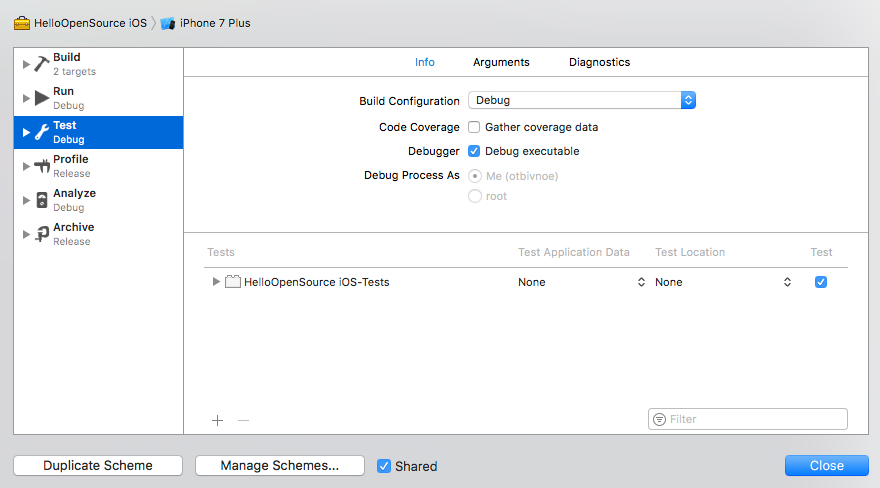
- Choose “iOS” scheme > Click “Edit Scheme” > Add test iOS target to “Test” menu item. Now you can run tests by “ Command+U ”.
Repeat this for all schemes.
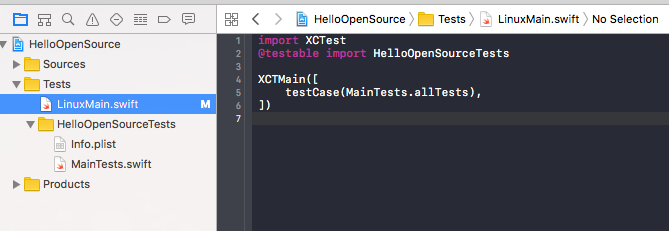
In order to run tests on linux, we have to add LinuxMain.swift file.

LinuxMain.swift doesn’t have any target references. So_,_ after that we have to have the following situation:
Let’s go create iOS example for checking that our library works correctly.
- Create “Example” folder in the root directory > Create “Single View Application” here.
Now it’s time to create the HelloOpenSource.workspace. When you create it, drag’n drop HelloOpenSource.xcodeproj and HelloOpenSourceExample-iOS.xcodeproj files into the workspace within Xcode.
Then add HelloOpenSource.framework in “Linked Frameworks and Libraries” within Example project.

Whoooh, this works! My Congratulations! 

In this tutorial we’ve written example only for iOS target, but you can create a big workspace with many examples. Do it!
Dependencies.
After that, when library is ready, we need to create comfortable ways of installing this one.
Carthage
For carthage all what we need is to mark our main schemes as shared (iOS, macOS, tvOS, watchOS). You can mark all schemes as shared, after that they all will be visible in the project, otherwise this schemes leave are local only - xcuserdata.

Swift Package Manager
As I said earlier that we will create another target later. So, it’s an executable target which just says hello to our platform 
By convention, a package containing a file named
main.swiftin its root directory produces an executable.
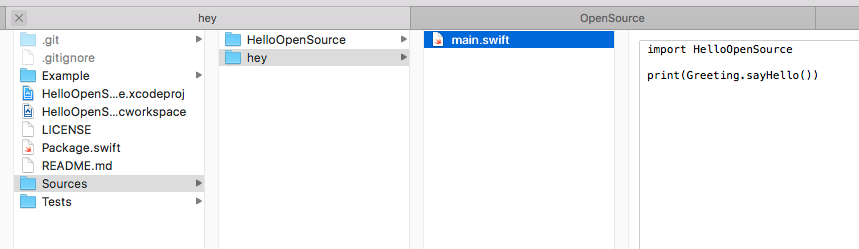
Also need to create Package.swift file.

Let’s check it. First, we build our library by special command: swift build. Then we can run tests by swift test.
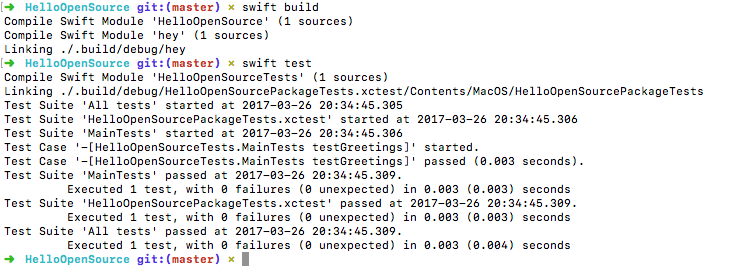
What about our executable target? Awesome!

Cocoapods
Add .HelloOpenSource.podspec file to the root directory. I won’t explain all these .podspec items, I hope everything is understood. For more details check Podspec Syntax Reference.

Also need to add .swift-version file for correct working with Swift 3.
3.0 - content of this file
Next, we need to validate our library. Run pod lib lint. If everything is okay, you should see the following:

There is a similar command - pod spec lint. It validates remote pod, not local. When previous steps are completed, create release tag, which associated with our spec version and push to remote. It’s time to publish our library! For this purpose we will use CocoaPods Trunk.
CocoaPods Trunk is an authentication and CocoaPods API service. To publish new or updated libraries to CocoaPods for public release you will need to be registered with Trunk and have a valid Trunk session on your current device.
So, we need to register a session:
$ pod trunk register gnod94@gmail.com 'Nikita Ermolenko' --description='mac mini'
and final step…
pod trunk push [NAME.podspec] 🚀
Travis.
It’s a hosted, distributed continuous integration service used to build and test software projects hosted at GitHub. It’s free for public repositories.
It looks good, when someone want to contribute to your project, but forgot to change existing tests, for example. In this case travis immediately warning us about it.
You can watch the following, if tests pass… something like this:

Configure it! Go to travis-ci.org and sign in with Github. After that, click on avatar and you should see a list of all your public repos. Turn on the needed repo:

Now we have to configure .travis.yml file. It will be a simple configuration file - just check that tests pass. But you can create notification that notifies you when everything is okay, also can write validation of .podspec file that it’s configured right and so many other cool things, but it’s another article already
Step by step:
- We defined which Xcode version want to use - osx_image.
- Set the workspace name, then we can get it by TRAVIS_XCODE_WORKSPACE.
- Then we defined 5 configuration options - matrix: linux, macOS, iOS, tvOS and watchOS. In Travis it will look so:

Want to note, that watchOS scheme has only build action due to lack of test mechanism, so we’re just checking the build.
We use build and test actions only. But there are other ones (check WWDC 2016):
- build-for-testing - it takes workspace scheme and destination as usual but on top of that it will create ‘XCTESTRUN’ file.
- test-without-building - we don’t need to provide workspace instead we specify the ‘XCTESTRUN file which will inject that file and runs all the tests.
install:
For Linux first what we need is to install the Swift. For this we have to install the swiftenv in the install block. Here is a simple script for installing it, without some checking - maybe this Linux OS doesn’t support it…
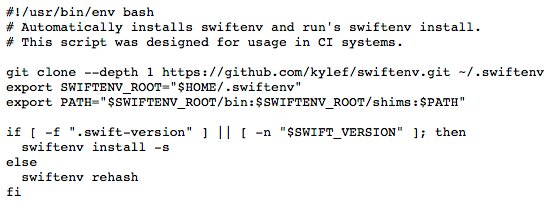
You can check more detailed script here - https://swift.vapor.sh/codecov
script:
For Linux everything is understood, just swift test, we already did it. But for macOS is a bit harder.
Darwin is an open-source Unix operating system released by Apple Inc. in 2000. It is composed of code developed by Apple, as well as code derived from NeXTSTEP, BSD, Mach, and other free software projects.> Darwin forms the core set of components upon which macOS (previously OS X and Mac OS X), iOS, watchOS, and tvOS are based.
- set -o pipefail - Stops with error the executions of pipe if one of the components execution with an error.
- Then 3 commands print helpful information about available sdks, devices and current version that travis supports.
- The core of our testing - is xcodebuild. In our case everything is obviously, except xcpretty and ENABLE_TESTABILITY.
ENABLE_TESTABILITY - This makes the Swift entities declared in the compiled module eligible for a higher level of access.
xcpretty - is a fast and flexible formatter for xcodebuild.
More about xcodebuild you can read here.
Good practice.
- Tool from the Realm - SwiftLint, which enforce Swift style and conventions.
- In advance check your library before releasing a new version of language.
- 100% test coverage. 😎
- Generate CHANGELOG.md and CONTRIBUTING.md files.
- Great README.md with beautiful logo.
- Use Gitflow. 👍
- Danger - help you to automate simple code review process via CI.
- Try to improve the Quality Indexes - collection of metrics for the Pod (Tests, good readme and so on - it all depends on it).
Share!
It’s time to show your library to the community.
- Usually I create post on Reddit in two subreddits (iOSProgramming and Swift).
- Submit library to the ManiacDev and Libhunt.
- Create pull request to the Awesome-iOS.
The source-code is here - https://github.com/Otbivnoe/HelloOpenSource.
Hope you enjoyed this article! Feel free to comment if you have any question, feedback or best practices!

I during ITC build processing
Shaggy iOS Engineer at Rosberry. Reactive, Open-Source lover and Retain-cycle detector
Also check my telegram channel about programming, twitter and my open-source projects: