Python Environment Management with Conda (Python 2 + 3, Using Multiple Versions of Python)
Coming across an ImportError similar to the one in the image below can be annoying.

Luckily, Anaconda makes it easy to install packages with the package manager functionality of conda. In case you need a refresher, a package manager is a tool which automates the process of installing, updating, and removing packages. While Conda is a package and environment manager, let’s first review the package manager functionality of conda and then focus on the environment manager functionality.
Install Packages
Open a command prompt/anaconda prompt (windows) or a terminal (mac/linux) and run the command below. You can be substitute numpy for whatever package you want to install.
conda install numpy
Uninstall Packages
Run the command below to uninstall a package. You can be substitute numpy for whatever package you want to uninstall.
conda uninstall numpy
Update Packages
Run the command below to update a package. You can be substitute scikit-learn for whatever package you want to update.
conda update scikit-learn
Conda vs Pip
Pip is a Python package manager which stands for “Pip Installs Packages” that is usually coupled with virtualenv (a tool for creating isolated environments).
Most of the time (with some exceptions) there isn’t much of a difference between installing packages through conda or through pip. This is because pip packages are also installable into Conda environments.
conda install numpy
pip install numpy
This isn’t a discussion on conda vs pip as Jake VanderPlas covered it pretty extensively, but why you can mostly install packages through either pip or conda.
Why you Need Multiple Conda/Python Environments.
Say you have multiple projects and they all rely on a library (Pandas, Numpy etc). If you upgrade one package it could break your other projects relying on old versions of the package as the old project’s syntax could become deprecated or obsolete. What should you do? Set up a virtual environment. It allows you to separate out packages, dependencies and versions you are going to use from project to project.
A common use of virtual environments for python users is having separate Python 2 and 3 environments. For example, a couple of my classmates at UC San Diego recently started a machine learning class where one professor sets assignments in Python 3. However, another class has a professor who sets assignments in Python 2. Consequently, they have to frequently switch between python 2 and 3 in their different class projects. With that, let’s get into conda environment commands. I recommend you open the video in a separate tab to watch the commands in action.
Create a New Environment
The command below creates a conda environment named subscribe in python version 3.6. You can be substitute subscribe for whatever you want to name your environment.
conda create --name subscribe python=3.6
Keep in mind that you will need to install additional packages inside that environment once you activate (enter) that environment. The packages you have in your root environment are not necessarily the ones you will have in your new environment unless you install them.
You can also create an environment with multiple packages in it. This also gives you the option to install additional packages later if you need them.
conda create --name chooseAnotherName python=3.6 numpy pandas scipy
Enter an Environment
If the name of your environment is not subscribe, you will need to substitute subscribe for the name of your environment.
Windows:
activate subscribe
Mac:
source activate subscribe
Leave an Environment
If the name of your environment is not subscribe, you will need to substitute subscribe for the name of your environment.
Windows:
deactivate subscribe
Mac:
source deactivate subscribe
List your Environments
This command shows you all the This is a really helpful command to see what environments you have, but also to see what conda environment you are in.
conda env list

Remove an Environment
If the name of your environment you want to remove is not subscribe, you will need to substitute subscribe for the name of your environment you want to remove.
conda env remove --name subscribe
If you have questions on this part, please refer to the documentation, leave a comment or refer to the video above.
Using Both Python 2.x and Python 3.x Environments in IPython Notebook
While this section of the post was largely taken and improved from stackoverflow, I feel like it is important to go over how and go over some technical issues people run into. The main idea is to have multiple ipython kernels. The package nb_conda_kernels will automatically detect different conda environments with notebook kernels and automatically register them.
- Make sure you have anaconda 4.1.0 or higher. Open a new terminal and check your conda version by typing

checking conda version
if you are below anaconda 4.1.0, type conda update conda
- Next we check to see if we have the library nb_conda_kernels by typing

Checking if we have nb_conda_kernels
- If you don’t see nb_conda_kernels type

Installing nb_conda_kernels
- If you are using Python 2 and want a separate Python 3 environment please type the following

py36 is the name of the environment. You could literally name it anything you want.
If you are using Python 3 and want a separate Python 2 environment, you could type the following.

py27 is the name of the environment. It uses python 2.7.
-
Close your terminal and open up a new terminal. type jupyter notebook
-
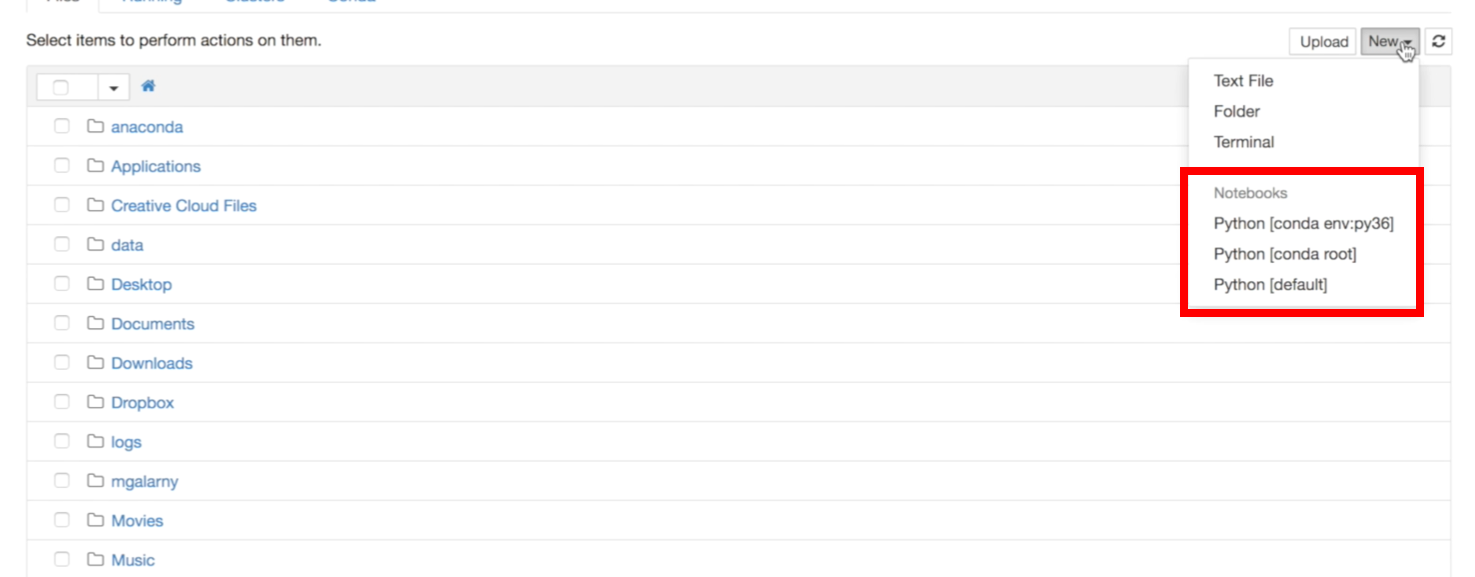
Click new and you will see your virtual environment listed.

Please let me know if you have any questions either here or in the youtube video comments!
This article originally appeared on my medium blog.
