
Start Building Daydream Apps: Exploring Google VR SDK
As usual, this year’s Google I/O conference saw a whole host of announcements and product launches. And with the buzz currently surrounding virtual reality, it was no surprise that one of these announcements was VR-related: enter Daydream, Google’s new mobile VR platform.
Fast forward a few months and the Google VR SDK with Daydream support has graduated out of beta and the first Daydream-ready smartphones are starting to hit the market — basically, it’s the perfect time to take a closer look at Google’s brand-new VR platform!
In this article, I’m going to show you how to setup a DIY development kit, so you can get that all-important hands-on experience with the Daydream platform—even if you haven’t managed to get your hands on the Daydream View or the Daydream Controller yet!
I’ll also be showing you how to setup this first official release of the Google VR SDK, and how to create a Daydream-ready Android project that’ll provide the perfect starting point for developing your own Daydream apps.
And finally, since a brand new platform means a brand new set of best practices, we’ll also take a quick look at some of the guidelines you need to keep in mind when developing for the Daydream platform.
Developing for Daydream: What you’ll need
If you’re going to develop anything for Daydream, then you need to be able to run Daydream apps. Not only is this essential for testing any Daydream apps you do create, but as a brand new platform the more time you can spend exploring everything that Daydream has to offer, the better — and one of the easiest (and most fun) methods is to spend some time playing around with virtual reality games.
Officially, if you want to run Daydream apps then you’ll need the following:
- A VR viewer, specifically Daydream View.
- The Daydream controller. This controller can track rotation and orientation, and includes a touchpad and buttons that allow you to interact with Daydream apps. This controller is sold as part of a package with the Daydream View.
- A Daydream-ready smartphone. At the time of writing, only the Google Pixel and the Nexus 6P were compatible with Daydream.
But don’t worry if you haven’t got your hands on the dedicated viewer and controller just yet, as you don’t actually need either the Daydream View or the Daydream controller in order to run Daydream apps.
Perhaps you’ve placed your order for the Daydream hardware but are still waiting for your package to arrive; maybe you plan on placing your order soon (post-payday, perhaps?) or maybe you simply want to see what Daydream is all about before you invest £69.00 in a dedicated controller and viewer.
Whatever the reason, if you don’t currently have access to the Daydream controller and Daydream View, then I’m going to show you how to setup a DIY Daydream development kit that enables you to experience this platform regardless.
The major drawback is that you will need two Android smartphones, but one of these devices can be running KitKat or above, so if you have an old smartphone hanging around then now’s the perfect time to bring it out of retirement.
In order to cook up your own development kit, you’ll need the following:
- A Daydream-ready “headset” phone. At the time of writing, only the Google Pixel and Nexus 6P meet this criteria.
- A “controller” phone. An Android phone running KitKat or above. This is what you’ll be using instead of a Daydream controller.
- A Cardboard-compatible VR viewer. You can use the viewer of your choice, as long as it plays nicely with Cardboard.
- The Google VR SDK for Android. Head on over to the Google VR Downloads page, click ‘Clone or download’ and select “Download ZIP.” Unzip the file.
Finally, you’ll need a Daydream app. I’m going to use Google’s “Treasure Hunt” sample app, as it demonstrates many of the core features of Daydream, so if this is your first hands-on experience with the platform then Treasure Hunt provides a great introduction.
To build and run the Treasure Hunt sample app, you’ll need the following:
- Android Studio 1.0 or higher.
- Version 23 of the Android SDK.
- Gradle 23.0.1 or higher.
- An Android device running 4.4 or higher.
1. Build and install the Treasure Hunt app
Our first task is building the Treasure Hunt app and installing it to our headset device:
- Head over to gvr-android-sdk and download Treasure Hunt as a ZIP file. Unzip it, then launch Android Studio and open the unzipped gvr-android-sdk folder as a new Android project.
- Grab the phone you’re using as your Daydream headset and make sure it has “USB Debugging” enabled. If USB debugging isn’t enabled, open the device’s “Settings” app, select “Developer options” and set the “USB debugging” slider to the “On” position.
- Connect your Android device to your development machine.
- Select “Run” from the Android Studio menu bar, followed by “Run…” Select “samples-sdk-treasurehunt,” and then click “Run” again.
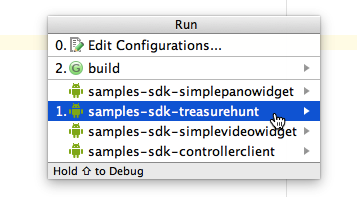
android studio run
- Once Treasure Hunt has been installed on your Android device, launch it and grant it any permissions it requests.
- If you haven’t already, download the Cardboard app from the Google Play store. Launch this app and grant any permissions it requests.
- Reboot your device.
2. Install the Controller Emulator APK
As already mentioned, we’re going to use the second Android device as our Daydream controller, by installing the Controller Emulator app:
- Grab the Controller Emulator APK from GitHub (note, this is a direct download link). Move this APK to your Android device.
- In order to install apps from APKs, you’ll need to have “Unknown sources” enabled, so open your device’s “Settings” app, select “Security” and then push the “Unknown sources” slider to the “On” position.
- Launch any file explorer app, such as ES File Explorer, and navigate to the Controller Emulator APK.
- Give this APK a tap, then follow the onscreen instructions to install.
- Launch your new Controller Emulator app and tap “Next.” Read the onscreen information, then tap “Finish.”
3. Set up the headset phone
You’ll now need to enable several settings on the phone you’re using as your headset:
A. Enable the Google VR Services permissions
- Launch your device’s “Settings” app.
- Select “Applications.”
- Tap the three-dotted menu icon.
- Select “Google VR Services” from the list of apps.
- Select “Permissions” and enable all the permissions that appear in this list.
B. Turn on special access for Google VR Services
- Navigate back to the main “Settings” screen.
- Select “Applications.”
- Tap the cog icon in the upper-right corner.
- Select “Special access.”
- Enable Google VR Services for the following: Do Not Disturb access; VR helper services, and Notification access.
C. Enable Bluetooth and Location services on both devices
- Navigate back to the main “Settings” screen.
- Select “Bluetooth” and make sure the “Bluetooth” slider is set to “On.”
- Navigate back to the main “Settings” screen.
- Select “Location” and make sure “Location” is set to “On.”
- Select “Mode” and choose “High accuracy.”
- Make sure Bluetooth is enabled on the phone you’re planning to use as your Daydream controller (Settings > Bluetooth > On).
- Pair your headset phone and your controller phone over Bluetooth, by selecting “Settings > Bluetooth” on either phone and waiting for it to detect the other device.
- Tap the device you want to connect to, and then confirm the pairing when prompted.
D. Setup your Controller Device — and connect!
On the headset phone, launch the Treasure Hunt app you installed earlier, then:
- Give the cog icon a tap in the app’s upper-right corner.
- Select “Settings,” followed by “Setup.”
- Tap the “Version” item 7 times to reveal the “Developer Options.”
- Select “Controller emulator device.”
- Select the phone you’re using as your Daydream controller.
- Close the Treasure Hunt app completely.
You’re now ready to check that your DIY development kit works:
- On your headset phone, re-launch the Treasure Hunt app.
- On your controller phone, launch the Controller Emulator app.
If everything is set up correctly, you’ll see ‘Connected’ at the top of the Controller Emulator app. At this point, you can interact with the Treasure Hunt app on your Android headset, using your second Android device as a Daydream controller.
From top-to-bottom, the Controller Emulator consists of:

Touchpad area (large circle). This emulates the Daydream controller’s touchpad area. On a real controller, the user can also “click” the touchpad by pressing it; to mimic this action in the Controller Emulator app, double-tap the touchpad area. When designing Daydream apps, you’ll typically map this “click” event to your app’s primary action.
App buttons (immediately below the touchpad). You’ll typically use this button for your app’s secondary actions.
Home button (bottom). This button is reserved for system use, so you can’t use it in your app.
Place your headset phone in your Cardboard-compatible viewer, and you’re ready to go! Since Treasure Hunt demonstrates many of the core Daydream features in action, it’s recommended that you spend some time playing around with this game — particularly if this is your first hands-on experience with Daydream.
Starting your own Daydream project
Once you’ve spent some time exploring the Daydream platform, you may want to start developing your own Daydream apps.
Guiding you through the process of designing and developing a complete VR experience is beyond the scope of this article, so instead I’m going to cover the essentials of creating a Daydream-ready project that you can continue to build on, and potentially develop into your own Daydream app.
Create a new Android project, and let’s get started!
1. Importing Libraries
The Google VR SDK is packaged as a set of .AARs instead of jars, so the first step is importing all the .AARs you want to use in your project. You’ll find all the available .AARs in the gvr-android-sdk-master folder you downloaded earlier.
Exactly which .AAR libraries you need to import will vary depending on the kind of app you’re creating, but the process is always the same:
- Select “File” from the Android Studio menu bar, followed by “New” and “New Module…
- Select “Import .JAR/.AAR Package.” Click “Next.”
- Click the little dotted button to the right of the “File name” field.
- Navigate to the “gvr-android-sdk-master” folder you unzipped earlier.
- Double-click “libraries.”
- Find the library you want to import and select its .AAR file.
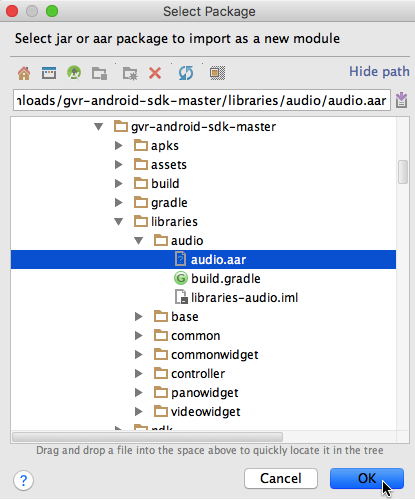
Select .AAR file
- Click “OK,” followed by “Finish.”
- Add this module as a dependency by selecting “File,” from the Android Studio menu bar, followed by “Project Structure…”
- In the “Project Structure” window, select the module you want to use.
- Click the little “+” towards the bottom-left of this window, and then select “Module dependency” from the dropdown that appears.
- Select your app and click “OK.” When prompted, click “OK” again.
- Open your module’s build-gradle file and reference the .AAR file in the dependencies block, for example:
    dependencies {
       compile project(":audio")
Repeat this process for every library you want to use in your project, and then perform a Gradle sync.
2. Embedding VR View
At its most basic, a VR app is a 360-degree image or video that you embed in your Android app via a new component known as a “VR view.”
Android’s new VR view component supports mono and stereo 360-degree images and videos, in the equirectangular-panoramic (equirect-pano) format — but how do you generate this content?
If you want to capture 360-degree content from the real world, then you’ll either need to use a camera that produces VR-compatible content, such as the Ricoh Theta camera or use the Cardboard Camera App and then reformat your content using Google’s conversion tool.
You can also use CGI software to generate 360-degree images and videos. Some popular options include the 360 Panorama Capture plugin for Unity, the Domemaster3D fulldome lens shader for Maya, and Unreal Engine 4, which has built-in support for capturing 360-degree content.
Once you have your image or video content, open the layout file where you want to display this content and add one of the following VR view elements:
google.vr.sdk.widgets.pano.VrPanoramaView, if you want to display a 360-degree image.google.vr.sdk.widgets.pano.VrVideoView, if you want to display a 360-degree video.
You can then style this view using Android’s regular XML attributes, for example:
    <com.google.vr.sdk.widgets.pano.VrPanoramaView
          android:id="@+id/myVRImage"
          android:layout_margin="15dip"
          android:layout_width="match_parent"
          android:layout_height="200dip" />
If you’re displaying an image, then open the corresponding Activity and tell the system which image it should load, using the VrPanoramaView.loadImageFromBitmap attribute.
If you want to display a 360-degree video instead, then you’d add a com.google.vr.sdk.widgets.pano.VrVideoView element to your layout resource file, and then open the corresponding Activity and tell the system which video it should load, using the loadVideoFromAsset attribute, for example:
videoWidgetView.loadVideoFromAsset("myVRVideo.mp4", options);
The Google VR SDK for Android comes with two sample apps that demonstrate how you can use VR view to display 360 images (Simplepanowidget) and 360 video (Simplevideowidget). You’ll find both of these samples in your unzipped “gvr-android-sdk-master/samples” folder. If you want to take a closer look at either of these apps, then simply open them as a new Android project in Android Studio.
Finally, you’ll need to make some changes to your project’s Manifest. Regardless of the kind of VR app you’re creating, you should request the following permissions:
<uses-permission android:name="android.permission.NFC" />allows the Google VR to access the VR viewer’s NFC tag, so your app will know when the user has placed their device in a compatible handset.<uses-permission android:name="android.permission.READ_EXTERNAL_STORAGE" />the Google VR SDK requires this permission in order to pair the user’s phone with their VR viewer.
Next, find the section of your Manifest where you declare the Activity that’ll contain your VR content, and make the following additions:
    <activity
                    android:name=".MainActivity"

    //Specify that this Activity must run in landscape mode, which is a requirement of all VR content.//


                    android:screenOrientation="landscape">


                <intent-filter>
                    <action android:name="android.intent.action.MAIN" />
                    <category android:name="android.intent.category.LAUNCHER" />


    //If the user installs the Cardboard app on their device, you’ll want it recognise that your app is Cardboard-compatible, so make sure you add the CARDBOARD category to your Activity.//


                   <category android:name="com.google.intent.category.CARDBOARD" />
                </intent-filter>
Designing for VR
Daydream isn’t just a few new pieces of hardware — it’s an entirely new platform, which means a new set of best practices.
If you’re going to make the most of Daydream’s strengths and overcome its challenges, then the earlier you can familiarize yourself with these best practices, the better. So let’s take a look at a few of them now.
1. Don’t make your users feel nauseous!

Motion sickness occurs when there’s a disparity between what you feel and what you expect to feel. Since you definitely don’t want to leave your audience feeling sick to their stomach, you should make efforts to reduce this disparity — and one way to do this is by maintaining head tracking at all times. Even a brief loss of head tracking can leave some users feeling nauseous!
When testing your app, look for any instances where head-tracking consistently freezes, and then try to figure out a) what’s causing this problem; and b) how you can rectify it. If head tracking is freezing because your app is performing some crucial work and you can’t find a way to optimize this area of your app, then as a last resort, you can fade the screen to black before head-tracking has a chance to freeze. If you do decide to fade to black, then you should maintain audio so your users know that your app is still running and that it hasn’t crashed or frozen on them.
Depending on the kind of VR experience you’re creating, you may be able to reduce the chances of your users feeling nauseous, by creating the illusion that they’re moving through your VR world at a constant velocity. This may sound strange, but think about when you’re riding in a car — when the car is traveling at a constant velocity you don’t really feel any movement, but you do notice when the car accelerates or decelerates.
When the user is “traveling” through your VR experience at a constant velocity they won’t expect to feel any sense of movement and are less likely to get motion sick as a result.
Another solution that may be appropriate for some apps, is to make the user stationary and have the VR world move around them. For example, you might sit the user in the carriage of a rollercoaster or ghost train; in the pilot’s seat of an airplane, or maybe they’re just sitting in a chair, watching the digital world go by. Don’t Let Go (https://www.wearvr.com/apps/dont-let-go) is a great example of the latter.
2. Don’t burn the user’s retinas!

Think about how close the screen of a VR headset is to the user’s eyes — any sudden increase in brightness is going to be uncomfortable, and snapping from a black screen to a blazing white screen is going to be downright painful.
If you do need to change the brightness levels within your app, then make sure you do it gradually.
3. Don’t rush the user

As you may have noticed when assembling your DIY development kit, running a Daydream app isn’t as straightforward as launching a regular Android app on your smartphone or tablet.
Your users might have to hunt down their Daydream controller and adjust their headset, and then may even decide that they need to move to a different room — one where there are less things they might trip over or bump into once they’re fully immersed in the VR experience. Therefore, you should always allow the user to dictate when the VR experience starts. For example, you might create a “Welcome” screen that the user has to physically click through in order to launch the real VR content.
4. Ensure UI controls are always within reach

If you need to display UI controls inside the VR environment, then you should make sure these controls are always within easy reach, by placing them within the user’s current field of view. If the user moves within the VR environment and these UI controls are still relevant, then you should reposition the controls, accordingly.
While we’re on the subject of controls, there are two special kinds of UI control that you might want to add to your Daydream apps:
- Fuse buttons : This is a button that the user can trigger by focusing on it for a set period of time. If you do use fuse buttons, then you should display a visual countdown to the button being activated, so the user knows when they’re successfully interacting with this fuse button. Since some users may get frustrated by this time delay, you should also give them the option to activate a fuse button immediately, by clicking it.
- Display reticles : This is a visual aid that helps users to accurately target small objects. If you do include reticles in your app, then you should avoid visual clutter by keeping the reticle hidden until the user approaches a target. You should also render reticles stereoscopically to create the illusion of depth, which will help users to focus on both the reticle and the target.
5. Think beyond the visual

While image or video content will form the basis of most (if not all) VR apps, if you’re really going to pull the user into the world you’ve created, then you need to involve their other senses, too.
Environmental audio can be a powerful way of setting the mood and communicating important information about the user’s surroundings. For example, if the user hears the sound of waves breaking then they’ll know that there’s an ocean nearby, even if they haven’t actually seen that ocean yet.
You may also want to provide haptic feedback, which is where the device vibrates slightly in response to user interaction, or to reflect events that are occurring within the VR world. Haptic feedback may not be high fidelity on your typical Android handset, but including it in your Daydream app can help you deliver a more tangible experience.
Summary
In this article, we got some hands-on experience with Google’s brand-new VR platform. If you’ve been following along then you’ll now have a development kit and a Daydream-compatible Android project that you can continue working with — potentially developing it into a full-blown Daydream VR app.
If you want to learn more about Daydream, then at this point, your best bet is to sign up to the Daydream Access Program, as this will allow you to access updates Daydream’s developer tools ahead of their official release.
Author’s Bio:

Jessica Thornsby is a technical writer based in Sheffield. She writes about Android, Eclipse, Java, and all things open source. She is the co-author of iWork: The Missing Manual, and the author of Android UI Design.