Ready for Android Nougat? Key Features + Tips & Tricks

Google just took one step closer to unleashing Android Nougat to the world—by publishing the final Android 7.0 developer preview.
Developer Preview 5 is particularly big news as it brings us “near final” system images and final APIs. This means developers now have access to everything they need to add Android Nougat features to their apps and put those features through some pretty thorough testing.
In this article, I’m going to show you how to get your apps Nougat-ready, by adding some of the big up-and-coming features that we’re all looking forward in Android 7.0.
Prepare Your Developer Environment for Android Nougat
Before you can start developing for Android Nougat, you’ll need the following:
- Android Studio 2.1 or higher. The quickest way to check if you’re running the latest version is to launch the IDE and select ‘Android Studio’ from the menu bar, followed by ‘Check for Updates…’ Ideally, you should be running the latest version of Android Studio. So if any update is available then you should take the time to install it.
- Android N Preview SDK. Open the Android SDK Manager and make sure the ‘SDK Platforms’ tab is selected. Select the ‘Android 6.x (N)’ package (this should appear at the top of this window) and then click ‘OK’ to install.
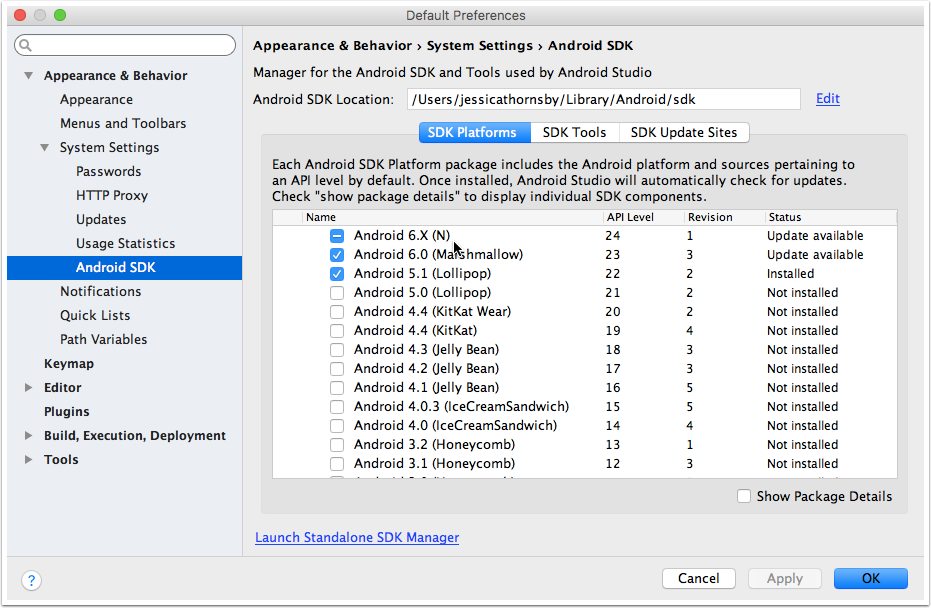 Android SDK preview
- Java 8 Developer Kit. In order to compile your app against Android Nougat, you’ll need JDK 8. If you don’t already have it installed, then you can grab it from Oracle’s website. You’ll also need to let Android Studio know where it can find the JDK on your machine, so select ‘File’ from the Android Studio menu bar, followed by ‘Project Structure’ and ‘SDK Location.’ Enter the location of your JDK 8 file in the ‘JDK Location’ field.
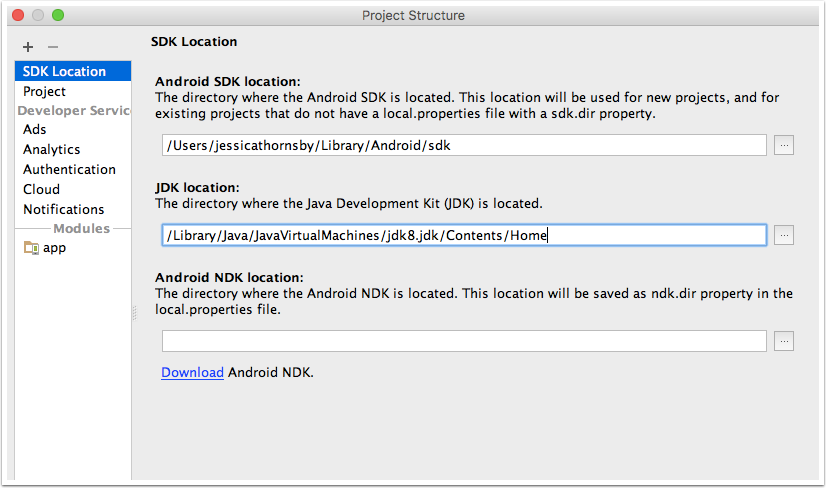 JDK location
- Finally, you’ll need to have a project that can support Android 7.0. You can either create a new project and set the Minimum SDK to Android N, or update an existing project. To update a project, open its module-level
build.gradle fileand set thebuildToolsVersionto 24.0.0. Now that the API 24 is final, you can also compile your project against sdkVersion 24, for example:
apply plugin: 'com.android.application'

android {
   compileSdkVersion 24
   buildToolsVersion "24.0.0"

   defaultConfig {
       applicationId "com.jessicathornsby.myapplication"
       minSdkVersion 21
       targetSdkVersion 24
       versionCode 1
       versionName "1.0"
Once you have a Nougat-ready project, you’re ready to start adding some Android 7.0 features!
Learn How to Stop Squandering Your Precious Mac Development Resources and be fully prepared to build your next app!
Direct Reply Notifications
Android 7.0 introduces ‘direct reply,’ a new notification interaction that enables users to reply to an incoming message directly from a notification’s UI. This is perfect for messaging apps (or any application that has some form of messaging functionality) as it allows the user to respond to messages without having to pause what they’re currently doing, for example they can continue watching a YouTube video in the background while replying to an SMS.
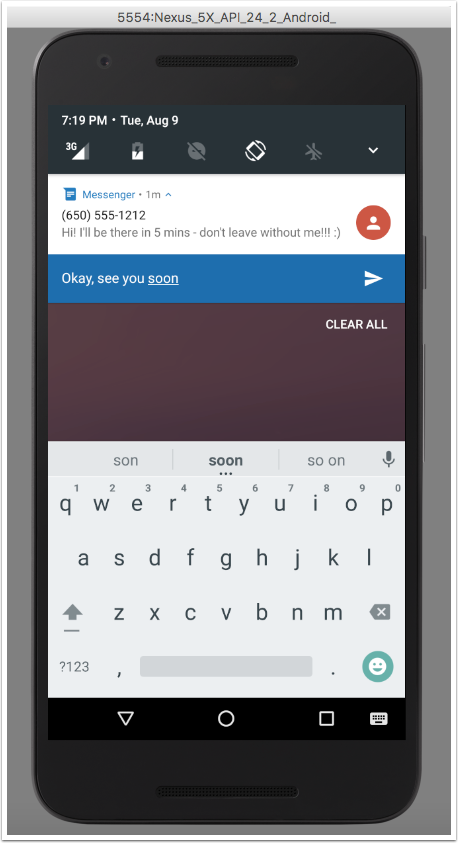 Direct reply notification
To add the direct reply functionality to a notification, you need to create a RemoteInput instance, which will receive the user’s input and then pass it to your app:
private static final String KEY_DIRECT_REPLY = "key_direct_reply";
String replyLabel = getResources().getString(R.string.reply_label);

//Assign a unique ID to this notification. You’ll use this ID to retrieve the user’s input further down the line//

RemoteInput remoteInput = new RemoteInput.Builder(KEY_DIRECT_REPLY)
       .setLabel(replyLabel)
       .build();
Attach your RemoteInput object to an action:
Notification.Action action =
        new Notification.Action.Builder(R.drawable.ic_reply,
                getString(R.string.label), replyPendingIntent)
                .addRemoteInput(remoteInput)
                .build();
Once the user has entered their response, you need to retrieve this input and deliver it to your application:
private CharSequence getMessageText(Intent intent) {

//Call getResultsFromIntent and pass it the notification action’s intent//

    Bundle remoteInput = RemoteInput.getResultsFromIntent(intent);
    if (remoteInput != null) {

//Retrieve the user’s input using the identification key we created earlier//

        return remoteInput.getCharSequence(KEY_DIRECT_REPLY);
    }
    return null;
 }
Bundled notifications
Android 7.0’s ‘bundled notification’ feature allows the system to group multiple related notifications together, which is ideal if you suspect your application might generate lots of notifications in a short period of time. No one enjoys having their smartphone or tablet flooded with notifications, particularly when they’re all from the same app!
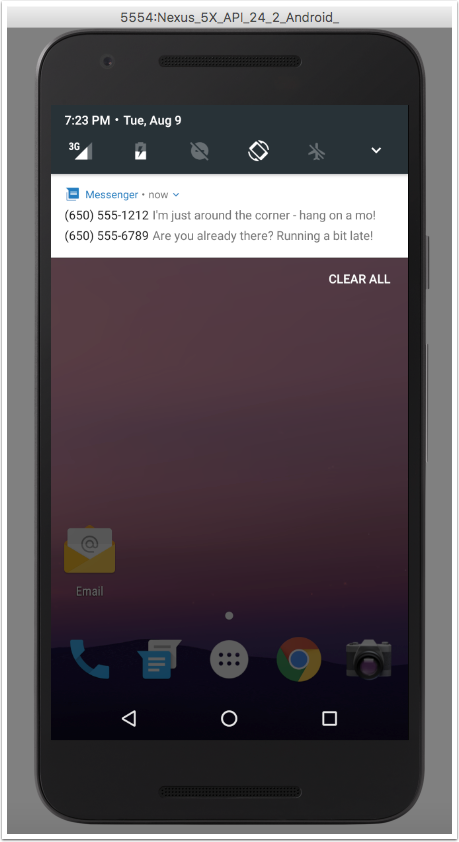 Bundled notifications
Bundled notifications give you a way of issuing notifications without cluttering the user’s device. And, if the user does want to take a closer look at the individual notifications that make up a particular bundle, they can always “unfurl” that bundle. At this point, they can view more information about each individual notification event, and act on each event separately.
To use bundled notifications in your app, you need to let the Android system know what notifications it can group together. The first step is to create a summary notification — this is the parent notification you’ll add all subsequent child notifications to.
To create a summary notification, use the setGroupSummary attribute and give this group a unique ID:
.setGroupSummary(true)
.setGroup(GROUP_SMS_MESSAGES)
Then, whenever you’re creating a notification that belongs to this group, you’ll use .setGroup to specify the same group ID (GROUP_SMS_MESSAGES). When you call notify(), this new notification will appear in the same stack as the summary notification.
By default, grouped notifications appear in the order you created them, but you can tweak this order using setSortKey.
Multi-Window Support
Beginning with Nougat, Android tablets and smartphones can display two apps side-by-side, or one-above-the-other in a split-screen mode known as ‘multi-window.’
If your app targets Android Nougat or higher, then the Android system assumes that your app supports multi-window mode unless you explicitly state otherwise. In other words, you can add multi-window support to your app by doing nothing at all! However, if you’re going to deliver the best possible user experience then you may want to make the following tweaks to your app’s multi-window support.
Read more: Getting Started with Android UI Design, Best Layout Practices, and More
In multi-window mode, the user can resize both apps simultaneously by dragging the line that divides them, making one app smaller and the other larger. By default, there’s no restrictions on how the user can resize your app, so you may want to set some restrictions of your own. To do this, you’ll need to test your app in multi-window mode (we’ll cover this shortly) and work out how far the user can shrink your app, before it starts to make an impact on the user experience.
Armed with this information, you can specify that users shouldn’t be able to shrink your app beyond this dp value. Open your project’s Manifest and then add the following to the relevant <layout> tag:
<activity android:name=".MyActivity">
    <layout android:defaultHeight="500dp"
          android:minimalSize="300dp"
    />
</activity>
If the user does try to shrink your app beyond this dp value, the system will crop your Activity’s UI, rather than continuing to shrink it.
Combat lag with windowBackground
While we’re on the subject of resizing, if the user resizes your app and the rendering lags behind, then the system will temporarily fill these empty areas with the drawable specified in your project’s windowBackground attribute. If you don’t specify a windowBackground, it’ll use your project’s windowBackgroundFallback instead.
To provide a more seamless experience even when your app is struggling to keep up, add windowBackground to your project and make sure it’s set to a complimentary colour, for example:
<item name="android:windowBackground">@color/appBackground
Does your Activity need to constantly update?
When your app enters multi-window mode, you won’t need to worry about any changes to the Activity lifecycle unless your application includes content that needs to update constantly, such as a video.
The problem is that even though two apps are visible on screen in multi-window mode, only one is considered active — and that’s the Activity the user has interacted with the most recently. The other Activity is in a paused state, which presents a problem if that Activity features content that should be updating constantly. For example, if an Activity contains a video, then that video will pause every time the user interacts with the other onscreen app, which kind of defeats the whole point of multi-window!
To prevent this problem from occurring in your app, you need to ensure that these kinds of Activity continue to update, even when they’re not in focus. The recommended method is to pause your Activity in onStop and resume playback in onStart, rather than using onPause handlers.
Enable drag and drop
Multi-window mode isn’t just about viewing two apps at once, it also gives users a way of dragging content from one Activity and dropping it directly into the other visible Activity — something that wasn’t previously possible.
Unless you have a specific reason not to (for example your app handles sensitive information that you don’t want users passing around between applications), then you should help your users take advantage of this convenient cross-Activity drag and drop.
The official Android documentation goes into detail about how to enable drag and drop in your app, but you’ll also need to call the View.DRAG_FLAG_GLOBAL flag as this allows the system to pass data from one application to another.
Only disable multi-window mode if you really have to
If you really want to prevent users from being able to launch your app in multi-window mode, then add the following to your project’s Manifest:
<activity
            android:name=".MainActivity"
            ...
            android:resizeableActivity="false">

        </activity>
Then, if the user tries to put your app into multi-window mode, it’ll launch in fullscreen mode instead. Since this isn’t the behaviour the user was expecting, you should only disable multi-window mode if you have a very good reason to. If every app on the user’s device is more than happy to cooperate and your app is the only one that refuses to open in multi-window mode, then it’s going to make your app stand out — and not in a good way!
Test your app’s multi-window experience
If your app does support multi-window (basically, you haven’t explicitly disabled it) then you need to test your application in this mode to ensure you’re delivering the best possible user experience.
To test your app, you’ll either need to create an Android Nougat AVD (Android Virtual Device) or use a physical Android device that’s compatible with the Android 7.0 developer previews.
Install your project, put it in multi-window mode and then spend some time interacting with it to get a feel for the overall user experience. Make sure you test your app when it’s arranged side-by-side with another app, and when those apps are arranged one-above-the-other.
In particular, check if your app moves between fullscreen and multi-window mode smoothly, without crashing, and ideally without lagging. Since being able to resize apps is a big part of the multi-window experience, you should also test if your app continues to look and function as you intended, regardless of how large or small the user chooses to make it. If you specified an android:minimalSize value, then check if the system is respecting your setup, and that it’s impossible to shrink your app beyond this point.
And if you set a windowBackground value, then make sure this delivers the seamless transition you had in mind. If not, then hop back to your project and change the value of windowBackground.
Even if you have no plans to actively implement Android Nougat features in your app, then remember that multi-window mode is enabled by default, so users running Android 7.0 will still be able to open your app in multi-window mode. At the very least, you should invest some time in creating a Nougat AVD and then check if your app delivers an acceptable user experience in multi-window mode.
How to get developer preview 5 on your Android device
Even though the Developer Preview includes everything you need to create a Nougat AVD, there’s no substitute for testing your app on a physical Android device.
The Nougat Developer Previews are compatible with Nexus 6, Nexus 5X, Nexus 6P, Nexus 9, plus Pixel C devices, and General Mobile 4G/ Android One devices. So if you happen to own one of these devices, then you can opt in to receive a developer preview update over-the-air (OTA). Enroll in the Android Beta program and your device will receive the latest developer preview as an OTA update.
Creating Nougat-ready drafts
After you’ve added Nougat features to your app and tested these changes against the latest Developer Preview, Google recommend that you publish your updated .apk as a draft to your Alpha, Beta, or Production channels in the Google Play Developer Console.
You may also want to get some early feedback on this new version of your app by taking advantage of the Developer Console’s Beta and Alpha Testing features. To setup alpha or beta testing, log into the Developer Console, select the APK you want to test, and then select ‘APK’ from the side menu. From here you’ll have access to the Beta Testing and Alpha Testing tabs.
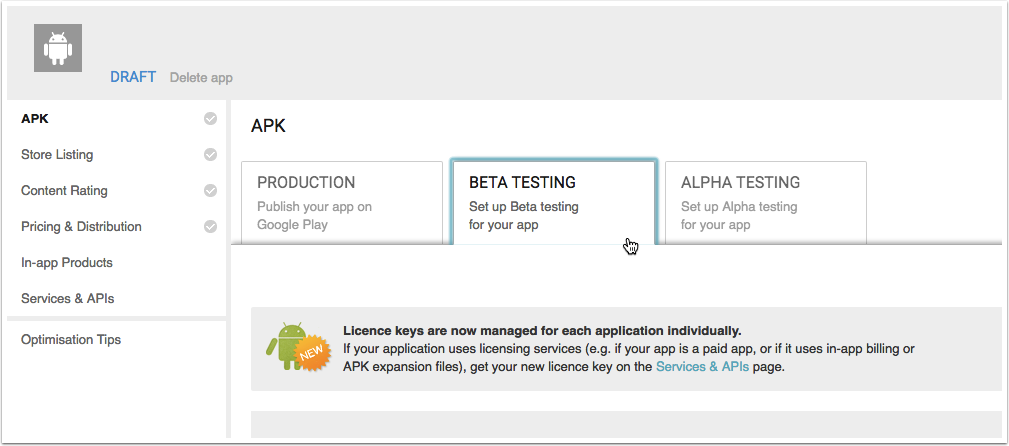 Alpha/Beta testing
Summary
In this article we looked at some of the new features coming in the final release of Android 7.0, and how you can get ahead of the crowd by adding them to your own applications, today. I also showed you how to begin testing these features against Android Nougat, including arranging alpha and beta testing ahead of the official Android 7.0 release.
How are you planning to use the new Android Nougat features in your applications?
Other tutorials you might also be interested in:
- Sending Push Notifications to Android with Firebase
- 6 Ways to Supercharge the Android Emulator
- 5 Ways to Make Learning Android Development Easier
- 3 Basic Rules Every Android Developer Should Know
- Create a Cross-platform App with Visual Studio
Author’s Bio:

Jessica Thornsby is a technical writer based in Sheffield. She writes about Android, Eclipse, Java, and all things open source. She is the co-author of iWork: The Missing Manual, and the author of Android UI Design.