
Build a WhatsApp Messenger Clone in React (Part 1)

Today we're going to build a WhatsApp messaging clone. A full WhatsApp Clone would include real-time messaging, notifications, and unfurling URL's using React, Flux, websockets and universal javascript. However, we will not be covering all of that in our first post here. Instead, our first step is to set up our system architecture on the backend using Node.js and Heroku.
The steps to get our system architecture running are:
-
Setting up our local work environment
-
Setting up the local test server
-
Reloading and linting
-
Setting up Heroku (our production server)
-
Installing Node Express
-
Adding a Redis database
-
Pushing our local servers to Heroku and test
Let's get started!
Setting up our work environment
You will need a Github account, Heroku account, and access to your terminal. We will use Node 6.9.1 TLS, so please be sure that's installed. Check by typing:
node -v
It should say in your terminal:
Now using node v6.9.1 (npm v3.10.8)
Installing Node is beyond our coverage here, please see Mac or PC installs.
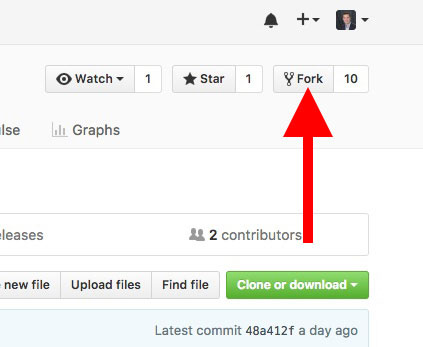
Let's fork our first respository, checkout a new branch called dev, and create a package.json file. Go to our starting repo, and click Fork in the upper right hand corner. See it here:
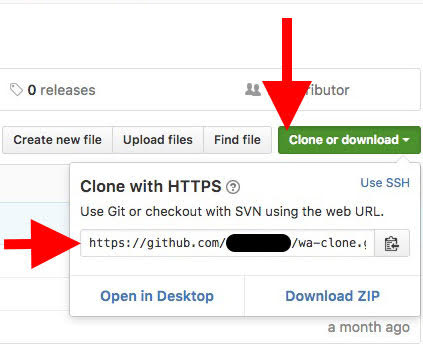
Select your name, and it should automatically set up a new repo in your Github account and take you to it. Then, in your new forked repo, click the Clone or Download green button, copy the contents, and use it in place of the code below.
git clone git@github.com:your_username/wa-clone.git
cd wa-clone
git checkout -b dev
npm init
You can accept all the default options, and type in yes at the end. Let's go ahead and add a .gitignore file, to keep things more organized when we save our work to Github, and open our project in Atom.
touch .gitignore
atom ./wa-clone
Then, let's modify our .gitignore file with the following if it isn't in there already. This will make sure our dev files don't get posted to Github.
.idea/
node_modules/
dist/
.env
The work environment is ready to go. If you're used to ES6 transpiling with Babel, please note that you will no longer need Babel with Node 6.9.1 TLS because it natively supports most of ES6. The only exception will be module imports, which you will see as we work on the following sections.
Setting up the test server
Let's go ahead and create a new folder under our project directory called src. Inside, let's create a new file called test-server.js
mkdir src
cd src
touch test-server.js
Add our initial server code to the system through Atom.
const http = require('http');
const port = process.env.PORT || 3000;


const server = http.createServer((req, res) => {
 res.statusCode = 200;
 res.setHeader('Content-Type', 'text/plain');
 res.end('Hello World - \n');
});


server.listen(port, () => {
 console.log(`Server running at port ${port}.`);
});
Save it, and let's fire up our server and visit it.
node test-server.js
Open up a browser and go to this the address: localhost:3000. You should now see a "Hello World -" in your browser window!
Reloading and Linting
Being able to automatically reload the server and check the quality of your code as you write it is going to help out tremendously as you develop the project. So, let's start with two great tools, nodemon and eslint. Hit Control-C on your terminal to stop the server, and type into the command line.
cd ..
npm install nodemon --save-dev
After it's finished installing, open up your package.json file in Atom, and add the following in the top section:
{
 ...
 "scripts": {
 "test": "echo \"Error: no test specified\" && exit 1",
 "nodemon": "nodemon --exec node"
 },
 ...
}
Let's go ahead and run our script via node in our terminal.
npm run nodemon src/test-server.js
Voila! Go to your src/test-server.js file, make any changes to your 'Hello World! - \n' string, save it, and you should see the server reboot in your terminal. Go into your browser, hit refresh, and you should see your changes! Now, you don't have to go the terminal to restart your server every time you make a change. Handy, huh? On to eslint.
Stop your server or open a new tab. In your terminal, let's install eslint and configure it.
npm install eslint --save-dev
./node_modules/.bin/eslint --init
Configurations can vary, however, these will work for our purposes here. You can find all the ESlint rules here. Please, no spaces versus tab wars. "Up and down" move the cursor, "space bar" selects an option (or more), and "y/N" confirms.
? How would you like to configure ESLint? Answer questions about your style

? Are you using ECMAScript 6 features? Yes

? Are you using ES6 modules? Yes

? Where will your code run? Browser, Node

? Do you use CommonJS? No

? Do you use JSX? Yes

? Do you use React Yes

? What style of indentation do you use? Tabs

? What quotes do you use for strings? Single

? What line endings do you use? Unix

? Do you require semicolons? Yes

? What format do you want your config file to be in? JSON
Because we want to add console logging to our code, and we don't want ESlint to complain about it when we do, we must add the following to our newly created .eslintrc.json file in our main directory.
{
 ...
 "semi": [
            "error",
            "always"
        ],
        "no-console": [
          "off"
        ]
    }
...
}
Let's go ahead and test it in our terminal..
./node_modules/.bin/eslint src/*
You may have a few formatting challenges, so feel free to fix them. Let's go ahead and commit our changes to gitbut instead of pushing them via the terminal.
git add .
git commit -m "Initial tasks, setup"
Awesome. Now on to Heroku.
Heroku Setup
I'm assuming you've already set up the Heroku toolbelt as part of your Heroku install. If not, download Heroku toolbelt here or check out Herou's full install documentation. Let's go ahead and login via our terminal.
heroku login
Enter your email and password. Then, go ahead and create a new server instance to host our app.
heroku create
This will give us a url to use, which starts with https:// and is usually in blue in your terminal. Now, we need to create a Procfile for Heroku, which is just something you need to do for Heroku to figure out where things are. We'll use the 'touch' command to create that file.
touch Procfile
In your Procfile, open it in Atom, and add this one line:
web: node dist/api-server.js
Heroku also needs to know exactly what versions of node and npm to use, so let's explicitly state them in our package.json file. If you don't know the version you can type node -v or npm -v in your terminal.
{
 ...
 "scripts": {
    "test": "echo \"Error: no test specified\" && exit 1",
    "nodemon": "nodemon --exec node",
  },
  "engines": {
    "node": "6.9.1",
    "npm": "3.10.8"
  },
  ...
}
Good work. Let's go ahead and commit our changes, and change the branch from dev to release.
git add .
git commit -m "Heroku setup"
git checkout -b release
Because Heroku automatically, by default, takes your repo from its master branch, we must let Heroku know that it must pull the release branch instead.
git push heroku release:master
This will take a few moments, so let it all run. To open your Heroku site, simply type this into the terminal:
heroku open
Congrats! Your Heroku site is now up and running. If you have any questions regarding this, please go back and read Heroku's full instal documentation. There are a ton of developers who use Heroku, and it has great documentation and support on StackOverflow if you get confused.
Installing Express
Express is a web application framework for Node. While Node can create a server, it will be a lot easier in the long run if you use an application framework like Express and it's very common to do so. So, let's go ahead and install Express and set up a new server file.
npm install express --save

touch src/api-server.js
In the new api-server.js file, go ahead and add the server code that should like familiar to you.
const express = require('express');
const app = express();
const port = process.env.PORT || 3000;


app.get('/', (req, res) => {
    res.send('Hello World from Express.js!');
});


app.listen(port, () => {
    console.log('Express app listening on port 3000');
});
Test it out on your local server:
npm run nodemon src/api-server.js
Fire localhost:3000 in your browser and you should see your Hello World from Express.js! there! Let's change our Procfile and deploy it to Heroku.
Procfile:
web: node dist/api-server.js
Terminal:
git add .
git commit -m "Adds Express.js"
git push heroku release:master
heroku open
Congrats! Your site should be up and running on Heroku with Express.js!
Adding a basic database
Setting up a database can be a long arduous process. For this project's purpose, we are going to use a Redis server, which is normally used as a local database and caching colution. Here are the instructions for installing Redis. You may also need wget — here are the Mac installation instructions.
Once you run the Redis installer, it will exit in the main Redis directory, which, as of right now, is redis-3.2.5. Start the Redis server in this folder.
src/redis-server
You can open up a new tab in your terminal and continue to work. Let's install the Redis library in our application so we can connect to the Redis server. We should also intall the redis-client.js file to house our code for the connection.
npm install redis --save
touch src/redis-client.js
Let's go ahead and add the code to connect the database and server. We need to access our redis-client.js and api-server.js files.
redis-client.js
const redis = require('redis');


let client = null;


function setup() {
  if (process.env.REDISCLOUD_URL) {
    console.log('connecting to redis cloud');
    client = redis.createClient(process.env.REDISCLOUD_URL);
  }
  else {
    console.log('connecting to local redis');
    client = redis.createClient();
  }


  client.on('connect', function() {
    console.log('redis client emitted connect event');
  });


  client.on('error', function (err) {
    console.error(err, 'redis error');
  });
}


exports.getClient = () => client;
exports.setupRedis = setup;
api-server.js
const express = require('express');
const {setupRedis, getClient} = require('./redis-client');


const app = express();


const port = process.env.PORT || 3000;


app.get('/', (req, res) => {
   res.send('Hello World from Express.js!');
});


app.get('/redis-test', (req, res) => {
   getClient().incr('inc-test', (err, result) => {
   	if (err) {
   		console.error(err);
   		res.send('Error connecting to redis');
   	}
   	else {
   		res.send(`New incremented value: ${result}`);
   	}
   });
});


setupRedis();


app.listen(port, () => {
   console.log('Express app listening on port 3000');
});
You can see in the api-server.js file that we've created a new route called /redis-test, which we will use to test whether Redis can increment a number over time. This will tell us if our database is actually working. This is nothing major, it's really just a simple test for fuctionality. Go ahead and start your server:
npm run nodemon src/api-server.js
Now, when you reload the page, you should get a counter. Every time you reload it, that key value gets saved to the Redis database and is incremented. The more you refresh, the higher the number goes!
Congrats! We're apporaching our final step for today!
Publishing our Redis Server to Heroku
Heroku has this concept of add-ons, which help extend the capabilities of your server. For us, we'd like to add the free tier of a Redis server. Please note, as of this time, you can only have one free Redis server per account, so if you already have one running somehwere, you're going to need to set up a different Heroku account or delete your other one. Ready? Let's go to our terminal.
heroku addons:create rediscloud:30

heroku config
You should see your REDISCLOUD_URL, which is what Heroku uses from your redis-client.js file to connect to its Redis cloud database. Let's do our final git dance of the day.
git add .
git commit -m "Adds Redis, test route"
git push heroku release:master
heroku open
Now, you should see your Heroku website. Navigate to /redis-test on your Heroku site, and voila, you are able to increment!
Closing
Congrats on getting this far. You may say, "But all I did was set up a few servers!" What you really did was set up the backbone of your messaging system. It's the circulatory system for your messages and is as vital as the rest of the parts to come. Come out for the rest of class at Codementor, and we'll fill in on the details.
Thanks again to everyone at Codementor, as well as Fernando Trigoso, one of the great teachers at Codementor, for putting together this course.
If you would like to sign up for the class I took with Fernando Trigoso:
Click on this button to check out the curriculum and stay tuned for future classes:

Author's Bio
Richard Everts is a successful full stack digital media specialist with recognized success in publications such as the New York Times and L.A. Times. Cutting edge technologist and designer, his practical experience spans 20 years of UX, UI, web application development and design, film, video, 3D, VFX, growth hacking, and IoT. He is currently the founder of Hapnapp, an event experience platform launching in late 2016.
Personally, for me, Audext is the best service to convert audio files into text. It has 2 options: manual or automatic transcription but both are pretty accurate in using. https://audext.com/
This may be obvious, but before setting up Express, the Procfile should read:
web: node src/test-server.jssince neither the
distfolder nor theapi-server.jsfile exist yetcan a javascript beginner follow this class ?