
Build a Serverless full stack app using firebase cloud functions.

In this article, I am going to demonstrate how to build a full stack application without a server.
First we are going to build the serverless part with 3 endpoints_(4 actually, the 4th endpoint will be your take home assignment)_, then we build a minimal shopping list app with React that will make use of these endpoints and persist to a database.
You can find the project repos for both serveless-firebase and react app.
What is Serverless?
According to Wikipedia, Serverless is a cloud-computing execution model in which the cloud provider dynamically manages the allocation of machine resources. Pricing is based on the actual amount of resources consumed by an application, rather than on pre-purchased units of capacity. The server management and capacity planning decisions are completely hidden from the developer.
Serverless can be explained in the perspective of humans utilizing water. Water is used on a need to need basis, when people are thirsty, they turn on the tap and drink water. Once they are done they close the tap till there is a need to use the water again. This is an abstract explanation of what serverless achieves, resources are available only when they are requested.
What is Serverless Firebase Cloud Function?
In lieu of setting up a server, routing requests, defining REST resources and then creating methods for GET, POST, DELETE and PUT, one can use an already existing server made available by google.
According to the Firebase Cloud Function documentation:
Cloud Functions for Firebase let's you automatically run backend code in response to events triggered by Firebase features and HTTPS requests. Your code is stored in Google’s cloud and runs in a managed environment. There’s no need to manage and scale your own servers.
Firebase’s goal is to help you worry less about your server implementations by abstracting it, to let you focus more on your front-end implementations. Significantly, it implies that one can build a full-stack app in a timely fashion.
They do this by taking care of your app’s back-end or infrastructure. Hence, Firebase let's you focus on solving problems for your users.
Four reasons why you should go Serverless.
- Most frontend Developers write Business Logic in the app. Prying eyes may try to reverse engineer and modify your app’s code.
- Instead of having a logic that is susceptible to change periodically when an app needs to be developed in another platform(web/mobile), a business logic can easily be abstracted into a piece of function and inserted into the server thereby exposing that function universally.
- You’d always need to publish a new version of your app whenever you change your app’s codebase (mobile app) and behavior.
- Scalability will no longer be an issue. You will only be charged for the execution times, which means no amount will be charged for unused space.
Problem Statement
Traditionally, you would have to deploy your private code to a back-end server that you manage. You’d also have to build a full fledge server using popular technology/frameworks like Node/Express, Ruby/ Ruby on Rails , Python/Django then connect to database like Postgres, MongoDb then host on heroku or other web hosting services.
The app would then use an API to communicate with the server and issue requests.
Solution
However, with firebase cloud functions, you don’t need to set up, maintain and scale your backend to get its benefit.
Instead, you can write and deploy code to firebase cloud servers that automatically responds to events in your app.
With a function, you can authenticate users, communicate with database, upload pictures and receive real time notifications.
Requirements for building this app:
- A basic understanding of the JavaScript language.
- Firebase Account
- Node.js installed
- Libraries used: cors, axios
- Postman (for testing the API end points)
As of the time of writing this post, Cloud Functions is still technically in BETA and has some areas for improvement. Secondly, it only supports Node.JS.
Cloud Functions runs Node v6.14.0, so its recommend that you develop locally with this version or greater.
To confirm your installations, run the following command:
node --version && npm — version
If you get their version numbers as results, then you’re good to go.
If you’re not familiar with firebase, don’t worry — the firebase API’s are quite easy to use. Infact, this should be a good opportunity for you to learn and get your hands dirty with firebase. Tutorialspoint is another great resource you could leverage on to get you started.
This tutorial will be divided into 3 phases.
- Setting up Firebase.
- Creating the endpoints.
- Building a minimal React App to consume the endpoints.
Phase 1
Creating a Firebase Project
- Go to https://firebase.google.com/
- Login with a google account or create an account to login if you don’t have one.
- Go to console.

- Add project, give it a name and click on
CREATE PROJECT
Once you have created the project, you will be directed to the firebase console

Setting up Firebase Locally.
On your Computer, open a terminal and create a new folder.
Let’s call this folder shop-list-server. Navigate into the folder
mkdir shop-list-server
cd shop-list-server
Once you have Node.js and npm installed, install the Firebase CLI via npm:
npm install -g firebase-tools
This installs the globally available firebase command.
If the command fails, you may need to change npm permissions.
To initialize your project:
- Run firebase login to log in and authenticate the firebase tool.
firebase login
Allow Firebase to collect anonymous CLI usage and error reporting information?
Yes

This will open your browser for you to choose an account
Once you are logged in, Run firebase init functions.
firebase init functions

This brings a list of all your projects, use the arrow key to select shop-list and enter
What language would you like to use to write Cloud Functions?
Javascript
Do you want to use ESLint to catch probable bugs and enforce style?
n
Do you want to install dependencies with npm now?
y

This will setup the project and install all your dependencies
Once the installation is complete, open your project folder, it should look like so:

Creating first endpoint
We create endpoint by defining a function which exposes a URL in the cloud.
Let's create a simple endpoint that will display on the browser Hello user, welcome to Serverless Database! to our user.
To create our first endpoint, first change directory into the function folder
cd functions
open the index.js file and insert the following code snippet
exports.helloWorld = functions.https.onRequest((req, res) => {

res.send("Hello from a Serverless Database!");

});
The functions.https is used to create a function that handles HTTP events. The event handler for an HTTP function listens for the onRequest() event.
The onRequest() takes arguments, the Request object gives you access to the properties of the HTTP request sent by the client, and the Response object gives you a way to send a response back to the client.

Run either of the following command on your terminal.
firebase deploy or firebase deploy --only functions:helloWorld
Once the app has been successfully deployed, the URL will be generated

The URL generated for mehttps://us-central1-shop-list-b60aa.cloudfunctions.net/helloWorld
To test, copy YOUR URL to your browser and enter the URL generated for you, it should look like so:
https://us-central1-xxxxxxxxxxxxxxxxxxxx.cloudfunctions.net/helloWorld

Congratulations, you have created your first endpoint.
Phase 2
Creating the endpoints.
Now that we have created our helloWorld endpoint, its time to get serious.
We will be creating 3 endpoints that will add a shop list, get all shop list from the database and delete an item.
- POST /your_url/addItem
- GET /your_url/getItems
- DELETE /your_url/removeItem
- UPDATE /your_url/updateItem
However let's set up the database first.
Pre Setup
1. Enable CORS
By default, our server will not accept request from any public content and will deny access to any universal JavaScript/browser, except we enable CORS.
CORS means Cross-Origin Resource Sharing and its a specification that enables truly open access across domain-boundaries.
CORS introduces a standard mechanism that can be used by all browsers for implementing cross-domain requests.
We would not go in depth into CORS as it is beyond the scope of this article.
To enable CORS, we install and configure it. Open your terminal
npm i -S cors
Then we import and configure it
const cors = require(‘cors’)({ origin: true });
This is a basic CORS configuration, the { origin: true } command automatically allow cross-origin requests to be made
2. Setup the database
Before we create the url where the data will be persisted to, the database path has to be configured
const admin = require(‘firebase-admin’);
admin.initializeApp();

const database = admin.database().ref(‘/items’);

Now your index.js should look like this
1 POST /your_url/addItem
This function will generate the url which would allow us create a shop item and persist to the database.
exports.addItem = functions.https.onRequest((req, res) => {
 return cors(req, res, () => {
  if(req.method !== 'POST') {
   return res.status(401).json({
    message: 'Not allowed'
   })
  }

  console.log(req.body)

  const item = req.query.item
  database.push({ item });
  let items = [];
  return database.on('value', (snapshot) => {
   snapshot.forEach((item) => {
    items.push({
     id: item.key,
     items: item.val().item
    });
   });
   res.status(200).json(items)
  }, (error) => {
   res.status(error.code).json({
    message: `Something went wrong. ${error.message}`
   })
  })
 })
})
addItem(), which exposes a URL that accepts a text value and writes it to the Realtime Database.
cors is a function that takes 3 parameters; req, res and anonymous function where all of or logic would reside.
return cors(req, res, () => {
 // …

});
This snippet below, specifies only POST method should be used, since we are writing to the database
if(req.method !== ‘POST’) {
  return res.status(401).json({
   message: ‘Not allowed’
  })
 }
For debugging purpose, you can see the event logs on logs section of functions
console.log(req.body)
Firebase method for saving data
const item = req.body.item

database.push({ item });
This will return the list of data after it has successfully saved.
return database.on('value', (snapshot) => {
   snapshot.forEach((item) => {
    items.push({
     id: item.key,
     items: item.val().item
    });
   });

res.status(200).json(items)
  }, (error) => {
   res.status(error.code).json({
    message: `Something went wrong. ${error.message}`
   })
})
The final code should look like this
const functions = require("firebase-functions");
const cors = require('cors')({ origin: true });
const admin = require('firebase-admin');

admin.initializeApp();

const database = admin.database().ref('/items');

exports.helloWorld = functions.https.onRequest((request, response) => {
  response.send("Hello from a Severless Database!");
});

exports.addItem = functions.https.onRequest((req, res) => {
  return cors(req, res, () => {
    if(req.method !== 'POST') {
      return res.status(401).json({
        message: 'Not allowed'
      })
    }
    console.log(req.body)

    const item = req.body.item

    database.push({ item });

    let items = [];

    return database.on('value', (snapshot) => {
      snapshot.forEach((item) => {
        items.push({
          id: item.key,
          items: item.val().item
        });
      });

      res.status(200).json(items)
    }, (error) => {
      res.status(error.code).json({
        message: `Something went wrong. ${error.message}`
      })
    })
  })
})
Run the following command on your terminal
firebase deploy or firebase deploy --only functions:addItem
firebase deploydeploys all the functions in your code.
firebase deploy --only functions:addItemdeploys a single function specified.
Once the app has been successfully deployed, the URL will be generated.
The URL generated for you would look like so:
https://us-central1-xxxxxxxxxxxxxxxxxxxx.cloudfunctions.net/addItem
Postman will be used for testing this time.

A method other than POST, will throw an error.
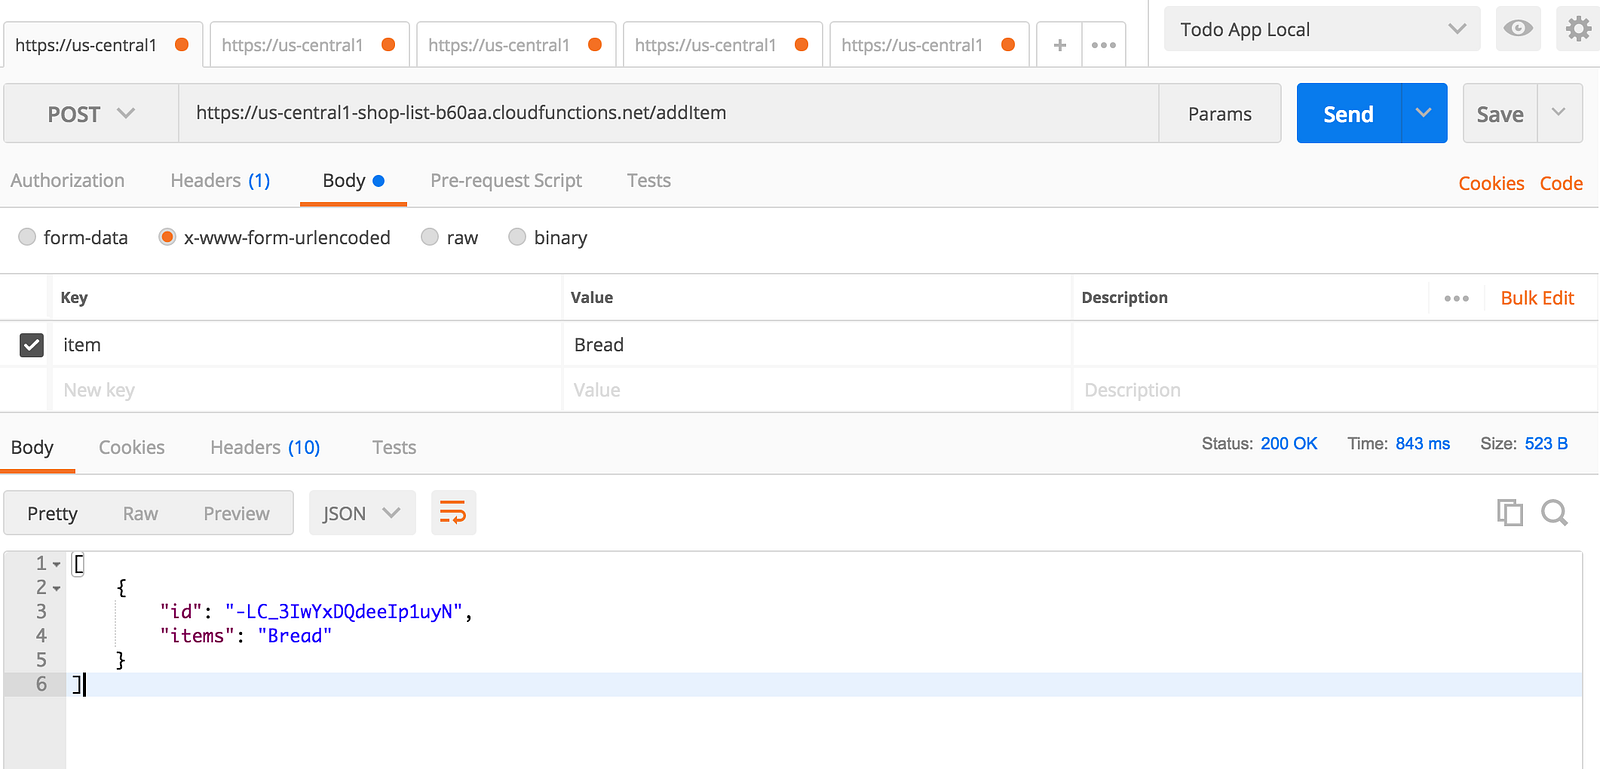
Congratulations, you have successfully made a post request.
To see the item posted, log back to the console of firebase.
- In the Develop section go to Database

- In the Develop section go to Functions, to see all the functions we created in our Node Environment.
We have only created two functions for now, which are the helloWorld and addItem.

Click over to the LOGS tab, this is where we see all the console.log statement we create in the code. Secondly, this tab displays all the errors that may occur in the code. Take advantage of it.

Add more shop items to the List.

Check Database to Confirm the list of shop items.

2 GET /your_url/getItems
This function will generate the url which would allow us get all the shop list from the database.
Add the following code snippet below;
exports.getItems = functions.https.onRequest((req, res) => {
  return cors(req, res, () => {
    if(req.method !== 'GET') {
      return res.status(404).json({
        message: 'Not allowed'
      })
    }

    let items = [];

    return database.on('value', (snapshot) => {
      snapshot.forEach((item) => {
        items.push({
          id: item.key,
          items: item.val().item
        });
      });

      res.status(200).json(items)
    }, (error) => {
      res.status(error.code).json({
        message: `Something went wrong. ${error.message}`
      })
    })
  })
})
This snippet below, specifies only GET method should be used
if(req.method !== 'GET') {

return res.status(401).json({

message: 'Not allowed'
 })
}
Run the following command on your terminal.
firebase deploy or firebase deploy --only functions:getItems
Once the app has been successfully deployed, the URL will be generated
The URL generated for you would look like so;
https://us-central1-xxxxxxxxxxxxxxxxxxxx.cloudfunctions.net/getItems
Let's test with Postman.

Before we create the last function, let's refactor out code to follow DRY principle.
DRY means Don’t repeat yourself
As Developers, it is good practice to follow design principle where each building block, (it can be a class, a module, an object or even a function) of a system should have only a single responsibility. This is known as Single Responsibility Principle (SRP)
Refactoring Our Code
Presently our code looks like
const functions = require("firebase-functions");
const cors = require('cors')({ origin: true });
const admin = require('firebase-admin');

admin.initializeApp();

const database = admin.database().ref('/items');

exports.helloWorld = functions.https.onRequest((request, response) => {
  response.send("Hello from a Severless Database!");
});


exports.addItem = functions.https.onRequest((req, res) => {
  return cors(req, res, () => {
    if(req.method !== 'POST') {
      return res.status(401).json({
        message: 'Not allowed'
      })
    }
    console.log(req.query)

    const item = req.query.item

    database.push({ item });

    let items = [];

    return database.on('value', (snapshot) => {
      snapshot.forEach((item) => {
        items.push({
          id: item.key,
          items: item.val().item
        });
      });

      res.status(200).json(items)
    }, (error) => {
      res.status(error.code).json({
        message: `Something went wrong. ${error.message}`
      })
    })
  })
})


exports.getItems = functions.https.onRequest((req, res) => {
  return cors(req, res, () => {
    if(req.method !== 'GET') {
      return res.status(401).json({
        message: 'Not allowed'
      })
    }

    let items = [];

    return database.on('value', (snapshot) => {
      snapshot.forEach((item) => {
        items.push({
          id: item.key,
          items: item.val().item
        });
      });

      res.status(200).json(items)
    }, (error) => {
      res.status(error.code).json({
        message: `Something went wrong. ${error.message}`
      })
    })
  })
})
If you look closely at the code above, we returning the result from the database in both the addItem and getItem function. This can be made easy by extracting the code into a function.
Refactoring
const functions = require("firebase-functions");
const cors = require('cors')({ origin: true });
const admin = require('firebase-admin');

admin.initializeApp();

const database = admin.database().ref('/items');

exports.helloWorld = functions.https.onRequest((request, response) => {
  response.send("Hello from a Severless Database!");
});

const getItemsFromDatabase = (res) => {
  let items = [];

  return database.on('value', (snapshot) => {
    snapshot.forEach((item) => {
      items.push({
        id: item.key,
        item: item.val().item
      });
    });
    res.status(200).json(items);
  }, (error) => {
    res.status(error.code).json({
      message: `Something went wrong. ${error.message}`
    })
  })
};

exports.addItem = functions.https.onRequest((req, res) => {
  return cors(req, res, () => {
    if(req.method !== 'POST') {
      return res.status(401).json({
        message: 'Not allowed'
      })
    };
    const item = req.body.item;
    database.push({ item });
    getItemsFromDatabase(res)
  });
});

exports.getItems = functions.https.onRequest((req, res) => {
  return cors(req, res, () => {
    if(req.method !== 'GET') {
      return res.status(401).json({
        message: 'Not allowed'
      });
    };
    getItemsFromDatabase(res)
  });
});
The getItemsFromDatabase() is a helper function which has been created to abstract repeated codes from addItem and getItems.
3 DELETE /your_url/deleteItem
This function will generate the url which would delete an item.
Add the following code snippet
exports.delete = functions.https.onRequest((req, res) => {
  return cors(req, res, () => {
    if(req.method !== 'DELETE') {
      return res.status(401).json({
        message: 'Not allowed'
      })
    }
    const id = req.query.id
    admin.database().ref(`/items/${id}`).remove()
    getItemsFromDatabase(res)
  })
})
Because we are deleting, the payload will be passed as a query.
const id = req.query.id
A firebase endpoint for deleting resource from database.
admin.database().ref(`/items/${id}`).remove()
The getItemsFromDatabase() helper method we created earlier is been reused inside the deleteItem function, thus following DRY principle.
Run the following command on your terminal.
firebase deploy or firebase deploy --only functions:deleteItem
Once the app has been successfully deployed, the URL will be generated
The URL generated for you would look like so;
https://us-central1-xxxxxxxxxxxxxxxxxxxx.cloudfunctions.net/deleteItem
Testing with Postman, let's delete Carrots item with its id.

We use the id of each item and pass it as a parameter to the header.
Use DELETE method
Use params not body
The source code is available on GitHub: HERE, feel free to fork and contribute to it.
Phase 3
Create React app to consume the endpoint.
Note: If you have not installed create-react-app, you may want to run this command first
npm install -g create-react-app
On your terminal, run
create-react-app shop-list-client
After installation,
cd shop-list-client
Then
npm start

NB: The React implementation used in this tutorial is modeled after the original creator, a major portion of it was used for illustration purpose. You can checkout it out here if you want to know more about the project.
Open the public/index.html file, add the following code snippet to enable bootstrap
Bootstrap CSS link in head tag
 <link rel="stylesheet" href="https://maxcdn.bootstrapcdn.com/bootstrap/3.3.7/css/bootstrap.min.css"
      integrity="sha384-BVYiiSIFeK1dGmJRAkycuHAHRg32OmUcww7on3RYdg4Va+PmSTsz/K68vbdEjh4u" crossorigin="anonymous"
    >
Jquery and Bootstrap js link in body tag
    <script
    src="https://code.jquery.com/jquery-3.2.1.min.js"
    integrity="sha256-hwg4gsxgFZhOsEEamdOYGBf13FyQuiTwlAQgxVSNgt4="
    crossorigin="anonymous"></script>

    <script src="https://maxcdn.bootstrapcdn.com/bootstrap/3.3.7/js/bootstrap.min.js"
      integrity="sha384-Tc5IQib027qvyjSMfHjOMaLkfuWVxZxUPnCJA7l2mCWNIpG9mGCD8wGNIcPD7Txa"
      crossorigin="anonymous"></script>
Source code for index.html file
Install axios
npm i -S axios
Finally we make use of the 3 endpoints we created in Phase 2.
Open your folder, in the src/App.js file, delete everything and replace with the following code snippet below.
import React, { Component } from 'react';
import axios from 'axios';
import './App.css';
class App extends Component {
  constructor(props) {
    super(props);

    this.state = {
      buyItems: [],
      message: '',
    }
}
  componentDidMount() {
    return axios.get('https://us-central1-shop-list-b60aa.cloudfunctions.net/getItems').then((response) => {
      this.setState({
        buyItems: response.data
      })
    })
  }
addItem(event) {
event.preventDefault()
const { buyItems } = this.state;
const newItem = this.newItem.value;
const isOnTheList = buyItems.includes(newItem)
if (isOnTheList) {
this.setState({
message: 'This item is already on the list'
})
} else {
return newItem !== '' && axios.post('https://us-central1-shop-list-b60aa.cloudfunctions.net/addItem', { item: newItem }).then((response) => {
this.setState({
buyItems: response.data,
message: ''
})
this.addForm.reset()
})
}
}
removeItem(item){
const newBuyItems = this.state.buyItems.filter(buyItems => {
return item !== buyItems
})
return axios.delete(`https://us-central1-shop-list-b60aa.cloudfunctions.net/deleteItem?id=${item.id}`).then((response) => {
this.setState({
buyItems: response.data
})
})
if(newBuyItems.length === 0){
this.setState({
message: 'No Item on the list, add some'
})
}
}
clearAll(){
this.setState({
buyItems: [],
message: 'No Item on the list, add some'
})
}
renderItems() {
let id = 1;
const { buyItems, message } = this.state;
return (
buyItems.length > 0 &&
<table className="table">
<caption>Shopping List</caption>
<thead>
<tr>
<th scope="col">#</th>
<th scope="col">Item</th>
<th scope="col">Action</th>
</tr>
</thead>
<tbody>
{
buyItems.map(item => {
return (
<tr key={item.id}>
<th scope="row">{id++}</th>
<td>{item.item}</td>
<td>
<button onClick={(e) => this.removeItem(item)} type="button" className="btn btn-default btn-sm">
Remove
</button>
</td>
</tr>
)
})
}
</tbody>
<tfoot>
<tr>
<td colSpan="2"> </td>
<td>
<button onClick={(e) => this.clearAll()}
className="btn btn-default btn-sm">Clear List</button>
</td>
</tr>
</tfoot>
</table>
)
}
render() {
const { buyItems, message } = this.state;
return (
<div className="container">
<h1>Shopping List</h1>
<div className="content">
<form ref={input => {this.addForm = input}} className="form-inline" onSubmit={this.addItem.bind(this)}>
<div className="form-group">
<label htmlFor="newItemInput" className="sr-only">Add New Item</label>
<input ref={input => {this.newItem = input}}
type="text" className="form-control" id="newItemInput" />
</div>
<button className="btn btn-primary">Add</button>
</form>
{
(message !== '' || buyItems.length === 0) && <p className="message text-danger">{message}</p>
}
{this.renderItems()}
</div>
</div>
);
}
}
export default App;
In the constructor, we set the buyItems state to an empty array.
constructor(props) {
super(props);
this.state = {
buyItems: [],
message: '',
}
In componentDidMount method, we make an http request with axios to fetch the list of items with my URL https://us-central1-shop-list-b60aa.cloudfunctions.net/getItemsas soon as the component has mounted, it would populate the buyItem state with the response data.
componentDidMount() {
return axios.get('https://us-central1-shop-list-b60aa.cloudfunctions.net/getItems').then((response) => {
this.setState({
buyItems: response.data
})
})
}
Replace the URL with yours
The addItem method adds new item to the list. First, it gets the buyItem state and the value of the newItem from the user’s input, then it checks if the newItem already exist in the list. If the item does not exist, it post the newItem with thehttps://us-central1-shop-list-b60aa.cloudfunctions.net/addItem endpoint and set the buyItem state to the new response from the database.
  addItem(event) {
    event.preventDefault()
    const { buyItems } = this.state;
    const newItem = this.newItem.value;

    const isOnTheList = buyItems.includes(newItem)

    if (isOnTheList) {
      this.setState({
        message: 'This item is already on the list'
      })

    } else {
      return newItem !== ' ' && axios.post('https://us-central1-shop-list-b60aa.cloudfunctions.net/addItem', { item: newItem }).then((response) => {
        this.setState({
          buyItems: response.data,
          message: ''
        })
        this.addForm.reset()
      })
    }

  }
Replace the URL with yours
The removeItem method removes an item from the database.
  removeItem(item){
    const newBuyItems = this.state.buyItems.filter(buyItems => {
      return item !== buyItems
    })

    return axios.delete(`https://us-central1-shop-list-b60aa.cloudfunctions.net/deleteItem?id=${item.id}`).then((response) => {
      this.setState({
        buyItems: response.data
      })
    })

    if(newBuyItems.length === 0){
      this.setState({
        message: 'No Item on the list, add some'
      })
    }
  }
GET

POST

There you go!
The source code for the frontend app is available on GitHub: HERE, feel free to fork and contribute to it.
Thanks for reading 😄 Please 👏 if you liked this article. If you have any questions at all, feel free to comment below and i will respond asap!
I can’t wait to see what you build. 🔥
Take home Assignment for You
1 Write a function that generate’s a URL to update an item on the shopping list.
2 On the front end;
Create an Update button on the user interface.
Write a method called updateItem that will consume the update-URL you just created.