
Beginner’s Guide to Deploying a Django + PostgreSQL project on Google Cloud’s Flexible App Engine
How to deploy a Django + Postgres app on Google Cloud’s Flexible App Engine using Gunicorn. Includes configuring a database instance and serving static files from a Google Cloud Storage bucket. Step-by-step guide for complete beginners.
This is a very long guide — although mostly pictures and sample code. It’s long not because of its complexity but because I didn’t want to skip any steps that would lead to frustration and confusion.
Too many times do you run into a guide that skips what are usually the exact fucking steps you need. If you follow along in order you will save yourself a lot of headache and should actually understand what you are doing rather than just copying.
If you are new to deploying a Django app on Google Cloud then follow the guide from beginning to end. It should take about 30 minutes to set up initially but will be faster for other projects once you are more comfortable with the service. Future updates to your project can be deployed using a single gcloud app deploy command.
If you have used Google Cloud before and are just looking for some specific details feel free to use the links below to skip to the solution you need.
Quick Links
- Project files [sample deployment templates for
settings.pyapp.yamland Conda shell scripts] - Create a Google Cloud project
- Create a Google Cloud Storage bucket
- Create a Google Cloud PostgreSQL instance
- Install the Google Cloud SDK[gcloud command line tool]
- Configure the Google Cloud SDK
- Create the
requirements.txtfile - Create the
app.yamlfile - Configure the
settings.pyfile - Syncing the static directory with a Google Cloud Storage bucket
- Deploy the project
Bonus Bits
- Customize the Conda environment for easy local development
- Install the Google Cloud SQL Proxy tool
- Use the Google Cloud SQL Proxy tool
- Connect to the database with a Django development server
- Connect to the database using the psql client
Background
In order to deploy a Django + Postgres project you need to configure a Flexible App Engine container. Django uses a C-based extension called psycopg2 for its PostgreSQL operations which the Standard App Engine does not support.
This guide will be using the gunicorn package as an HTTP server for our WSGI Django application. This is one of several recommended strategies for deploying a Django app to production. I chose gunicorn because it was in the Google Cloud docs and is simple to use.
As far as I know other server packages should work similarly (with an update to the entrypoint field in the app.yaml file) but I don’t have enough experience to compare the other strategies. If you do please share an article. I’d love to learn more and will update this section with a link to your research.
In addition to the programs installed during the instructions you will need the following:
- PostgreSQL client [
psql] →brew install postgresqlor download - (Anaconda) + Conda [package and environment manager] → download
The psql client will be used for connecting and interacting with your Google Cloud database instance remotely.
The Conda program is not needed if you use some other environment manager like PyEnv. However, the instructions here will use Conda and some customization (at the end in the Bonus section) for effortless local testing.
If you don’t have a virtual environment preference it’s worth installing so you can follow along exactly with the guide.
If you use ZSH for your Terminal shell you may run into an issue with Conda’s default installation. I wrote a solution herefor anyone running into this issue.
Google Cloud Setup
To begin we need to set up a new Google Cloud project that we can host our app on. You will need a Google Cloud account to continue which you can set up here.
Note: you will need a valid credit card and address although they won’t charge you anything if you stay within the free $300 credit given to new users. This credit will give you plenty of time to get a feel for the platform and determine what your monthly costs may be at scale if you choose to continue.
Create a New Project
Go to your Google Cloud dashboard by clicking the console button in the top right of the cloud homepage.

Click the dropdown arrow on the right

Create a new project using the + sign on the right
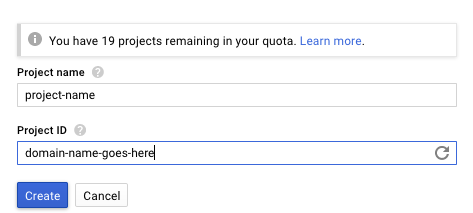
Project ID will be the base of your project’s domain
- the top part ( Project name ) is the name you will see within your dashboard
- the bottom part ( Project ID ) will be used in the configuration and for the domain once its deployed. Whatever you put here will look like this when your project is up:
https://PROJECT-ID.appspot.com
Create a Storage Bucket
According to the Django docs serving static files from your deployed application is inefficient and carries potential security risks.
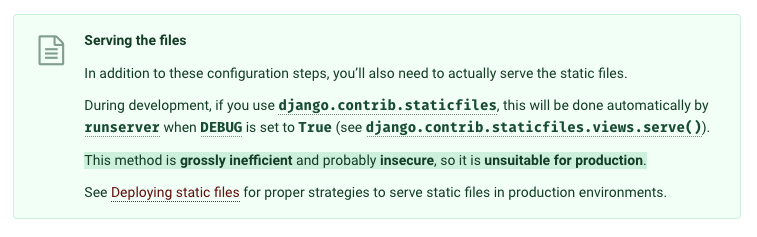
Instead we will use a secure method of serving static content with a Google Cloud Storage bucket. This will act like our own mini content delivery network. It offers granular privacy control as well so you can have both public and private data hosted in the bucket.
In this tutorial we’ll be using it for static files but you can use buckets for any file storage including user uploaded content like images and documents.
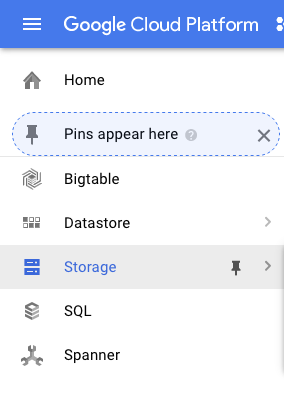
From the dashboard click the menu on the left and choose storage. If it prompts you to select a project select the new one you just created.
Creating a Google Cloud bucket for static files
In here you may see two buckets already. These are defaults for your project and you should not touch them. Instead select create bucket at the top.

Create a new bucket for static files
Call it something descriptive. I use app-name-purpose like app-name-staticto label my buckets. A Google Cloud project can have multiple buckets associated with it. Using a consistent naming pattern like this can help you stay organized.
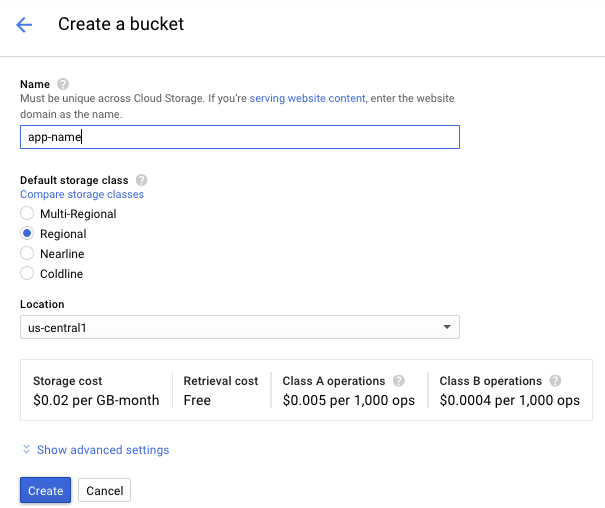
You can read about the different storage classes. For my purposes I chose Regional because it will primarily be visited by people in my country.

Your static directory
Now you can serve static files from this URI
https://storage.googleapis.com/project-name-static/
Later we will be collecting and sending our static files to this bucket.
Creating a Google Cloud PostgreSQL Instance
Next we have to create a PostgreSQL instance to store the data. Google Cloud gives us the choice of MySQL or, more recently, PostgreSQL.
Note: The PostgreSQL instance service is in Beta and may change by the time you view this guide. If the instructions don’t match up leave a comment and I’ll look into it with you and update the article.

Choose the SQL option from the menu
You will be prompted to enable Cloud SQL instances for your project.

First time project configuration of Cloud SQL Instances
This process can take a few minutes. When complete hit the create instance button at the top

Create a new PostgreSQL instance
Choose PostgreSQL and hit next. Now you can define your instance. Once again use a consistent naming convention for better organization. I choose app-name-db for my database instance names. Warning: the instance name can not be changed in the future.
By default Google Cloud will create the user postgres and the password generated using the generate button. I will show you how to add another user account after. If you insist on using the default account make sure you store this password somewhere.

After creating it will take a few minutes for the database to be made available. Once it is ready you can create a non-default user account ( recommended ) by clicking on the database name and then the users tab.
You will use this (or the default) account to login to your app so make sure you don’t forget the username and password.
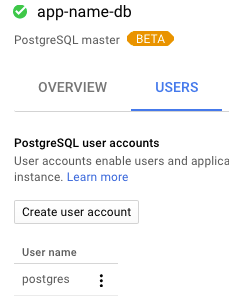
Create a custom user account
At this point all of the setup on Google Cloud side is complete. Next we need to install and configure the tool needed to interact with our Google Cloud project.
Install and Configure the Google Cloud Tool
Next we install the Google Cloud tool that will be needed for deploying and interacting with the project.
Install Google Cloud SDK
- Download the Google Cloud for Mac SDK (this is a direct link to the zipped OSX 64-bit tar file). You can view the full list of installation sources and guides here.
- Make sure to save it somewhere easy to navigate to
Navigate to the file and double click to unzip.

Double click the .tar.gz file (below) to unzip it into a directory (above)
Open your terminal and navigate to the directory with the now unzipped package. I downloaded it to ~/Downloads which may be the default for you as well.
Ideally you want to install the SDK in your home directory. To do this you can enter mv google-cloud-sdk ~/google-cloud-sdk which will move from where it was downloaded to the home directory. Now you can cd to ~ to navigate to your home directory for installation.
In your terminal enter

install in your home directory
Select whether to share usage data
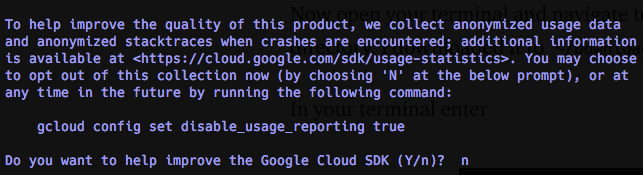
This part is important to add the SDK to your $PATH

this step should automatically detect your default shell and modify its path variable
Close and reopen the Terminal window. Then install the two Google Cloud components we’ll be using:
gcloud components install betagcloud components install gsutil
If all goes well try entering gcloud --version and you should see the following :

Expected installation profile
Configure Google Cloud SDK
Now that you have everything installed you need to associate your Google Cloud account with the Google Cloud SDK. This will enable you to recognize and connect to your projects using the gcloud tool.
To do this we use the command gcloud init

This will open Chrome / Firefox to log into your Google account
Once you have logged in go back to your Terminal window and you should see a list of your projects. Select your project from the list. Congratulations you are now ready to interact with your current and future projects!
Note: to switch to another project in the future use the init command to either create a new configuration or update the default one.
Configuring the Django App for Deployment
Back on the Python side of things we need to create a few configuration files for our deployment. We will be creating a requirements.txt file which will hold a list of our packages and their versions. We will also create an app.yaml file which Google Cloud will use for configuring the Docker container.
Creating the requirements.txt File
First make sure that you have installed all of the required dependencies for the project. You probably have all of them except for gunicorn which we will need to run the HTTP server hosting our app.
- Enter
conda install gunicornorpip install gunicorn - Confirm that you have all of the required packages using
pip list
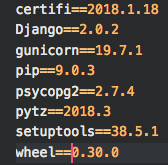
You should have all of these packages ( versions may differ )
If you are missing any of these just run conda install package-name to install them now. Next you will generate your own requirements.txt which is the image you see above.
You will want to create this file in the top level directory of your Django project, where the manage.py file is. We will get into creating the app.yaml file next so don’t worry about not having it right now.
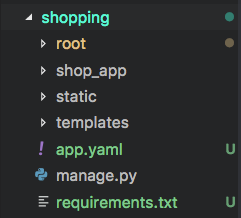
Directory structure of where app.yaml and requirements.txt should be created
Once you’ve navigated to the top level directory run the following command to create the requirements.txt file.
pip list --format freeze > requirements.txt
This command instructs pip to generate a list of packages with their versions listed in the == format that Google Cloud expects. The >symbol is a shell operator that writes the output of the first (left) command to an input file (right).
Side-note
- the
>operator writes to a file ( will be overwritten if anything exists ) - the
>>operator _append_s to the end of the file ( no overwrite ) - Both commands will create the file if it doesn’t already exist
Confirm that the file was made using the == format and in the top level directory. **If it is not in this format and location your deployment will fail — ** delete it and check that you entered the command properly.
Create the app.yaml file
The app.yaml file is used by Google Cloud to configure your Docker deployment container. There are a lot of configuration options for this. For the purposes of this guide I will only include the bare minimum that is necessary to get going
Any that are missing will have default values inserted by the Flexible App Engine during configuration. You can take your time digging into the documentation if you’d like to make further refinements.
I’ve added some notes to help clarify the parts we will be adding. If you make any modifications do us all a favor — open a PR and contribute with some notes of your own so we can all learn from them.
Bare-bones template app.yaml
THIS FILE IS NOT SAFE TO PUSH TO GITHUB
It contains private credentials that should be protected. There is a way to host these environment variables on Google Cloud and import them during startup but I have not fully figured this part out. When I do I will post another article. If you know how to configure this process post a comment and I will update the article and credit you.
Make sure to add
app.yamlto your.gitignorebefore pushing to GitHub.
This app.yaml file is specific to thesettings.py file described below. Make sure if you make any deviations to either of them that they are reflected properly in both locations.
Updating settings.py
The final changes we need to make are to the settings.py file located in your base project directory. The following is a list of changes that need to be made along with a sample settings.py that you can use as a template to customize for your deployment.
- set
DEBUGas an environment variable to ensure it is alwaysFalsewhen deployed (set by theapp.yaml) andTruewhen testing locally - set
SECRET_KEYas an environment variable for protection - set
DATABASEdictionary configuration keys to environment variables for protection - Add
127.0.0.1(for connecting to the database proxy) and the deployment domainPROJECT-ID.appspot.comto theALLOWED_HOSTSlist ( host only — nohttps://protocol ) - [optional] add
'DIRS': [os.path.join(BASE_DIR, 'templates')]to theTEMPLATESlist if you’d like a top-level directory to store all your templates

using a top-level templates directory
All of the changes are reflected in the sample settings.py file below that you can place into your project. I have added notes here as well as TODO comments so you don’t miss anything when customizing.
Syncing Django static files with the GCS bucket
The last step before deployment is to collect and push your static project files up to the Google Cloud Storage bucket. This is a step you will repeat every time you are ready to deploy a new version of your project. Navigate to the top level directory of your project (where manage.py is) then run the following command:
./manage.py collectstatic
If this command executes properly you should have a static directory that has all of the admin and project specific static files copied to it. Django recommends this strategy to keep your production and development files compartmentalized.

The bucket-static directory is outside the project directory
You can modify the ACL [access control list] on an individual file basis through the Google Cloud Storage bucket interface. If you would like to set all of the static files to have public read access (typical use case) enter the following command first:
gsutil acl ch -u AllUsers:R gs://BUCKET_NAME/STATIC_BUCKET_DIR
This command changes [ch] the access control list [acl] for all users granting read [:R] access to the given bucket object (directory).
After setting the permission you can use the gsutil tool to synchronize the static files with the project bucket you created earlier. We will only be using the -r flag (to recurse through the static directories). You can read about the other available flags on the gsutil rsync documentation page:
gsutil rsync -r PRODUCTION_STATIC_DIR gs://BUCKET_NAME/STATIC_BUCKET_DIR
Where PRODUCTION_STATIC_DIR is the static directory that the files were copied to in the collectstatic command. If you have the same setup I have been using for this tutorial it will look like this:
gsutil rsync -r bucket_static gs://BUCKET_NAME/static
Note that the /static at the end is where the app.yaml and settings.py expect the bucket’s static directory. If you choose another name for the static directory in your bucket make sure to reflect that change in those files.
You can verify that the sync was successful by navigating back to the Google Cloud Console and viewing your storage bucket.
Deploying the Project
Congratulations, you’ve made it! The last step is to finally deploy the project. This will be the easiest step so far just navigate to the directory with the app.yaml file and enter the following command:
gcloud app deploy
This process will take about 10 minutes depending on the size and complexity of your container configuration. When it completes it will output a link to your live project!
As you continue to improve your project you will create new versions of it that can be deployed using the same command. You can view all the versions you have deployed from your Google Cloud dashboard sidebar under Computer → App Engine → Versions

View all versions that have been deployed (most recent at the top)

Tools leads to deployment logs, View leads to the configuration file for that deployment
If you want to roll back to another version just select the checkbox next to it and hit the start button at the top

This will deploy the selected version and route traffic to it
Bonus Features
Now that you have successfully deployed your app I will give you a few tips on how to interact with it. The first tip is how to set up your Conda environment for seamless local development. The second will describe how to connect and interact with your database remotely. Both tips rely on the configuration of the settings.py file described earlier.
Customizing Conda for Local Development
With this configuration your environment variables will automatically be loaded and removed when activating or deactivating the environment using Conda.
The trick here is to write a shell script that will load and export the environment variables for use in your app. The second script is used to remove the environment variables when the environment is deactivated. Both of them rely on hooking into the native Conda environment setup and tear-down processes.
First navigate to the directory of the Conda environment for your project. If you followed the default installation for Conda then the directory with all of your environments will be under /anaconda3/envs/ENV_NAME. Just add the name of your environment to the end of the path.
Once you are in the environment directory you need to create some new directories that Conda will check when activating / deactivating your environment. Enter the following commands to create the directories:
mkdir -p etc/conda/activate.d etc/conda/deactivate.d
The -p flag is used to make parent directories. If you don’t include this flag then you will get an error when trying to make nested directories like the command above.
Within the activate.d directory we will add the first env_vars.sh file. Navigate to it and enter vim env_vars.sh to open VIM and paste in the following lines. Edit the lines by hitting I on your keyboard (to insert) and escwhen done typing. Finally enter :x and ENTER to save and close the editor.
Alternatively you can clone this gist into the directory and customize it in another text editor.
Next we write a similar script for hooking into the Conda deactivation process. This one goes in etc/conda/deactivate.d
Now every time you activate your Django project environment you will also execute the script to load the environment variables for local development. Accordingly those variables will be removed when the environment is deactivated.
Installing the Google Cloud SQL Proxy Tool
If you want to connect to your Google Cloud PostgreSQL instance remotely you will need a connection mechanism. One easy and secure way to connect is to install and configure the Google Cloud SQL Proxy Tool.
If you don’t plan on connecting to your database remotely you can skip this section. The remainder of these instructions will be using this tool though so if you are unsure I’d suggest following this section.
If you want to read the full instructions, installation for alternate operating systems / architectures, and details about how it works (pretty neat) here is the documentation.
For 64 bit OSX machines you can ins
then enter the following to make the file executable
chmod +x cloud_sql_proxy
Using the Cloud SQL Proxy Tool
You may have noticed that the environment activation script from earlier had a host and port of 127.0.0.1 and 3306 respectively. These are the connection parameters we will use to connect to our database instance through the proxy server tool. To use the proxy tool you first need to get the connection name for your database instance:
gcloud beta sql instances describe DATABASE NAME

The second line of the output contains the Connect Name field you need
Next create a proxy connection by entering the data from the connectionName property between the quotes below. Note: if you change the port you will need to reflect that change in the environment activation script.
~/cloud_sql_proxy -instances="CONNECTION-NAME"=tcp:3306
Depending on how you authenticated with the Google Cloud SDK you may receive the following error:

google: could not find default credentials [Cloud SQL Proxy tool]
If this happens just run the following command to set the default credentials:
gcloud auth application-default login
This will open your default browser and request permission to set the default credentials. Try the sql proxy tool again after authenticating to get the proxy server running.
Leave this terminal window open to keep the proxy server running.
Make sure you turn off the server when you are done
Note: If you are just writing a sample app it’s okay to interact directly with a single database. But for production apps you will always want two database instances (at minimum) — one for production and one for development. This will separate the horrible things you and your team do in development from the data your users will interact with.
You can follow the same directions to create another instance on Google Cloud. Make sure you update the activation shell script and the sql proxy tool to connect to the dev database if this is your case.
Database Connection: Django Development Server
This one is simple. With the proxy server running, activate your environment (which will load the shell script). Then you can spin up your dev server using ./manage.py runserver and interact with your database instance.
Database Connection: PostgreSQL [psql] Client
If you want to muck around with the database directly you can connect using the psql client and the proxy server that is exposing the connection to your instance.
psql “host=127.0.0.1 port=3306 sslmode=disable dbname=DATABASE-NAME user=USERNAME”
where username is the name of the user account you established for the database on Google Cloud (postgres if you did not explicitly create a custom user). You will then be prompted for the PASSWORD that you set for that user and you’re in!
I hope the article was informative and saved you some time. Maybe you even picked up a few new tricks (I certainly did when learning it myself).
If any part of the article is still confusing or not working leave me a comment and I’ll sort you out.
If anything is incorrect / incomplete let me know so I can update it. I’d like to keep this guide up to date both for myself and anyone in the future.
Shameless plug — if you are looking for an extremely passionate (I can’t stop coding…) and driven back-end developer [Node, Django, Flask, C# .NET] visit my GitHub to see my work and email me if you think I’d be a good fit.
— Vamp

✉️ Subscribe to CodeBurst’s once-weekly Email Blast , 🐦 Follow CodeBurst on Twitter, view 🗺️ The 2018 Web Developer Roadmap, and 🕸️ Learn Full Stack Web Development.