
Create a Facebook Share Button and Twitter Tweet Button for Your iOS Swift App
Hello, in this iOS Swift tutorial I will teach you how to share on Facebook and tweet on Twitter using the Social Framework.
To be able to share and tweet using Social Framework you must have the Facebook and Twitter Application installed on your iOS device.
Building the App
First create a new project in Xcode.
Select Single View Application and hit Next.
Name App SocialApp

Hit "Next" and "Create".
In the main.storyboard we need to add 2 Buttons.
The first one with title: Share on Facebook
The second with title: Tweet on Twitter
Now we need to create 2 actions; one for each button.
Creating a Facebook Share Button
Open your assistant editor and Ctrl click - hold and drag from Facebook Button to the ViewController.swift file, and then release your click.
One the popup box select: Connection from outlet to action
and Name to facebookBtn
Hit "Connect" to create the action.
Close the assistant editor and navigate to your ViewController.swift file
First we need to import Social Framework
After you've imported the UIKit, add:
import Social
And you should have something that looks like this:
Now let's write the code in the facebookBtn action.
Add the code:
if SLComposeViewController.isAvailableForServiceType(SLServiceTypeFacebook) {
    var fbShare:SLComposeViewController = SLComposeViewController(forServiceType: SLServiceTypeFacebook)

    self.presentViewController(fbShare, animated: true, completion: nil)

} else {
    var alert = UIAlertController(title: "Accounts", message: "Please login to a Facebook account to share.", preferredStyle: UIAlertControllerStyle.Alert)

    alert.addAction(UIAlertAction(title: "OK", style: UIAlertActionStyle.Default, handler: nil))
    self.presentViewController(alert, animated: true, completion: nil)
}
Where it will look like this:
Understanding the Code
First we have to check if the user has their Facebook Application installed and if they're logged in.
We do this with this line of code:
if SLComposeViewController.isAvailableForServiceType(SLServiceTypeFacebook) {
}
If the user has not installed the Facebook app or is not logged in, we create a UIAlertController and notify the user that they need to Login to Facebook to share.
We create the UIAlertController with this code:
var alert = UIAlertController(title: "Accounts", message: "Please login to a Facebook account to share.", preferredStyle: UIAlertControllerStyle.Alert)

alert.addAction(UIAlertAction(title: "OK", style: UIAlertActionStyle.Default, handler: nil))

self.presentViewController(alert, animated: true, completion: nil)
We create a variable called alert as our UIAlertController, with title "Accounts", message "Please login to a Facebook account to share." and the style UIAlertControllerStyle.Alert.
Next, we add an action to this alert using alert.addAction with the title "OK", the style as "Default", and the handler to "nil".
Our last step is to present this Controller. We use self.presentViewController: alert animated true and completion: nil.
If the user has installed the Facebook app and is logged in, then write the code to open the "Share Controller".
Our first step to do this is to create a variable fbShare as your SLComposeViewController for ServiceType: SLServiceTypeFacebook.
And the last step is to present this fbShare Controller using:
self.presentViewController: fbShare animated true and completion: nil.
Running the App
If you run the application in the simulator and press the "Share on Facebook" Button, you will see the AlertController because your simulator does not have the Facebook app.
However, if you Run the app on a real iOS device with Facebook installed, you will see the Facebook Share Controller.
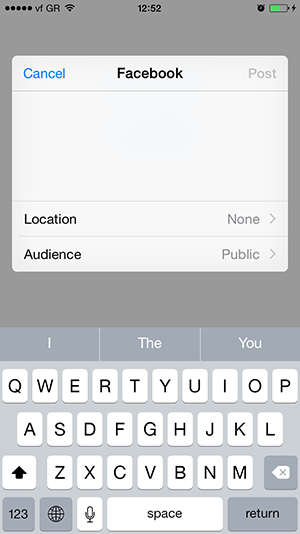
Type something and hit Post, and you will see your post in your Facebook profile.
Creating Your Tweet Button
First we need to create an action for the other button.
With the same way as your Facebook Share button, open your Assistant Editor and Ctrl click, drag, and release under the shareBtn. Select "Action" as your Connection, and name it tweetBtn.
The code for it will look like this:
Now the code we need is the same as before, but with one change: we ask for SLServiceTypeTwitter .
Add this code:
if SLComposeViewController.isAvailableForServiceType(SLServiceTypeTwitter) {

    var tweetShare:SLComposeViewController = SLComposeViewController(forServiceType: SLServiceTypeTwitter)

    self.presentViewController(tweetShare, animated: true, completion: nil)

} else {

    var alert = UIAlertController(title: "Accounts", message: "Please login to a Twitter account to tweet.", preferredStyle: UIAlertControllerStyle.Alert)

    alert.addAction(UIAlertAction(title: "OK", style: UIAlertActionStyle.Default, handler: nil))

    self.presentViewController(alert, animated: true, completion: nil)
}
Where you should have something that will look like this:
As with the Facebook share button, we'll check if the user has Twitter installed and if the user is logged in.
If not, we present the Alert messages, if yes, we open the Twitter Controller.
As with the Facebook sharing function, if you run the app in a real iOS device and press the "Tweet on Twitter" Button, you will see the Twitter Controller.
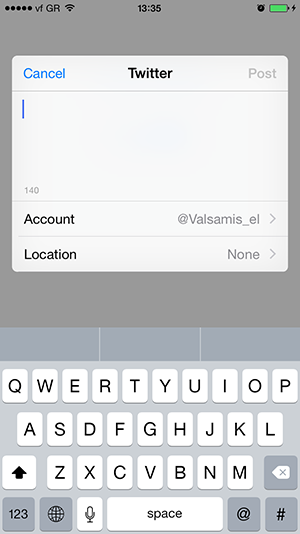
Type something and hit "post", and you'll have your Tweet posted.
The tutorial ends here - happy coding!
Sheet not being presented, calling premature completion I got this one could you help me out and Can you update it for Swift 4 please
This tutorial looks simple. Can I have this for Object-C?
Hi !
Perfect tutorial !
Juste with the “new” swift, we have to ut :