
How to create a staggered animation for paginated list in Vue.js
Vue.js makes handling different kinds of animations very easy. It provides components and hooks for animating single and multiple elements — Transition and Transition-Group; you can read more about them in official documentation which you can find at https://vuejs.org/v2/guide/transitions.html. It is quite easy to create simple and even more advanced animations with just using CSS. If you need something more advanced then third-party libraries can be easily integrated. For the purpose of this tutorial I will use TweenLite for animation. Before starting, make sure that you have a minimum Node.js 8.x.x installed as it is required by vue-cli, and npm.
First lets quickly prepare the folder structure and all the packages we need for the app. Open your terminal and install the latest vue-cli by typing
npm install -g @vue/cli
After it successfully installed in the folder in which you want to have your project, in my case it’s C:\Users\User\Dev. Cd to it and run
vue create AnimatedList
You can use vue command after installing vue-cli. If it doesn’t work make sure you reopen your terminal. If it still doesn’t work then maybe the PATH was not set correctly. Create is a command provided by vue, and “AnimatedList” is the name for our project. After running this command, you will have to pick few options for the project. As this is just for creating the animations lets go with defaults (babel, eslint). When everything is done you should see something like this in your terminal:

cd in AnimatedList and run npm run serve to check if everything works.
This is a folder structure which you probably now have. However, it may be different for you as at the time of writing this tutorial, vue-cli 3 is in beta stage.
In the terminal, run ‘npm install –save axios gsap’. We need Axios for fetching some data from API and GSAP as it provides TweenLite for animations. You can read more about what GSAP has to offer on https://greensock.com/gsap. After packages were installed, run in your terminal ‘npm run serve’ to start the dev server.
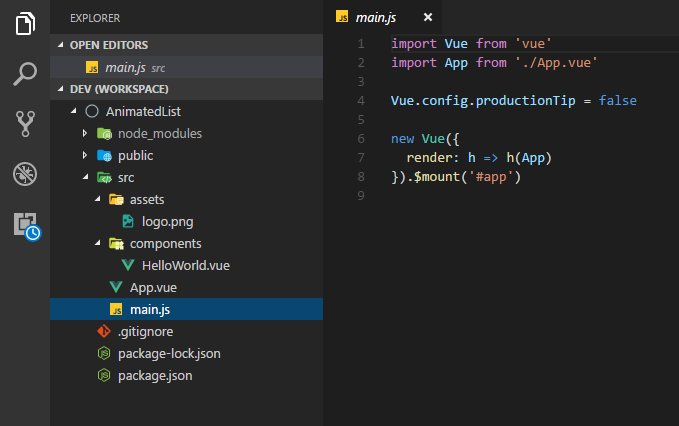
Rename HelloWorld.vue file to AnimatedList.vue and change it’s content so it just has a base template for the Single File Component.

Now we have to adjust App.vue file as it still tries to import and use HelloWorld.vue component which doesn’t exist anymore. Change the import from “import HelloWorld from ‘./components/HelloWorld.vue’” to “import AnimatedList from ‘./components/AnimatedList.vue’”. Update components property to AnimatedList as well as component in the template. Also, remove Vue logo from the template. Your App.vue file should now look like this:

We are done with clearing the files so first let’s get some data for the list which we want to animate. In AnimatedList.vue, before “export default”, add “import axios from ‘axios’, and then create a new axios instance.

We will use a starwars API to get some data.
If you are on localhost, you might have CORS issues. In this case, just install a browser plugin like MOESIF on Chrome.
Add “people” property to data which should be an array. We will store our list there. Also, we need currentPage, loadingData flag and animating flag which we will use later.

After that, we create a method for fetching people from starwars. Add methods property to exported object and create “getPeople” method which will accept “page” as a parameter. It should default to 1 and return a data object.

As you probably spotted, I am using here const, async/await, and default parameters, which are available in new EcmaScript standards. If you have to support older browsers then make sure you use something like babel for transpiling your code to ES5. Also, since ES6, if the object property has the same name as the value, instead of writing { page: page }, you can just write { page }.
Now let’s add a created() hook in which we will call g_etPeople()_ and handle the result. The swapi API will return an object which will have count, next, previous and results properties. However, we are only interested in results and count. With destructuring, we can easily get results and count and assign them constants. After that, we update people property. This will cause re-rendering of a list which we will add soon. We also have to store a maximum number of pages for the pagination. Max pages number will not change and therefore it does not need to be reactive. We need to also store length of the array, but it also doesn’t have to be reactive. Static properties usually are stored in $options prop. Also, we have to switch on and off loadingData so pagination buttons are disabled while data is being fetched.

We have data to display so it’s time to add some html and CSS.
Above the <script> tag add this code:
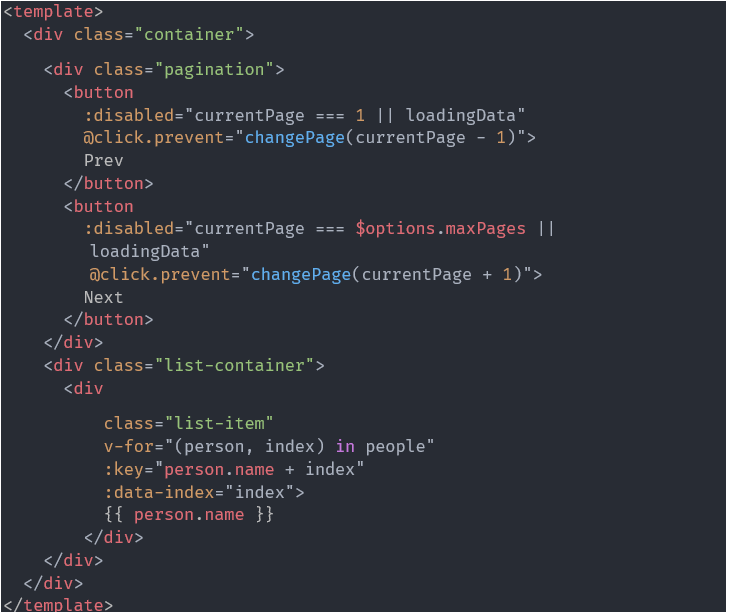
Here we are adding pagination buttons to update our list. Buttons should be disabled if the data is being loaded or if currentPage is 1 or equal to maxPages. “v-for” is a directive offered by Vue.js to loop through data. We are looping through people array and display person’s name. Remember that v-for requires unique :key attribute to be passed. We will use data-index later on for delaying each list element.
Below the </script> tag add a little bit of styling for buttons and list.

Just remember that list items must have “position: relative” so we can later animate their “left” property. Now we have to add a changePage method as Vue compiler will be throwing an error. In changePage we will check if page passed is not smaller than 1 or bigger than maxPages. If it is then we will change it to 1 or to maxPages. After the check we will call updateList(page) and pass page as a parameter. In updateList we will fetch more people and update people array and currentPage.

We have a list and pagination in place. Now it’s time to finally add some animations so let’s import TweenLite to our file.
“import { TweenLite } from ‘gsap’”
We also have to wrap our list with <Transition-Group> component to be able to use transition system and hooks provided by Vue.js.

We also need to add methods for each hook.

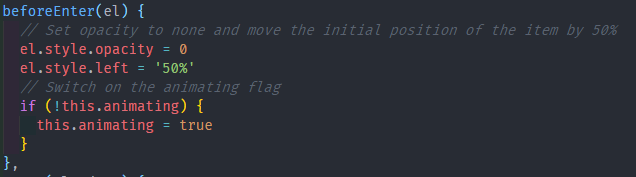
In beforeEnter hook we set opacity to 0 and left property to 50% to move the item from its position. We also switch on animating flag which we will need soon.
In enter hook we get delay number based on the index of the item. The higher index number, the longer the delay. This way we make sure that items will not start appearing at the same time, but rather one after another. TweenLite takes an element to animate as a first parameter, duration of the animation as a second param, and additional options as a third param. In options we pass props for which properties of element we want to animate. onComplete will fire a callback after the animation has finished.

In afterEnter hook we just switch off animating flag

If you refresh the browser now, you will see that our list nicely slides in from right to left. We also have to add code to leave hooks so that when we change the page list items will slide away.
Switch on animating flag in beforeLeave hook

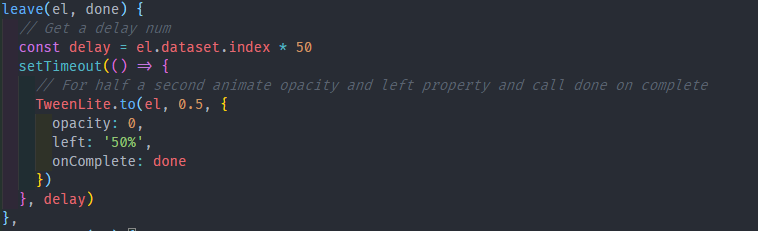
Leave hook is basically the same as enter hook besides values passed to TweenLite for opacity and left property.
Last thing to do is to add code to afterLeave hook in which we set animating flag to false.

Finally, our list slides in and out. Howver, there is an issue when we fetch a new set of data which forces re-render and triggers new animation to start before the current one finished. That’s why we need “animating” flag. Add new property to the data object called peopleToUpdate. That’s how your data object should look like now.

Now modify updateList function so when it receives results, it will check if the animation is not in progress. If it is not, then it should assign results to ‘people’ property, otherwise to ‘peopleToUpdate’?. Note that we are updating peopleLength only when animation is not in progress in this function. We are doing it like this because animation depends on the length of the previous array so we can’t override it just yet, in case it was different.

Before

After
However, that’s not all. We also need a way to update people with new data when animation does finish. We could initialise a function after the last item leaves to check if there is any data to update, but let’s use a watch property of Vue instance. We will be watching “animating” property and do something only when animation was switched off and if we have any data to update. Besides updating people property and triggering new animation, we also update peopleLength with new length.

This is a last thing which we needed to finish creating a staggered animation for the list. There are various ways to create animations like this one, there are also many improvements which could be made to this code, for example, moving transition-group component with its methods to another component and then just passing list items in a slot. However, this is something what you can do by yourself for a practice. You can find this project on my Github repo at https://github.com/DeraIeS/AnimatedList I hope you have enjoyed reading this tutorial.
Great article. It would be even better if you had a live (or recorded) example of what this accomplishes. The meaning of “staggered animation” is not obvious to me!
Hi Thomas. Thanks for sharing
There’s a typo in the link to your Github repo: the ‘.’(dot) should not me inculded :)
Cheers
Hi Cedric, thanks for spotting that :)