
Microservices: integrating kong api gateway with Auth0 authentication provider
Introduction
I used to work with several startups recently. Authentication is present in any product you do. Authentication is not simple. Not hard in the development sense well-defined standards such as OAuth2 are complete, extensively documented and supported by an ecosystem of tooling
Rather, authentication is hard to get right sometimes. There are number of limitations like time constraints, product owner concentrated on other features, budget constraints and so on. If you have some previously developed user subsystem which evolves from project to project — that is cool. Otherwise you are about to start yet another authentication subsystem for your project. Story starts… Stored your passwords as an MD5 hash instead of, saying, using bcrypt and salt — tadamm. Didn’t force HTTP Strict Transport Security (HSTS) and get down-grade tadamm. Rookie mistakes, few sprints to polish.
But what if short term you need to comply with some of the security standards, like ISO27001/ISO27018, SOC II, HIPAA, PCI DSS etc? Implementation time grows while you need to implement your MVP instead.
So Auth0 is authentication as a service solution, which offloads your pain with authentication for a while, and allows to delay your own implementation, while immediately start using your application with robust authentication approach.
API gateway. The same situation in a modern world. You want to have lightweight api, so you want to offload number of checks to some middle-ware while keep solution as modular as possible. Most of the major cloud providers have their solution (like AWS API gateway), but if you want to stay provider independent you again have less choices — either implement api gateway on your own, or use some opensource solution. Here comes kong — makes connecting APIs and micro-services across hybrid or multi-cloud environments easier and faster. Not, that Kong gateway is the open source API gateway, built for multi-cloud and hybrid, and optimized for micro-services and distributed architectures. It is built on top of a lightweight proxy(nginx + lua) to deliver unparalleled latency, performance and scalability for all your micro-service applications regardless of where they run. It also allows flexibility by introducing granular control over your traffic with Kong’s plugin architecture.
Often you have situation, when you have separate api gateway, optional separate client portal and delegated authentication to Auth0… And here comes purpose of this article — illustrate proof of concept of combining Auth0, Kong and your portal in one architecture. Unfortunately, by this time in number of situations — swiss knife of proven plugins is needed to make kong to work nicely in a non-standard architecture solutions.
Integrating with Auth0
Generally, there are two possible flows: you are going to consume services interactively from some web portal — in that scenario customer logs on it’s own and consumes api directly from api gateway, or your api are about to be consumed on your server-side and then proxied to client of the your portal.
Let’s review both approaches.
Web application (interactive customer login to api gateway via browser UI)
This flow supposes, that API accessible through kong will be consumed by some browser application, while user management and authorization is delegated to some openid2 compatible third party service, in our case Auth0.
To accomplish this, one of the Nokia teams implemented plugin kong-oidc available at https://github.com/nokia/kong-oidc. Kong-oidc is a plugin for Kong implementing the OpenID Connect Relying Party (RP) functionality.
This plugin should be preinstalled on a kong VM or container.
LABEL description="Ubuntu + Kong 1.4.0 + kong-oidc plugin"
RUN luarocks install kong-oidc
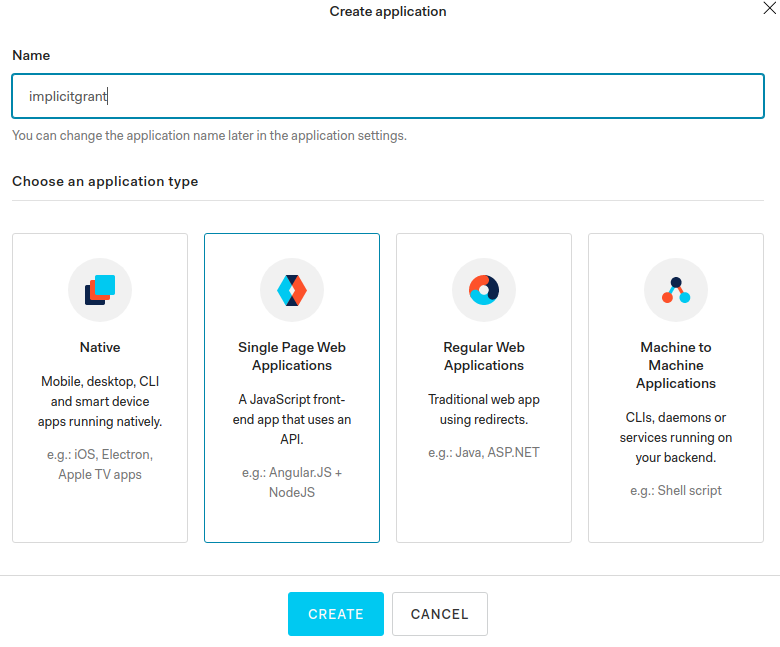
On Auth0 interface lets create SPA application.
For further ideas, check advanced settings, and ensure that you can add up to 10 255 byte long custom value pairs, that will be later passed to your api behind kong.
In most of situations, you would like to pass some application specific info from your authentication provider to your api endpoint. To accomplish this, Auth0 has rules concept, on a UI you can find Rules section, where you can implement number of java-script routines with custom logic, that may add number of real-time parameters to the request passed.
function (user, context, callback) {
  user.user_metadata = user.user_metadata || {};
  user.user_metadata.color = user.user_metadata.color || 'blue';
  context.idToken['https://example.com/favorite_color'] = user.user_metadata.color;
  context.idToken.yourcustomattrs = ['someattr1', 'someattr2'];
  context.idToken['https://example.com/yourcustomattrs'] = {
    objectattr1: "objectvalue1",
    objectattr2: "objectvalue2",
    objectattr3: "objectvalue3"
  };

  auth0.users.updateUserMetadata(user.user_id, user.user_metadata)
    .then(function(){
        callback(null, user, context);
    })
    .catch(function(err){
        callback(err);
    });
}
In a example above note, that any additional parameters should follow
uri scheme, in other case they will not be passed downstream (someattr1, someattr2) in snippet above.
In that scenario you will have some web application running at some domain. Let's assume, it is http://app.lvh.voronenko.net/ - it has some custom portal logic, but also consumes data from microservices hosted behind kong, running at endpoint http://app.lvh.voronenko.net:8000/
Lets mock it:
Create the service
curl -i -X POST \
--url {{ kong }}/services/ \
--data 'name={{ spaservice_name }}' \
--data 'url=https://httpbin.org/get'

HTTP/1.1 201 Created
Create route, service will be exposed at {{ domain }}/spa/
curl -i -X POST \
--url {{ kong }}/services/{{ spaservice_name }}/routes \
--data 'hosts[]={{domain}}&paths[]=/spa/'
If everything ok, you should get at /spa/ endpoint copy of the enchanced request received.
HTTP/1.1 200 OK
...
Via: kong/1.4.0

{
  "args": {},
  "headers": {
    "Accept-Encoding": "gzip, deflate",
    "Host": "httpbin.org",
    "User-Agent": "vscode-restclient",
    "X-Forwarded-Host": "app.lvh.voronenko.net"
  },
  "origin": "172.20.0.1, 172.20.0.1",
  "url": "https://app.lvh.voronenko.net/get"
}
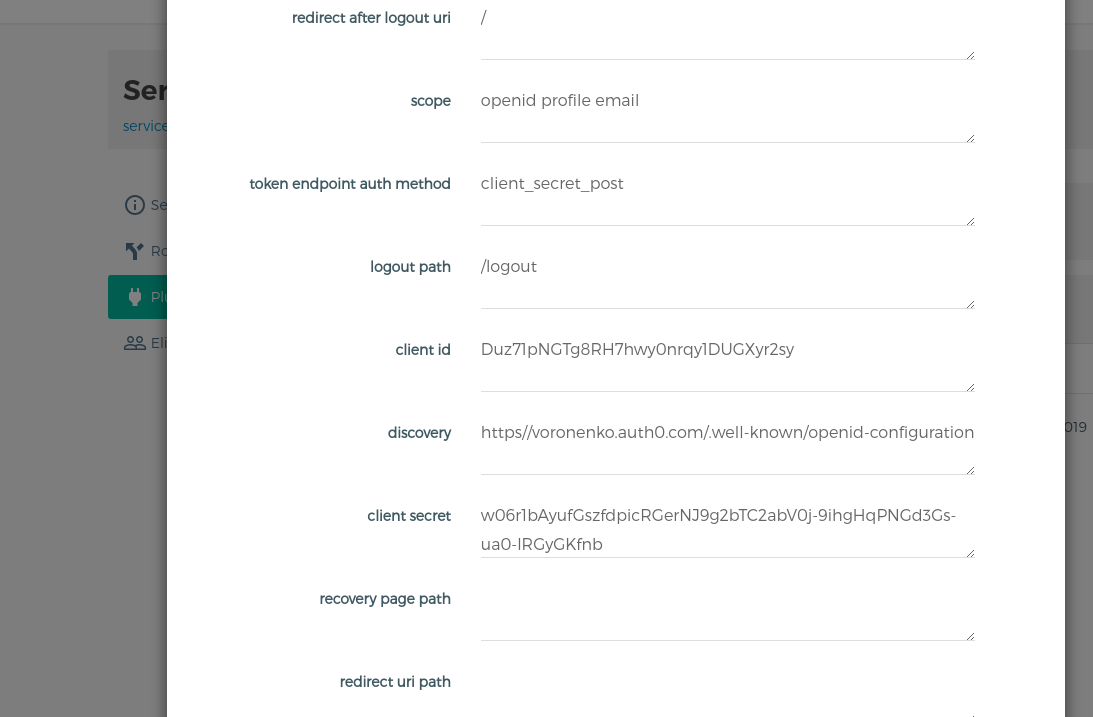
Now lets protect our endpoint with auth0 authentication. We will need to get three additional parameters: client id, client secret and discovery file. All can be obtained directly from auth0.
# Can be obtained at application settings page
@spa_client_id=Duz71pNGTg8RH7hwy0nrqy1DUGXyr2sy
@spa_client_secret=w06r1bAyufGszfdpicRGerNJ9g2bTC2abV0j-9ihgHqPNGd3Gs-ua0-lRGyGKfnb
# discovery url is fixed
@spa_discovery=https://{{ companyname }}.auth0.com/.well-known/openid-configuration
If you open spa discovery url, you will find, generally, “contract” supported by authentication provider, auth0
{
  "issuer": "https://voronenko.auth0.com/",
  "authorization_endpoint": "https://voronenko.auth0.com/authorize",
  "token_endpoint": "https://voronenko.auth0.com/oauth/token",
  "userinfo_endpoint": "https://voronenko.auth0.com/userinfo",
  "mfa_challenge_endpoint": "https://voronenko.auth0.com/mfa/challenge",
  "jwks_uri": "https://voronenko.auth0.com/.well-known/jwks.json",
  "registration_endpoint": "https://voronenko.auth0.com/oidc/register",
  "revocation_endpoint": "https://voronenko.auth0.com/oauth/revoke",
  "scopes_supported": [
    "openid",
    "profile",
    "offline_access",
    "name",
    "given_name",
    "family_name",
    "nickname",
    "email",
    "email_verified",
    "picture",
    "created_at",
    "identities",
    "phone",
    "address"
  ],
  "response_types_supported": [
    "code",
    "token",
    "id_token",
    "code token",
    "code id_token",
    "token id_token",
    "code token id_token"
  ],
  "code_challenge_methods_supported": [
    "S256",
    "plain"
  ],
  "response_modes_supported": [
    "query",
    "fragment",
    "form_post"
  ],
  "subject_types_supported": [
    "public"
  ],
  "id_token_signing_alg_values_supported": [
    "HS256",
    "RS256"
  ],
  "token_endpoint_auth_methods_supported": [
    "client_secret_basic",
    "client_secret_post"
  ],
  "claims_supported": [
    "aud",
    "auth_time",
    "created_at",
    "email",
    "email_verified",
    "exp",
    "family_name",
    "given_name",
    "iat",
    "identities",
    "iss",
    "name",
    "nickname",
    "phone_number",
    "picture",
    "sub"
  ],
  "request_uri_parameter_supported": false,
  "device_authorization_endpoint": "https://voronenko.auth0.com/oauth/device/code"
}
Let's associate plugin with the service
curl -i -X POST \
--url {{ kong }}/services/{{ spaservice_name }}/plugins \
--data 'name=oidc&&config.client_id={{ spa_client_id }}&config.client_secret={{ spa_client_secret }}&config.discovery={{ spa_discovery }}'
If you check documentations of the plugins, you will note that it has number of customizations, that allows redirecting to proper pages of your main portal after login and so on.
Additionally, we need to inform auth0 about callbacks used. If your application
does not have own, kong can provide default ones, which would reside under
/cb

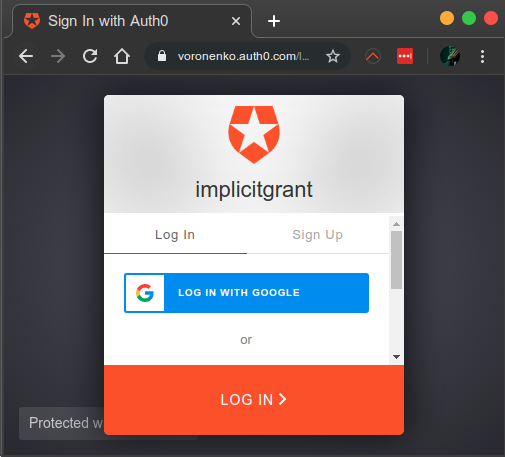
Now, if you would try to navigate to {{ domain_endpoint }}/spa/, you will get
redirected to auth0, where you can login with credentials given, including social logins.
Upon successful login we are redirected back to kong, and now
{
  "args": {},
  "headers": {
    "Accept": "text/html,application/xhtml+xml,application/xml;q=0.9,image/webp,image/apng,*/*;q=0.8,application/signed-exchange;v=b3",
    "Accept-Encoding": "gzip, deflate",
    "Accept-Language": "en-US,en;q=0.9,ru-UA;q=0.8,ru;q=0.7,uk;q=0.6",
    "Cookie": "session=UHH45jCV9A87Aev2IEBCJA..|1575582049|4Kc2 ... .",
    "Dnt": "1",
    "Host": "httpbin.org",
    "Upgrade-Insecure-Requests": "1",
    "User-Agent": "Mozilla/5.0 (X11; Linux x86_64) AppleWebKit/537.36 (KHTML, like Gecko) Chrome/78.0.3904.108 Safari/537.36",
    "X-Forwarded-Host": "app.lvh.voronenko.net",
    "X-Userinfo": "eyJuaWNrbmFtZSI6ImF2aXNiaXJkIiwiaWQiOiJnb29nbGUtb2F1dGgyfDEwMjE2MTg5MzYxMDUxMzg5MDczMyIsImxvY2FsZSI6ImVuIiwiaHR0cHM6XC9cL2V4YW1wbGUuY29tXC9mYXZvcml0ZV9jb2xvciI6ImJsdWUiLCJnaXZlbl9uYW1lIjoiVnlhY2hlc2xhdiIsInN1YiI6Imdvb2dsZS1vYXV0aDJ8MTAyMTYxODkzNjEwNTEzODkwNzMzIiwiaHR0cHM6XC9cL2V4YW1wbGUuY29tXC95b3VyY3VzdG9tYXR0cnMiOnsib2JqZWN0YXR0cjIiOiJvYmplY3R2YWx1ZTIiLCJvYmplY3RhdHRyMyI6Im9iamVjdHZhbHVlMyIsIm9iamVjdGF0dHIxIjoib2JqZWN0dmFsdWUxIn0sImZhbWlseV9uYW1lIjoiViIsInBpY3R1cmUiOiJodHRwczpcL1wvbGg0Lmdvb2dsZXVzZXJjb250ZW50LmNvbVwvLXo0am1QaFZKTDE4XC9BQUFBQUFBQUFBSVwvQUFBQUFBQUFBQUFcL0FLRjA1bkNQNl9NLUVvQlItWVRWZV9tTlhrQVZhUEUxS3dcL3Bob3RvLmpwZyIsInVwZGF0ZWRfYXQiOiIyMDIwLTAzLTA5VDEyOjU3OjIyLjA4MVoiLCJuYW1lIjoiVnlhY2hlc2xhdiBWIn0="
  },
  "origin": "172.20.0.1, 172.20.0.1",
  "url": "https://app.lvh.voronenko.net/get"
}
As we see, now user is authorized to use or API in kong, and oidc plugin
also adds special header called X-Userinfo, which contains base64 encoded jwt token. At the same moment, plugin performs validation of the token signature, and also can be configured to do more background checks.
You can decode base64 decode to view token data insides, pay attention to presence of the custom attributes.
{
  "nickname": "avisbird",
  "id": "google-oauth2|102161893610513890733",
  "locale": "en",
  "https://example.com/favorite_color": "blue",
  "given_name": "Vyacheslav",
  "sub": "google-oauth2|102161893610513890733",
  "https://example.com/yourcustomattrs": {
    "objectattr2": "objectvalue2",
    "objectattr3": "objectvalue3",
    "objectattr1": "objectvalue1"
  },
  "family_name": "V",
  "picture": "https://lh4.googleusercontent.com/-z4jmPhVJL18/AAAAAAAAAAI/AAAAAAAAAAA/AKF05nCP6_M-EoBR-YTVe_mNXkAVaPE1Kw/photo.jpg",
  "updated_at": "2020-03-09T12:57:22.081Z",
  "name": "Vyacheslav V"
}
The same does your code server-side in a micro-service or any next plugin in a chain and performs necessary actions basing on information received.
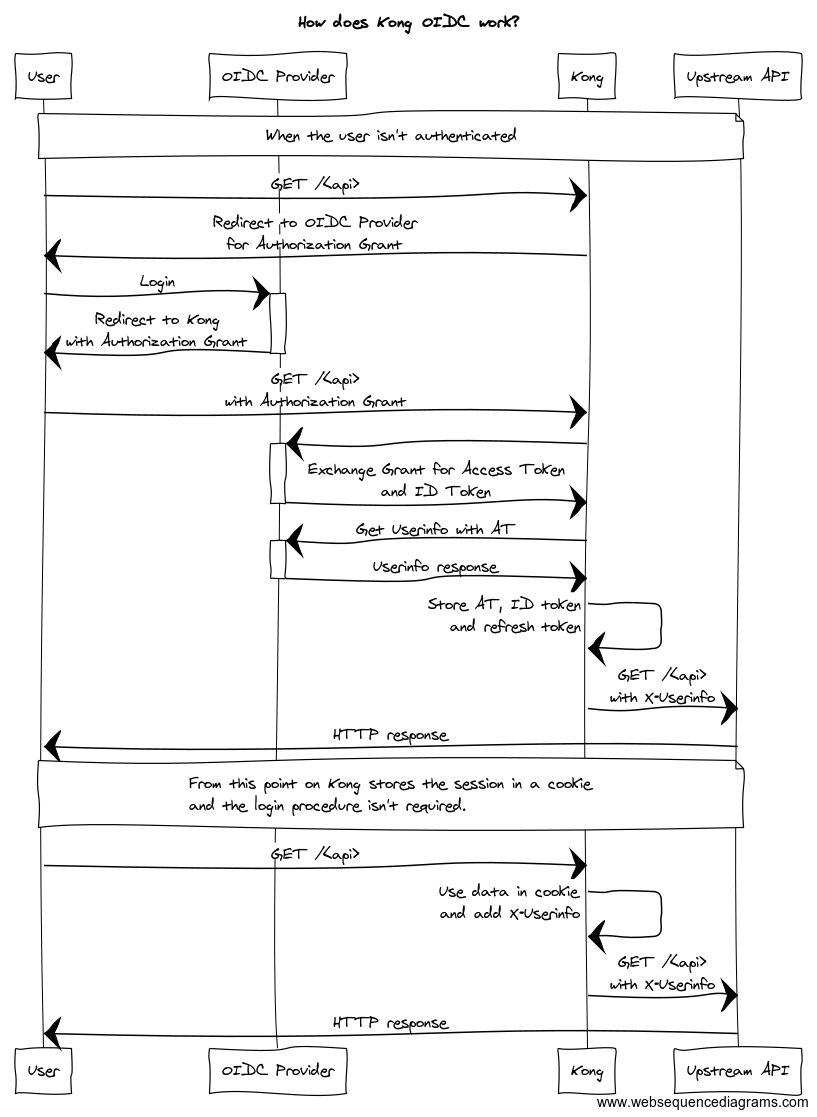
So with kong oidc plugin flow looks like
Some interesting discussion can be also found on https://github.com/nokia/kong-oidc/issues/15
And the same information can be now extracted by next plugin in chain or
end service.
Note, that there is some mess with rules and hooks, as discussed in that thread
https://community.auth0.com/t/custom-claims-not-added-to-access-token-despite-rule/9460/19
https://auth0.com/docs/api-auth/tutorials/client-credentials/customize-with-hooks
M2M application (non-interactive scripts)
This time we create another type — machine to machine application, and link it with api created in Web application flow, it is usual situation for consumers of your service implemented on some server side.
Let's create direct route service
curl -i -X POST \
--url {{ kong }}/services/ \
--data 'name={{ m2mservice_name }}' \
--data 'url=https://httpbin.org/get'
Organize route for the service
curl -i -X POST \
--url {{ kong }}/services/{{ m2mservice_name }}/routes \
--data 'hosts[]={{domain}}&paths[]=/direct'
Now associate jwt plugin with service.
curl -i -X POST \
  --url {{kong}}/services/{{ m2mservice_name }}/plugins/ \
  --data 'name=jwt'
Now call to api will return 401 Unauthorized
HTTP/1.1 401 Unauthorized
X-Kong-Response-Latency: 1
Server: kong/1.4.0

{
  "message": "Unauthorized"
}
How can we consume api ? We need to configure jwt consumer.
First of all, we need to get private key for message signing,
#!/bin/bash

COMPANYNAME=voronenko
curl -o ${COMPANYNAME}.pem "https://${COMPANYNAME}.auth0.com/pem"
openssl x509 -pubkey -noout -in ${COMPANYNAME}.pem > ${COMPANYNAME}.pub
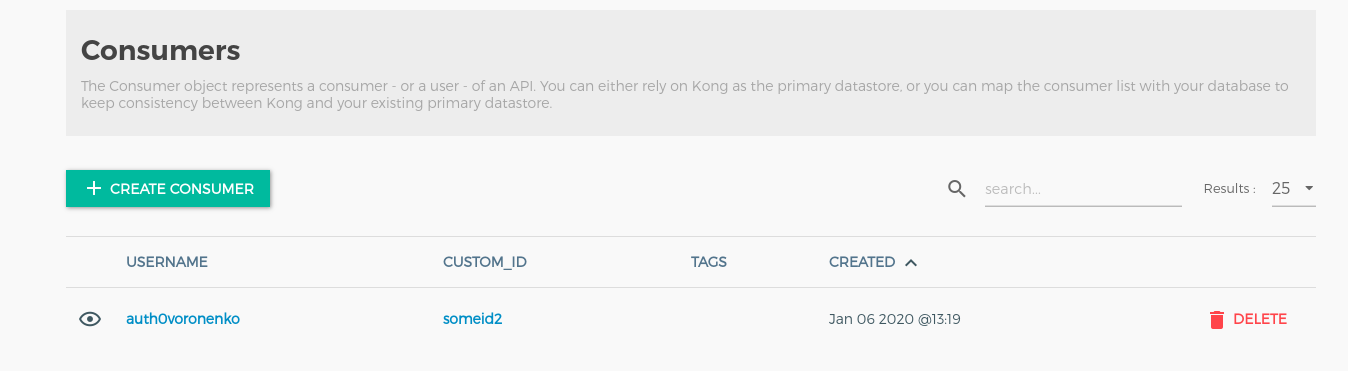
Having that key, lets create kong consumer
curl -i -X POST \
  --url http://localhost:8001/consumers/ \
  --data "username={{auth0consumer}}&custom_id=someid2"
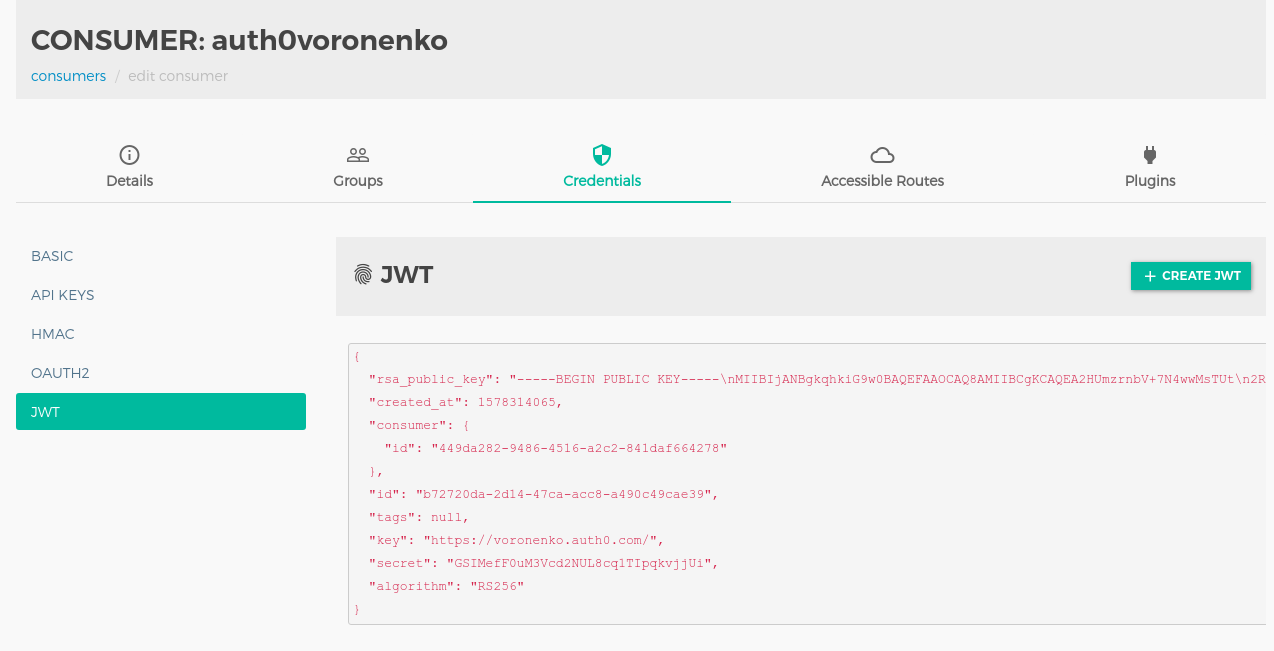
and specify jwt method of the authentication for him:
#!/bin/bash

COMPANYNAME=voronenko
CONSUMERNAME=auth0voronenko
curl -i -X POST http://localhost:8001/consumers/${CONSUMERNAME}/jwt \
    -F "algorithm=RS256" \
    -F "rsa_public_key=@./${COMPANYNAME}.pub" \
    -F "key=https://${COMPANYNAME}.auth0.com/"
At that moment we are ready to consume our api behind kong.
First of all, user obtains access token from Auth0:
curl --request POST \
  --url https://{{companyname}}.auth0.com/oauth/token \
  --header 'content-type: application/json' \
  --data '{"client_id":"R477zd0dhD0Hq3CnNIEgE677nwboYD5u","client_secret":"Omps9OmF5j_gNJBfc6byC3i6YuokRhVxtUG3THzEpKtOau8mgq9qAUZ6FxhxIHm2","audience":"https://implicitgrant.auth0.voronenko.net","grant_type":"client_credentials"}'
with response kind of
{
  "access_token": "eyJ0eXAiOiJKV1QiLCJhbGciOiJSUzI1NiIsImtpZCI6IlF6bEZOak5CUmtZNVJqY3lOVVpCUmpJMU5qRkJOMFl4T0VNMVJFSXhNelU0TVVJeU5qa3dSUSJ9.eyJpc3MiOiJodHRwczovL3Zvcm9uZW5rby5hdXRoMC5jb20vIiwic3ViIjoiUjQ3N3pkMGRoRDBIcTNDbk5JRWdFNjc3bndib1lENXVAY2xpZW50cyIsImF1ZCI6Imh0dHBzOi8vaW1wbGljaXRncmFudC5hdXRoMC52b3JvbmVua28ubmV0IiwiaWF0IjoxNTc1NTgzNTM2LCJleHAiOjE1NzU2Njk5MzYsImF6cCI6IlI0Nzd6ZDBkaEQwSHEzQ25OSUVnRTY3N253Ym9ZRDV1IiwiZ3R5IjoiY2xpZW50LWNyZWRlbnRpYWxzIn0.aIx7LnT7aFPxmK4wCXxxGhEKrxPsGlZ3azEFykynkf6hfyb-4zCXlrqvxNjB9pk_PO8MxmKRJeoRsHLmNOvVls3tE90GQNa6DrqyWuO5PxZetkPyR56o5axt4PddZlop-mukiMYrZF2bP_gdRBZnhR2OJ4vU3qG6Rvs2k-J65tbb2oUERWps7KDC2FeTbV2bc09JtH25StNfYyHOPUR1MiDSKZbZqH3Z0bZUFHN1Ac7jznU3xUV8yEPTy7hQwOWUK5CxUSvd_s4RlTLKsHdAQWWxoDPRvxldwPXtxc7n13hwQPslJNR1ScbREcgJo4zPOcVM_uzTk1ygczLJCzvdsA",
  "expires_in": 86400,
  "token_type": "Bearer"
}
This request now passes, our API gets consumed.
@accessToken = {{accessTokenRequest.response.body.$.access_token}}

GET {{domain_endpoint}}/direct
authorization: Bearer {{accessToken}}
Additionally. we get bunch of headers:
  "headers": {
    "Accept-Encoding": "gzip, deflate",
    "Authorization": "Bearer eyJ0eXAiOiJKV1QiLCJhbGciOiJSUzI1NiIsImtpZCI6IlF6bEZOak5CUmtZNVJqY3lOVVpCUmpJMU5qRkJOMFl4T0VNMVJFSXhNelU0TVVJeU5qa3dSUSJ9.eyJpc3MiOiJodHRwczovL3Zvcm9uZW5rby5hdXRoMC5jb20vIiwic3ViIjoiUjQ3N3pkMGRoRDBIcTNDbk5JRWdFNjc3bndib1lENXVAY2xpZW50cyIsImF1ZCI6Imh0dHBzOi8vaW1wbGljaXRncmFudC5hdXRoMC52b3JvbmVua28ubmV0IiwiaWF0IjoxNTc1NTgzNTM2LCJleHAiOjE1NzU2Njk5MzYsImF6cCI6IlI0Nzd6ZDBkaEQwSHEzQ25OSUVnRTY3N253Ym9ZRDV1IiwiZ3R5IjoiY2xpZW50LWNyZWRlbnRpYWxzIn0.aIx7LnT7aFPxmK4wCXxxGhEKrxPsGlZ3azEFykynkf6hfyb-4zCXlrqvxNjB9pk_PO8MxmKRJeoRsHLmNOvVls3tE90GQNa6DrqyWuO5PxZetkPyR56o5axt4PddZlop-mukiMYrZF2bP_gdRBZnhR2OJ4vU3qG6Rvs2k-J65tbb2oUERWps7KDC2FeTbV2bc09JtH25StNfYyHOPUR1MiDSKZbZqH3Z0bZUFHN1Ac7jznU3xUV8yEPTy7hQwOWUK5CxUSvd_s4RlTLKsHdAQWWxoDPRvxldwPXtxc7n13hwQPslJNR1ScbREcgJo4zPOcVM_uzTk1ygczLJCzvdsA",
    "Cookie": "session=RvFnGF5MLqV5bO-gT9G_Sw..|1575567729|fVmDt5WSp1UFkU8CGCKbUKfvtdZAJQsuYRWFVAo8XZxYeNaZocUqdCltgzroNkLG7gd-wwsxBS2xrjumlOnPQTIyrbrbY9CALL1Px3ATwipnHeuqaVEabu1xXvJjOgnjAlFsJ7tq0G95hzsKaF2rtW1lYq_HRoWYK9NFbaxR0J5ZE7PBM6vIOJWZLzGEXn6FWM6MI0_vnm7SubOyOVPRHA..|LHlXUDxEsWwJhGbYfkmccT1fz2g.",
    "Host": "httpbin.org",
    "User-Agent": "vscode-restclient",
    "X-Consumer-Custom-Id": "someid2",
    "X-Consumer-Id": "954353fb-46e9-4be2-b4e6-a96ea468bcde",
    "X-Consumer-Username": "auth0voronenko",
    "X-Forwarded-Host": "app.lvh.voronenko.net"
  },
Header after Bearer is again our jwt token, that can be decoded.
  {
  "iss": "https://voronenko.auth0.com/",
  "sub": "R477zd0dhD0Hq3CnNIEgE677nwboYD5u@clients",
  "aud": "https://implicitgrant.auth0.voronenko.net",
  "iat": 1575583536,
  "exp": 1575669936,
  "azp": "R477zd0dhD0Hq3CnNIEgE677nwboYD5u",
  "gty": "client-credentials"
}
and later consumed by our API.
Extending Autho metadata
Hooks
For M2M applications in difference to web based applications, where custom attributes can be injected via rules, point of extension are hooks.
Related documentation: https://auth0.com/docs/hooks
Take a look on a example below representing dummy Client Credentials Exchange hook extending access_token with additional keypair
'https://foo.com/claim':bar and somehookattr:somehookattrvalue
/**
@param {object} client - information about the client
@param {string} client.name - name of client
@param {string} client.id - client id
@param {string} client.tenant - Auth0 tenant name
@param {object} client.metadata - client metadata
@param {array|undefined} scope - array of strings representing the scope claim or undefined
@param {string} audience - token's audience claim
@param {object} context - additional authorization context
@param {object} context.webtask - webtask context
@param {function} cb - function (error, accessTokenClaims)
*/
module.exports = function(client, scope, audience, context, cb) {
  var access_token = {};
  access_token.scope = scope;

  // Modify scopes or add extra claims
  // access_token['https://example.com/claim'] = 'bar';
  // access_token.scope.push('extra');
  //client.metadata['yourcustomattrs'] = ['someattr3h', 'someattr4h'];
  //client.metadata.yourcustomattrs = ['someattr1h', 'someattr2h'];
  access_token['https://foo.com/claim'] = 'bar';
  access_token['https://foo.com/somehookattr'] = 'somehookattrvalue';
  access_token['somehookattr'] = 'somehookattrvalue';
  cb(null, access_token);
};
upon issuing request for token
curl --request POST \
  --url https://{{companyname}}.auth0.com/oauth/token \
  --header 'content-type: application/json' \
  --data '{"client_id":"R477zd0dhD0Hq3CnNIEgE677nwboYD5u","client_secret":"Omps9OmF5j_gNJBfc6byC3i6YuokRhVxtUG3THzEpKtOau8mgq9qAUZ6FxhxIHm2","audience":"https://implicitgrant.auth0.voronenko.net","grant_type":"client_credentials"}'
we receive following response
HTTP/1.1 200 OK
Date: Mon, 06 Jan 2020 11:58:45 GMT
Content-Type: application/json
Content-Length: 883
Connection: close
Server: nginx
ot-tracer-spanid: 19efb150187ac510
ot-tracer-traceid: 01032ad94083ad4d
ot-tracer-sampled: true
X-Auth0-RequestId: c629c3e05e0881e81315
X-RateLimit-Limit: 30
X-RateLimit-Remaining: 29
X-RateLimit-Reset: 1578311926
Cache-Control: no-store
Pragma: no-cache
Strict-Transport-Security: max-age=15724800
X-Robots-Tag: noindex, nofollow, nosnippet, noarchive

{
  "access_token": "eyJ0eXAiOiJKV1QiLCJhbGciOiJSUzI1NiIsImtpZCI6IlF6bEZOak5CUmtZNVJqY3lOVVpCUmpJMU5qRkJOMFl4T0VNMVJFSXhNelU0TVVJeU5qa3dSUSJ9.eyJodHRwczovL2Zvby5jb20vY2xhaW0iOiJiYXIiLCJodHRwczovL2Zvby5jb20vc29tZWhvb2thdHRyIjoic29tZWhvb2thdHRydmFsdWUiLCJpc3MiOiJodHRwczovL3Zvcm9uZW5rby5hdXRoMC5jb20vIiwic3ViIjoiUjQ3N3pkMGRoRDBIcTNDbk5JRWdFNjc3bndib1lENXVAY2xpZW50cyIsImF1ZCI6Imh0dHBzOi8vaW1wbGljaXRncmFudC5hdXRoMC52b3JvbmVua28ubmV0IiwiaWF0IjoxNTc4MzEyMTM4LCJleHAiOjE1NzgzOTg1MzgsImF6cCI6IlI0Nzd6ZDBkaEQwSHEzQ25OSUVnRTY3N253Ym9ZRDV1IiwiZ3R5IjoiY2xpZW50LWNyZWRlbnRpYWxzIn0.zwpoOLe93yTt9dXidsVfBPCujsOdC37dHGpxBepU0vEJ4hLB0PiKOgpHd6XCr4VqaZWshlCtyGgS7xUNHjvg7RyIOn8AyXXX2q2FRVkStXNB7p88HizF79dENLfX5jSDqpHMLiP7F1FjMlzCpLnB9x4NCR_vIt4HQDj5lOqI7B55q1gx7UKSzY1qgMzm1U8rl8BsA9tFoEMfMwEvhtHhVXdijo_-XbLkjmX-646V_Fl2bJUpkneZF5ZDR-lbh7qfp995UwpQBRqVfNhupOUP1_OyeOm19VP8ka0RBRdYhQGkSwSsFGQ07kHbe0md-d9fIO-AJYimaci37QvlTYQAXQ",
  "expires_in": 86400,
  "token_type": "Bearer"
}
Using debugger at jwt.io lets decode payload
{
  "https://foo.com/claim": "bar",
  "https://foo.com/somehookattr": "somehookattrvalue",
  "iss": "https://voronenko.auth0.com/",
  "sub": "R477zd0dhD0Hq3CnNIEgE677nwboYD5u@clients",
  "aud": "https://implicitgrant.auth0.voronenko.net",
  "iat": 1578312138,
  "exp": 1578398538,
  "azp": "R477zd0dhD0Hq3CnNIEgE677nwboYD5u",
  "gty": "client-credentials"
}
Important: note, that extension attributes passed via custom name spaced uri was allowed, while un-namespaced custom attribute somehookattr was stripped out from the payload.
Known issues
No credentials found for given 'iss'
Please check, that iss returned in token payload,
should match to key field of the jwt token
In example above, "iss": "https://voronenko.auth0.com/" matches
to key attribute of the jwt key.
What's next?
If you start with kong with auth0, you will note, that in number of situations you would not be able to find flow of plugins
that ideally suits your needs. Fortunately that is not a dead lock, as you always can write your own kong plugin -
and this task is not so hard
Own plugin first steps
First step you need is to follow good boilerplate. Current recommended boilerplate for kong plugin can be found at https://github.com/Kong/kong-plugin where you can look for ideas
Own plugin implementation
Per my experince - success key with kong plugin development - is strict test driven development, and addressing all compiler warnings.
Take a look on a https://github.com/Voronenko/kong-plugin-sa-jwt-claims-validate plugin as an example - which was implemented to accomplish
specific jwt token data validations and thus offload microservices behind.
Usual plugin is compact: ig could consists just of two files - schema.lua , which describes "configuration" contract for the plugin. You can keep validations simple while you are the only consumer of the plugin, but per my experience you would like to invest more efforts into configuration validation once you start targeting wider audience. Reasoning is that it is harder troubleshouting of misbehaved plugin in a production environment, if plugin fails on a configuration (consumer provides wrong configuration options, but that is not handled by schema validations), it could be also not clearly seen in kong logs.
Second file is handler.lua - you would need to implement few hooks according to your plugin logic. Important parts to pay attention to:
plugin priority - as it controls order of your plugin execution in chain of other plugins during the request processing
local plugin = {
  PRIORITY = 1000, -- set the plugin priority, which determines plugin execution order
  ....
}
and access callback, which is the one that will be implemented in every custom plugin.
---[[ runs in the 'access_by_lua_block'
function plugin:access(plugin_conf)

  -- your custom code here
  kong.log.inspect(plugin_conf)   -- check the logs for a pretty-printed config!
  ngx.req.set_header(plugin_conf.request_header, "this is on a request")

end --]]
During callbacks implementation, pay attention to scope of the variables in lua - accidental exposing variable globally might lead
to unexpected issues during concurrent calls. You might also want to introduce detailed logging activated using plugin configuration.
By that moment it is the end for the introduction with Auth0 , kong and your custom plugin. Good luck in your journey. Dockerized environment can be found at https://github.com/Voronenko/kong-compose-template/