
Let’s Write a Chat App in Python
It’s Always Good to Have a Conversation!
Tkinter + sockets in less than 150 lines of code.
Not too frequently, you happen to create something astonishingly simple yet fun to use that you just can’t wait to share with the world.
That’s exactly what happened to me, so I’m here to share how I made a simple chat app with quite concise Python code. What’s more, I’ve implemented the code without any third party dependencies!
Let’s just dive in!
First, I created a chat server that could recieve incoming requests from clients wanting to communicate. For this, I used good ol’ sockets and a bit of multithreading.
Using frameworks like Twisted and SocketServer was an option, but that seemed like overkill to me for software as simple as ours.
The Server

Here’s how we begin our server script (for this app, there are just two scripts: one for server and another for client):
#!/usr/bin/env python3"""Server for multithreaded (asynchronous) chat application."""
from socket import AF_INET, socket, SOCK_STREAM
from threading import Thread
We will be using TCP sockets for this purpose, therefore we use AF_INET and SOCK_STREAM flags. We use them over UDP sockets because they’re more telephonic — the recipient has to approve the incoming connection before communication begins.
UDP sockets are a more post-mail sort of thing (anyone can send mail to a recipient whose address he or she knows), so they don’t really require an establishment of connection before communication can happen.
Clearly, TCP is more suited to our purpose than UDP sockets, therefore we'll use them. You can learn more about sockets here.
After imports, we set up some constants for later use:
clients = {}
addresses = {}
HOST = ''
PORT = 33000
BUFSIZ = 1024
ADDR = (HOST, PORT)
SERVER = socket(AF_INET, SOCK_STREAM)
SERVER.bind(ADDR)
Now, we break our task into accepting new connections, broadcasting messages, and handling particular clients. Let’s begin with accepting connections:
def accept_incoming_connections():
    """Sets up handling for incoming clients."""
    while True:
        client, client_address = SERVER.accept()
        print("%s:%s has connected." % client_address)
        client.send(bytes("Greetings from the cave!" + "Now type your name and press enter!", "utf8"))
        addresses[client] = client_address
        Thread(target=handle_client, args=(client,)).start()
This is just a loop that waits forever for incoming connections. As soon as it gets one, it logs the connection (prints some of the connection details) and sends the connected client a welcome message. Then, it stores the client’s address in the addresses dictionary and later starts the handling thread for that client. Of course, we haven’t yet defined the target function handle_client() for that, but here’s how we do it:
def handle_client(client):
    # Takes client socket as argument.
    """Handles a single client connection."""
    name = client.recv(BUFSIZ).decode("utf8")
    welcome = 'Welcome %s! If you ever want to quit, type {quit} to exit.' % name
    client.send(bytes(welcome, "utf8"))
    msg = "%s has joined the chat!" % name
    broadcast(bytes(msg, "utf8"))
    clients[client] = name
    while True:
        msg = client.recv(BUFSIZ)
        if msg != bytes("{quit}", "utf8"):
            broadcast(msg, name+": ")
        else:
            client.send(bytes("{quit}", "utf8"))
            client.close()
            del clients[client]
            broadcast(bytes("%s has left the chat." % name, "utf8"))
            break
Naturally, after we send the new client the welcome message, it will reply with the name he or she wants to use for further communication. In the handle_client() function, the first task we do is save this name and then send another message to the client regarding further instructions.
After this comes the main loop for communication: here we recieve further messages from the client and if a message doesn’t contain instructions to quit, we simply broadcast the messsage to other connected clients (we’ll be defining the broadcast method in a moment).
If we do encounter a message with exit instructions (i.e. the client sends a {quit}), we echo back the same message to the client (it triggers close action on the client side) and then we close the connection socket for it. We then do some cleanup by deleting the entry for the client, and finally give a shoutout to other connected people that this particular person has left the conversation.
Now comes our broadcast() function:
def broadcast(msg, prefix=""):
    # prefix is for name identification.
    """Broadcasts a message to all the clients."""
    for sock in clients:
        sock.send(bytes(prefix, "utf8")+msg)
This is pretty much self-explanatory — it simply sends the msg to all the connected clients, and prepends an optional prefix if necessary. We do pass a prefix to broadcast() in our handle_client() function, and we do it so that people can see exactly who is the sender of a particular message.
That was all the required functionalities for our server. Finally, we put in some code for starting our server and listening for incoming connections:
if __name__ == " __main__":
    SERVER.listen(5)
    # Listens for 5 connections at max.
    print("Waiting for connection...")
    ACCEPT_THREAD = Thread(target=accept_incoming_connections)
    ACCEPT_THREAD.start()
    # Starts the infinite loop.
    ACCEPT_THREAD.join()
    SERVER.close()
We join() ACCEPT_THREAD so that the main script waits for it to complete and doesn’t jump to the next line, which closes the server.
This completes our server script, which is presented in the following gist (for those who are reading this on smartphones, visit this link for the complete server code):
The Client

This is more fun beause we’ll be writing a GUI! We use Tkinter, Python’s “batteries included” GUI building tool for our purpose. Let’s do some imports first:
#!/usr/bin/env python3
"""Script for Tkinter GUI chat client."""
from socket import AF_INET, socket, SOCK_STREAM
from threading import Threadimport tkinter
Now we’ll write functions for handling, sending, and receiving messages. We'll start with receive:
def receive():
    """Handles receiving of messages."""
    while True:
        try:
            msg = client_socket.recv(BUFSIZ).decode("utf8")
            msg_list.insert(tkinter.END, msg)
        except OSError:
            # Possibly client has left the chat.
            break
Why an infinite loop again? Because we’ll be receiving messages quite non-deterministically, and independently of how and when we send the messages. We don’t want this to be a walkie-talkie chat app which can only either send or receive at a time — we want to receive messages when we can, and send them when we want.
The functionality within the loop is pretty straightforward; the recv() is the blocking part. It stops execution until it receives a message, and when it does, we move ahead and append the message to msg_list. We will soon define msg_list, which is basically a Tkinter feature for displaying the list of messages on the screen.
Next, we define the send() function:
def send(event=None):
    # event is passed by binders.
    """Handles sending of messages."""
    msg = my_msg.get()
    my_msg.set("")
    # Clears input field.
    client_socket.send(bytes(msg, "utf8"))
    if msg == "{quit}":
        client_socket.close()
        top.quit()
We’re using event as an argument because it is implicitly passed by Tkinter when the send button on the GUI is pressed. my_msg is the input field on the GUI. Therefore, we extract the message to be sent using msg = my_msg.get().
After that, we clear the input field and then send the message to the server, which, as we’ve seen before, broadcasts this message to all of the clients (if it’s not an exit message). If it is an exit message, we close the socket and then the GUI app (via top.close())
We define one more function, which will be called when we choose to close the GUI window. It is a sort of cleanup-before-close function and will close the socket connection before the GUI closes:
def on_closing(event=None):
    """This function is to be called when the window is closed."""
    my_msg.set("{quit}")
    send()
This sets the input field to {quit} and then calls send(), which then works as expected. Now we start building the GUI in the main namespace (i.e. outside any function). We start by defining the top-level widget and set its title:
top = tkinter.Tk()
top.title("Chatter")
Then, we create a frame for holding the list of messages. Next, we create a string variable, primarily for storing the value we get from the input field (which we will define soon). We set that variable to "Type your messages here." to prompt the user to write their message. After that, we create a scrollbar for scrolling through this message frame. Here’s the code:
messages_frame = tkinter.Frame(top)
my_msg = tkinter.StringVar() # For the messages to be sent.
my_msg.set("Type your messages here.")
scrollbar = tkinter.Scrollbar(messages_frame) # To navigate through past messages.
Now we define the message list, which will be stored in messages_frame and then pack in (at the appropriate places) all the stuff we’ve created until now:
msg_list = tkinter.Listbox(messages_frame, height=15, width=50, yscrollcommand=scrollbar.set)
scrollbar.pack(side=tkinter.RIGHT, fill=tkinter.Y)
msg_list.pack(side=tkinter.LEFT, fill=tkinter.BOTH)
msg_list.pack()
messages_frame.pack()
After this, we create the input field for the user to input their message and bind it to the string variable defined above. We also bind it to the send() function so that whenever the user presses return, the message is sent to the server.
Next, we create the send button if the user wishes to send their messages by clicking on it. Again, we bind the clicking of this button to the send() function. And yes, we also pack all of this stuff we created just now. Furthermore, don’t forget to make use of the cleanup function on_closing(), which should be called when the user wishes to close the GUI window. We do that by using the protocol method of top. Here’s the code for all of this:
entry_field = tkinter.Entry(top, textvariable=my_msg)
entry_field.bind("<Return>", send)
entry_field.pack()
send_button = tkinter.Button(top, text="Send", command=send)
send_button.pack()
top.protocol("WM_DELETE_WINDOW", on_closing)
(Almost) done. We haven’t yet written code for connecting to the server. For that, we have to ask the user for the server’s address. I’ve done that by simply using input(), so the user is greeted with some command line prompt asking for the host address before the GUI begins. It may be a little inconvenient, and you can add GUI for that, but I leave that to you as homework 🙂. Here’s my code:
HOST = input('Enter host: ')
PORT = input('Enter port: ')
if not PORT: PORT = 33000 # Default value.
else: PORT = int(PORT)
BUFSIZ = 1024
ADDR = (HOST, PORT)
client_socket = socket(AF_INET, SOCK_STREAM)
client_socket.connect(ADDR)
Once we get the address and create a socket to connect to it, we start the thread for receiving messages, and then the main loop for our GUI application:
receive_thread = Thread(target=receive)
receive_thread.start()
tkinter.mainloop() # Starts GUI execution.
That’s it! We’ve coded our chat application. Again, the complete client script is given in the following gist:
Demo
This feels great tested on multiple computers. You can, of course, run the server and the client on the same machine for testing (using 127.0.0.1 for HOST in your client), but seeing the communication happen in realtime among different computers feels awesome. The server script will log which IP addresses are accessing it and the client script will generate a GUI (after asking for the host address) similar to the following screenshots:
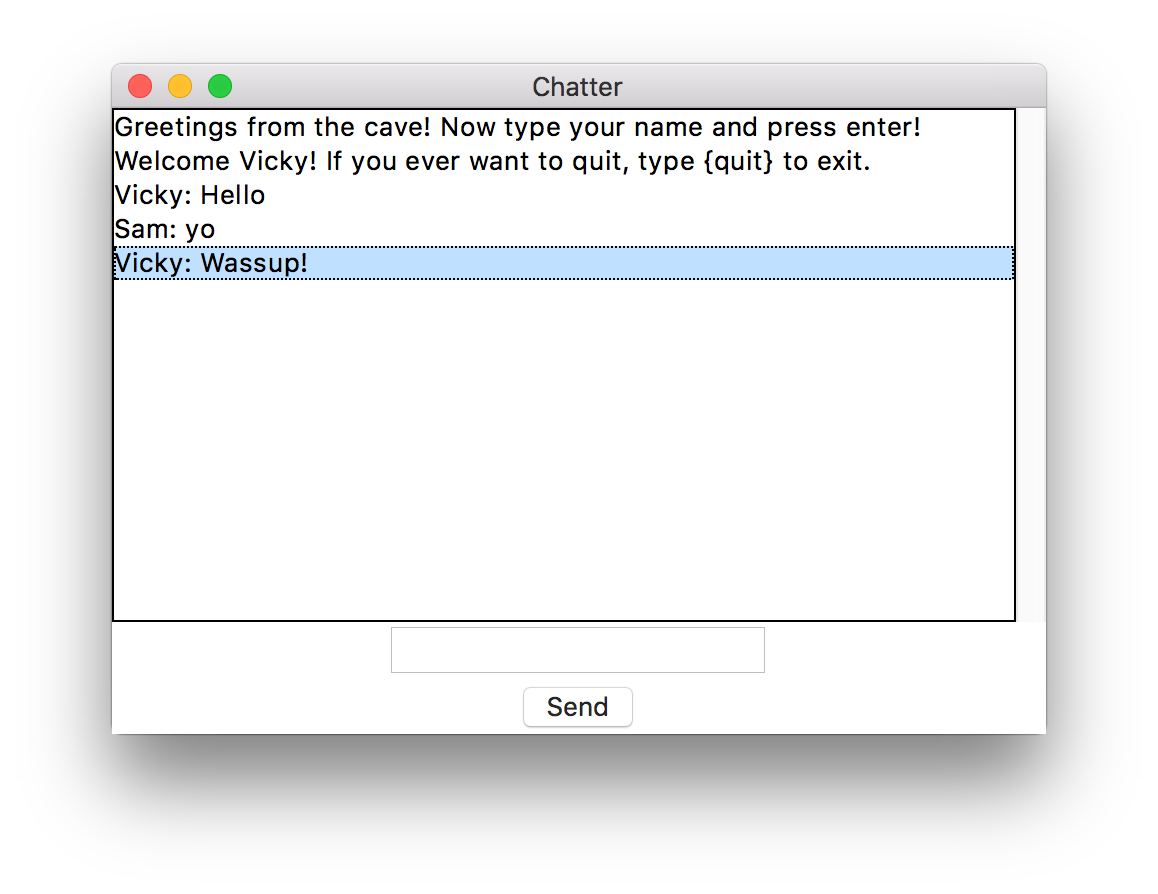
Client GUI

Another Client Connected to the Same Server
Honestly speaking, the GUI looks good, considering the number of lines of Python code behind it, but not great! I leave it to you to make this look better (and more intuitive), perhaps by making a left-right chat interface like Facebook’s Messenger. You may even use third-party libraries like Kivy for more beauty and cross-platform portability, or a Web interface instead - post your ideas in the comments. Finally, thanks for bearing with me and reading until the last character! I applaud your patience 🙂.
P.S: For my other projects (some smaller and others much larger), visit my GitHub profile.
Furthermore, I’m new to blogging, so constructive criticism is not only needed, but very much wanted! I’m open to better writing styles, techniques and pedagogy — feel free to mention them in the comments.

This post is originally published by the author on The Startup. This version has been edited for clarity and may appear different from the original post.
The server :D
I know python but for some reason I don’t understand this. How do I run a python server and client? Might be a stupid question
You typically run a server on your machine (usually with specialised hardware) to handle clients. Each of your users runs your client application which connects to the server and, in our case, facilitates chat.
It might be helpful to see the Wikipedia article on client-server architecture.
Can you give some insights on how to program and build bots?
Umm… Perhaps yes, but I need more details about your specific application.
Just for basic queries and responses to keep the consumer tied up!