
Upgrading the firmware of the Odroid Go.

“Black and white shot of assorted woodwork equipment on wooden wall, Broadstairs, Ramsgate, England, United Kingdom” by Sneaky Elbow on Unsplash
If you don’t know what the Odroid Go is, take a look at my introductory and assembly post to get up to speed.
This guide explains how to upgrade to the new style firmware. It is assumed you have some basic understanding regarding the Odroid Go firmware and that you are using a Linux OS. If this is not the case use the guide at the following URL: https://wiki.odroid.com/odroid_go/emulator/firmware_update#windows

Preamble
The Odroid Go’s firmware is in active development with new releases happening every few days. The way the software is packaged and delivered has changed drastically causing some confusion among users. In this post, I’ll go over the steps I used to upgrade my Odroid Go to the latest firmware version which includes among other things support for emulating the ColecoVision system.
Getting started
The Odroid Go comes with firmware version 20180627 of the box. The initial versions of the firmware were released as a single downloadable file that when executed would flash the bootloader and emulators. The newer format splits the code into the following units:
- A base firmware that is also a bootloader and a flasher
- A firmware.bin file containing the Go Play emulators
The base software of the Odroid Go’s microprocessor is called firmware but in this case, it also works as a bootloader and can flash the content of a file in the SD card into the flash memory of the ESP32 microprocessor. In this regard, this file behaves more like the BIOS of a computer.
The Go Play emulators package is also called firmware and distributed as a single file called firmware.bin. Think of this file an installable package. Instead of installing it using the computer and the USB cable, this file is copied to the SD card and the “BIOS” installs it by flashing it into the microprocessor.
The base firmware (“BIOS”) has to be flashed from the command line into the flash memory of the Odroid Go first. The latest version (20180718) can be found here: https://github.com/OtherCrashOverride/odroid-go-firmware/releases

Once downloaded, uncompress it and execute the following commands (text in bold are commands entered by the user, normal text is computer output).
Step 1: Uncompress the firmware (“BIOS”):
cd /tmptar -xvf ~/Downloads/odroid-go-firmware-bin-20180718.tgz

odroid-go-firmware-bin/
odroid-go-firmware-bin/esptool.py
odroid-go-firmware-bin/flashall.sh
odroid-go-firmware-bin/odroid-go-firmware.bin
odroid-go-firmware-bin/bootloader.bin
odroid-go-firmware-bin/partitions.bin
odroid-go-firmware-bin/eraseflash.sh
Step 2: Erase the flash memory of the Odroid Go:
cd odroid-go-firmware-bin./eraseflash.sh

esptool.py v2.3.2-dev
Connecting.....
Chip is ESP32D0WDQ6 (revision (unknown 0xe))
Features: WiFi, BT, Dual Core, VRef calibration in efuse
Uploading stub...
Running stub...
Stub running...
Changing baud rate to 921600
Changed.
Erasing flash (this may take a while)...
Chip erase completed successfully in 13.3s
Hard resetting via RTS pin...
Step 3: Flash the firmware (“BIOS”) into the flash memory area of the Odroid Go:
./flashall.sh

esptool.py v2.3.2-dev
Connecting....
Chip is ESP32D0WDQ6 (revision (unknown 0xe))
Features: WiFi, BT, Dual Core, VRef calibration in efuse
Uploading stub...
Running stub...
Stub running...
Changing baud rate to 921600
Changed.
Configuring flash size...
Auto-detected Flash size: 16MB
Flash params set to 0x0240
Compressed 24656 bytes to 14569...
Wrote 24656 bytes (14569 compressed) at 0x00001000 in 0.2 seconds (effective 969.9 kbit/s)...
Hash of data verified.
Compressed 3072 bytes to 201...
Wrote 3072 bytes (201 compressed) at 0x00008000 in 0.0 seconds (effective 5911.9 kbit/s)...
Hash of data verified.
Compressed 287760 bytes to 143254...
Wrote 287760 bytes (143254 compressed) at 0x00010000 in 2.4 seconds (effective 959.9 kbit/s)...
Hash of data verified.

Leaving...
Hard resetting via RTS pin...
Once the flashing process finishes, the Odroid Go will reset and display the following error message.

This is normal as this firmware (“BIOS”) acts as a bootloader plus a flasher and is looking for a firmware.bin file to flash (“install”) but is not finding any.
Download the latest Go Play emulators firmware.bin file from the repository.
Emulators update
Visit the URL https://github.com/OtherCrashOverride/go-play/releasesand download the firmware.bin file from the 20180718-smsplusgx pre-release:

Take the SD card from the Odroid Go, place it in an SD card reader and connect it to a computer. Copy the firmware.bin file to the root directory of the SD card. Go to the roms folder and create a new folder named col (to support the new ColecoVision emulator). Create another folder named col in the odroid/data folder. Eject and remove the SD card and place it back on the Odroid Go. Turn on the Odroid Go and the following screen should appear.
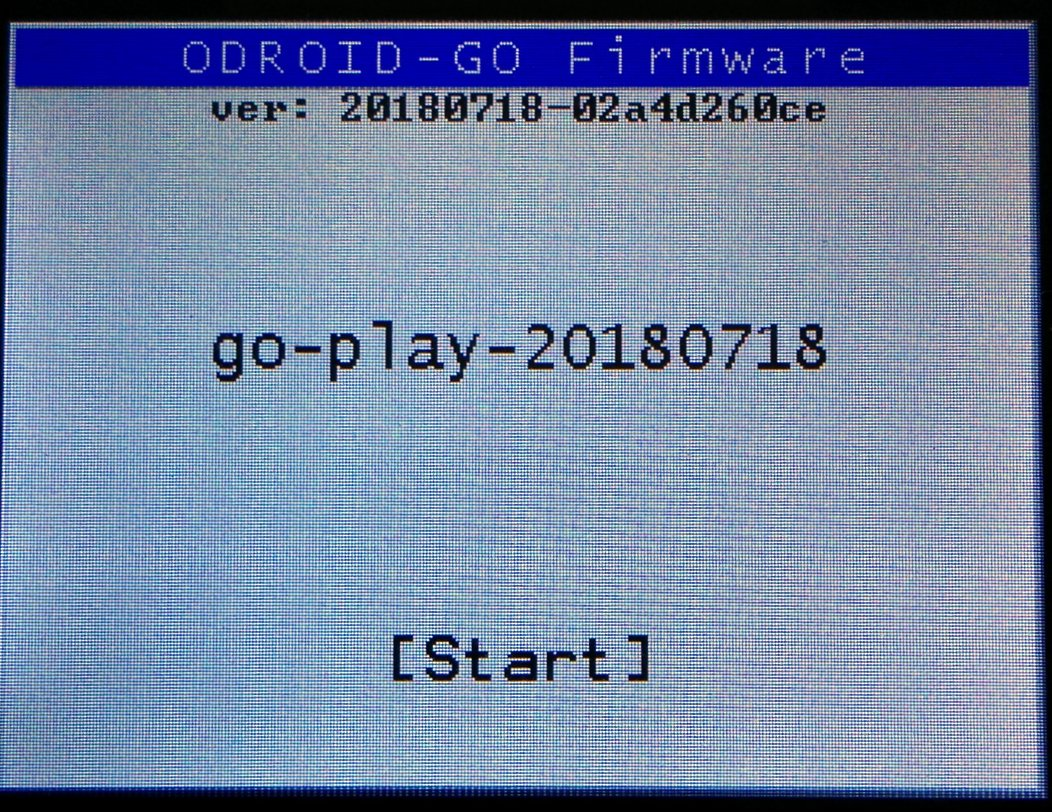
The firmware (“BIOS”) of the Odroid Go has detected the firmware.bin file in the SD card and is showing the release date of the file. Press the Start button to flash (“install”) the content of the firmware.bin file.


Go Play emulators flashing progress
Once finished, the Odroid Go will reset, boot up and show the main user interface menu. Take note of the version number at the bottom. It should read 20180718-a4227d52bd.
Enjoy the new features including the new ColecoVision emulator.

List of changes
This is the complete list of changes since the initial Go Play version included by default with the Odroid Go:
From 20180718-smsplusgx:
Notes:
- Device firmware 20180718 is required
- New SD card skeleton folders are required: “odroid/data/col” and “roms/col”
- SMS/GG save files are not compatible with new emulator.
- ColecoVison requires a BIOS file on the SD card to operate and is expected at “roms/col/BIOS.col”.
Springboard
- Add ColecoVision menu
- Increase menu wrap around speed
All Emulators
- Save/load from SD card
- Improve LCD display functions internally
GB
- Fix truncated sprites
- Fix CPU instruction emulation
SMS
- Replace smsplus with smsplus-gx (improved compatibly)
Coleco
- New emulator
- Select = Reset console, Start = Keypad 1, B = Left button, A = Right button
From 20180712:
Springboard
- Case insensitive sort.
GB
- Fix load/save of large SRAM
NES, GB, SMS
- Display SD card error conditions
From 20180710:
- [GB] Fix slowdown on some GB titles
- Disable audio amplifier when muted.
From 20180708:
Springboard enhancements
- Use Select/Start to move the file list by letter
- File lists wraps around using Left/Right
- Emulator list wraps around using Left/Right
Emulator enhancements
- [GB] Emulate LCD disabled
- [SMS] Disable debug message (slow down)
- [GB] Fix rendering issue with some titles
- [GB] Support large SRAM
- [GB] Fix palette issue on GB (not color) titles
- [GB] Fix sprite clipping (left side of screen)
- [NES] Add mapper 10
- Improve audio range (extra volume level)
- Next-gen firmware support
From 20180702-psram:
- [GB] Demand load page.
- [NES] Experimental workaround for PSRAM issue.
From 20180629-psram:
- Fix save data not being written to SD card
- Update partition table
- Ignore hidden files (start with “.”)
- Stability improvements
- Show splash screen on GB/GBC emulator at startup
From 20180628:
- Use PSRAM instead of flash for ROM data.
From 20180627:
- Scaling enable/disable [Start]+[Right].
- Fix load issue with some NES ROMs.
Conclusion
The transition to this new firmware style distribution might feel awkward. But, what the developers are achieving is very much worth the wait and the effort to follow up.
The developers are managing to create a new installation system that makes flashing the Odroid Go, from a computer, using a USB cable a thing of the past.
What this new firmware system achieves, is making the Odroid Go self-sufficient. It can now perform upgrades without requiring a separate computer, SDKs or command line utilities. Just copy the firmware.bin file to the SD card, turn on the Odroid Go while pressing the B button to boot up in flash mode and install the new firmware.bin file. Easy peasy!
If this post helped you out upgrading or unbricking you Odroid Go, click the little hand icon, it is very much appreciated. Thanks!