
How to create a custom context menu for your web application.
Before we begin, here's a preview of what we'll be creating.
Let's discuss a few use cases of a custom context menu.
- You wish to display a custom context menu in an area of your web app rather than the default one.
I've exhausted my use case examples, but I'm sure you can think up a few other ones.
Let's code!
First, we'll create a list of items that will represent our custom context menu using HTML.
    <div class="menu">
      <ul class="menu-options">
        <li class="menu-option">Back</li>
        <li class="menu-option">Reload</li>
        <li class="menu-option">Save</li>
        <li class="menu-option">Save As</li>
        <li class="menu-option">Inspect</li>
      </ul>
    </div>
Then, we'll add a few lines of SCSS to freshen up our custom menu. Make it look nice and clean.
.menu {
  width: 120px;
  box-shadow: 0 4px 5px 3px rgba(0, 0, 0, 0.2);
  position: relative;
  display: none;

  .menu-options {
    list-style: none;
    padding: 10px 0;

    .menu-option {
      font-weight: 500;
      font-size: 14px;
      padding: 10px 40px 10px 20px;
      cursor: pointer;

      &:hover {
        background: rgba(0, 0, 0, 0.2);
      }
    }
  }
}
To the main course
Whenever we right click to view a context menu on our page, an event is triggered. The event name is (you guessed it right) contextmenu.
Crazy, right? Not so much.
The first thing we'll do is to listen for this event, then prevent the default behavior from triggering.
window.addEventListener("contextmenu", e => {
  e.preventDefault();
});
Here we are listening for a contextmenu event on the whole window, but you can always specify a specific area rather than the whole window.
Now that we've cleared that up, we'll set up the display of our custom context menu right there in the event callback. We are going to be making use of two properties on the event object to determine where we'll display our menu. It's going to be the area where the user's click originated.
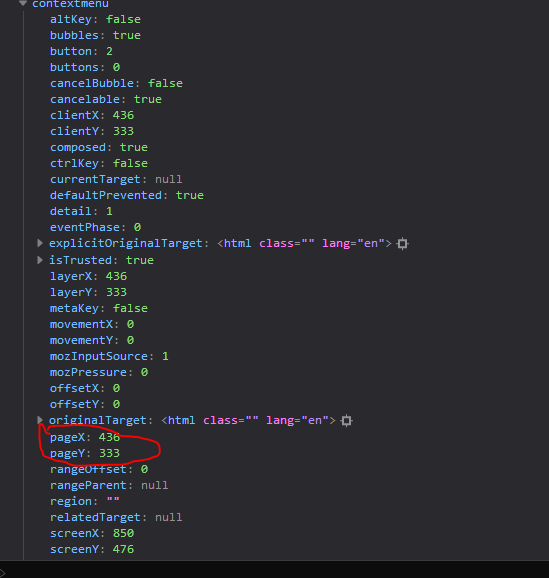
The pageX and pageY property of the event callback describes the position of the mouse when the request for a context menu was triggered. You'll want to place your context menu at that point. Let's update our JS code to reflect these changes.
const toggleMenu = command => {
  menu.style.display = command === "show" ? "block" : "none";
};

const setPosition = ({ top, left }) => {
  menu.style.left = `${left}px`;
  menu.style.top = `${top}px`;
  toggleMenu('show');
};


window.addEventListener("contextmenu", e => {
  e.preventDefault();
  const origin = {
    left: e.pageX,
    top: e.pageY
  };
  setPosition(origin);
  return false;
});
The toggleMenu function toggles the display of the menu and the setPosition function sets the position of the menu. The function names are really self-explanatory.
By now we should have a fully functional context menu but there's the issue of our menu not going away. It's just there. So we'll have to set up another event listener to hide our context menu if it is visible. To do this, we'll listen for a click event on the window or area where you've set up your custom context menu.
const menu = document.querySelector(".menu");
let menuVisible = false;

const toggleMenu = command => {
  menu.style.display = command === "show" ? "block" : "none";
  menuVisible = !menuVisible;
};

const setPosition = ({ top, left }) => {
  menu.style.left = `${left}px`;
  menu.style.top = `${top}px`;
  toggleMenu("show");
};

window.addEventListener("click", e => {
  if(menuVisible)toggleMenu("hide");
});

window.addEventListener("contextmenu", e => {
  e.preventDefault();
  const origin = {
    left: e.pageX,
    top: e.pageY
  };
  setPosition(origin);
  return false;
});
There's the final look of our JS file. We have a working context menu but, as usual, there are still a few enhancements we'll need for our context menu to be real classy.
- How to position the menu when the click is very close to the bottom or top of the window.
- Adding a few animations to smoothen the entry and exit of our menu.
It'll take just a few lines of code to achieve this. I believe you can figure it out.
Check out the codepen for the full code base. Hit me up on Twitter for any suggestions and issues @iamAfro
Hey great article! I have a few questions left unanswered though. How can you capture the click event from a specific menu item? Do you need to check in the click handler which menu item was clicked and if so how? Also, I was using this with a list of nodes in an expandable tree and when I for example click on a menu option, the click handler fires for every node, this was a bit unexpected, do you have any idea why this would happen? Thanks!
Hello Christopher,
To answer your first question of how to target a specific menu item, I’ve created a fork of the codepen and added a click handler for the menu option, you can find that here.
However, for your second question, I’m kind of lost in your problem. It’ll be more helpful to have an example to walk through. Maybe a snippet on codepen. Hope this helps
Thank you very much for sharing
Thanks for sharing. It’s cool to know how to create a custom context menu on the web.
Do you use it regularly? What are the appropriate use cases according to you?
Hii Cedric, I’ve never had to use a context menu in production, but it’s really cool being able to create one. About use cases, there are several web applications that make use of a custom menu.
You’ll know when it’s necessary to create one for your application. You’ll feel an itch. Lol 😅😅
Examples:
https://figma.com
https://codesandbox.com