
Everything you Need to Know About IntelliJ IDEA IDE
IntelliJ IDEA IDE for Java is the most powerful Integrated Development Enterprise. It is developed and maintained by JetBrains. This IDE is loaded with rich features and functionalities that, one can possibly imagine. In this tutorial, I’ll walk you through its important capabilities.
What is IntelliJ?
IntelliJ is a powerful IDE designed by JetBrains This particular IDE was created for importing, developing, modelling, and deploying computer software.
It is available in two versions, namely:
- Community Version (Free and Open-Source)
- Ultimate Version (Licensed version)
Features of IntelliJ IDEA IDE

Smart code completion : IntelliJ can predict exactly what are you trying to type. It follows context-based code completion.
- Chain code completion: It is an advanced feature, designed for auto code competition. This lists the applicable symbols through methods and getters in the present context.
- Static member’s completion: IntelliJ enables you to use static methods and constants that automatically adds the needed statements to avoid errors.
- Detecting duplicates: IDEA searches the duplicate code fragments on the go and gives suggestions to the user.
- Inspections and quick-fixes: When IntelliJ detects a mistake, a notification bulb pops up on the same line. Clicking on it gives you suggestions that will avoid you from making a mistake.
- Editor-centric environment: Instant pop-ups guide in checking additional information without leaving the present context.
- Shortcuts for everything: IDEA has shortcuts for nearly everything, including rapid selection and switching between tool windows.
- Inline debugger: Inline debugger enables the user to debug the application in IDEA itself.
Some equivalent IDE such as Eclipse has ground-breaking features and is capable give a cutting-edge competition to IntelliJ IDEA IDE, then How IntelliJ is a better choice?
Why choose IntelliJ?
Of course, IntelliJ and Eclipse are both the top-notch IDEs that the Eclipse Foundation and JetBrains respectively had to offer. But, JetBrains also added in some crucial characteristics which developers often look for.
- Debugging : In Eclipse press Ctrl+Shift+I to evaluate the expression. If you fail to select the complete expression, then eclipse cannot evaluate it. But in IntelliJ you just to hover over to the expression you wish to evaluate and press Atl+F8 and its done.
- Auto code complete : IntelliJ has the ability to decode the context and provide suggestions to the user.
- Code Refactoring : Unlike the other IDEs, IntelliJ offers intelligent code refactoring. It realizes what exactly you wish to type.
Installation of IntelliJ IDEA IDE
We will install IntelliJ from the official site of Jet brains and remember to choose the version as per your requirements. Few prerequisites are:
- A programming language like Python, Scala and Java. Here we shall choose Java.
- Download JDK and JRE.
- Set J ava Home and Java Path.
- Download IntelliJ IDEA IDE Community Version
- Go to downloads and extract IntelliJ
Let us first begin with Windows.
- Run the .exe file
- If you wish to work with some build tools and frameworks like Gradle, Maven and Spark, then you need to install them as well and set up the home path requirements for them too.
Now, let us begin with Linux.
Similar to Windows You need to download all the prerequisites here as well.
- Get into bin, execute idea.sh by using the following command on the terminal
./idea.sh
Now that we have successfully understood how to install IDEA in both the operating systems, let us understand how the user interface for this particular IDE looks like.
Getting Started with IntelliJ IDEA IDE
It is important that you must know how to interact with your IDE in order to be an efficient programmer. The typical User Interface of the IDEA looks as follows.
- Menu bar: Menu bar includes all the options for you to create new projects and code refactoring, auto code builds, run/execute code, code debugging options.
- Toolbar: Toolbar has the shortcuts to compile, debug and run functions.
- Navigation bar: The Navigation bar enables easier Navigation within a project. This feature comes handy as codebase increases.
- Tools tab: You can access crucial tools like databases, Maven, and Gradle build-tools and many more from the tools tab.
- Project perspective: Project perspective window holds packages, modules, classes, external libraries and many more.
- Editor window: Editor window allows a user to write code with highlighting and other important features.
Plugins: File –> Settings –> plugins.
Settings: File –> Import/Export Settings –> OK
Configuring JVM Options and Platform Properties: Help –> Edit Custom VM Options.
Now that we got basic Idea about all the functionalities available on the instrumental cluster, let us start executing some basic programs.
Basic Operations in IntelliJ IDEA IDE
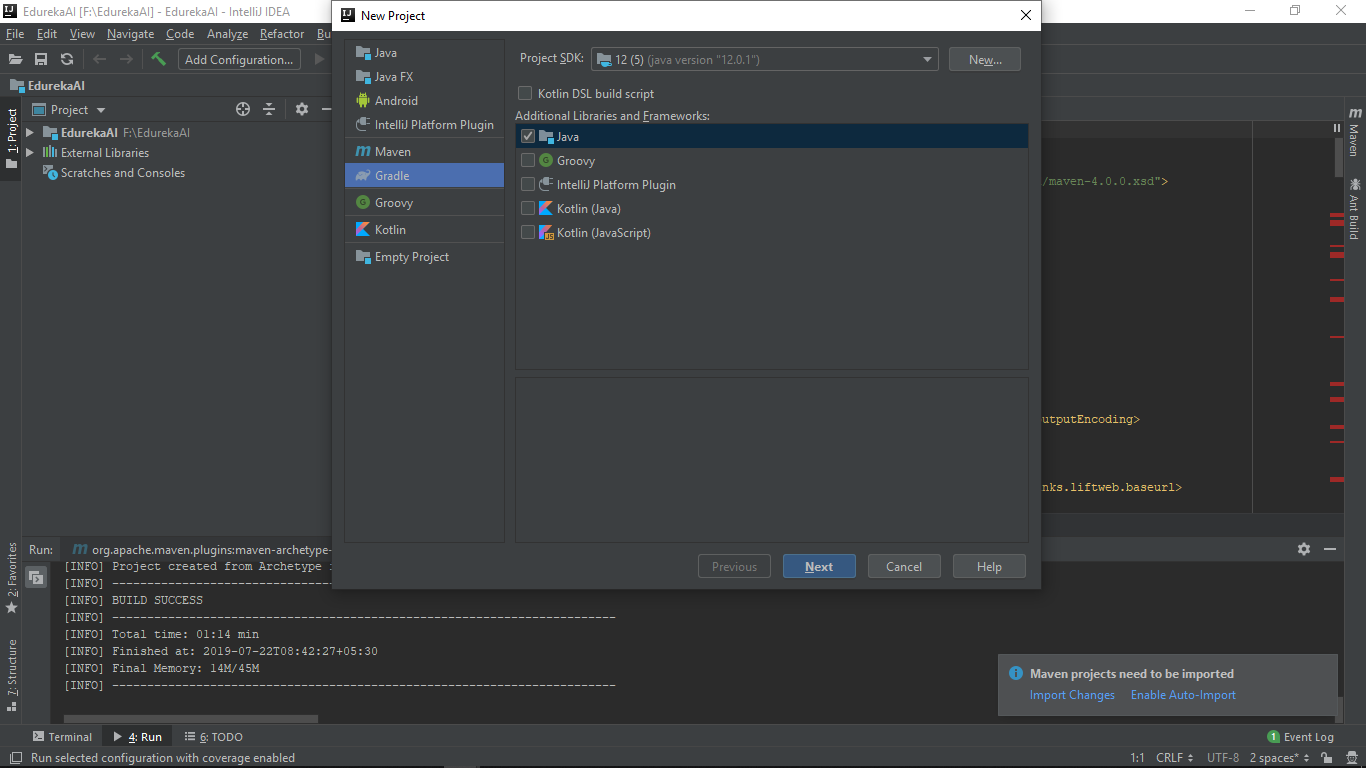
Once you fire up IntelliJ, You can find different options to start with a project. the picture below depicts the various options available to start with a project.
Let us first try to create a simple project by using the create option.
- left menu –> Java from the options available.
- Select a Project SDK. We can choose JDK by proving the JDK location in your system..
- Provide a title to your project and select Finish to create your project.
If you have a project in your Local File System and you would like to run it. Then, all you have to do is, just import the project execute it.
For example, I have a Java file in my local system which I would like to run using the IntelliJ IDEA IDE. I can do it by opening it from the File options and open it from its location.
The Additional operations available in IntelliJ are as follows:
- Unit Testing
- Debugging
- Rename
- Find and Replace
- Safe Delete
Unit Testing
Unit Testing can be defined as a procedure where individual units of the source code are run against tests associated with usage procedures and operating procedures in order to find out if they are fit for usage or not. Unit Testing in IntelliJ can be achieved by following these steps below:
- Navigate –> test –> create test
- Next, another dialogue box will pop up, where, you must allocate the testing library, class details, setUp, tearDown methods and your preferences
- Click the OK button and execute the program
- IntelliJ will suggest you if there are any prerequisites missing. Add those Jar Files by downloading them.
- Here, I have selected JUnit.Jar
- After this step, IntelliJ will create a new Unit Test Program
- Now, you have to select the code Editor
- Go to the Run menu –> Run
//Unit Testing code
package Unit;
public class HelloWorld {
    public static void main ( String[] args ) {
        sayHello ( "Hello World...!" );
}
    static void sayHello ( String msg ) {
        System.out.println ( msg );
    }
}
//UnitTest Code by IntelliJ
junit.framework.TestCase;
public class HelloWorldTest extends TestCase {
    public void setUp () throws Exception {
        super.setUp ();
}
   public void tearDown () throws Exception {
     }
   public void testSayHello () {
     }
}
Debugging
Java IntelliJ IDEA IDE comes with a Built-in Debugger. The debugging process is made easier with this In-built Debugger. The Debugger enables us to set break-points in the code, so, that we can stop the execution of the program at a certain point and take a step in to inspect the code and its variables.
We can execute the Debugging process by following these steps below:
- Select the line where you wish to drop a break-point and click on the gutter to set a break-point.
- The break-point will be highlighted by a red glowing point.
- Right-click on the glowing point and select more options to add in your preferences.
- Now, go to the Run option on the toolbar and select the Debug option.
Find and Replace
IntelliJ also supports Find and Replace options. You can do it by using the shortcut Ctrl + Shift + R keys, this will result in a pop-up window (as shown below) which will ask you for the keys to be found and then its asks for the word to be replaced with the currently found word throughout the program.
Rename
IntelliJ IDEA IDE supports Rename operation. You can use the Rename operation by selecting the word and hovering to Refactor option, then, select the Rename option as shown below.
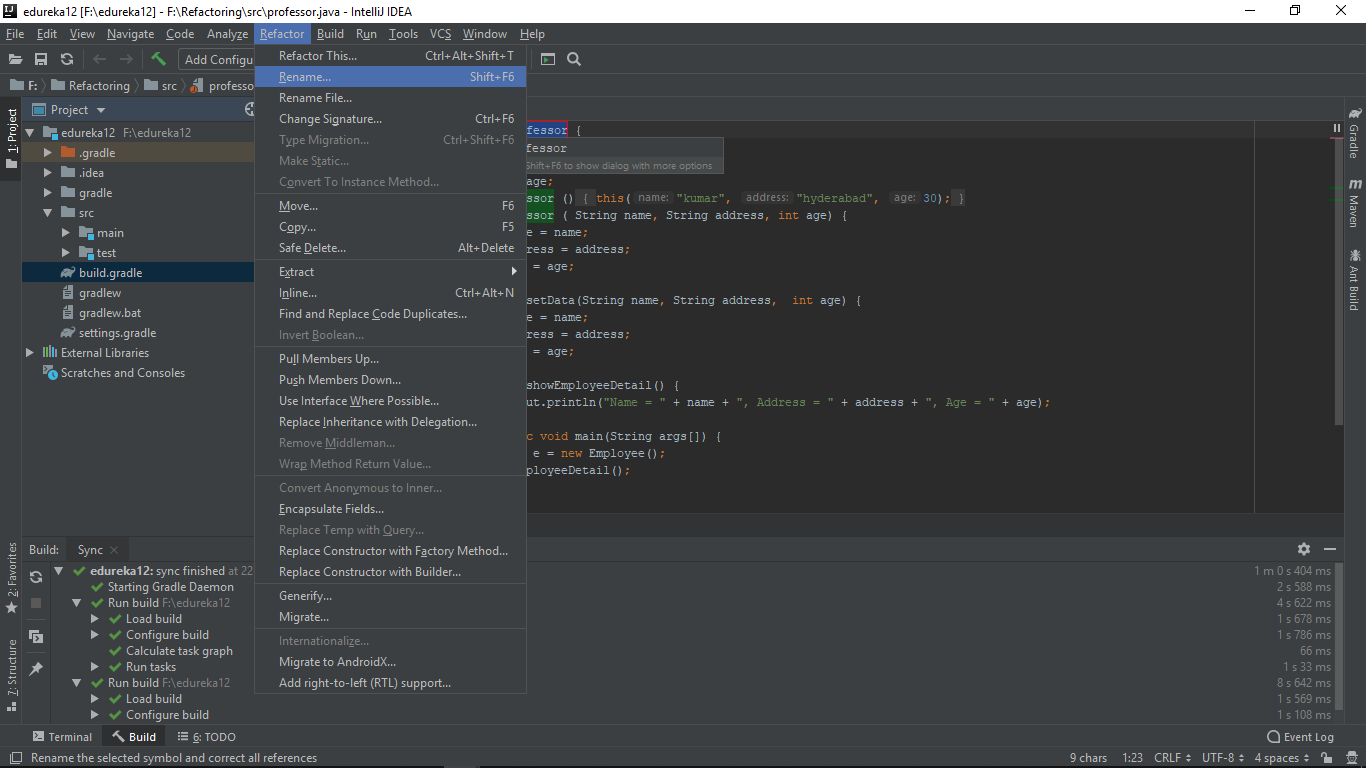
In the above code, I wish to apply Code Refactor Operation where I would rename Professor to Student. This will result in changing the class, objects and all other operations related to Professor will be changed to Student.
Safe Delete
We can try to delete a code segment by using the Safe Delete option. The code will be deleted only if the participants of that particular code segment are not participating in the execution of the remaining code.The delete command can be executed by pressing Alt + Delete keys together.
Now we shall try out some major build tools. I shall explain to you some build tools like Maven and Gradle and other ones are also used and executed in a similar manner.
Build Tools in IntelliJ
Maven
To begin with, the Maven project, let us follow the steps below.
To work with Maven, you need to download and install Maven in your system and also set the home and path variables for Maven.
- Select File –> new –> project
- Select the Maven Project option
- Set up the GroupID and the ArtifactID
- Select next –> finish
- The terminal downloads all the dependencies for the project
- Select the Auto-Import option.
//Pom.XML
</pre>
<?xml version</span><span>="1.0" </span><span>encoding</span><span>="UTF-8"</span><span>?>
<project xmlns="http://maven.apache.org/POM/4.0.0" xmlns:xsi ="http://www.w3.org/2001/XMLSchema-instance" xsi : schemaLocation ="http://maven.apache.org/POM/4.0.0 http://maven.apache.org/xsd/maven-4.0.0.xsd">
<modelVersion>4.0.0</modelVersion>
<groupId>com.edureka</groupId>
<artifactId>edureka</artifactId>
<version>1.0-SNAPSHOT</version>
<packaging>jar</packaging>
<dependencies>
   <!-- https://mvnrepository.com/artifact/com.google.code.gson/gson -->
    <dependency>
       <groupId>com.google.code.gson</groupId>
        <artifactId>gson</artifactId>
       <version>2.8.5</version>
    </dependency>
</dependencies>
</project>
To run this program, the IntelliJ requires Gson Dependencies in its Pom.XML file, You can download all the required dependencies from the Maven Respository.
Similarly, let us get started with a Gradle project.
Gradle
You can begin with a Gradle project by following the steps below:
To work with Gradle, you need to download and install Gradle in your system and also set the home and path variables for Gradle.
- Select File –> toolbar
- Select New –> Project
- Select the Gradle project option
- Similar to the Maven Project, you have to select a GroupID and ArtifactID for your project and click on next
- Select the Auto-Import –> next –> Finish
//Code
package edurekagraddle;
public class factorial {
public static void main(String args[]){
int i,fact=1;
int number=5;//It is the number to calculate factorial&amp;amp;lt;/pre&amp;amp;gt;
for(i=1;i&amp;amp;lt;=number;i++){
fact=fact*i;
}
System.out.println("Factorial of "+number+" is: "+fact);
}
}
Let us try to work with MySQL and Databases. in IntelliJ IDEA IDE.
MySQL
You can begin with a MySQL project by following the steps below:
To work with MySQL, you need to download and install MySQL in your system and also set the Local Host using XAMPP.
- To begin with a MySQL based program, I have selected a Maven Project
- I have filled up all the credentials for getting started with a Maven Project.
- I have started XAMPP application and in that, I have started MyQSL and Apache.
- Using my LocalHost, I have set up a Database by name Edureka
- Inside the database, I have created an employee table with 3 entities namely, uname, uid, and salary
- My code is designed to access and print the user names in the Edureka Database as shown below.
//Pom.XML
<?xml version="1.0" encoding="UTF-8"?>
<project xmlns="http://maven.apache.org/POM/4.0.0" xmlns:xsi="http://www.w3.org/2001/XMLSchema-instance" xsi : schemaLocation="http://maven.apache.org/POM/4.0.0 http://maven.apache.org/xsd/maven-4.0.0.xsd">
   <modelVersion>4.0.0</modelVersion>
  <groupId>com.edureka.MySQL</groupId>
  <artifactId>MySQL</artifactId>
  <version>1.0-SNAPSHOT</version>
  <dependencies>
      <!-- https://mvnrepository.com/artifact/mysql/mysql-connector-java -->
     <dependency>
            <groupId>mysql</groupId>
           <artifactId>mysql-connector-java</artifactId>
          <version>5.1.6</version>
        </dependency>
    </dependencies>
</project>
To run this program, the IntelliJ requires MySQL Dependencies in its Pom.XML file, You can download all the required dependencies from the Maven Respository.
Now, Last but not the least, achieving the pro mode, let us quickly grasp some important shortcuts we have on our IDE which makes our programming methods seamlessly simpler and efficient.
Shortcuts in IntelliJ IDEA IDE
With this, we come to the end of this IntelliJ IDEA IDE tutorial. I hope you understood how to install this IDE and what are the prerequisites for installation, the basic operations and build tools supported in IDE.
Got a question for us? Mention it in the comments section of this “IntelliJ IDEA IDE” blog and we will get back to you as soon as possible.