
How I automated the boring University stuff with Python
Hello,
I'm a second year CS Undergrad from India. I love Python. This is my first article here on the dev.to community. So let's begin!
My college has a general student - login, where students can view their profile, upload assignments, get due dates, download course materials, and stuff.
But the site is kind of tedious to navigate through, and hence I decided to use python to automate the boring stuff. One of them is the Assignment Reminder Service.
As for this article, you need to know a bit about how the web request - response model works and simple python knowledge. It will be split into two parts.
Here we go!
The Reminder Service
In my first year, due to my laziness, I tended to miss certain Digital Assignment Uploads.
To counter this, I learned Web Scraping using Python.
This is a resource I found useful:
https://www.dataquest.io/blog/web-scraping-tutorial-python/
Once I learned how to use the BeautifulSoup and Requests libraries, it became quite clear that if we sequentially emulate what the browser does, we can work with the HTML/JSON responses that we get.
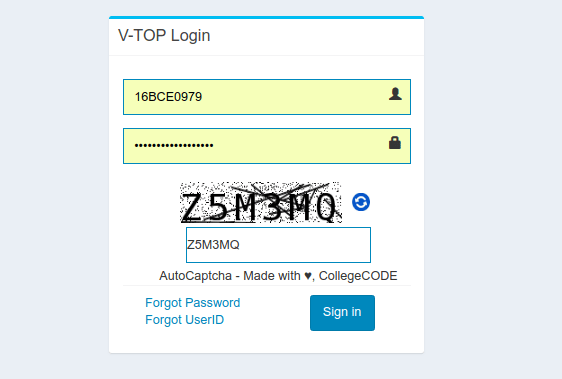
I would also have you know, as a project in my first year, I developed a cracker for the Captcha that is present in the student login. The captcha looks like this:

I have written up a simple article explaining how I did that here on Dev.to.
You can find the repository on my GitHub profile. Here's the link.
The chrome developer tools are pretty handy, and I used the network monitor in it.
The logic I used was this:
- Opened the Website, and in developer tools opened the network monitor tab.
- Observed the requests being sent and their details(headers, form - data, URL, method)
- For example, if a request looks like this:
method = POST, form-data = {'uname': "username", 'passwd' "password"}, url = "https://example.com/login", headers = {"User-Agent":"blah blah"}
- What I did was with python, emulate the request. So the request in python syntax would be:
import requests from bs4 import BeautifulSoup response = requests.post( "https://example.com/login", # URL {'username': "username", 'password' "password"}, # form-data headers = {"User-Agent":"blah blah"}, # headers verify=False # this simply disables SSL security check ) root = BeautifulSoup(response.text, "html.parser") print(root.prettify()) # pretty prints the response HTML
The assignment page looks like this:

- This way, I was able to acquire the HTML content and then wrote few lines to navigate to the assignments page. Once that was done, I used BeautifulSoup, a parsing library in python.
- What BeautifulSoup does is, parse the HTML response into a tree-like structure, and if I want to navigate to a lower branch I can simply go to the next child and so on. The documentation link is mentioned above.
- A list of all the pending assignments is returned, in a dictionary-list format after parsing each link.
- Next thing to do was sync it with the Google Calendar API. The documentation is on - point and pretty easy to understand and implement. The quickstart guide is more than enough to get started.
- Wrote some lines of code that do sanity checks, and finally, request the google calendar API by creating an event, and the code looked like this.
# Refer to the Python quickstart on how to setup the environment:
# https://developers.google.com/calendar/quickstart/python
# Change the scope to 'https://www.googleapis.com/auth/calendar' and delete any
# stored credentials. event = { 'summary': 'Data Structures Assignment - 1', 'description': 'Theory Assessment', 'start': { 'dateTime': '2018-03-28T09:17:30+05:30', 'timeZone': 'Asia/Kolkata', # my timezone }, 'end': { 'dateTime': '2018-03-28T17:18:30+05:30', # 12 midnight is the deadline 'timeZone': 'Asia/Kolkata', }, 'recurrence': ['RRULE:FREQ=DAILY;COUNT=1'], 'reminders': { 'useDefault': False, 'overrides': [{'method': 'email', 'minutes': 24 * 60}, # a day before start {'method': 'popup', 'minutes': 100}, # 100 minutes before start], },
} event = service.events().insert(calendarId='primary', body=event).execute()
print 'Event created: %s' % (event.get('htmlLink'))
- I wrapped this snippet into a function, and for every pending assignment called the function which added the event to my calendar.
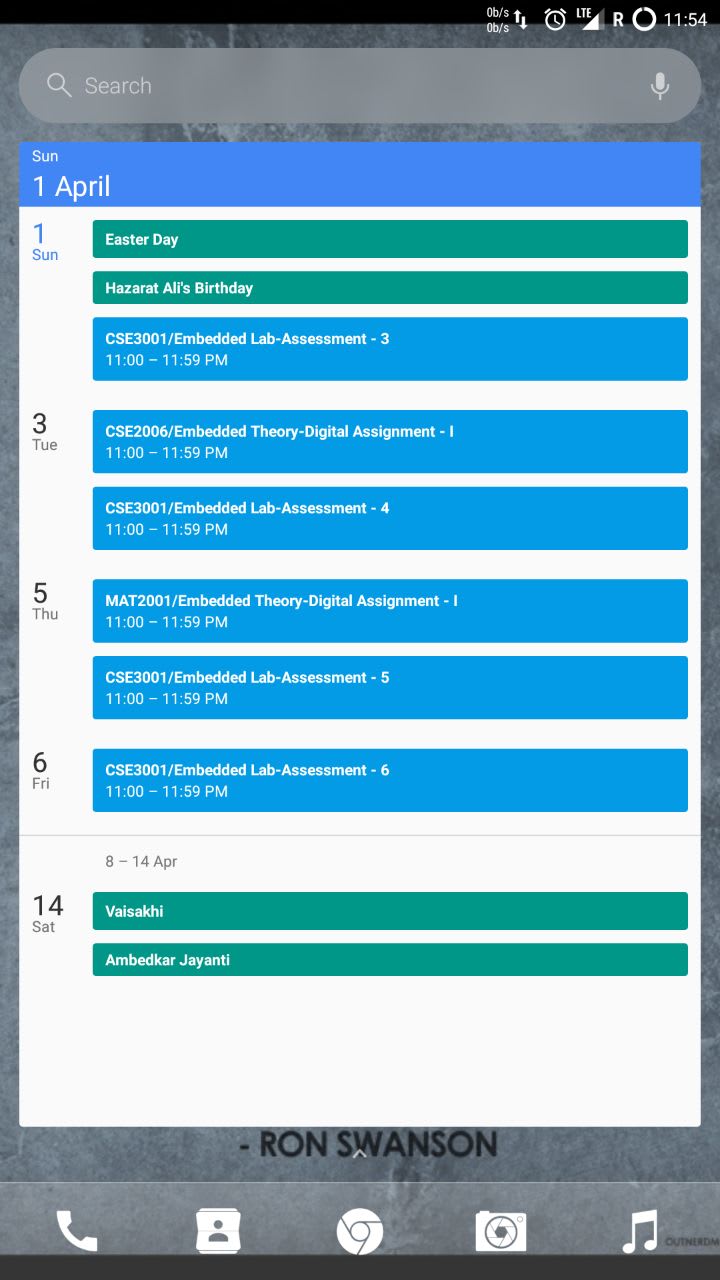
- And voila! All my assignment due dates showed up on my calendar, and I could use them on my phone. This is how my home-screen widget looks:

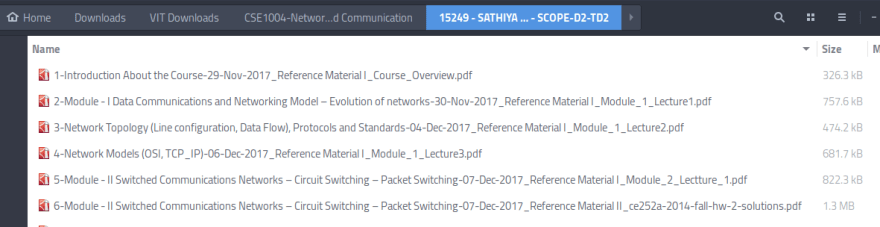
In addition to this, I developed a chrome extension that automatically cracks the captcha and fills the textbox. It also managed downloads from the university website, categorizing them on the basis of course code and faculty name, and organizing into the respective folders. How the course resources page looks:

How the downloads are saved without the extension:

How the downloads are saved when I download them via the extension:
You can view the extension page, it has over 1500 users, who are students here at my college. It was great fun learning to build using JavaScript!
Bonus!
This one is partial automation, but you can still have a read! Highly Practical.
In order to be more productive, I planned to use Google Sheets' Daily Schedule Template. This is basically a week-long activity chart that has days for columns, and times for rows. My current week looks like this:

The red colored regions imply that I won't be available at the time.
The beauty of this was that since my timetable always remained the same for an entire semester, all I had to do was sit for like 15 minutes on every Sunday night, and plan the entire week.
Now what I wanted was, to sync it to the Google Calendar, so I could see what I've planned on my phone. The method I used is as follows:
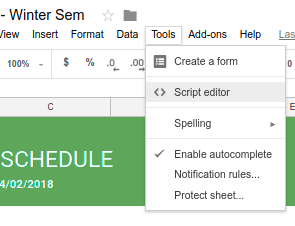
- Fill in the schedule sheet. While you're at it, adjust the times accordingly. On the top bar, navigate to Tools -> Script Editor.
- The Script Editor is for Google Scripts, that lets you create JavaScript functions to perform while using Google apps APIs. Here is a sample code snippet you can use. Note that we'll be using the indexes for the same template
var cal = CalendarApp.getDefaultCalendar(); var dayOffset = 0; // replace this with the loop index var currSheet = SpreadsheetApp.getActiveSheet(); // gets the currently active sheet var startTimeString = currSheet.getRange(row, column).getValue() // replace row and column with desired values var startTime = new Date(startTimeString); startTime.setDate(startTime.getDate() + dayOffset); var endTime = new Date(startTimeString); endTime.setDate(startTime.getHour() + 1); var title = currSheet.getRange(row, column).getValue(); // specify the row and column of the cell cal.createEvent(title, startTime, endTime); // creates the event in calendar and syncs it }
- This is just a sample snippet, but you should have an idea. Adjust it according to your will, use it in a loop to sync all times. I kind of hard-coded it as I was too lazy to look at some of the APIs.
- Here's my code that should work for a template with a small change - The time-rows weren't in a macro and were strings, so I converted them to a macro using this simple formula:
=C2 + 0.0416666 * <hour_number>
Here, C2 is the current week cell. To adjust a cell's property, click on a cell, and head over to the macro section right above the index cells.

The hour number if it is 8, then it will equalize to 8:00 AM. I made this change to all the other times, as I wanted an hour wise split up. Here is the script I use now. "0.041666" is basically 1/24th of the day = an hour.
function myFunction() { var cal = CalendarApp.getDefaultCalendar(); var currSheet = SpreadsheetApp.getActiveSheet(); var times = currSheet.getRange("B6:B20").getValues() var weekDate = currSheet.getRange("C2").getValue() var columns = ["C","D","E","F","G","H","I"] var offSet = 6; var totalDays = 7; var totalRows = 15; for(var i = 0; i < totalDays ; i++) { var column_no = columns[i] + "5:" + columns[i] + "20"; var schedule = currSheet.getRange(column_no).getValues(); for(var j = 0; j < totalRows; j++) { var startTime = new Date(times[j]); startTime.setDate(startTime.getDate() + i); var title = currSheet.getRange(columns[i] + (offSet + j).toString()).getValue(); if(title === ""){ continue; } var startTZoffSet = 240; // adjust hour in timezone var endTZoffSet = 180; // adjust hour in timezone var correctedStart = new Date(startTime.getTime() + (60000*(startTime.getTimezoneOffset() - startTZoffSet))); var correctedEnd = new Date(startTime.getTime() + (60000*(startTime.getTimezoneOffset() - endTZoffSet))); cal.createEvent(title, correctedStart, correctedEnd); } }
}
I ran this script, and all the events got synced to my google calendar.
So this is how I've automated some stuff in my college. Let me know if there is anything I can help you with, or if you have any suggestions, in the comments!
dev.to is where software developers stay in the loop and avoid career stagnation. Signing up (for free!) is the first step.
nice