
Let’s Build A Decentralized Game Economy Using Blockchains
Decentralization and Creating Your Own Cryptocurrency
With crypto mania currently at fever pitch, you’d be hard-pressed to not have heard about Bitcoin, Ethereum, cryptocurrencies and blockchains. Even here in Makati, I hear random people talk about Bitcoin in coffee shops and at the supermarket queue.
What is a blockchain though? And, as a game developer, is it something that I can use in making games? I’ve found a lot of content online that answers the first question, but haven’t seen as many answering the second.
Blockchains are currently disrupting the fundraising space and, in my opinion, have the potential to disrupt the game industry as well. My hope with this post is that more game developers will learn about blockchains, and use them to make new kinds of games enabled by the technology.
But first, why should we use a blockchain to create a game economy?
Blockchains, cryptocurrencies, and economies are deep topics that we won’t delve into in this article, but we will touch on one aspect of blockchains: decentralization. I highly suggest reading this post by Adam Ludwin on understanding cryptocurrencies. It’ll not only explain what decentralization is, but will clearly discuss the fundamentals.
As we mentioned, blockchains have the capability to create decentralized applications, or applications that aren’t run by a central authority.
The game industry actually runs on several systems that rely on these central authorities. Blockchains have the potential to disrupt these, for better or worse.
As an example, let’s look at the current Free-to-Play economic model:

The current Free-To-Play (F2P) economy. Value is transferred across the economy via fiat currency and incentivized actions
In the current Free-To-Play economy, the Ad Networks and the App Stores are the central entities from which value flows in and out of. Value in this case is ‘fiat currency’, meaning any currency backed by a government, like US Dollars or Philippine Pesos. This value is earned by a Game Developer whenever a Player pays via an in-app purchase or watches an ad.
This model has been the standard for the past few years, and consequently has been a powerful economic force that influences game design.
Twitch games that show an ad every few seconds are optimized for this ecosystem. Gacha games that make use of opaque Loot Box percentages, similarly, are designed for players to spend a lot of fiat currency in in-app purchases or microtransactions.
What if games were designed outside of this economic model? What if developers are able to decentralize value away from Ad Networks and App Stores, and instead design the economy themselves?
Blockchains and Smart Contracts provide that option. The Ethereum Blockchain, in particular, allows developers to create their own cryptocurrency, as well as define the rules that allow the cryptocurrency to flow across users.
For our example, we’ll be creating an ERC20 Token, or a standard Token that can be used on the Ethereum Blockchain. The goal for the Token is for us to be able to create a game economy where players are able to freely transfer value to their peers, and also in the future be able to take that value out of the ecosystem if they wanted. An overview of the model is shown below.
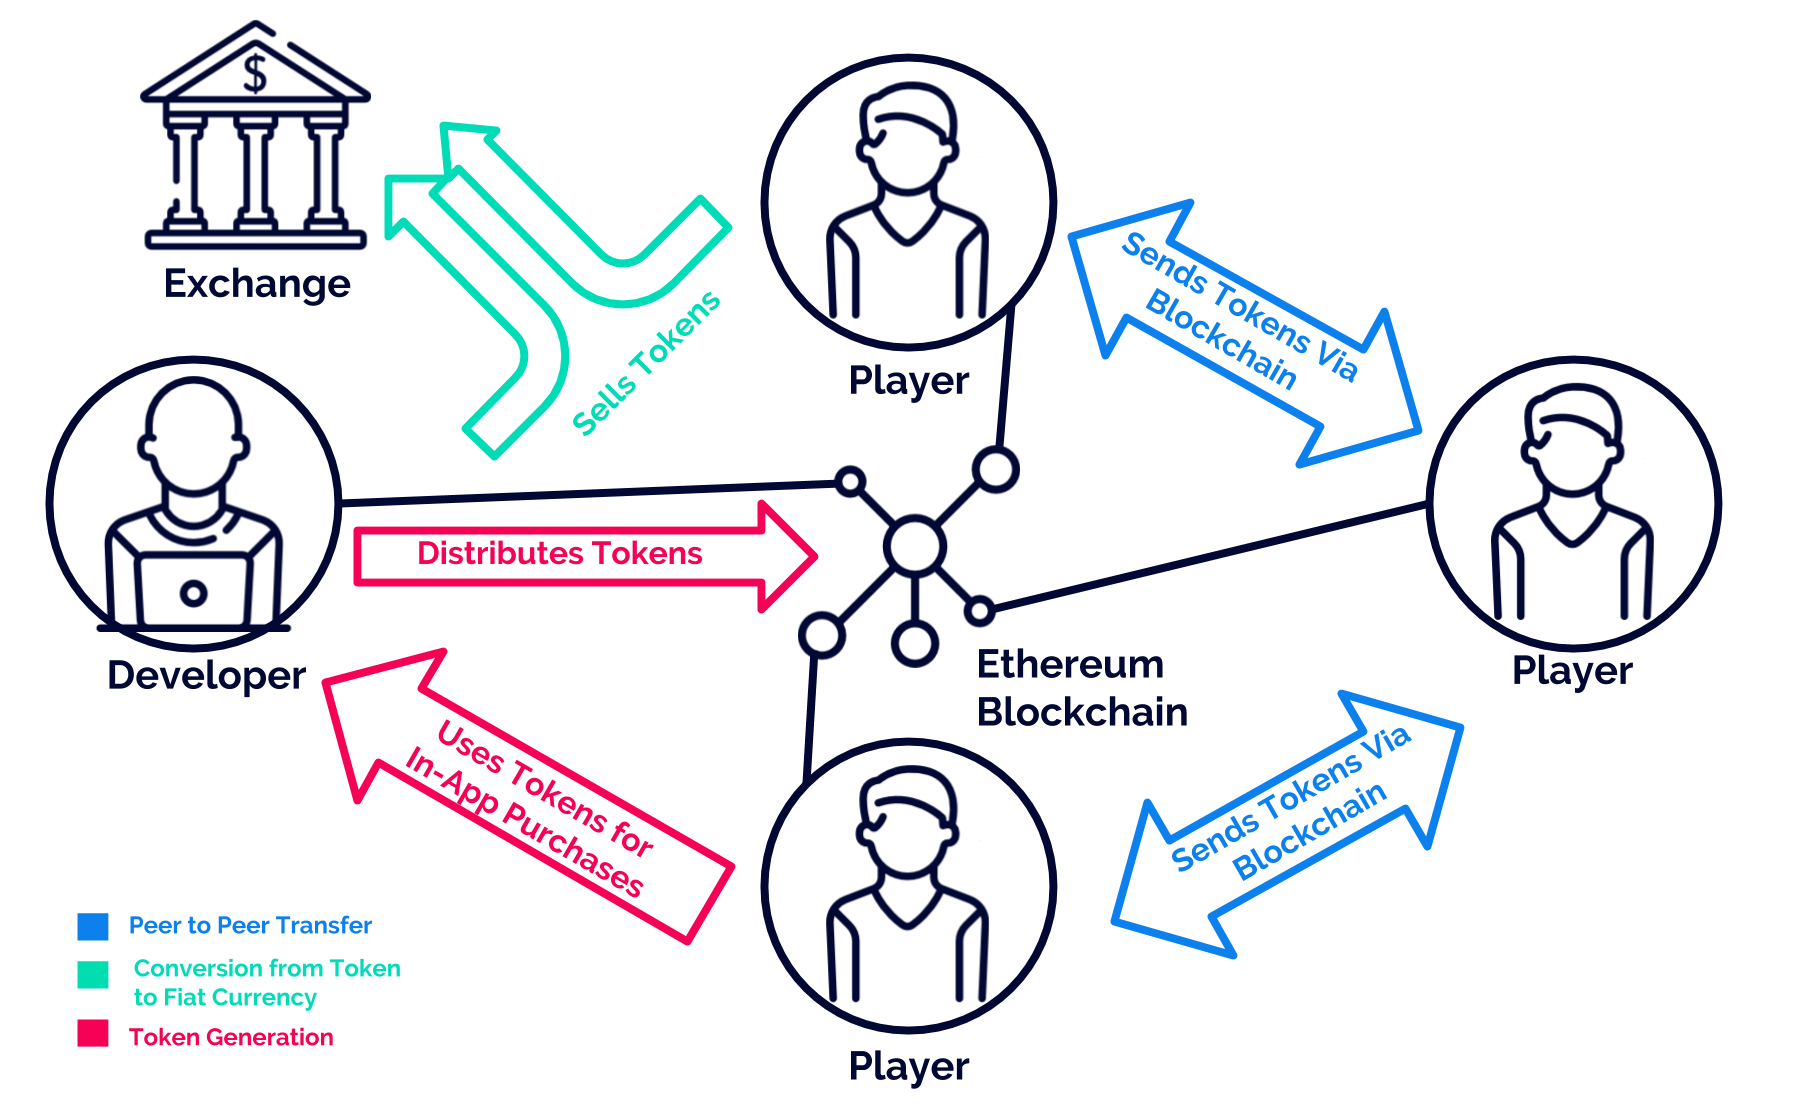
Our sample decentralized game economy
Let’s get started!
In order to set up our game economy, we’ll need to accomplish 6 steps —

1. Create Wallets Using Metamask
The first thing we need to do is to create a Wallet that will deploy the Token Contract that creates our Token. This Wallet will also initially hold all the tokens that will be created by the Contract.
One of the easiest ways to create a Wallet is via the Metamask Chrome Browser Extension. Let’s install the extension from the Metamask site and create a Metamask account.

Once installed, click the Metamask icon on the Taskbar
After creating a Metamask account, we’ll see that Metamask has already created a Wallet for us called ‘Account 1’. We’ll be using this Wallet to deploy the Contract in Step 2.
While we’re here though, let’s also create another Wallet which we’ll use to test for transferring Ether (ETH) and our created Token. Let’s also rename the Wallets to ‘Bank’ and ‘User’ for easier reference. The gif below shows how to do this.
2. Create Token Contract Using Remix
Next we’ll create our Token by deploying a Token Contract on the Ethereum Blockchain. We’ll be deploying the sample Token code from Ethereum using the Remix IDE.
In order to deploy a contract though, we will need to have ETH to pay for the transaction fee. On the Main Ethereum Network this will mean having to buy ETH from an exchange, but on Test Networks we can easily get ETH by using faucets. For this whole process we’ll be using the Ropsten Test Network.
Let’s use Metamask to buy from a faucet — first let’s get on the Ropsten Test Network by changing the selected network on Metamask.
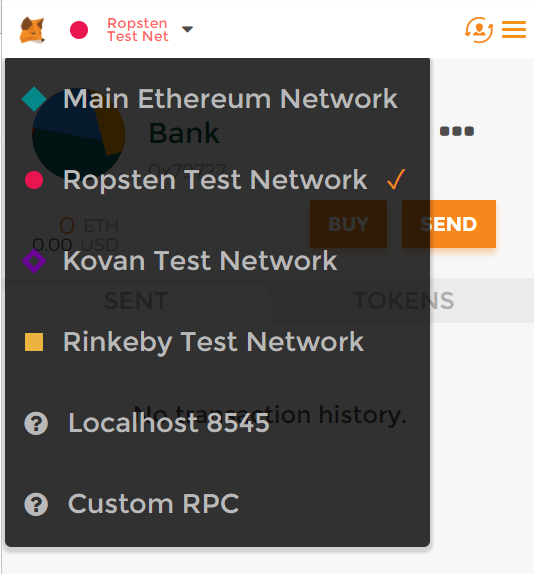
Click the upper left dropdown and make sure we’re on the Ropsten Test Network
Once on the Ropsten Test Network, we can get ETH from the metamask faucet by simply clicking the BUY button. This will redirect us to faucet.metamask.io, where we can easily obtain 1 ETH by pressing the ‘request 1 ether from faucet’ button. The gif below shows this process.
Notice that after requesting an ETH, faucet.metamask.io showed a transaction link that redirects to ropsten.etherscan.io. Etherscan is a site where we can view details on any transactions that were performed on a blockchain, and will be a useful site for us for checking if our operations are successfully done on the Test Network.
To verify that the ETH was sent to our address, we can wait for the success confirmation from the Etherscan link. We should also see that 1 ETH has been added to our Wallet via Metamask.
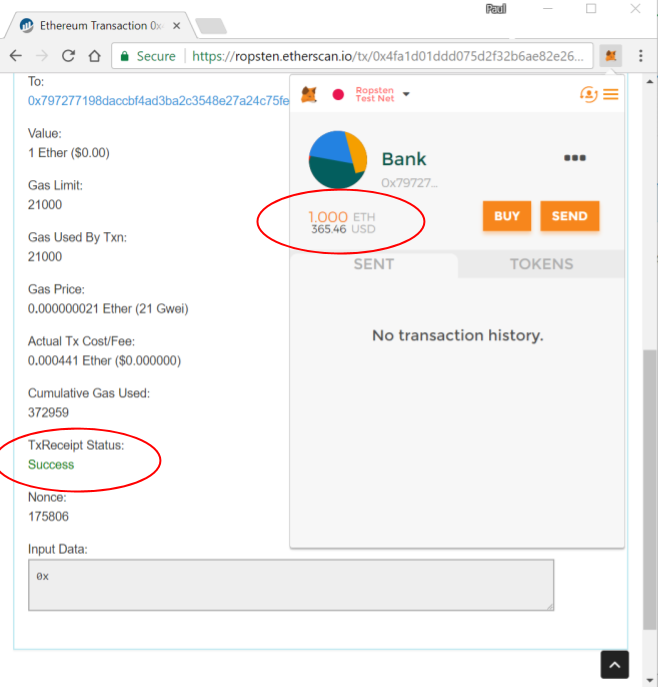
Successful request from faucet. We can see the Success message in Etherscan and the 1 ETH now in the account balance via Metamask.
Now that we have ETH in our ‘Bank’ Wallet, we can start using Remix to deploy our Token Contract. Remix is an IDE for Solidity, the programming language used to create Contracts. To use it we simply use the browser and go to remix.ethereum.org.

Initial view when we open up remix.ethereum.org
Remix will initially show a sample Solidity contract named ballot.sol. We’ll replace the source code here with a sample Token Contract which we’ll find on Ethereum’s site at ethereum.org/token.
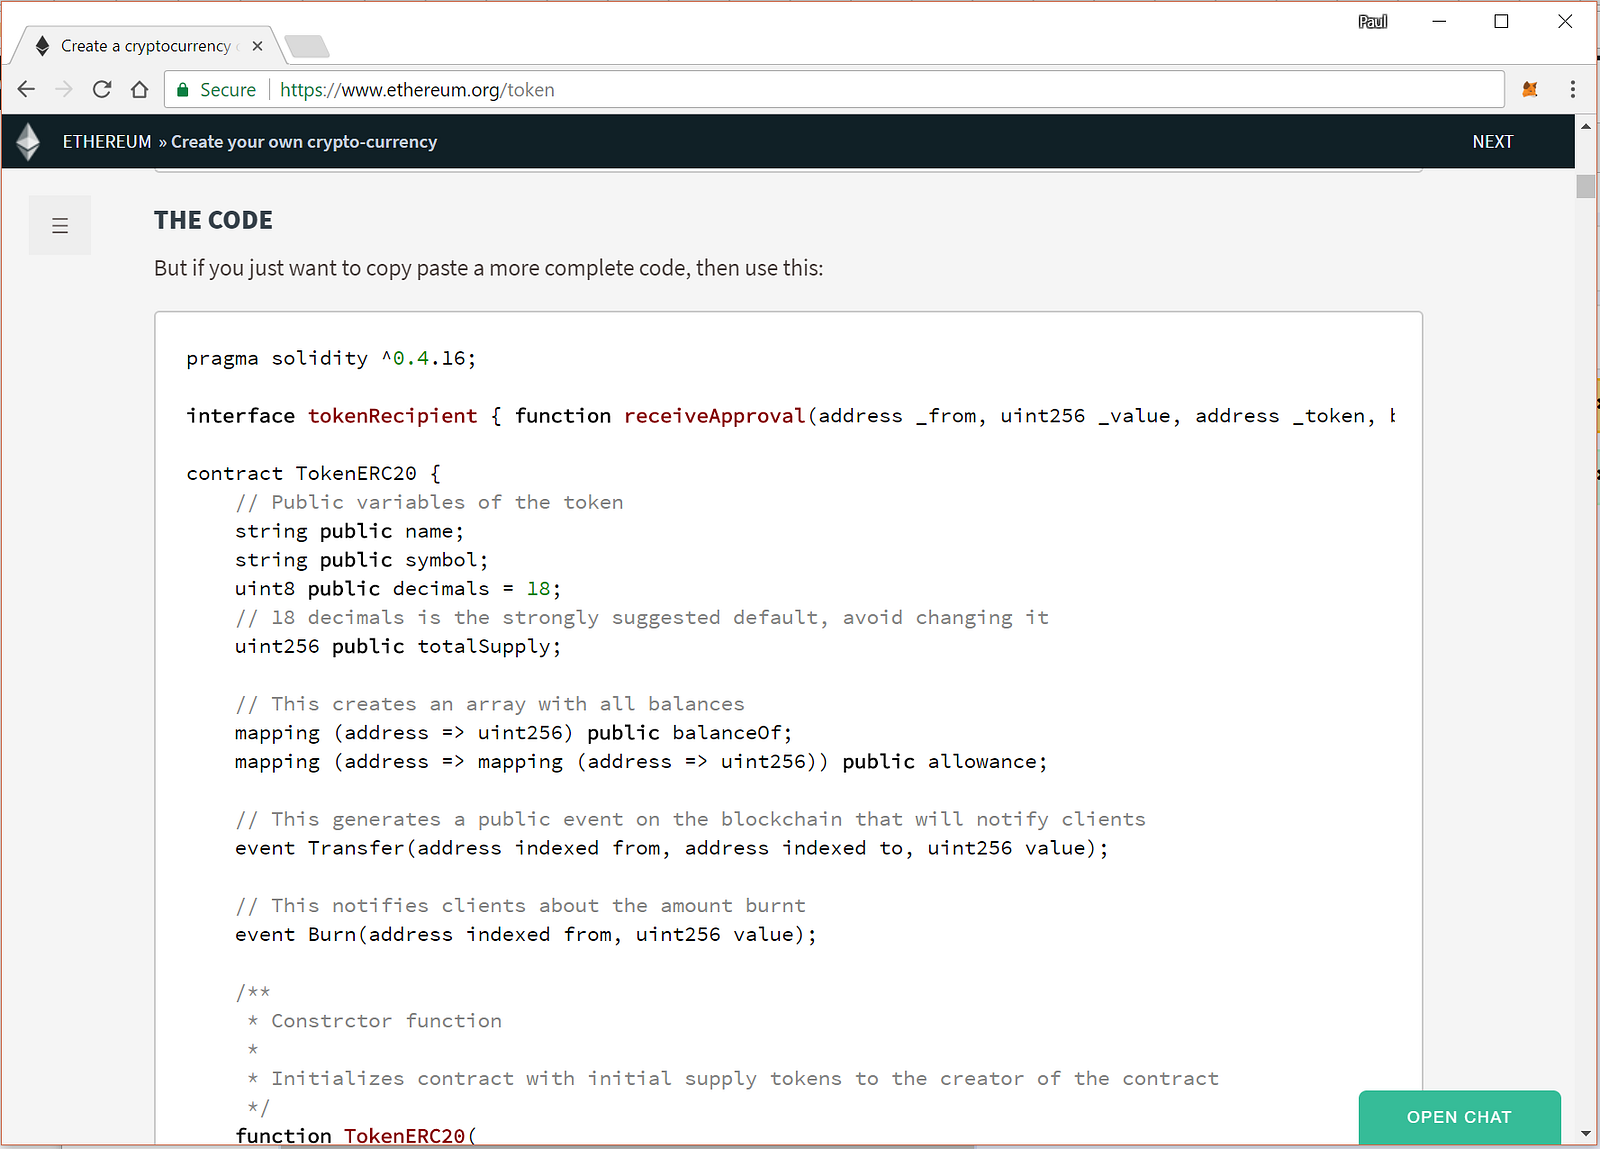
We copy paste this code from the Ethereum site unto the Remix IDE
After copy pasting the code, we then use Remix to deploy the Contract. We do this by pressing the ‘Create’ button on the ‘Run’ tab after specifying the constructor parameters defined by the contract; in this case, initialSupply, tokenName and tokenSymbol. Reference gif attached!
After clicking ‘Create’, we see a Metamask pop-up asking us to confirm the transaction. As mentioned before, deploying a contract incurs a transaction fee in ETH, and this is where the ETH we bought from the faucet comes into play. Click ‘Submit’ on the pop-up to start deploying the contract.
Deploying the contract will take a while as it will need to be confirmed by the blockchain. To check the progress, we can again use Metamask. We can see a log of the transaction on Metamask, and clicking on it will redirect us to the transaction’s Etherscan entry.
Once the contract has been deployed, we can then add the new token to be tracked in Metamask. To do this, we need to get our Contract Address, which we can get from Etherscan. We copy paste this address in Metamask to start tracking the token, as shown below.
Congratulations! At this point we have actually already created our cryptocurrency on the Ropsten Test Network Blockchain.
From here on we’ll see how we can interact with the cryptocurrency using Unity3D and how to transfer our created Tokens across Wallets.
3. Create Player Wallets Using Nethereum + Unity3D
For players to be able to receive our Tokens, they will also need to have their own Wallets. Our game may eventually need to be able to allow players to import their personal Wallets that they created on other software such as Metamask; to keep things simple for now though we’ll be creating the wallets on our game through code using Juan Blanco’s Nethereum, a C# integration library that can be used in Unity3D.
I’ve created a sample project called unity3d-blockchain-wallet over at Github for all the Unity3D code that we need for the next steps. It used code from the Nethereum github and from Experimental’s Nethereum examples.
Check out the project using git and open it in the Unity Editor.
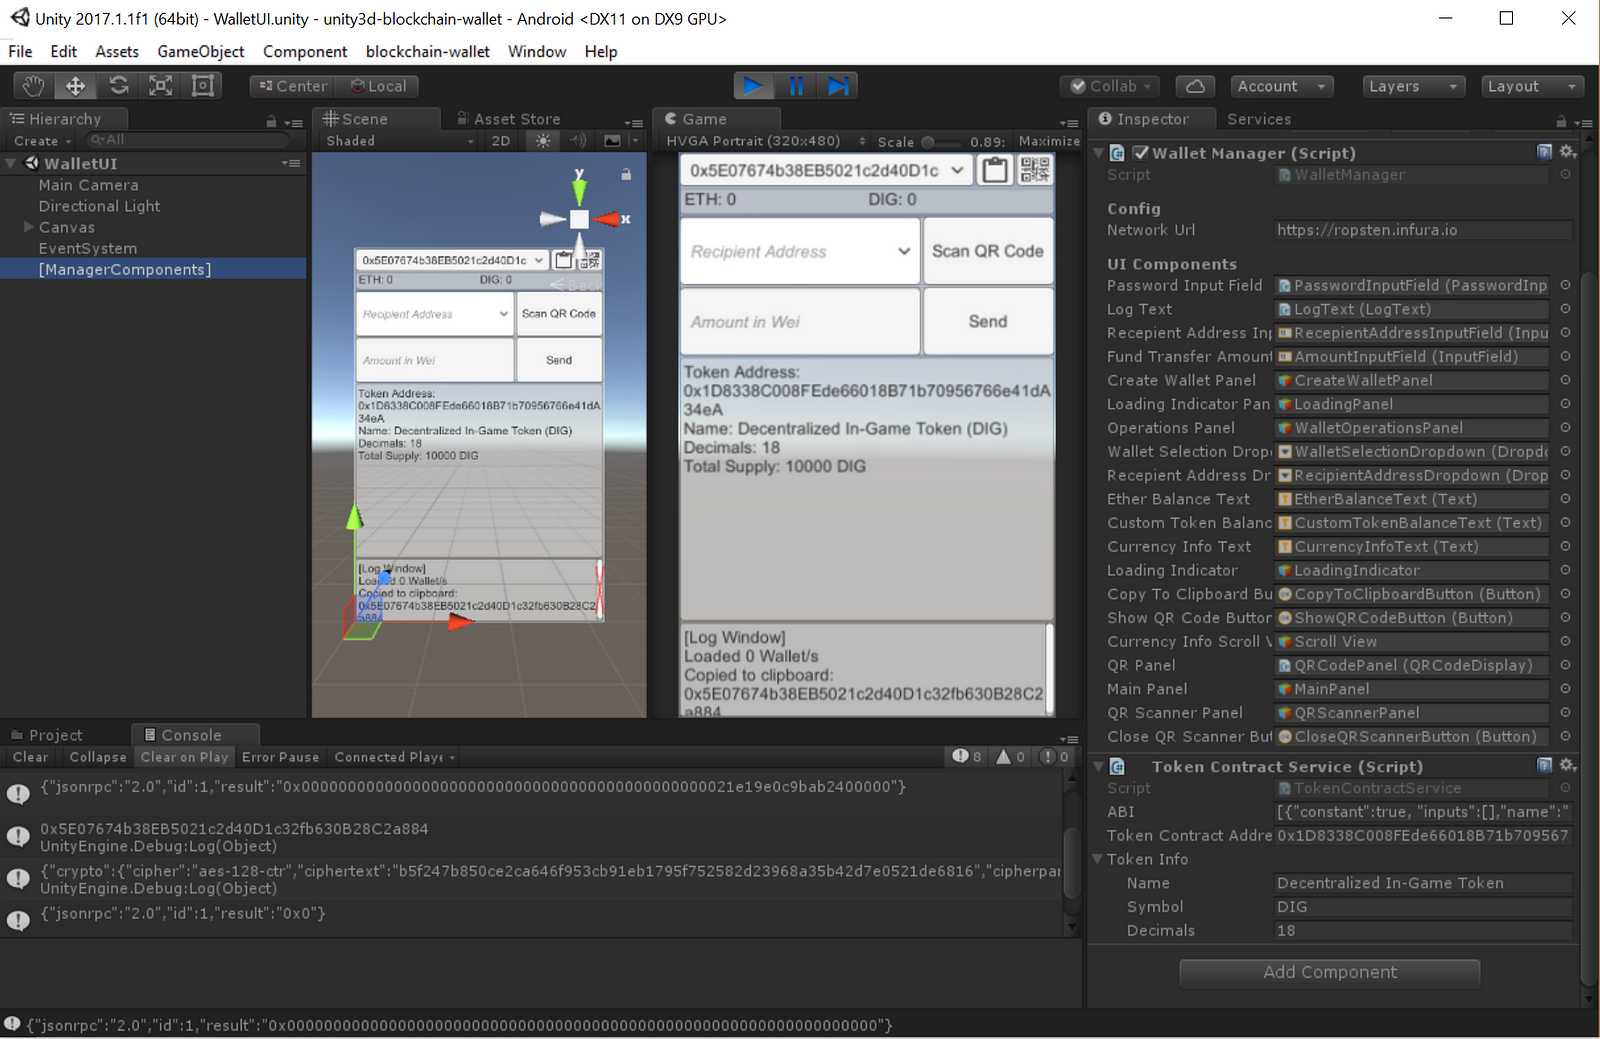
unity3d-blockchain-wallet running on Unity Editor
Once in Unity Editor, we first need to change the Token Contract Address variable in the Token Contract Service component. Select the [ManagerComponents] Game Object in the Hierarchy View, and change the Token Contract Address on the Inspector View to the Contract Address of the new token that we created on Step 2. You can use Metamask’s transaction history to review the Contract Address if you closed the previous tabs.

To use our token in unity3d-blockchain-wallet, replace the Token Contract Address of the Token Contract Service component with our created token’s Contract Address
If our Contract Address is correct, we should see the correct Name, Symbol and other details in the app once we run it in the Unity Editor.
In code, we use Nethereum’s EthCallUnityRequest to retrieve the Token details. The relevant source can be found in the GetTokenInfo function of TokenContractService.cs.
Once we have the correct Token Address, we can start creating our Player Wallets. To do this in unity3d-blockchain-wallet, we first need to input and confirm a password in the Password fields, and then push the ‘Create Wallet’ button.

Fill up the password fields with the same password, and push ‘Create Wallet’ to start creating the Player Wallet. This will take a few seconds especially on slower devices.
Once the Wallet is created, we’ll see the Wallet’s public address shown on the Wallet selection dropdown at the top of the app.
Let’s create another account by choosing ‘New Wallet’ from the dropdown, and once again creating a Wallet. Once we’re done, we should see a total of two accounts on our Wallet selection dropdown, as seen in the screenshot below.

unity3d-blockchain-wallet app with 2 created wallets
Take note of the two buttons on the top-right of the app — the left one, Copy To Clipboard, is used to copy the public address to the clipboard, while the second one is used to display a QR code of the public address. Both of these are useful when we want to copy paste or show our address to other users who want to transfer funds to our account.
For this demo though we’ll only be using the Copy to Clipboard button. Go ahead and click that now to copy the first account’s public address, which we’ll be using in the next step.

QR Code screenshot of public address on Unity3d-blockchain-wallet, but we won’t be using the QR code in this step. Instead press the ‘Copy to Clipboard’ Button encircled in Red to finish Step 3. You should see ‘Copied to Clipboard’ appear on the Log Window below.
Source code note: We use the ZXing library for generating the QR code, similar to Adrian M. Nenu’s example.
4. Send ETH Using Metamask
Next, we’ll go back to Metamask and use that to transfer ETH to two wallets: the User Wallet we created in Step 1 and to the first player Wallet whose public address we just copied to the clipboard in Step 3. We’ll need this ETH as, again, performing transactions on the Blockchain incurs a transaction fee.
Sending funds via Metamask is very simple, and is done with just the press of the ‘Send’ button. If the Recepient Wallet is also registered in Metamask like our ‘User’ Wallet it’s even simpler, with us being able to select the Recepient Wallet’s address from a dropdown. Gif below for reference.
Similar to other operations like Deploying a Contract, we’ll able to track the progress of our Send ETH transaction using Metamask’s transaction history and Etherscan.
After sending ETH to our User Wallet, let’s also send ETH to the player Wallet we created using unity3d-blockchain-wallet. Select our Bank Wallet from Metamask, and then press the ‘Send’ button again. This time though instead of choosing the Recipient Address via the dropdown, copy paste the public address that we copied to our clipboard via unity3d-blockchain-wallet.
We should then see a pop-up and after we press ‘Submit’, a corresponding entry into the Metamask transaction history similar to our first ETH send transaction. Once the transaction is completed, let’s go back to the Unity Editor and run the app. We should see that our account now has the ETH transferred from our Bank Wallet.
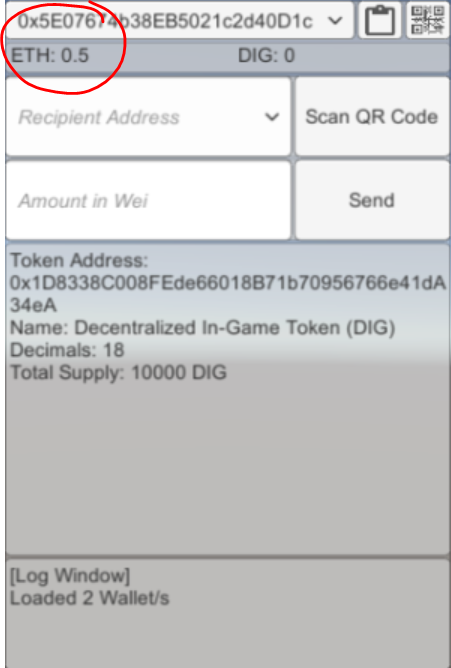
If successful, we should see the ETH transferred to our account in unity3d-blockchain-wallet
The C# code that takes care of querying the account balances can be found in WalletManager.cs, under the CheckAccountBalanceCoroutine.
5. Send Tokens Using Metamask + wallet.ethereum.org
In this second to the last step, we’ll now transfer our created Tokens from the Bank Wallet to both the User Wallet and to the Player Wallet. Metamask doesn’t have the functionality to send custom tokens, so we’ll be using wallet.ethereum.org with Metamask for wallet authentication.
On your browser, just head over to wallet.ethereum.org. Since we have the Metamask extension installed, the website autheticates our Wallet and displays its details automatically on the Accounts section.
The first thing we need to do is the add the Custom Token to the page. To do so we need to click on the Contracts Tab, and then the ‘Watch Token’ button at the bottom. Input our Token’s Contract Address on the field and press OK.
Watch Token adds our Token to wallet.ethereum.org so we can start sending it
After adding our Token, we can then start sending it to other accounts by using the Send Tab. From here we’ll be able to select our Token from a Dropdown list and send it to other accounts, similarly to how we do it on Metamask.
Sending our Tokens to another Address
Let’s transfer Tokens from our Bank Wallet to the User Wallet and the Player Wallet. Remember that we can use our Wallet apps to copy to Token Addresses to the clipboard. Once done, we can confirm our updated balance on Metamask and on the unity3d-blockchain-wallet app.

Successful transfer of our custom Token!
6. Send Tokens Using Nethereum + Unity3D
Finally, we’ll now use Unity3D to send funds peer to peer from one Player Wallet to another. This will be a very simple last step as we’ve already set up our Token Contracts, provided our source Wallet with the needed ETH and custom Tokens, and have the source code ready in the unity3d-blockchain-wallet app.
To transfer Tokens from the Player Wallet to another recipient Player Wallet on unity3d-blockchain-wallet, all we need to do is to select the other Wallet on the Recipient Address Dropdown. We then input how much Custom Token we want to transfer, and then press Send.
That’s it! If it’s successful, we’ll see a ‘transfer tx submitted’ along with the Transaction Hash identifier on the Log Window. The app will also automatically open an Etherscan tab on the browser so you can verify the transaction happened on the Blockchain.

Sent! It will take a few seconds for the operation to be confirmed on the Blockchain. Once that’s done though you’ll see the new Account Balance reflected on the other Wallet. Congratulations, you’ve successfully sent your own cryptocurrency between two players!
As a bonus: If we wanted to send Tokens to an account not on unity3d-blockchain-wallet, we can press the ‘Scan QR Code’ button and hold up a QR code of the Address to the camera. This is a standard way of distributing Public Addresses of Wallets and should be useful whenever we build features where players need to send each other their addresses.

After pressing the Scan QR Code button, hold up a QR code to have it entered automatically into the Recipient Address field
The relevant source code for transferring tokens over to other addresses using can be found at TokenContractService.cs, using Nethereum’s TransactionSignedUnityRequest. The QR Scanner code is found at QRScanner.cs.
Congratulations and Next Steps
Thanks for making it this far! If you were able to accomplish all six steps, you should now have the basic information needed to create a cryptocurrency for use in a game economy.
This article glossed over a lot of important information regarding blockchains though such as mining, gas, wallet management and writing contract code — just to name a few. Someone seriously looking into developing Smart Contracts should read more on the technical aspects of blockchains in order to get a more foundational understanding of the technology.
There are still two things in our economic model that we haven’t finished: 1) allowing players to use their tokens for an in-game service and 2) allowing players to sell their tokens in an exchange. The first one will depend on the specific kind of game we’re developing, and the second one we can maybe explore in a future article.
Before enabling users to sell our tokens though, I suggest we take a good amount of time making sure they have value inside our own economy first.
And this is exactly the challenge for us game developers that I see with blockchains. Given the chance to determine the value of our currency and its behavior, what game and economy would we create? How would we balance an economy where players can easily trade value among themselves? Or even one where players can earn value by mining transactions?
Will we use our Tokens to create the same mechanics as before, crafting mechanics for incentivized actions and loot boxes? Or is there a way for us create a new kind of economy, eschewing ads and microtransactions?
Or, what if accumulating fiat currency wasn’t even the end goal of our economy?
Further attribution:
Big thanks to {cryptonight} who has been the best cryptocurrency resource aside from the Internet.
Icons from the economic models and overview diagram were sourced from Flaticon.com
Thank you for reading! Please also leave questions and comments, as well as any suggestions on what you want to know more about on the next article.