
Real-time Kanban board with Vue.js and Hamoni Sync
A kanban board is a workflow visualization tool that enables you to optimize the flow of your work. In this post, I'll show you how to build a real-time kanban board in Vue.
To follow along you'll need to have some knowledge about Vue and its single file component. You'll also need the following tools:
- Node.js & npm (follow this link to download an installer for your OS)
- Vue CLI. If you don't have this, run
npm install -g vue-cliin the command line to install it.
If you have no knowledge about Vue, you can read my previous post before continuing with this one.
Setup the project
We'll set up the project using Vue CLI, which is a simple command line interface (CLI) for scaffolding Vue.js projects. Open the terminal and run vue init webpack-simple realtime-kanban-board. You'll get some prompts, accept the default values by pressing enter and select y when asked if you want to use saas. Before running the command, you can change realtime-kanban-board to your preferred project name. Once this is set up, run the following command to install the dependencies from the scaffolded template:
cd realtime-kanban-board
npm install
We will be using vue-kanban as a kanban board component with drag and drop features. We'll also use Hamoni Sync to store and synchronise the application state in real-time. They're both on npm and we'll install them by running the following command:
npm install vue-kanban hamoni-sync
We need some extra packages for Babel. Install them by running the following command:
npm install --save-dev babel-plugin-transform-runtime babel-preset-stage-2
Add vue-kanban
We've scaffolded the application which now contains the necessary files to run the application. Open the file src/App.vue with your text editor (or IDE) and replace its content with the following:
<template>
  <div id="app">
    <kanban-board :stages="stages" :blocks="blocks" @update-block="updateBlock">
      <div v-for="block in blocks" :slot="block.id" :key="block.id">
        <div>
          <strong>id:</strong> {{ block.id }}
        </div>
        <div>
          {{ block.title }}
        </div>
      </div>
    </kanban-board>
  </div>
</template>

<script>
import Vue from "vue";
import vueKanban from "vue-kanban";
import Hamoni from "hamoni-sync";

Vue.use(vueKanban);

export default {
  name: "app",
  data() {
    return {
      stages: ["on-hold", "in-progress", "needs-review", "approved"],
      blocks: [],
      listPrimitive: null
    };
  },
  methods: {
    updateBlock(id, status) {
      //TODO: add code to update the block
    }
  },
};
</script>

<style lang="scss">
@import "./assets/kanban.scss";
</style>
The code above uses the kanban-board component with 2 props, stages and blocks. The stages prop defines the columns for the board, and blocks contains the data representing task item placed on a column. The @update-block event is triggered when a block is moved from one stage to another. We will use this event to update the board in real-time.
Add Hamoni Sync
We've added the necessary code to render a kanban board to the page. In this section, we'll setup Hamoni Sync to store and synchronise the data for blocks. Hamoni Sync is a service which enables you to synchronise your application state in real-time.
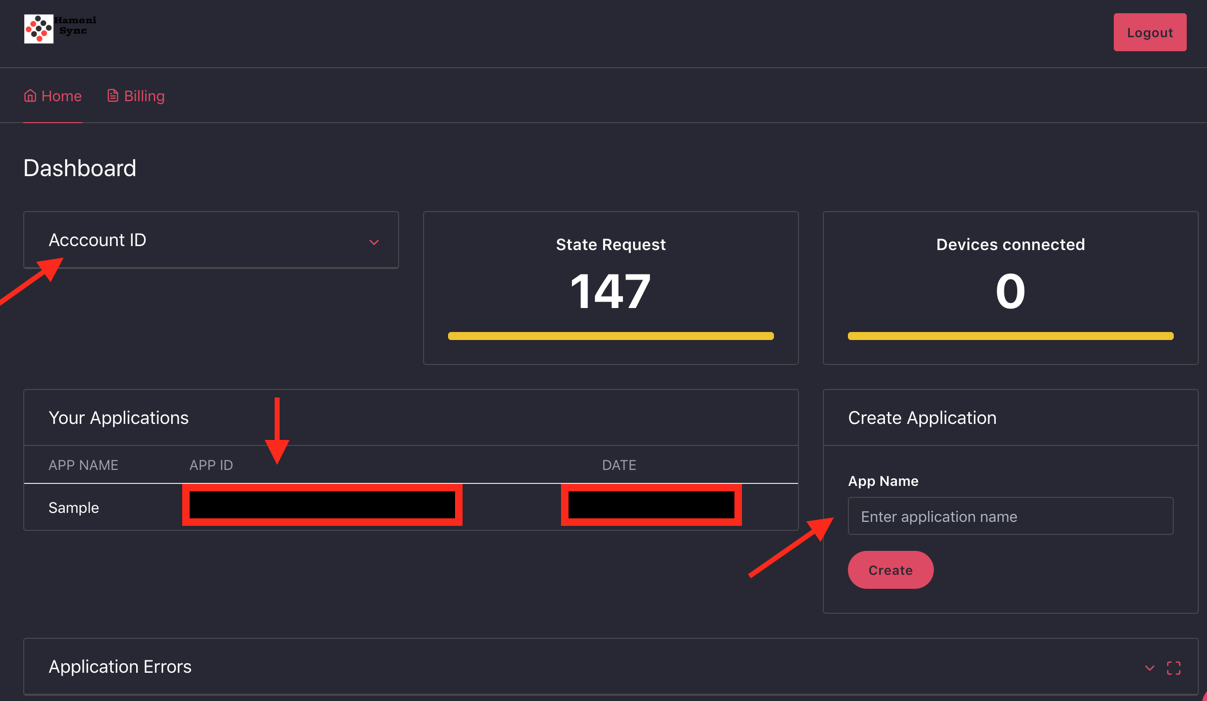
To use Hamoni Sync, we need to initialise it and connect to Hamoni server. To do this we need an account and application ID. Follow these steps to create an application in Hamoni.
- Register and login to Hamoni dashboard
- Enter your preferred application name in the text field and click the create button. This should create the app and display it in the application list section.
- Expand the Account ID card to get your account ID
Add the following code to App.vue on line 35.
mounted: function() {
  const accountId = "YOUR_ACCOUNT_ID";
  const appId = "YOUR_APP_ID";
  let hamoni;

  fetch("https://api.sync.hamoni.tech/v1/token", {
    method: "POST",
    headers: {
      "Content-Type": "application/json; charset=utf-8"
    },
    body: JSON.stringify({ accountId, appId })
  }).then(token => {
    hamoni = new Hamoni(token);

    hamoni
      .connect()
      .then(() => {
      hamoni
        .get("board")
        .then(listPrimitive => {
          this.listPrimitive = listPrimitive;
          this.blocks = listPrimitive.getAll();
          listPrimitive.onItemUpdated(item => {
          this.blocks.splice(item.index, 1, item.value);
          });
        })
        .catch(error => {
          if (error == "Error getting state from server") {
          hamoni
            .createList("board", blocks)
            .then(listPrimitive => {
              this.listPrimitive = listPrimitive;
              this.blocks = listPrimitive.getAll();
              listPrimitive.onItemUpdated(item => {
              this.blocks.splice(item.index, 1, item.value);
              });
            })
            .catch(console.log);
          }
        });
      })
      .catch(console.log);
  });
  }
Add the following before the closing </script> tag:
const blocks = [
{
id: 0,
status: "approved",
title: "Buy coffee machine"
},
{
id: 1,
status: "in-progress",
title: "Find better AirBnB options"
},
{
id: 2,
status: "on-hold",
title: "Approve Q3 budget"
},
{
id: 3,
status: "approved",
title: "Travel to Colombia"
},
{
id: 4,
status: "needs-review",
title: "Add Redux to the app"
},
{
id: 5,
status: "approved",
title: "Well, Sleep all day 👩🎤"
},
{
id: 6,
status: "in-progress",
title: "Find language exchange partner"
}
];
We initialised it by calling new Hamoni(token); with the token retrieved from Sync's token API. It's recommended to call the Sync token server from your backend and sending the response token to the client application. For this example, I'll keep them all in one place.
Replace the string placeholders with your account and application ID which you will get from Hamoni dashboard. Then we connected the app using hamoni.connect(). We retrieved the data by calling hamoni.get() with the name of the application state stored on Hamoni Sync. If it doesn't exist yet, we'll create it and then add function to update Vue's state when an item is updated. This is achieved by calling onItemUpdated() with code to update the block on item.index. Hamoni Sync provides what is called a list primitive which we've used here by calling hamoni.createList() and passing it an array.
Now we need to update the state on Hamoni when a block is moved from one stage to another. We'll update the function updateBlock(id, status) which we added earlier
methods: {
    updateBlock(id, status) {
        let block = this.blocks[id];
        this.listPrimitive.update(id, { id, title: block.title, status });
    }
},
This code tells sync to update the state and once this is done, it'll be synchronised to all connected clients/devices.
That is all the code that's needed. Now run the app by running npm run dev from the command line and this will launch the web app in your default browser.

There you have it 🚀A real-time kanban board.
That's a Wrap!
So we've built a real-time kanban board using vue-kanban and Hamoni Sync. Hamoni Sync makes it easy to integrate real-time features in your applications. You can get the completed code on GitHub. Happy coding! 👍
Resources
Thanks to Andrew Hedges and Gift for reviewing this post.