
How I built a CI server Using Docker
Introduction
Continuous integration, CI, is fast becoming an ingrained part of every engineering team. And of the various CI practices, self-testing builds often serve as the core focus for many projects, hence popular services such as CircleCI, HerokuCI, TravisCI, Semaphore, AWS Codebuild etc have grown to provide easy integrations for asserting the reliability of a given code change as determined by the accompanying tests. These integrations often involve a CI server that constantly monitors the project code repository and on changes to the repository, sets up an impartial environment to assert the state of the project with the change that occurred.
Here’s an excerpt from Thoughtworks on what a typical continuous integration flow looks like:
- Developers check out code into their private workspaces
- When done, commit the changes to the repository
- The CI server monitors the repository and checks out changes when they occur
- The CI server builds the system and runs unit and integration tests
- The CI server releases deployable artifacts for testing
- The CI server assigns a build label to the version of the code it just built
- The CI server informs the team of the successful or failed build
Often times, situations arise where there exists a disagreement between test results on the developer’s machine and the CI server environment. Investigations into such disagreement often unearth disparities in both environments that give rise to the causative elements. While conducting many of these investigations, I find myself increasingly interested in what goes on behind the scenes in these CI servers and the various (possible) elements that come together to make up a CI server. And with increasing curiosity and a sense for adventure, I embarked on a journey to (re)create one such server.
This article identifies the various parts to a reliable CI server and explores how to put them together using docker.
Overview
A typical CI service will have an interface for users to log in and connect their project’s version control accounts like GitHub and Bitbucket. Once connected, the user should be able to specify projects within these accounts that the CI server would monitor for code change events such as commits and pull requests. Once any of these changes occur, the CI would test the change to ascertain its integrability with the codebase.
Implementation
The implementation is heavily focused on GitHub but the end result is easily extendable to work with any other Web-based Git version control repository hosting service.

The web app provides an interface where users log in using GitHub OAuth, allowing the CI server the access to view their GitHub projects. Users are presented with a list of their projects and they can select which projects the CI server should monitor. The CI server registers a webhook on GitHub for common events (pull requests, and commit) on the selected projects so that whenever any of those actions occur, GitHub will notify the CI server. And on receiving such notifications, the CI server pulls the latest code change in the project and runs the accompanying tests with the output and progress displayed on an interface for the user to view.
This implementation walkthrough easily hints at two major sections to a CI server:
- A section for direct user interaction: login, project subscription, viewing test progress. i.e these parts require user’s presence to spring into action
- A section for pulling the project’s code, running the tests and logging the results; i.e doesn’t require the user’s input (whether the user is online or not) to do it’s thing.
The first part, I refer to as the web app and the second as the CI and together they make the CI server (which I call Sicuro.)
The CI
The CI server’s sole purpose will be running the tests for a given project and providing insights into the test’s progress and result. To perform this task, it will require information such as:
- The name of the project
- The project URL (on GitHub)
- The target project branch or commit hash
- The project language (i.e. Ruby, Javascript, Golang, Python …)
An alternative to the project language would be the exact command to run the test but as explained in the Test containers section (below), we would find the language more useful.
With this information, the CI server sets up the necessary docker environment for running the tests for the given project. The following sections have some insightful overview of the docker environment.
Now, with the docker container faithful chugging along, running the tests, all that remains is to provide insights into the progress of the test process. A quick solution is piping the output of the test’s container logs to a file and then tailing file for new log information.
Putting this all together with Golang, our ci server should resemble:
Notes:
- The
JobDetailsstruct details the information required to run the server. An interesting addition is theupdateBuildStatuscallback function, which is triggered at the end of the test run with the status of the test. We’ll find a use for it later in the web app. - The
Runfunc serves as the main entry point and it’s responsibilities include:
- Creating the log file (if it doesn’t exist)
- Ensuring there are no active CI jobs writing to said log file (
lsof filename) - Setting up a CI job to run the tests. Jobs are run in goroutines to allow concurrent request handling.
- It links the container to possible on-demand services like database and set up necessary environment variables to connect to them. For simplicity, we’ll have these services constantly running and leveraging docker container networking, we connect the test containers to the resources as needed by adding the containers to the
ci_defaultnetwork.
The final command executed to run the test would be something of the form:
docker run -it --rm \
   -v [PATH-TO-SSH-KEYS-FOLDER]:/.ssh \
    -e PROJECT_REPOSITORY_URL=[THE-PROJECT-REPO-URL] \
    -e PROJECT_REPOSITORY_NAME=[PROJECT-NAME] \
    -e PROJECT_BRANCH=[PROJECT-TARGET-BRANCH] \
    -e DATABASE_URL=[POSTGRES-DATABASE-URL]\
    -e REDIS_URL=[REDIS-DATABASE-URL] \
    --network ci_default \
    [DOCKER_IMAGE_REPO]/sicuro_[PROJECT-LANGUAGE]
Given a sample rails project with job details
{
  LogFileName: "0sc/activestorage-cloudinary-service/master",
    ProjectRepositoryURL: "git@github.0sc/activestorage-cloudinary-service",
    ProjectBranch: "master",
    ProjectLanguage: "ruby",
    ProjectRespositoryName: "activestorage-cloudinary-service"
 }
The command would be
docker run -it --rm \
  -v ci/.ssh:/.ssh \
    -e PROJECT_REPOSITORY_URL=git@github.0sc/activestorage-cloudinary-service \
    -e PROJECT_REPOSITORY_NAME=activestorage-cloudinary-service \
    -e PROJECT_BRANCH=master \
    -e DATABASE_URL=postgres://postgres@postgres:5432/postgres \
    -e REDIS_URL=redis://redis:6379 \
    --network ci_default \
    xovox/sicuro_ruby:0.2
Test Containers
The required environment for running test differs for different projects. One obvious difference is the required runtime depending on the programming language of the project. A Ruby project has a runtime dependency different from a Javascript project which is different for a Python project etc. And these differences need to be taken into account by the CI server.
A common way of handling this is to have one prebuilt “god” image that is set up with all basic dependencies for every language. Just in the same way any single dev machine can be set up to run projects in different languages, so too the test containers can be prepared with all necessities to run projects in all languages. Basically a docker image with necessary runtime and dependencies for every (supported) language: Ruby, Javascript, PHP etc. This approach has the obvious advantage that it removes the burden for the language-specific concerns and tweaks, and it’s the favored implementation for many of the popular CI’s available.
For this implementation, however, I decided to have separate images for each language. This decision is to help learn the intricacies of each language’s environment and to decipher the dependency entanglements that come with various projects.
The dockerfiles for the various languages can be found here. Here’s the ruby dockerfile:
And as you may have observed in the CI code, each resultant image is expected to be tagged sicuro_[language] e.g sicuro_ruby
But irrespective of the image language, they all share a similar docker-entrypoint.sh script.
The Docker Entry point
This script orchestrates the test execution flow. It starts up by adding some generic ssh keys for cloning GitHub projects. And since we are only interested in publicly accessible repositories, any ssh key combination that’s duly registered on GitHub should work. (However, to allow access to private repos, this would easily be extended to allow users provide specific ssh keys for their GitHub accounts).
With the SSH keys set, it proceeds to clone the project. Recall that the PROJECT_REPOSITORY_URL and the PROJECT_REPOSITORY_NAME are part of the information provided while starting the container. This information is used here to clone the project into a folder with the project name. For our sample job, this results in:
git clone ${PROJECT_REPOSITORY_URL} ${PROJECT_REPOSITORY_NAME}
# git clone git@github.0sc/activestorage-cloudinary-service activestorage-cloudinary-service
Now we’ve got the project, cd into the folder and checkout to the desired branch. Remember PROJECT_BRANCH, right?
cd activestorage-cloudinary-service
git checkout master
At this point, we could set some standard language specific environment variables. For example, a rails project would benefit from knowing RAILS_ENV and/or RACK_ENV in which the project is running and also the SECRET_KEY_BASE values for the given environment. Same for a NodeJS app with NODE_ENV.
This is would also be a good time to set up some machine specific tweaks, like start a headless browser for capybara integration tests etc. The aim is that at the end of this, all machine specific configurations should be in place.
Now we turn our attention to the default project setup for the language. Setting up a NodeJS app begins with npm install, a python app: pip install, bundle install for a Ruby app ... There could be other necessary standard setup needed like; setting up the DB and running migrations … etc. With all this taken care off, we are finally ready to execute the standard test command for the project language.
Here’s an overview of some default for Ruby on Rails and NodeJS
| Language | Machine dependencies | Project setup | Test |
|---|---|---|---|
| Ruby | RAILS_ENV | bundle install | rake test |
| NodeJS | NODE_ENV | npm install | npm test |
Thus far, so long as a given project adheres to it’s language defaults, our CI server would be able to successfully handle it. But unfortunately, very few projects do.
The story of sicuro.yaml
Like every (good) CI, aside scriptable defaults, there should be options for customizing each of the test execution process (ie. the machine dependencies, setup, test phases) per projects. Projects often find the need for more than the default offerings of the project language; an alternate test framework (rspec instead of minitest, ruby), alternate dependency manager (glideinstead of d, Golang), a task runner (gulp, NodeJS) etc. Accommodating these variations gives rise to circle.yml, travis.yml … used by the respective major CI offerings. And in our case, sicuro.json
Sicuro.json is an optional configuration file that can be included at the root of any project for customizing/overriding the various stages: dependencies, setup and test sections of the CI test execution process. If the file is present, the contents are read and taken into account while executing the tests:
Here’s a sample
For simplicity, the customization is limited to two possibilities:
- The default executions can be turned off for the project by setting:
override: true - And custom executions can also be included for a project
Both customizations are not mutually exclusive. So say that a given nodejs project requires phantomJS to be included in the setup and it uses grunt, the sample above would be a valid sicuro.json file for the project would be.
The sicuro.json file is parsed using the nifty jq library; “a lightweight and flexible command-line JSON processor”. JQ is an awesome tool and amongst it’s many benefits, for our use case, it’s alternative operator, //, comes in handy. It allows defining fallbacks for missing keys in a json script which we leveraged to make providing the various keys in the sicuro.json file optional.
Throwing sicuro.json parsing via jq into the mix, the execution logic for each of the test sections, becomes
- If
sicuro.jsonis present - If the override flag is set, skip the default command
- If the override flag is not set. Perform the default commands
- If the custom flag is set, perform the custom commands
With this, the docker-entrypoint.sh script is updated to
In a nutshell:
- The ci server will receive a job request containing the project name, url, language
- Proceeds only if no other job of the same signature is currently running.
- Sets the necessary environment variables to make resources such as database available to the test environment
- Spins up a docker container based on the project’s language with necessary details to run the test and attaches the container log outputs to the specified log file
- The container entrypoint scripts setups the necessary ssh keys and proceeds to clone the project
- Checks if the project has any
sicuro.jsonfile - Setup specific machine dependencies for the project taking into account the contents and instructions in the
sicuro.jsonfile (if present) - Setup project specific dependencies for the project taking into account contents and instructions in the
sicuro.jsonfile (if present) - Runs the test for the project taking into account the contents and instructions in the
sicuro.jsonfile (if present)
The Web App
Thus far we’ve explored the internals of the CI server and expectedly, users shouldn’t be interacting with the bare bones specifications of the server. The webapp exists to abstract these interactions by providing a richer experience for using the server.
The web app caters to two main clients, (human) users, who come to subscribe their projects for the CI server to monitor and VCS (version control system) servers (like GitHub) where these projects are hosted.
The User Interface
To have the CI server monitor a project, a user will need to subscribe the project. Subscribing a project requires the user to allow the CI server register a webhook with the project’s online vc server. Most VCS provide webhooks, which allow apps subscribe to certain events on the project. And when one of those events is triggered, the vcs sends a payload to the webhook’s configured URL.
The first phase to setting this up is to have an OAuth integration allowing users sign in with their GitHub account. The sign in flow is packed with the necessary authorization required for the web app to read and list the users' (public) projects on GitHub.
This walkthrough details how to register a GitHub OAuth app and get your GITHUB_CLIENT_ID and GITHUB_CLIENT_SECRET codes. The registration process will require a callback URL which you can set to localhost for now. Later in the hosting section below, we’ll update this to the AWS URL for the hosted app.
Note : If you desire to extend access to private repos, aside including that in the permission requested, as mentioned earlier, you will also need to tweak the SSH section in docker compose section to use specific keys pre-approved by the user. So part of the sign up process could be to have the user add this key to their GitHub account to get the necessary access and updating the docker containers to use said keys for the user’s projects (see the section on Handling Creds with S3).
Now with access to the user’s projects, we can begin exploring the expansive offerings of the GitHub project’s API. Of main interest at this point is the repository webhook api which provides information on the webhooks subscription for a given project respository. With this information we check
- If the project is not already subscribed and provide the user an option to subscribe
- If the project is already subscribed, provide the user an option to view the test builds for the project
We could also throw in an option to unsubscribe but there’s no fun in that for now 
Here’s the code snippet to achieve this
You could then easily loop through all the user repo and evaluate IsRepoSubscribed for each of them
The test build results for a project is an aggregation of the test logs. A project will have multiple builds corresponding to various commits, pull requests and other events that occur on the project. And a simple way to adequately store this (since we are using file-based storage) is to use the commit hash as the log file name. Each build could have information such as the build status, time, author, hash … etc. The GitHub API provides a rich array of details to pick from.
Remember the ActiveSession func from the CI server? We leverage it here to show the user if a build is currently in progress. For completed builds, we provide the opportunity for the user to run the build again and an option to view the test build results.

The final bit is showing the user the actual log output from the container and the cool part, real-time updates from an in-progress build. To do that, we’ll leverage a WebSocket connection. The Gorilla web framework for Golang has a websocket sample that’s a simple drop-in implementation of what we require.
Once the websocket connection is established, an infinite loop is set up that monitors the given log file for modifications (by checking the last modified at time). And whenever the file is modified it pushes this information to the client.
The collaborating js client side code is:
sicuro-clientside-websocket.js
All good
The VCS interaction
Aside authenticating users, we have 3 other businesses with the VCS servers
- Registering webhooks for events we care about on the projects
- Receiving webhook event payload
- Communicating test build progress and results
GitHub has an expansive documentation on all there is to their webhook API. To set up a webhook, the requirements is to send a POSTrequest to the /repos/:owner/:repo/hooks with a payload including the event(s) the hook is triggered for. This functionality alongside other features are often available out of the box with the GitHub SDK for different languages. The Golang library has it all tidied up with the function call:
sicuro-sample-subscribe-webhook.go
When a webhook is registered, GitHub will ping the subscribed callback URL with a dummy payload to ascertain that the given endpoint is reachable. With this, we can set up an initial run for every project subscribe request.
Putting this together the webhook registration flow becomes:
User clicks the subscribe link for a given project. When the request reaches the backend server, we send a subscribe request to GitHub for the PR and commit event. When GitHub pings the provided callback url to confirm reachability, we trigger a first job for the project running tests on the master branch.
With webhook registered successfully, whenever any of the pull or commit event takes place on the project repo, GitHub sends the event payload to the webhook callback url earlier registered. And on receiving this payload, the app parses the necessary information from the payload, builds the appropriate job request payload and hands off the instruction to the CI server to run.
One of the cool things about integrations such as this is that most VCS allow for feedback (success or failure) from the webhook’s activity; which is aptly displayed inline with the change so the user can easily see.

As you would have guessed, this is where the updateBuildFunc callback function mentioned briefly in the CI server section comes handy. Here’s a sample implementation for the callback function:
sicuro-sample-update-build-status-func.go
Once the test build is started, the callback function is executed with the in progress status and afterward the verdict for the build, pass/fail, is passed on to the function execution.

Hosting
Now that we’ve got the nuts and bolts of the CI together, it’s set to be deployed and put to use. Although, in this section, I discuss how to deploy the app to AWS, any of the other cloud providers GCP, Azure, DigitalOcean, etc works as well. I actually did try out different providers before settling for AWS; notes from the try out would make for another write-up.
The first step to hosting is identifying the various resources required to run the app and determining how to make those available in your platform of choice. Looking through what we have thus far, any platform will require:
- Docker and Docker compose
- Go runtime
- Valid GitHub SSH keys and other project credentials
- A copy of the app
Let’s get on with setting this up on aws.
Note: I assume familiarity with the aws basics; particularly launching EC2 instances, AMI roles, S3. If I fail you with this assumption, consider taking a look at any of the available resources on the subject. I find this pluralsight course helpful.
Custom AMI
Amazon Machine Image (AMI) is the base from which EC2 instances are provisioned. They “… contain the software configuration (operating system, application server, and applications) required to launch your instance”. The choice of AMI largely depends on the requirements of the application that will be deployed on it.
Sicuro, as we detailed above requires Docker, Docker compose and a Golang runtime; and as is often the case for specialized apps, there’s readily no prebuilt AMI that bundles the entire requirement. So we have to roll out our own.
First, we spin up a generic EC2 instance running a base image that has as much of the project required dependency. Custom AMI’s as you would expect (and much like docker images) are based off existing images and in our case here we’ll base off the Amazon Linux AMI 2017.09.1 (HVM), SSD Volume Type (largely because it’s eligible for the aws free tier  )
)

Next up in the configure instance section, under the Advanced Details, we’ll set the following command to be executed
#!bin/sh
curl https://gist.githubusercontent.com/0sc/71975ba7e9c1a32d37c815e2e2806920/raw | sh

This executes the following script to install docker, docker-compose, and golang in the image
With that set, we can go ahead and launch the image.
Once the instance is running, SSH into it and confirm that docker, docker-compose, and golang where installed

All is now set for us to create an image from the running instance. Select the running instance from the EC2 instance dashboard on your aws console; then select Actions > image > create image option. Give your image an interesting name and create.

FYI you can also use the image created for any project that requires similar dependencies, docker, docker compose
Handling Credentials with S3
Like every good project, we need to be wary of how we handle project credentials and secrets. Secrets required by Sicuro include
- GitHub SSH keys
- Client ID and Client Secret for the GitHub OAuth app
- Webhook Secret for registering webhooks on GitHub projects
- Session Secrets for handling user sessions for the web app
There are a couple of ways to discreetly make this information available to the app at runtime. One approach, which we would use, is the S3 approach detailed in this blog post.
Create a bucket on S3; call it say sicuro-secrets. Upload your copy of the .env file containing production creds to the bucket.
GITHUB_CLIENT_ID=YOUR-GITHUB-CLIENT-ID
GITHUB_CLIENT_SECRET=YOUR-GITHUB-CLIENT-SECRET
GITHUB_WEBHOOK_SECRET=YOUR-GITHUB-WEBHOOK-SECRET
SESSION_SECRET=SOME-LONG-RANDOM-STRING-FOR-ENCODING-USER-SESSION
DOCKER_IMAGE_REPO=xovox
Setup (another) GitHub SSH key for your GitHub account following the walkthrough here. The end result should be two files: id_rsaand id_rsa.pub containing your private and public keys respectively. Add these to a .ssh folder and upload to a keys subfolder in the S3 bucket. Here’s what the final file structure should look like:
sicuro-secrets
  |-- keys
    	|-- .ssh
            |-- id_rsa
            |-- id_rsa.pub
  |-- .env
Note that there’s no constraint on the file structure or name. The suggestion here is based on the assumption for the script provided in the next section below.
Finally, create an IAM role with read access to the S3 bucket. We’ll assign this to EC2 instances running the app so they can pull contents from the bucket.
All is now set to run the app in EC2.
Deploying the App
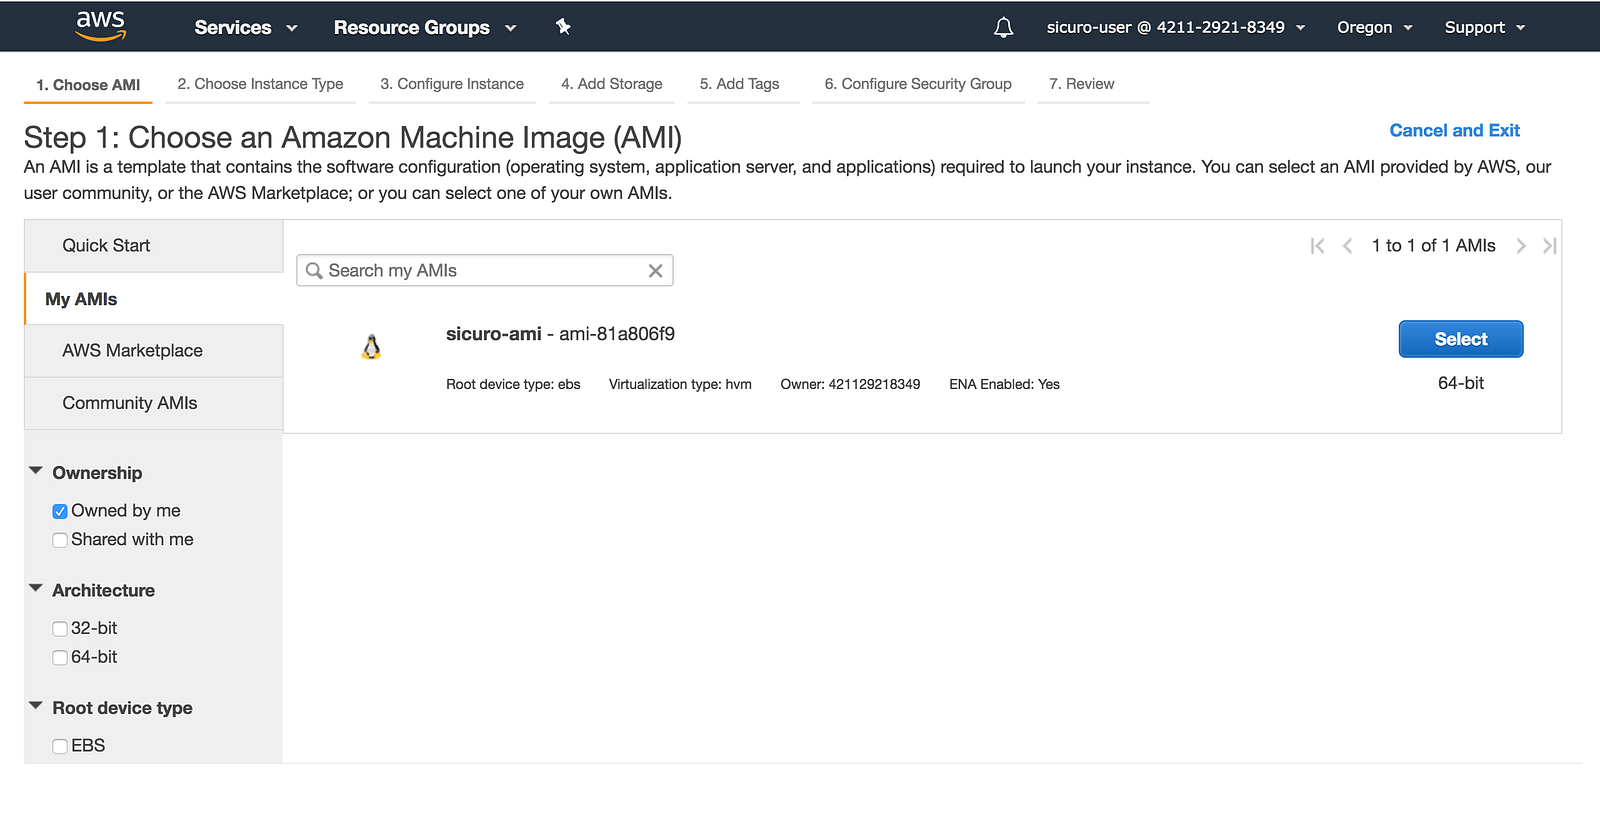
On the EC2 dashboard, click to create a new instance. When prompted for the AMI to use, click to select from MY AMIs sections, and select the custom image created in the Custom AMI section above.
In the instance configuration, assign it the IAM role created in the section above and in the advanced details section, add the following startup script (in the user data field as text):
#!bin/bash
curl https://gist.githubusercontent.com/0sc/c2d80f5a127ad6b12744ab416e73e8aa/raw | sh
This executes the following startup script
Copy your Public DNS and set it as the callback URL for GitHub OAuth login in the User Interface section e.g http://ec2–52–43–89–100.us-west-2.compute.amazonaws.com:8080/gh/callback

Your CI is ready; visit the url and take it for a spin
- Login with Github
- Subscribe one of your projects
- View the logs as the CI runs your test
- Create a PR or push new changes to the project and observer the CI pull your changes, trigger a new build and run your tests
Summary
It’s interesting the various moving parts to a CI server and how they collaborate to verify code changes. In this article I’ve explored each of these parts and how to reimplement them. The sample implementation used for this article is available on Github with instructions on how to run it locally, check it out here.
Thanks for reading and be sure to share your thoughts in the comment section.
Republished from Medium.com (https://medium.com/@Oskarr3/sicuro-ci-2f40ba138233)