
Setting up an infallible Bastion node for private instances on AWS using Cloud Formation

While setting up your infrastructure on AWS, you need to provide a means for SSH/RDP access to your private instances for administrative purposes. A simple way to achieve this is by simply allowing SSH Traffic on port 22 in the inbound rules of your instance’s security group and then expose the instance to the public internet via an Elastic IP and Internet gateway. This however becomes flawed as an attacker may easily have access to your security key pair and if perhaps such key pair is also used for other private instances, then such attacker has full access and control over your infrastructure.
To avoid this, companies now use bastion instances spread across all availability zones(AZ) where infrastructure has been setup. A Bastion node is a specialized instance that is deliberately exposed on the internet designed and configured for the sole reason of withstanding attacks. Seeing that bastion nodes are exposed to the public internet in a demilitarized zone(DMZ), facing a lot of risk for potential attacks, it therefore becomes necessary to ensure that the bastion node is completely foolproof. This article provides a practical insight into how an infallible bastion node can be setup. CloudFormation is used since it eases the whole bottleneck of setting up the bastion instance for each AZ by simply tweaking some parameters in the cloud formation template.
Prerequisite Knowledge:
- Basic Understanding of the following Amazon web services/concepts: EC2, VPC, Subnet, NAT, Security Group and Access Control Lists(ACL)
- Basic Understanding of Cloud Formation.
We shall consider a hypothetical network with private instances on 10.6.0.0/24 subnet in 10.6.0.0/16 VPC. Also, our bastion instance shall exist in the 10.5.0.0/16 VPC in 10.5.0.0/24 subnet as shown in the diagram below:
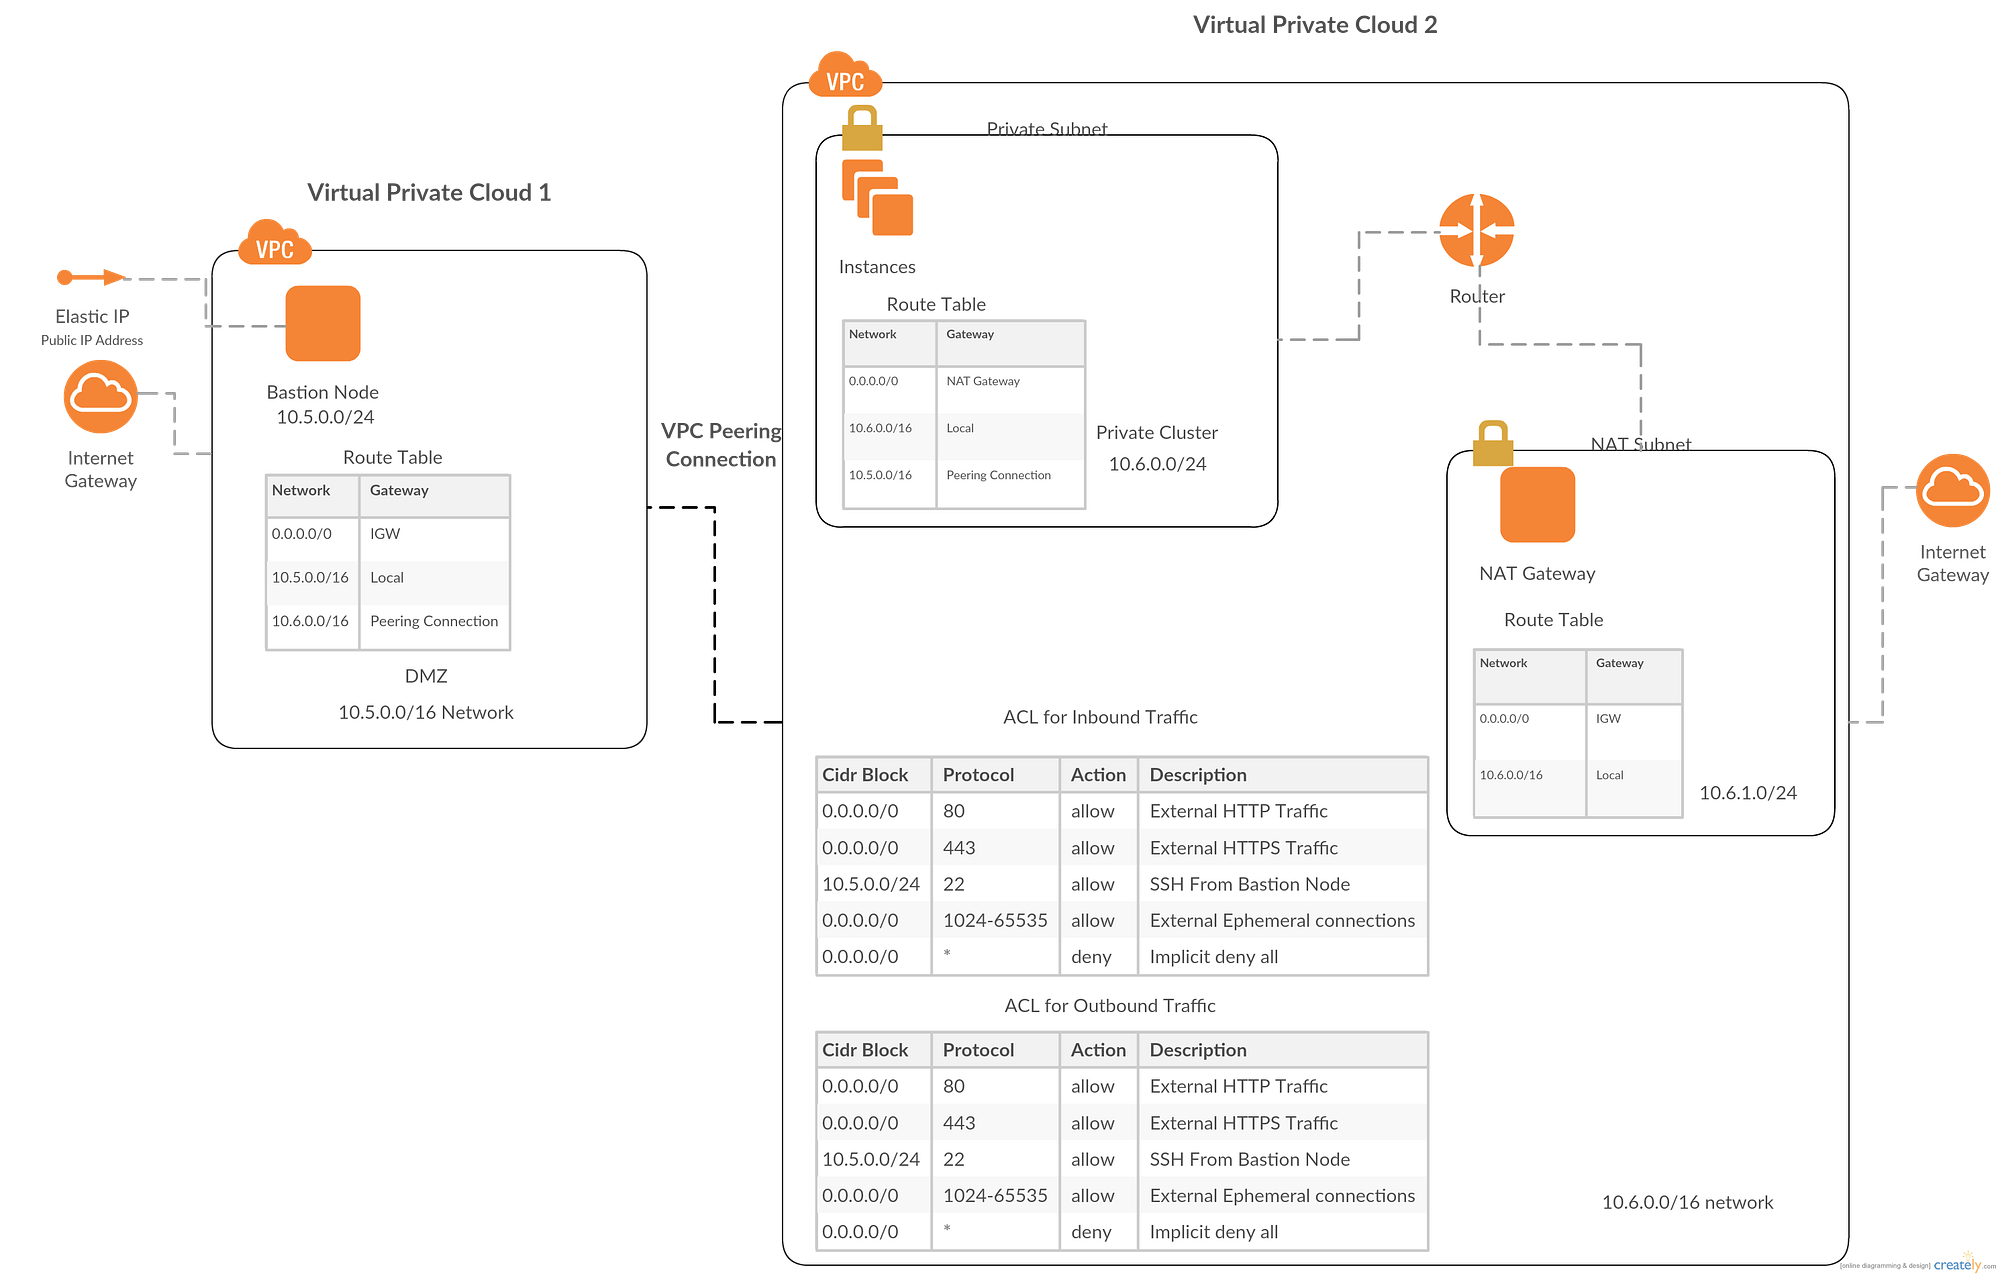
From the diagram above, it can be seen that a NAT gateway has also been added to the architecture. This provides an extra layer of security to our private instances whenever they need to access the public internet for software updates. The NAT gateway allows all outbound traffic from the private instances but blocks all originating traffic from the internet to the private instances. NAT gateway is used since we only want to allow SSH traffic from the bastion node and block all other traffic from the internet. Security group information for each instance has been purposely left out from the above diagram for simplification/clarity purposes but shall be looked into in the cloud formation templates. The diagram also contains Access Control List(ACL) information for the 10.6.0.0/16 network to add an extra layer of security on top of the security groups since security groups are stateful. We shall explore configuration details of the Bastion node, Private instances and NAT gateway in the sections below:
Bastion Node
This lives in its own VPC which is exposed to the internet gateway and uses a VPC peering connection to communicate with VPC2 (VPC for our private instances). An internet gateway has been associated with the VPC and an Elastic IP(EIP) has been assigned to the bastion node to allow for traffic from the internet.
The route table clearly depicts that all outgoing traffic from the bastion node except for the 10.5.0.0/16 and 10.6.0.0/16 network should be forwarded through the internet gateway. Traffic destined to 10.6.0.0/16 should use the VPC peering connection as gateway, this way, SSH traffic can get to our private instances.
For security group, we simply allow all SSH traffic from/to the public internet and block all other traffic. Here is how this can be achieved using cloud formation:
Instances in Private Cluster
We decided to place our hypothetical private cluster on the 10.6.0.0/24 subnet. The route table depicts that all traffic destined for the 10.5.0.0/16 network should use the peering connection as gateway. Internet specific outbound traffic uses the NAT instance as gateway.
For security group, we only allow SSH traffic from the 10.5.0.0/24 subnet and HTTP/HTTPS traffic from the internet(0.0.0.0/0) on Egress and deny all other protocols.
To add an extra layer of security, we use ACL allowing only SSH, HTTP and HTTPS traffic as shown in the above figure on both ingress and egress. Ports 1024–65535 has been left open for ephemeral connections since the NAT gateway requests for this ports in order to communicate with the private instances. This is shown below using this cloud formation template:
NAT Gateway
The NAT gateway has also been placed in its own 10.6.1.0/24 subnet. The route table depicts that all outbound traffic for the internet should use the Internet Gateway to properly segment the network since the NAT does not require access to the peering connection.
The security group for the NAT gateway allows only HTTP and HTTPs traffic from the internet on ingress only. Here is how this can be achieved with cloud formation:
Now we have the complete setup for the bastion architecture. There is still one last thing left out which is SSH Agent Forwarding
SSH Agent Forwarding
Why is this needed? We can simply ssh into the bastion and then jump into any of our private instances. Why this is true, it is a huge security risk. Anyone with access to the bastion host, has access to every other users private key and can impersonate that user. So credentials should not be stored on the bastion host, rather they should be forwarded from the local machine to the bastion via SSH Agent Forwarding.
Appending a -A while using the SSH command should forward your local credentials onto the next machine, however, we shall do this config via the ~/.ssh/config file to simplify our life and avoid trying to forward agent on each ssh attempt.
Add the following lines to the ssh config file:
Host bastion HostName [Bastion Public Ip address] User ec2-user #For example IdentityFile [Path to Identity file] ForwardAgent Yes
N.B: You can simply touch this file if it does not exist by touch ~/.ssh/config
Now, we can simply say ssh bastion and we are able to get into our bastion instance from which we can jump onto all other instances.
To simplify things further, we can add the following lines to either ~/.bashrc or ~/.zshrcfiles:
function ssh-instance() { BASTION_USER = # Your Bastion Username BASTION_IP = # Your Bastion IP SSH_OPTIONS = "ProxyCommand ssh -q -A -W %h:%p $BASTION_USER@$BASTION_IP" ssh $1@$2 -o $SSH_OPTIONS}
Save the file, source it via source ~/.bashrc and now you can simply just say ssh-instance ec2-user [my instance ip] and voila, you taken directly into your private instance without first having to go through bastion.
Additional Tips
It is advisable to use different ssh keys for the bastion node and private instances and have these keys frequently rotated to reduce the chances of an attacker gaining access in anyway.
Also a dedicated SysAdmin or DevOps engineer can additionally have user groups setup in each bastion node and create users assigned to these various user groups having various administrative privileges. The public ssh keys of each user should be copied into ~/.ssh/authorized_keys file.
Conclusion
This article has looked into how a foolproof bastion node can be setup for our private instances on AWS without compromising internet accessibility for these instances whenever there is a need for system/software updates.
Thanks for reading!!!