Persisting a Node API with PostgreSQL, without the help of ORM's like sequelize.
What do we mean when we use the term 'persist'? Persistence in our everyday English is "the continuance of an effect after its cause is removed", in the context of storing data in the a database, persistence refers to the ability of a record to survive after the process with which it was created has ended.
Unlike other NodeJS tutorials where data persistence is done with MongoDB, we would be using PostgreSQL instead. And also in order to make sure we get the basics of developing Restful API'S with NodeJs and PostgreSQL, we would be avoiding the use of ORM(Object-relational mapping), read more about it 👉 here.
Prerequisites :
- Go through my course on writing a basic NodeJs API with Express and Es6, you can find it below 👇
- Have a basic knowledge of SQL query syntax as this tutorial won't cover those
- Basic Knowledge of NodeJs and Express
- Have NodeJs installed, here is the download link
- Have PostgreSQL installed, here is the download link
- After installation search for the application
pgAdminand get it started, comes installed with PostgreSQL. pgAdmin is a GUI administration and development platform for PostgreSQL(meaning it helps make our DB management much easier and friendly)
Getting Started:
In this tutorial we would be creating an API for a class registry, we would get started with creating and setting up our Database.
Follow the direction below to creating a Database with pgAdmin:
1. Double click on the PostgreSQL server.
2. Right-lick on Login Roles, assuming you have none and select new login role.
3. Type your preferred Role name, mine is school_reg.
4. Move to the next tab *Definition* and set your password for this role, mine is school_reg.
5. Click on *OK* to save.
6. Right-click on Databases and select New Database.
7. Type Database name in the space for Name, mine is school_register.
8. Select owner of Database, here we would select the login role or user we created, remember mine is school_reg.
9. Click *OK* to save.
The Image above illustrates the process above, zoom in to see clearly:
After creating our Database, we would need to create tables and table relationships, in geeky terms, let's create our schema. For now we would have just one table, our student table, that would have basic information about the student, as the application grows if we choose to expand, we would have to create further tables.
Project Setup:
-
We would start by creating our project folder, i named mine
AwesomeNodepostgres, yeah i know that's long, you are free to choose a shorter name. -
Initialize your project as a node project by running
npm initfrom your command line when you have found your way to your project folder from the command line. Refer to the last tutorial to figure out how to do this if you haven't already.
Having gone through the steps above, your project directory should appear like this, assuming you are making use of my favorite code editor vscode.
Now that's out of the way, lets start by installing some packages we would need to get writing our application. We would be needing the following node packages in this tutorial;
- Express, this one we already encountered in the previous article
- To communicate with our postgres Database, we would need a package called node-postgres.
- To make sure our server is always listening for changes and restart our application, we would also install another package nodemon.
To install the first two packages, make sure you are inside the project folder from the command line. Then run the following commands;
npm install express pg --save npm install nodemon --save-dev
--save-dev here means save and only use nodemon during development as a development dependency, so during production nodemon won't be used.
Now to establish database connection, we would create a folder services, and inside the folder we would create a file named db.js.
So inside services/db.js, type the following code;
const pg = require('pg'); const config = { user: 'school_reg', //this is the db user credential database: 'school_register', password: 'school_reg', port: 5432, max: 10, // max number of clients in the pool idleTimeoutMillis: 30000,
}; const pool = new pg.Pool(config); pool.on('connect', () => { console.log('connected to the Database');
});
Now to create our tables, type the following code under the previous block of code;
const createTables = () => { const schoolTable = `CREATE TABLE IF NOT EXISTS students( id SERIAL PRIMARY KEY, student_name VARCHAR(128) NOT NULL, student_age INT NOT NULL, student_class VARCHAR(128) NOT NULL, parent_contact VARCHAR(128) NOT NULL, admission_date VARCHAR(128) NOT NULL )`; pool.query(schoolTable) .then((res) => { console.log(res); pool.end(); }) .catch((err) => { console.log(err); pool.end(); });
};
To create our table with this script we need to find a way to run this code on the command line. we can use another package for this called make-runnable, install the package; npm install make-runnable --save, after installation, go back to your codebase at the bottom of the page, add the following;
pool.on('remove', () => { console.log('client removed'); process.exit(0);
}); //export pool and createTables to be accessible from an where within the application
module.exports = { createTables, pool,
}; require('make-runnable');
Now to create our app, lets write a script on our package.json file, which when run from the command line would create a table for us. On your package.json file locate the object scripts, replace what is inside the object with the code below;
"create": "node ./services/db createTables"
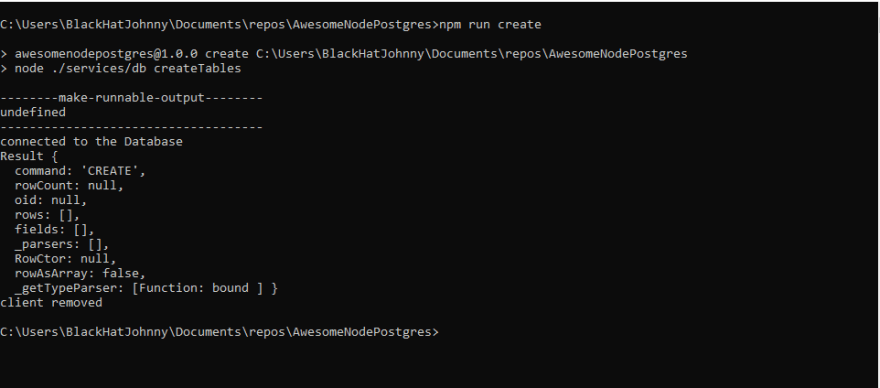
Go to your command line while still in your project directory and run;
The image below shows what happens when you do, and also look closely at where you would locate your newly created table on the pgAdmin application.
With our Database and Table creation complete, its time for us to start storing data in our database and retrieving this stored data too.
Before we do, lets create our index.js file, which would contain our server and express codes, on the project folder create a file named index.js. Type the following code into our index.js.
const express = require('express'); const app = express(); const port = process.env.PORT || 3000; // Add route code Here app.get('/', (req, res) => { res.send('Welcome to Our SCHOOL API'); }); app.listen(port, () => { console.log(`We are live at 127.0.0.1:${port}`); });
To run our app, lets add two extra codes on our scripts object found on the package.json file, before create, drop this two;
"dev": "nodemon index.js", "start": "node index.js",
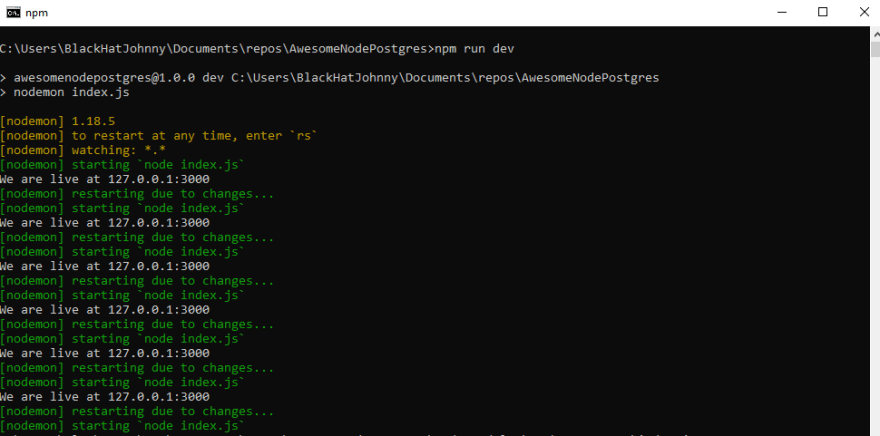
Now to run our project, we would be using the nodemon option, so whatever changes we make, we would be able to notice. Try observing how nodemon restarts the server, when you make a change and save it.
With our server up, visit the link your server is listening on, 127.0.0.1:3000 as is specified on mine. Open your postman application and make a GET request using the link.
Now lets, create routes that would handle creation of students, and fetching of all students. After the first route on your index.js file, add the following codes, these codes would handle, inserting a student, fetching all students. To be able to insert into our Database we would need to be able to pick the value supplied to the body of any request, and to do this we would use a node package called body-parser.
After installing the package above, add the following code to our index.js before continuing with our routes.Add the following below const app = express();
const bodyParser = require('body-parser');
app.use(bodyParser.json());
app.use(bodyparser.urlencoded({extended:true}));
Now lets continue with our routes;
app.get('/student', (req, res) => {
pool.connect((err, client, done) => { const query = 'SELECT * FROM students'; client.query(query, (error, result) => { done(); if (error) { res.status(400).json({error}) } if(result.rows < '1') { res.status(404).send({ status: 'Failed', message: 'No student information found', }); } else { res.status(200).send({ status: 'Successful', message: 'Students Information retrieved', students: result.rows, }); } }); });
}); app.post('/student', (req, res) => { const data = { name : req.body.studentName, age : req.body.studentAge, classroom : req.body.studentClass, parents : req.body.parentContact, admission : req.body.admissionDate, } pool.connect((err, client, done) => { const query = 'INSERT INTO students(student_name,student_age, student_class, parent_contact, admission_date) VALUES($1,$2,$3,$4,$5) RETURNING *'; const values = [data.name, data.age, data.classroom, data.parents, data.admission]; client.query(query, values, (error, result) => { done(); if (error) { res.status(400).json({error}); } res.status(202).send({ status: 'SUccessful', result: result.rows[0], }); }); });
});
Run your app, and visit the link on postman, this time visit the link 127.0.0.1/student alternating between GET and POST for each of the request. Take a look at the screenshots below and do exactly same thing if you don't know how to test with postman.
First you set your header information on postman:
After that, we would set the body values, follow the screenshot below:
Then you click Send, and holla you have your result
Now to run a get request, change request type to GET and then click send.
Wolla!!! Now we have our API fetching and sending to the Database.
Note : Having our route, server and express application on one file is bad practice, star this projects Repository on GitHub, fork and submit PR's, to learn how to, as i continue working on it, or you could try working on it yourself and submitting a push request.
Let's add one more route to our application, say we want to fetch a particular students information, we would write the route, but i expect you to write the queries and return a response, based on what you've learnt.
app.get('/student/:id', (req,res) => { const id = req.params.id; res.send(`Student ${id} profile`);
});
when we make a request to the new endpoint we would get;
SO try completing the code to pick the student whose id your are referencing from the Database.
Attached Below is the GitHub Repo as promised., don't forget to star. Thanks.
In our next tutorial, we would be looking at how we could authenticate our routes, so without proper authentication, users cant access the routes.
Checkout Repo here:AwesomeNodePostgres


