
Cloudinary Image Upload - The Setup
Before visiting this page, you might have stumbled upon tutorials on how to use the cloudinary plugin for setting up an image upload functionality on your application, but few actually talking about how to do so without the plugin, doing it the crude way, which some of us actually prefer since it gives us control to tweak things how we want. To go straight to the point in this article without cutting corners, we would be adopting more of a hands-on approach to it.
I would break down the process and use an image where necessary
To get started, create an account with cloudinary when you have, follow the steps below to process your first upload.
From your Dashboard, locate your API base URL and copy that out.
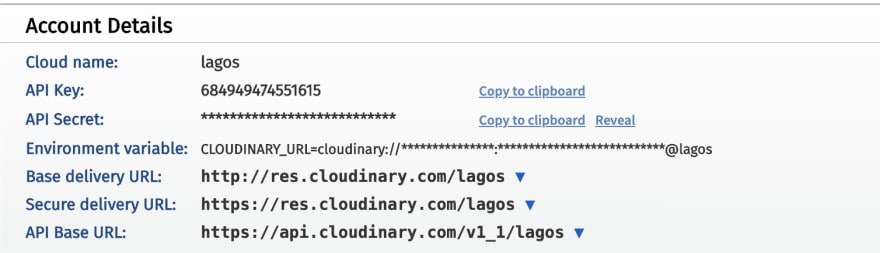
Next up we need to get our preset ID, without it, cloudinary won't process our image upload. To get this follow the steps (1 - 4), if you already have those, you can skip to the end of the article.
-
Click on the Setting icon by the top right side, see the image below for direction.

-
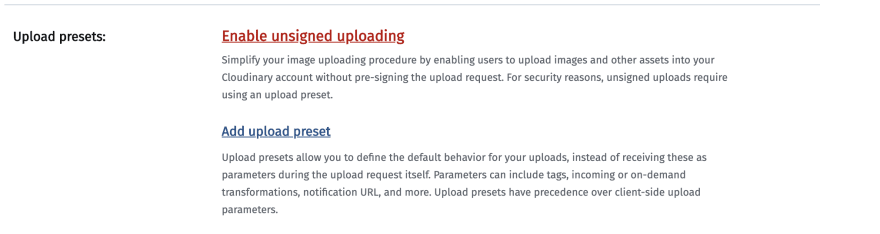
On the settings page, click on the upload tab, and scroll down to the
upload presets section. -
Click on the bold text that says Enable unsigned uploading , this allows users to upload images and other assets into your Cloudinary account without pre-signing the upload request. For security reasons, unsigned uploads require using an upload preset. To get our
upload presets; -
Click on the
Add upload presets link, on the page that opens, copy yourUpload preset nameand change thesigning modetounsignedthen SAVE.


Haven grabbed your API base URL and your Upload preset name, you can now write the code that facilitates image upload, we would use JavaScript in this example, together with the fetch API, you could use any language of your choice.
We have an HTML DUMMY File with an input field for files,
<input type="file" id="fileupload">
Now, all we need is this block of Javascript code to process this upload request, I would explain the process after the code.
const CLOUDINARY_URL = 'https://api.cloudinary.com/v1_1/lagos/image/upload';
const CLOUDINARY_UPLOAD_PRESET = 'moox1jnq';
const image = document.querySelector('#fileupload');
image.addEventListener('change', (e) => {
  const file = e.target.files[0];
  const formData = new FormData();
  formData.append('file', file);
  formData.append('upload_preset', CLOUDINARY_UPLOAD_PRESET);

  fetch(CLOUDINARY_URL, {
    method: 'POST',
    body: formData,
  })
    .then(response => response.json())
    .then((data) => {
      if (data.secure_url !== '') {
        const uploadedFileUrl = data.secure_url;
        localStorage.setItem('passportUrl', uploadedFileUrl);
      }
    })
    .catch(err => console.error(err));
});
From the code, we see that first, we need two information, our API base URL and our upload preset name. To our base URL, we would add /image/upload to it and assign it to a variable. Then we assign our preset name likewise to a variable. I named mine CLOUDINARY UPLOAD PRESET.
We check for a change in the event of the form fields state so that when the user selects an image, we check for the uploaded file information. Now to send this information to cloudinary we would use the "formData API". It provides a way to easily construct a set of key/value pairs representing form fields and their values, which can then be easily sent as a request.
We would append our uploaded file to the formData API and also append our upload preset name to the formData API, cloudinary would look for this information here. Please note, the name of the key, should always be upload_preset, no camelCase just underscore, if not cloudinary won't process the upload.
Lastly, we make a fetch request to the cloudinary Base API URL and pass in our formData as the body of the request.
If the request is processed successfully a secure_url is returned, which links you to the uploaded image.
BOOM!!!!!! BOOM!!!!!! BOOM!!!!!
Disclaimer: Please note this kind of approach may leave our image upload URL and upload preset name visible for others to use (when they simply view your site scripts), which may result to unsolicited upload of images by users with your details.
I would be changing my details at the end of the tutorial, so feel free not to use them. LOL
No particular reason, but for the sake of the tutorial. Yes you are right, using the API directly gives you that.
The cool thing about using API directly is that it’s transferrable across many different languages.
We have just finished implementation of using the same API in Elm without official cloudinary plugin support.
I think signed upload would be more secure option, any reason why you are not using that?