
Let’s Build a Video Chat App with JavaScript and WebRTC
Part 2: How to implement WebRTC using JavaScript and Node.js in the Backend

Tutorials in this Series
- Understanding WebRTC
- Implementing WebRTC in code (this tutorial)
In the previous tutorial, we learned about the fundamentals of WebRTC.
In this tutorial, we will learn how to implement those concepts in code and create a website for online video-conferencing.
Live Demo
You can see and use the website live in action at the link mentioned below. You just have to enter the room name to create/join a room.
WebTutsPlus Webcon
Note:-
- The website currently supports only 2 persons per room.
Video
You can also watch the following video to see how to use this website.
Requirements
If you have not read the previous tutorial, it is highly recommended that you read it before you begin this tutorial.
We will use the following:-
- Node.Js (version 12.14.1) — Runtime Env for JS
- Socket.IO (version 1.2.0) — for signaling in WebRTC
- Express.Js: (version 4.17.1) — BackEnd Framework
- Code Editor (Microsoft Visual Studio Code recommended)
- A Good Browser (Google Chrome Recommended)
We will use Node.Js with Express.Js Framework for the backend. If you are not familiar with Node.Js and Express.Js but you know any other MVC framework, DON’T WORRY. We have tried to explain in such a way that you should be able to understand even if you have never worked with Node.Js & Express.Js
Step 1. Setting up the Project
Let’s begin with setting up the project.
Step 1.1. Download Node.Js
- You can download Node.Js for your platform by clicking on this link. Downloading Node.Js will automatically install NPM (Node Package Manager) on your PC. NPM is the default Package Manager for Node.Js
Step 1.2. Create a node project
- Create a New Folder. This folder will be the root directory for our project.
- Open terminal/CMD in this folder and run the command npm init .
- Press the Enter Key continuosly to skip the additional configurations for the project and write YES when prompted.
- This will create a file package.json in the root directory of the project. This file will contain all the necessary information regarding our project like project dependencies.
Step 1.3. Installing dependencies
- In the terminal, run the following command. It will install the dependencies — Express.JS and socket.IO in our project.
npm install express@4.17.1 socket.io@1.2.0 --save
- The flag
--savewill save the name and versions of these dependencies inpackage.jsonfor future reference. - After the above command has finished execution, you will see a folder
node_modulescreated in the root directory of the project. This folder contains the dependencies that we have just installed.
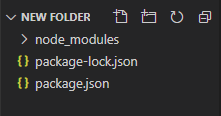
Now we have finished setting up the project. The following is the project structure at this stage.
Step 2. Creating The BackEnd
Let us now begin writing the code for the backend. Before we begin, let’s revise a few points from the previous tutorial.
- We need a backend server for signaling.
- Certain information — Candidate (network) information & Media Codecs must be exchanged between the two peers before a direct connection can be made between them using WebRTC.
- Signaling refers to the mechanism using which two peers exchange this information
The above points tell us that we have to implement a mechanism using which two clients (browsers) can send messages to each other. We will use Socket.IO for this purpose. Socket.IO is suited to learning about WebRTC signaling because of its built-in concept of ‘rooms’. Let’s first discuss what is Socket.IO
Socket.IO
- Socket.IO consists of two parts—
client Library&server Library. Obviously, theclient libraryis used on the client-side &server libraryis used on the server-side. - Socket.IO helps in implementing the following — Let’s say four clients are connected to the server. When the server receives a new message from one client, it should notify all the other clients and also forward this message to the other client. It is similar to a group chat.
- In Socket.IO, each message, that is sent to the server or received from the server, is associated with an event. So, if a client sends a message to the server on a particular event, the server will forward this message to only those clients that are listening to this corresponding event.
- There are some reserved events. However, we can also define custom events. To know about the reserved events, you can visit this link.
- Also, the clients can join a room and ask the server to send the message to only those clients that have joined a particular room.
Now that we have discussed Socket.IO, we can begin implementing the backend server
Step 2.1. Create a file index.js
- In the Express framework,
index.jsis the starting point for our server by default. So create a file index.js at the root level of our project.
Step 2.2. Create a Public folder and a views folder
-
Create the following folders at the root level of our project
public— contains the static files like CSS and JS files for the frontendviews— contains the views for the frontend
-
Our website will only contain one page. Inside the views folder, create a file index.ejs that will contain the HTML code for the frontend. Expresses uses ejs as the templating engine.
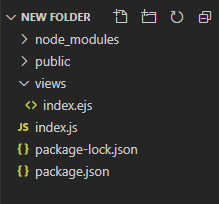
The project structure will now look like the following

Step 2.3. Initialize Express and an HTTP Server -
Now, we must initialize Express, HTTP server, and Socket.IO for our backend. To do this, paste the following code in the
index.jslocated at the root level of the project
Step 2.3. Implement Socket.IO
- Now, it is time to implement Socket.IO in the backend.
- Paste the following code in
index.jsfile
@alt
So, now we have implemented the backend of our website. The following is the complete code ofindex.js.
Step 3. Creating the FrontEnd of our website
Now, let’s create the frontend of our website
Step 3.1. Create the HTML file
- Let’s create the HTML file for our frontend.
- We will define the CSS and Javascript for the front-end in
public/css/styles.cssandpublic/js/main.jsrespectively. Hence, we must import those files. In the backend, we explicitly setpublicit as the default directory for serving static files. Hence, we will import the files fromcss/styles.css&js/main.jsin HTML. - We will also import the client library for
socket.io. - We will also import
adapter.jsfor WebRTC because implementations of WebRTC are still evolving, and because each browser has different levels of support for codecs and WebRTC features. The adapter is a JavaScript shim that lets your code be written to the specification so that it will “just work” in all browsers with WebRTC support. - We discussed STURN/TURN servers in the previous tutorials. We will import the TURN/STUN URLs from
public/js/config.js. We will create this file later in this tutorial. - Paste the following code in
views/index.ejs.
Step 3.2. Add the CSS code
- We are not explaining the CSS code.
- Paste the following code in public/css/styles.css
@alt
Step 3.3. Add the JS file
- Now, let’s add javascript to our frontend. We had already the file
public/js/main.jsinindex.ejs. It is in this file, we will implement the various methods for usingWebRTC and client library of Socket.IO - A lot of messages will be exchanged between the two clients before a direct connection is created between them. We saw this in details in the previous tutorial when we gave the example of Amy and Bernadette. It is highly recommended that you read that example. We have simply implemented each step mentioned in that article using Socket.IO
- Paste the following code in
public/js/main.js
Step 3.4. Add the STUN/TURN URLs in config.js
- To make this website in the real world, we must specify TURN/STUN configuration to
RTCPeerConnection(). There are a lot of companies that provide free STUN/TURN servers. We will use the servers offered by XirSys. - Steps to obtain the TURN/STUN URLs from XirSys are mentioned in this README file
- Paste the obtained configurations in
public/js/config.js - Following is how
config.jswill look. (The urls will be different
Congratulations!
You have now created a web-conferencing website. To deploy your website on localhost and test it, follow these steps
- Open a terminal in the root directory of our project.
- Run the following command — node
index.js. - Open Google Chrome and visit
localhost:8000. Enter a room name (say foo). You should see your video. - Open a new tab and visit
localhost:8000. Enter the same room name (foo). You should now see two video elements.
You can find the complete code in this