
A Simple Site Made With Spring MVC Architecture – webtutsplus
Demonstration Of Our Web Application with Spring Boot
Nowadays, developers tend to move towards frameworks than using the actual Language itself for development. The reason is their simplicity as well as their power of development.
Considering Spring, it is totally a monster of frameworks! Spring has many advantages; Spring provides a lightweight container that can be activated without using web server or application server software. It gives good support for IoC (Inversion of Control) and Dependency Injection results in loose coupling. With that, the interaction with the Database becomes a piece of cake!
In this tutorial, we are gonna develop a site in our local server that support user registration and login using spring boot. We are going to follow MVC (Model – View – Controller) architecture in this tutorial.
Prerequisites
- Knowledge in Core Java
- Coding skills
- Knowledge in Servlet and JSP
- Java Development Kit (JDK)
- Spring tool suite 4 IDE – open source (recommended)
- MySQL database – You can get it here !
- A good browser (Chrome – recommended)
Make sure you have all the listed prerequisites softwares installed and have a basic knowledge on the request – response cycle as well as web containers. What more ? Let’s jump into the tutorial!
 *Spring tool suite *
Project Setup
- Open Spring Tool Suite application
- Navigate to your workspace
- Click File -> New -> Project ->Spring Starter Project
- Give the essential data in the opened dialog box
- The specifications given for my project is listed below


Dependencies
The dependencies I am adding to this project are given below. You can either add them during the creation of the project itself or later search for them in Maven repository and add the tags of required version in the pom.xml file.
- Spring boot starter web
- Tomcat embed jasper
- Spring boot starter data jpa
- Mysql connector java
- Spring boot starter test
Project Hierarchy
The hierarchy is the important thing to notice in MVC design structure. My project hierarchy is as below.
 Project hierarchy
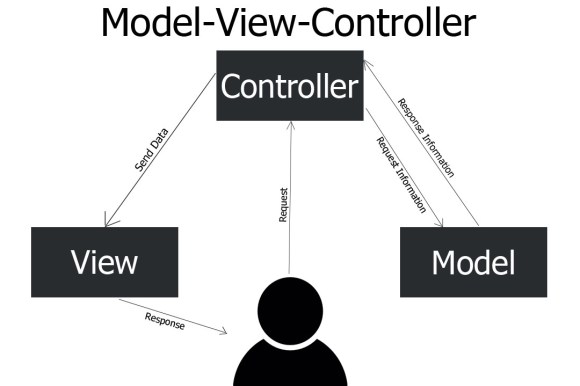
Model – View – Controller
Here we shall see a brief on MVC architecture. Simply, it is a method of arranging our files based on their functionality. Rather than creating all our files in the same package, we shall split it and store it to achieve a great architecture for our project to make our code easily maintainable.
Model – The file that stores the model or a structure of the objects that we are gonna deal with in our project will be stored here. In our project, it contains the User class.
View – The files that are responsible for the content that is shown in the screen of the client are stored here. It mostly contains the template files of a project.
Controller – The file that is responsible for the navigation of the site and controls the tasks running in the back end are stored here.
 MVC architecture
Packages in our project
The newly created project will be having a package of your group name.firstapp in src/main/java which contains the main class. There are no modifications in the class because it contains the main method. In this package we are gonna create four more inner packages:
- com.giridhar.firstapp.controller
- com.giridhar.firstapp.model
- com.giridhar.firstapp.services
- com.giridhar.firstapp.repository
controller package for having the files that control the server
model package for having User class
services package for executing tasks on users with repository
repository package to contain and work on users repository
In src/main we are adding a folder webapp, that further contains the folder WEB-INF, that contains the folder ‘ view ‘. The view folder is to keep all jsp files that are displayed to the users.
Database setup
Before coding the actual project, we need to create a database for our project and a table to store user details in MySQL. The steps can be found here.
In our project, the database name is spring_app_db and the table name is users. The table description is as below:
 Users table description
Application Properties Configuration
In src/main/resources there is file called application.properties which is responsible for the database connectivity and view resource locating. First two lines set the view folder as the default folder to fetch views for our site. Other lines are responsible to connect the mysql database to the server. The configuration is as below:
 application.properties file content to be entered
The project repository that I have done can be found in this bitbucket link. You can follow up the tutorial to find the explanation for the code.
Repository package
It contains the interface for user repository, whose object is created at runtime for usage. It will be supporting CRUD operations in the database by implementing crudRepository interface. It has an abstract method findByUserNameAndPassword() that fetches user with given user name and password. Annotations used are as below –
@Repository – specifies that this interface will be defining the repository for the project
Services Package
It contains the UserService class that contains a field of UserRepository object. All the database operations like saving and fetching the users are initiated from here and performed through its data field and member methods. Annotations used are as follows –
@Service – Represents that this class elicits users service
@Transactional – Represents that the class methods perform transactions over the database.
Model Package
This contains the User class that gives the object for the users. It accepts name, username and password to create a user. The annotations used are as follows –
@Entity – It specifies that the class is an entity and is mapped to a database table.
@Table – It specifies the table name to which the entity is mapped
@Id – It specifies that the property is the Id in the table
@Column – It species that the property is a column in table with the specified name.
Controller Package
This package contains the the AppController class that decides that decides on which method to be called when and how. The requests come to the controller and it is processed by the controller. The string returned by its methods are mapped to views to elicit a response. When users login, session attributes are set here. The annotations used are as follows-
@Controller – It depicts that the class is the controller part of the application
@Autowired – It is for the Inversion of Control. The control of dependency for the project ‘UserService’ object is injected or inversed to the application. This is called dependency injection
@RequestMapping – It specifies that the method should be called when the given URL pattern is encountered.
View folder
It contains the JSP files to decide the view of the clients. The JSP files get session attributes and request object parameters set by the controller to decide on what to show when. It contains two JSP files, one to show before login and another to show after login.
Hurray! We have completed the coding portion for our application. Now let’s run this application.
Running the application
Right click the root folder of the application -> Run As -> Spring Boot App

If the console didn’t prompt any error, proceed to the browser and go to the localhost using the default port 8080 as
localhost:8080 or 127.0.0.1:8080

Yohooo! Our application is working fine! Now users can be registered and logged in with our site. The screenshots of registration and login are as follows –
 Registration
 Login
Login
 User Dashboard
Hope you had a great session with us! Follow us for such great and awesome tutorials !