
Handbook for React projects - Applozic Blog
In this blog post, I’ll write about things that we should finalise before starting a react project. These include topics like Rendering, Language selection, Routing, Data fetching, State management, Testing and Folder structure. I will go over each of these topics and provide best practices that we can follow so that our project is scalable and maintainable in the long run.
Rendering
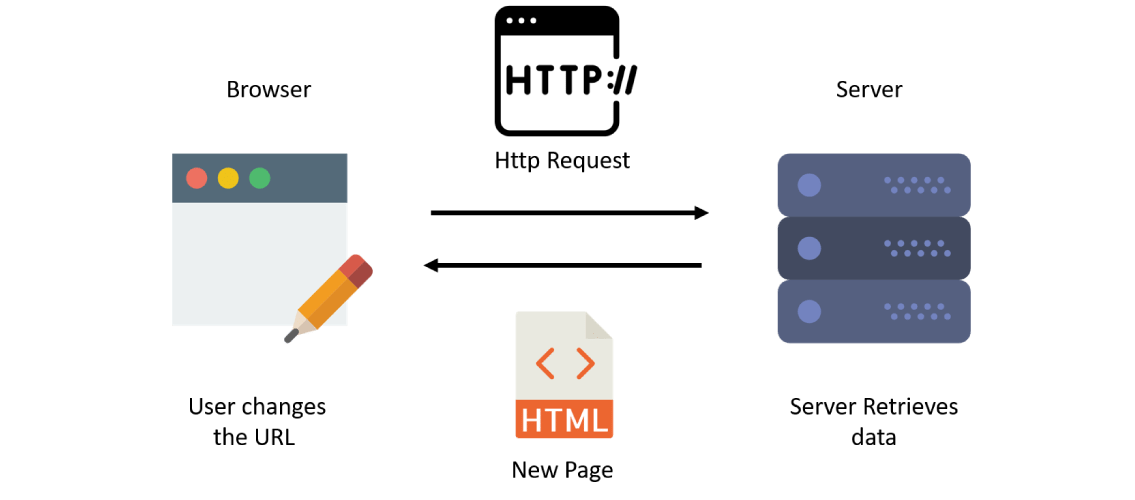
Let’s start with rendering. Rendering is a process that is triggered by a change of state in some component of your application, when a state change occurs. We have three types of rendering:
- Client side rendering,
- Server side rendering, and
- Pre rendering.
 Rendering in React
 Rendering in React
You can choose between these different types of rendering based on your application needs.
If you use create-react-app to bootstrap your react project, you will get only client side rendering out of the box. For server side rendering and pre rendering, I would recommend using Next.js. Next.js supports all the three renderings.
Language selection
Here we have two options, JavaScript and TypeScript. TypeScript is a superset of JavaScript and it has a lot of benefits over JavaScript.
Here are a few advantages of TypeScript
- Fail fast – Catch errors in compile time.
- Better intellisense.
- Better code readability.
- Fast and confident refactoring.
Both create-react-app and Next.js have the option to bootstrap your application using TypeScript. TypeScript does have a little learning curve, but I would still highly recommend going with TypeScript.
Routing
If you are using Next.js, then routing is provided out of the box. When you create react components inside the pages folder, routes are generated based on the file name of your react components.
 Routing
If you are using create-react-app, you have two major options: React router and Reach router. In the future these two will be unified to become React router. For new projects it is recommended to use Reach router as it’s API looks slightly more like the new API so it’ll be easier for you to migrate once the unification happens.
Data fetching
Data fetching can get very messy in the long run, if you just use useEffect for HTTP requests. That’s where react-query comes in. It provides a powerful and easy to use hook based API for all your data fetching needs. I highly recommend using react-query.
These are some of the features of react-query:
- Status states for requests.
- Dependent and parallel requests.
- Caching and re-fetching.
- Optimistic updates.
- Dedicated dev tools.
You can check out a tutorial on React Query on Applozic Blog here!
State management
 React state management. Image Courtesy: LoginRadius Engineering
If you are using react-query, then all your data fetching states like loading states, error states, response states are already handled.
For local component level states, go with the useState hook. If you have a complex state logic that involves multiple sub-values or when the next state depends on the previous one, go with the useReducer hook.
If you need states that need to be shared with multiple components go with Context. Don’t have a global context unless it’s absolutely necessary, for example, global theme state. In almost all cases, keep states as close to where it’s needed as possible.
If you are dealing with more complex UI states that transition to different states, then you might want to consider giving XStatea try.
Testing
Unit testing
To test the functionality of react components in isolation, render that particular component using testing-library/react and test various functionalities by triggering events and asserting the changes.
To test the presentation components, go with jest snapshots.
To test the custom hooks, create an example component which uses your custom hook, render the example component with react testing library and test the hooks functionality. If the hook is complex, then you might end up creating a bunch of example components which are hard to maintain. For this case, you can use the renderHook function from testing-library/react-hooks and test it’s functionality.
Integration testing
For integration tests, render your top level App component using testing-library/react and test the various functionalities by triggering events and asserting the changes. You can mock the HTTP requests using msw.
End to end testing
End to end tests can give you a great deal of confidence as your tests will run in an actual browser, and mimics the actions that the end user might perform while using your application. For this I would recommend using Cypress or Puppeteer.
If you want to test styles in your application, consider using Cypress Visual Regression or Percy.
Folder structure
Take some time and finalise the folder structure of your project based on the need and follow it. Knowing where a certain functionality resides just by looking at the folder structure will definitely help you in the long run. Here is a folder structure that works for me.
- src/
--- components/
------ Component.tsx
------ tests/ (components unit tests)

--- pages/

--- context/

--- hooks/
------ useSomeHook.ts
------ tests/ (hooks unit tests)

--- utils/
------ someUtil.ts
------ tests/ (Utils unit tests)

--- tests/ (Integration tests and end to end tests)

--- assets/

--- public/

--- styles/

--- App.tsx

- root level config files for eslint and prettier etc
Conclusion
Do consider these topics before starting your React projects. You don’t have to follow all my recommendations that I provided here. You can use these as a reference and decide based on the application needs and what works for you. Hope you find this useful.