Validate form submission
Introduction
I am sure you ever implemented login, register form at least once in your life. What did you do?
Below is some basic steps for register flow:
- Validate email: empty, invalid
- Validate password: empty, too short password, some situations, you need check it contains at least 1 uppercase character or other conditions.
- Submit form
I did that many times and found validating in controller is not the good way. I found a better way to do that. Share you today.
This is definitely not the best practice to validate form submission, but much better than the method I told you above. Let's see how it work
Download the starter project at FormValidator.
Very simple UI with email, password, phone number.
How it works
Create new file RegisterValidator.swift and enter code below.
extension RegisterController {
    struct Validator { }
}
We create Validator struct inside the RegisterController. We also can do that for LoginController. It's not conflict together. Same name in different namespace.
1. Define your properties
struct Validator {
    var email: String?
    var password: String?
    var phone: String?
    mutating func setValue(email: String?, password: String?, phone: String?) {
        self.email = email
        self.password = password
        self.phone = phone
    }
}
You can add more properties like your requirement, sometimes need to have first name, last name or address.
2. Validate your properties
func check() -> ValidatorResult {
    guard let email = email else {
        return ValidatorResult(isValid: false, message: "Email can't be empty")
    }

    if email.isEmpty == true {
        return ValidatorResult(isValid: false, message: "Email can't be empty")
    }

    if email.isValidEmail() == false {
        return ValidatorResult(isValid: false, message: "Invalid email")
    }

    guard let password = password else {
        return ValidatorResult(isValid: false, message: "Password can't be empty")
    }

    if password.isEmpty == true {
        return ValidatorResult(isValid: false, message: "Password can't be empty")
    }

    if password.count < 6 {
        return ValidatorResult(isValid: false, message: "Password must have at least 6 characters")
    }

    guard let phone = phone else {
        return ValidatorResult(isValid: false, message: "Phone can't be empty")
    }

    if phone.isEmpty == true {
        return ValidatorResult(isValid: false, message: "Phone can't be empty")
    }

    return ValidatorResult(isValid: true, message: nil)
}
We validate every factor of every property, and return correct error to user. For instance, you can tell user empty email error or invalid email or password length.
Clear enough? I think yes. You can check every requirement here, add or remove conditions quite easily with this way.
3. ValidatorResult
We need something to return to users, you can add more convenience things in ValidatorResult. I use the basic thing only.
struct ValidatorResult {
    var isValid = true
    var message: String?
}
4. Setup controller
@IBAction func registerAccount(_ sender: Any) {
    validator.setValue(email: emailTextField.text,
                       password: passwordTextField.text,
                       phone: phoneTextField.text)
    let result = validator.check()
    if result.isValid == false, let message = result.message {
        showMessage(message: message)
        return
    }

    callRegisterApi(email: validator.email!,
                    password: validator.password!,
                    phone: validator.phone!)
}

func showMessage(message: String) {
    let controller = UIAlertController(title: "", message: message, preferredStyle: .alert)
    controller.addAction(UIAlertAction(title: "OK", style: .default))
    present(controller, animated: true)
    return
}
We can put exclamation point - ! at validator.email, validator.password here, because they're not nil, sure.
Much better when we check result by switch...case. Your code is cleaner and good for complicated projects. (Thanks Bishal Ghimire for suggestion).
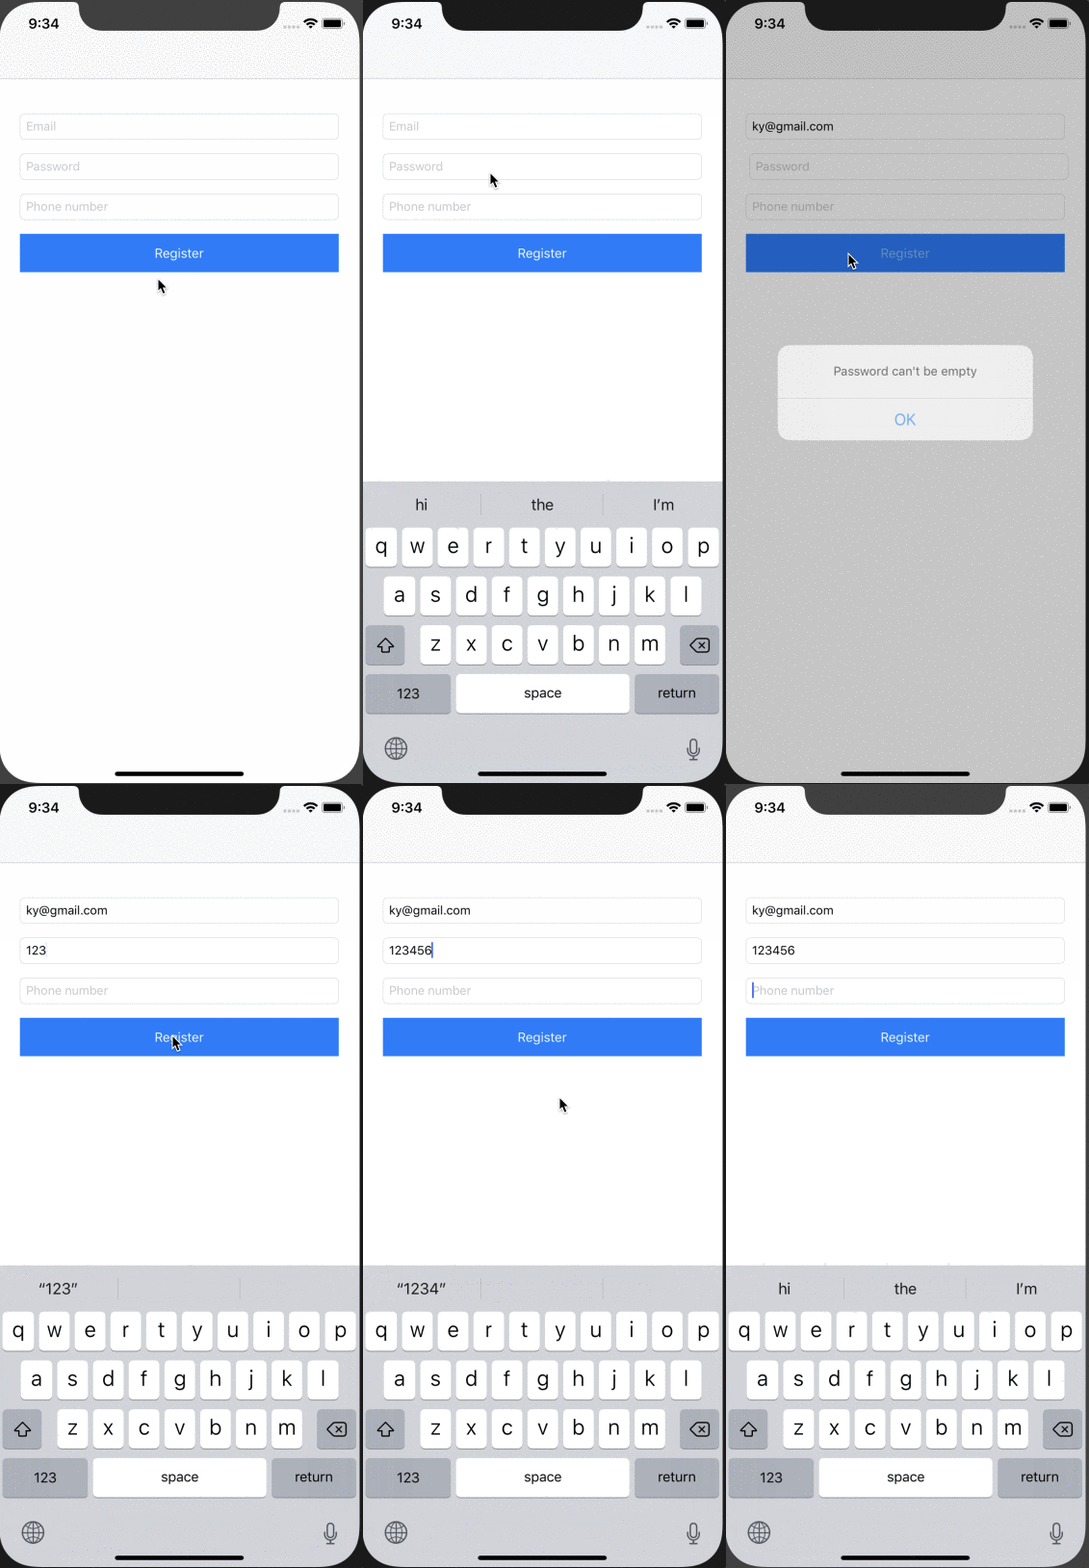
5. Run and see
We need an extension to check email validity.
extension String {
    func isValidEmail() -> Bool {
        let emailRegEx = "[A-Z0-9a-z._%+-]+@[A-Za-z0-9.-]+\\.[A-Za-z]{2,64}"

        let emailTest = NSPredicate(format:"SELF MATCHES %@", emailRegEx)
        return emailTest.evaluate(with: self)
    }
}
Ready to run.

You can download the completed project here.
Improvement
What do you think we can make better here? Is it better if focus on the error textfield? Or change the error textfield background color? Or shake it?
Yes, it will be much better. Add some code and make it done.

This post is too long now. You can check branch improvement to see how to improve it. Download at improvement.
Conclusion
The most convenience thing of this way is, you can reuse Validator everywhere you want, change properties and conditions a bit. Hope it can help you in coding.
There are lots of way to do validation. Please share everyone what you are doing below. Share to grow.
Enjoy coding.

Nice & explained in a very simple manner.
I would like to suggest some small changes
if result.isValid == false, let message = result.message {
showMessage(message: message)
return
}
Rather than using the IF check, the switch would make this code cleaner. As in real production app, we have to show the error message on UILabels with colors property and hidden properties, etc, it would make code clean if we can refactor to Switch Case.
Thanks for suggestion. I updated the post.
Amazing job. Thanks for sharing.