
How to create a store locator app using Vuejs, Cosmic JS, and Google Maps.
store locator app build using Vue, Cosmic JS, and Google Maps
TL;DR:
Intro
This little application can be used to allow users to search, and locate your stores. If stores are not relevant to your business, you can it to locate your offices, branches, warehouses… or whatever your business is into. To make this work you need to define a list of your locations that the user can find and locate.
The backend
Using Cosmic JS can saves you a lot of time, because it will allow you to store your data, and also have a REST api ready without any extra coding. For the purpose of this app I used the following features of Cosmic JS:
- Bucket Objects: to store data on the backend like cities, states, where the stores are available.
- Bucket Media: to store application images and Google maps icons. This is very convenient to have data and media stored in one place.
- Web Hosting: to host my application I used Cosmic JS, however you can also use Cosmic JS to deploy your app into other hosting services.

Cosmic JS dashboard — adding cities where your store is available
Starting your vue application
After installing vue-cli you can run the following commands to start building your application
$ npm install -g vue-cli
$ vue init webpack store-locator
$ cd store-locator
$ npm install
$ npm install --save vuex vuetify vue-router vue-resource vue-googlemaps cosmicjs moment
$ npm run dev
The vue application will have two major components:
- SearchPanel.vue : allow the user to select a city, and get a list of stores
- MapPanel.vue: display the coresponding map with a marker for each store
You can easily build the application layout with vuetify grid system without the need to write a lot of css.
Adding state management with Vuex and Cosmic JS
import Vue from 'vue'
import Vuex from 'vuex'
import VueResource from 'vue-resource'
import Cosmic from '../api/cosmic'

Vue.use(Vuex)
Vue.use(VueResource)

export default new Vuex.Store({
    state: {
        userLocation: {},
        selectedLocation: {},
        selectedStore: null,
        availableLocations: {},
        stores: []
    },
    getters: {
        ...
    },
    mutations: {
        ...
    },
    actions: {
        ...
    }
})
We need to call Cosmic JS rest api when the application is created to fetch cities which will be used in the search. So in the code below two things are worth mentioning. First we are initializong VueGoogleMaps component with the GOOGLE_API_KEY which is provided from google api console. Second we are calling this.$store.dispatch('fetchCities') to populate the availableLocations on the vuex store file. We can also call this.$store.dispatch('fetchStoreCardImages') that will call Cosmic JS REST api to fetch all images stored within the Media folders.
import Vue from 'vue'
import Vuetify from 'vuetify'
import 'vuetify/dist/vuetify.min.css'
import VueGoogleMaps from 'vue-googlemaps'
import 'vue-googlemaps/dist/vue-googlemaps.css'
import App from './App'
import router from './router'
import store from './store'

Vue.use(Vuetify)

Vue.use(VueGoogleMaps, {
    load: {
        // put your google API key either in the ./config/local.env.js file or just hardcode in the string below
        apiKey: process.env.VUE_APP_GOOGLE_API_KEY || '',
        libraries: ['places'],
        useBetaRenderer: false
    }
})

Vue.config.productionTip = false

/* eslint-disable no-new */
new Vue({
    el: '#app',
    router,
    store,
    components: { App },
    template: '<App/>',
    created () {
        this.$store.dispatch('fetchMapIcons')
        this.$store.dispatch('fetchCities')
        this.$store.dispatch('fetchStoreCardImages')
    }
})
This is the code to call to configure Cosmic JS REST API. You can get the Api read, and write keys after you sign up, and add your Bucket.
const config = {
    bucket: {
        slug: process.env.COSMIC_BUCKET || 'store-locator',
        read_key: process.env.COSMIC_READ_KEY,
        write_key: process.env.COSMIC_WRITE_KEY
    },
    object_type: 'cities'
}

export default config
The Bucket is the root container for all data, files, images for your app.
import Cosmic from 'cosmicjs'
import Config from './config'

export default Cosmic().bucket(Config.bucket)
In the code below as you can see in the fetchCities action we call Cosmic JS api to select all objects of type cities and loop through the result array and create another object to populat the store availableLocations variable which in turn will be used in the SearchPanel component to display a list of available locations.
...
actions: {
        ...
        fetchCities ({commit, dispatch, state}) {
            // will populate the cities from cosmic js REST API
            const params = {
                type_slug: 'cities'
            }
            Cosmic.getObjectsByType(params)
                .then(data => {
                    let locations = {}
                    let country = ''
                    data.objects.forEach(city => {
                        const cityKey = city.slug.toUpperCase()
                        const stateKey = city.metadata.state.slug.toUpperCase()
                        ...
                        locations[stateKey][cityKey].city = city.title
                        locations[stateKey][cityKey].state = city.metadata.state.title
                        locations[stateKey][cityKey].postalCode = city.metadata.postal_code
                        locations[stateKey][cityKey].dataUrl = city.metadata.data_url
                        locations[stateKey][cityKey].country = country
                        locations[stateKey][cityKey].geoPoint = {
                            latitude: city.metadata.lat,
                            longitude: city.metadata.lng
                        }
                    })
                    commit('SET_AVAILABLE_LOCATIONS', locations)
                    // set the initial default location
                    dispatch('updateSelectedLocation', {state: 'FL', city: 'ORLANDO', postalCode: '32821'})
                })
                .catch(err => {
                    console.log(err)
                })
        }
    }
Also in very similar way we can call Cosmic JS REST Api to fetch images and store them in Vuex store using Cosmic.getMedia(...)
...
action: {
  ...
  fetchStoreCardImages ({commit}) {
      // will get the images from Cosmic js media folder and store in vuex
      const params = {
          folder: 'store-card-images'
      }
      Cosmic.getMedia(params)
          .then(data => {
              commit('SET_STORE_CARD_IMAGES', data.media)
          })
          .catch(err => {
              console.log(err)
          })
  }
  ...
}
Adding Google map to your vue application
To display a map, I have used vue-googlemaps component, which is an easy to use Vue component that acts like a wrapper around Google Maps Javascript API. In order to draw a map, you need to provide the mapCenter point which is a geocode of a specific location. For instance Orlando center downtown have the following geopoint {latitude: 30.325974,longitude: -81.660454}. Also to draw a marker on the map that represents a store or a special location, you need a geopoint, a title, and an icon. For the purpose of this application I stored the geolocation of different cities, and stores in Cosmic JS backend.
You may be asking how do I get the geolocations for my home address or work office. There several services that can convert a regular address to a geolocation, and vice versa. But the easiest way, is to open Google maps, and click on any point on the map. Then you will see down the bottom a geopoint of that location.
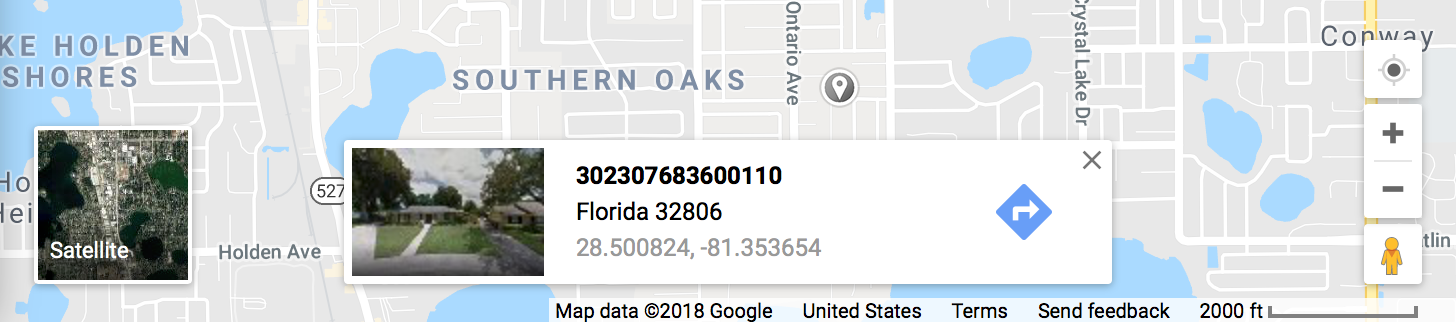
Google maps showing a geolocation of selected point
Here is the code to draw a map when the application starts
<template>
    <div class="map-panel-container elevation-8 brown lighten-4">
        <googlemaps-map
            ref="map"
            class="map"
            :center.sync="mapCenter"
            :zoom.sync="zoom">

            <googlemaps-marker
                v-for="marker in mapMarkers"
                :key="marker.id"
                :title="marker.title"
                :animation="marker.animation"
                :icon="marker.icon"
                :position="marker.position"
                @click="onMapMarkerClick(marker.id)"
                @mouseover="onMapMarkerMouseOver(marker.id)"
                @mouseout="onMapMarkerMouseOut(marker.id)">
            </googlemaps-marker>

        </googlemaps-map>
    </div>
</template>
<script>
import {mapActions} from 'vuex'
import EventBus from '../eventBus'

export default {
    data () {
        return {
            mapCenter: {lat: 0, lng: 0},
            zoom: 11,
            mapMarkers: null,
            ...
        }
    },
    computed: {
        selectedLocation () {
            return this.$store.getters.selectedLocation
        },
        selectedStore: {
            get () {
                return this.$store.getters.selectedStore
            },
            set (value) {
                this.updateSelectedStore(value)
            }
        },
        stores () {
            return this.$store.getters.stores
        },
        ...
    },
    watch: {
        selectedLocation () {
            this.updateMapCenter(this.selectedLocation)
        },
        selectedStore (newValue, oldValue) {
            this.selectMapMarker(oldValue, false)
            this.selectMapMarker(newValue, true)
        }
    },
    ...
}
In the MapPanel vue component we are using vue-googlemaps to display Google map. All we have to provide is mapCenter, zoom, mapMarkers. We have a couple watchers to update the map. First is the selectedLocation which is triggered whenever the user selects new city from the SearchPanel. We are also watching for stores to populate the map with the markers, which display a little icon for each store within that location. We are also watching for selectedStore to make the corresponding map marker highlighted. This is how we update the map view
methods: {
        ...
        updateMapCenter (location) {
            this.mapMarkers = null
            setTimeout(() => {
                this.mapCenter.lat = location.geoPoint.latitude
                this.mapCenter.lng = location.geoPoint.longitude
                this.zoom = 11
                this.addMapMarkers()
            }, 500)
        },
        addMapMarkers () {
            // go through the stores list and add a map marker for each
            let markers = {}
            for (let i = 0; i < this.stores.length; i++) {
                const marker = {}
                marker.id = this.stores[i].id
                marker.title = this.stores[i].displayName + '\n' + this.stores[i].address.address + '\n' +
                    this.stores[i].phone
                marker.animation = 4
                marker.position = {
                    lat: this.stores[i].geoPoint.latitude,
                    lng: this.stores[i].geoPoint.longitude
                }
                marker.icon = {url: this.mapIcons.defaultIcon, scaledSize: this.mapMarkerIconSize}
                markers[this.stores[i].id] = marker
            }
            this.mapMarkers = markers
        },
        ...
        selectMapMarker (id, isOn) {
            // will make the specified id marker either heilighted or not
            if (this.mapMarkers && this.mapMarkers[id]) {
                const url = isOn ? this.mapIcons.selectedIcon : this.mapIcons.defaultIcon
                const icon = {url: url, scaledSize: this.mapMarkerIconSize}
                this.mapMarkers[id].icon = icon
                if (isOn) {
                    const storeLocation = Object.assign({}, this.mapMarkers[id].position)
                    this.centerOnStore(storeLocation)
                }
            }
        }
    },
And lastly we just need to add a couple events on map. The first event onMapMarkerClick to make the marker icon highlighted, and also make the corresponding store selected on the search pane. onMapMarkerMouseOver to add a little animation to make the icon jump up and down.
Build and deploy
After you build your application and testing it, you need to add .env file to you root folder to have you application configuration, which look like something like this.
GOOGLE_API_KEY=PASTE-YOUR-API-KEY-HERE
COSMIC_BUCKET=store-locator
COSMIC_READ_KEY=PASTE-YOUR-API-KEY-HERE
COSMIC_WRITE_KEY=PASTE-YOUR-API-KEY-HERE
PORT=5000
You also need to add start command to package.json script, which will be used by Cosmic JS hosting to start your application server. Once you update your Api keys, you can just build and deploy to Cosmic JS using the following commands
$ # to run you app on dev mode
$ npm run dev
$ # to test your production server mode
$ npm run start
$ # to build your application before deployment
$ npm run build
$ # commit all changes to github
$ git add .
$ git commit -m 'Before deployment'
$ git push
Now you can just go to Cosmic JS web hosting, and follow the instructions to deploy your application.
Conclusion
Adding Google maps to your application is fun and easy way to enhance user experience. Using Vue.js for this application was also big time saver. However with Cosmic JS I was able to have full stack application with server Rest Api with no additional coding. I think Cosmic JS is an owesome cloud platform, that can boost your development without extra coding.
I would love to hear from you
Lastly, I encourage you to go through the source code, try the application and let me know if you have any questions or comments below.
Keep creating awesome apps.
Cheers.