
Optimizations Beyond the Big O — Performance Tricks I Learned at Google
Original article posted on Medium: https://medium.com/better-programming/optimisations-beyond-the-big-o-that-i-learned-at-google-5014d5c9d28a
I did learn many of these at university, but either didn’t fully understand them or forgot due to lack of practice. Using it at work was a game changer!
For many of us in the field of computer science, our early education in this area starts with the concept of big O or big Omega(Ω).
Big O is used in computer science to describe the performance or complexity of an algorithm. Big O is used to describe the worst case complexity of algorithms while Big Omega is used to describe the best case complexity.
For many of us, it might be our biggest nightmare as well. Software engineering interviews often involve technical questions which requires interviewee to come up with optimised algorithms within a strict timeframe.
A single programming problem can be solved in several ways so the key aspect is often to reduce the time and space complexity — the big O.
A quick example of this would be — searching for an element in a sorted array.
- The brute-force algorithm has O(N) complexity.
- OTOH, a binary search would have O(logN) complexity.
What this means is, that if you had about 10⁶ elements in the sorted input array
- With the brute force approach it would require 10⁶ iterations in worst case.
- While with binary search (optimised) you would need about
log2(10^6) ~ 20iterations.
I haven’t done interview preparations very often, but every time I have — I have found it to be a fun journey. In general at work too, I love taking a piece of code and finding ways to make it faster or more efficient in other aspects (optimizations). If I were to be completely honest it’s a source of dopamine for me  .
.
Luckily my work at Google has allowed me to spend a great deal of time at that. I work on a product called Camera from Google. It’s an Android Camera app for low-end Android devices. Thus, my work involves researching and implementing high-quality computational photography algorithms that can run feasibly on low-end mobile hardware.
Contrary to my work at Microsoft which revolved around distributed systems, this has helped me learn about optimizations that go beyond the standard approaches. I have covered some key differences between working in the two domains in a different article:
I Worked at Microsoft Cloud and Google Mobile for 3 Years — Here Are the Differences in Ecosystems
Why working on cloud vs. mobile (Edge) is so different?
Optimisations beyond big O involve taking advantage of modern hardware design to execute your algorithms in the least amount of time. It’s not just about reducing the number of iterations but also about reducing the time spent on bringing data from main memory to CPU registers, leveraging different types of parallelism, reducing IDLE CPU time, reducing avoidable branching, and so on.
This article will cover a few examples of such optimisations with evidence.
Foreword
I’ll be using Halide code examples in this article. I wrote in-depth about Halide in a series of articles.
TL;DR; Halide is a domain-specific language that makes it easier to write high-performance image and array processing code on modern machines.
All the numbers presented in this article are measured using code written in Halide/C++, built with compiler optimisations enabled, and measured using the microbenchmark framework.
The benchmarks were run on a certain mid-end octa-core, arm64 Android device. All mentioned approaches are run on the CPU.
Vectorisation
Traditionally we think of CPUs as a scalar machine. Let’s take an example of problem of generating a gradient image like this

Gradient image generated using matplotlib (cmap=vidris). Image by Author.
It can be expressed as f(x, y) = x + y or for a 2D array as a[y][x] = x + y.
In our scalar mindset, we imagine it to be executed once for each pixel for WIDTH * HEIGHT times thus giving a O(WIDTH * HEIGHT) time complexity.
This used to be true in the past. Earlier CPUs used to only have SISD capabilities. SISD stands for Single Instruction Single Data.
On the contrary, modern CPUs have SIMD capabilities. SIMD stands for Single Instruction Multiple Data.
Modern CPUs can execute single instruction on a vector of data (multiple data) at once in a single execution cycle depending on data type and CPU register size.
Let’s say you were doing an addition operation like a[i] = a[i] + b[i]. Instead of running it individually per index, a modern CPU could execute it as vector:
a[i + 0] = a[i + 0] + b[i + 0];
a[i + 1] = a[i + 1] + b[i + 1];
a[i + 2] = a[i + 2] + b[i + 2];
a[i + 3] = a[i + 3] + b[i + 3];
In one go.
It’s not restricted to just adding 4 numbers either — depending on the data type (For example uint8 = 1 byte, int32 = 4 byte) and register size on processors & supported instruction sets — the max number of data elements can be processed in a single CPU cycle can vary.
You may have seen more and more DSPs (Digital Signal Processor) coming into picture these days(like Hexagon from Qualcomm). Amongst other thing, they tend to have very wide registers meant for supporting wide SIMD arithmetic. This enabled them to support much efficient data parallel operation.
Visualisation
If things are still not clear, allow me to present some graphics. This is how your scalar execution of gradient would look like for a 4x4 image.

Execution order of the gradient example — default. Source: halide-lang.org, Apache license.
And this is how it would look like with SIMD (for a4x8 image)

Figure: Execution order of the gradient example — vectorisation. Source: halide-lang.org, Apache license.
Benchmark results
I am well aware of you number hungry folks, you won’t buy it until I show some numbers!
Code
// Algorithm
output_(x, y) = u8(u16(x + y) % 256);

// Schedule 1 without vectorisation
output_.compute_root().vectorise(x).reorder(x, y);

// Schedule 2 with vectorisation
output_.compute_root().reorder(x, y);
Halide algorithm for gradient written to a u8 image and two schedules. First one is without vectorisation and other with vectorisation.
Result
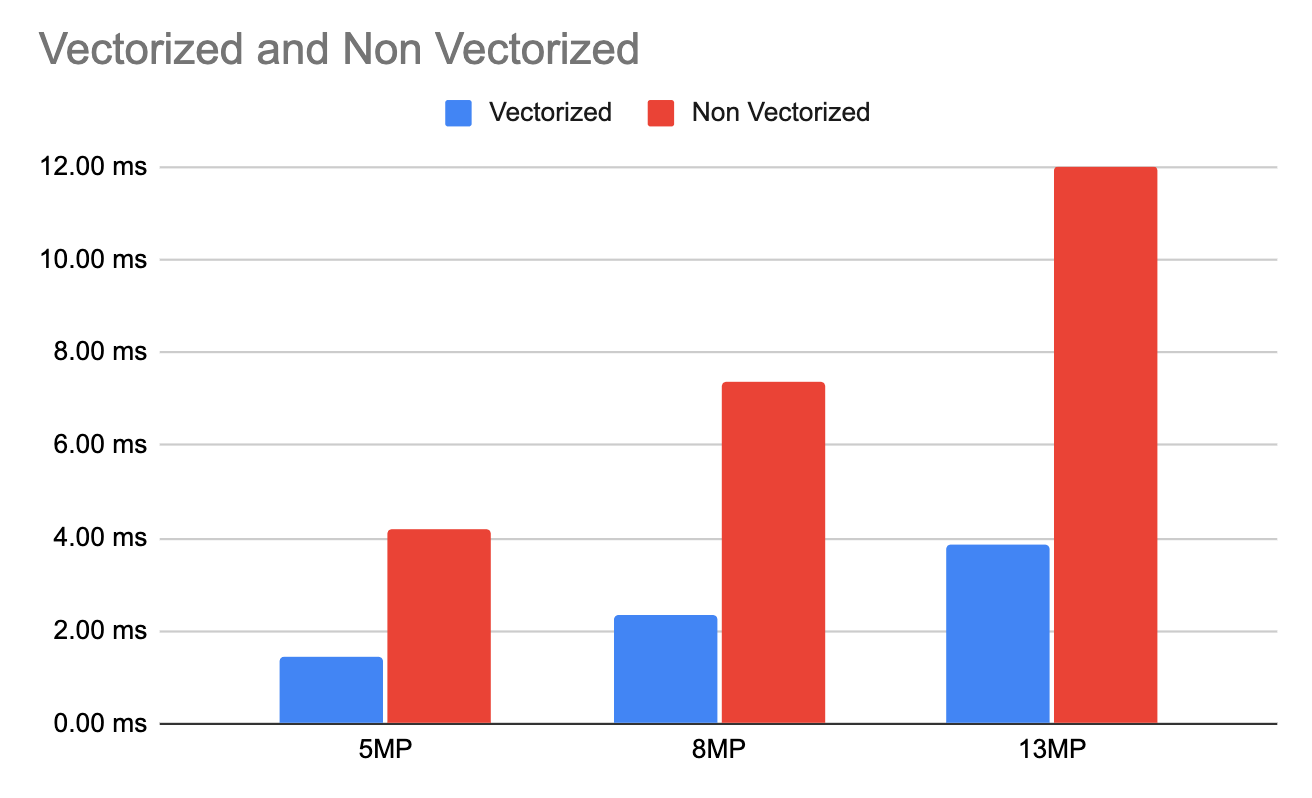
Comparison of latency benchmark of running f(x, y) = u8((x + y) % 255) in vectorised vs non vectorised fashion. Image by Author, generated using Google Sheets.
The vectorised code is ~3 times faster than non vectorised code on average for this example.
The numbers can be different depending on the algorithm and data type. For example for a simple brightening algorithm like f(x, y) = g(x, y) + b I have found vectorized code to be ~5.3 times faster than non vectorised code for u8 data type in the same environment.
How to use it?
Sometimes the compiler will auto-vectorise your code. It depends on the compiler being used and how the loops are designed. Sometimes it cannot, for example if it cannot determine your loops to be data independent.
A loop like a[i] = a[i-1] — 1 is hard to vectorise as result for each index depends on the result of previous index.
To use vectorisation in your code, you can
- Let the compiler decide automatically if you are happy with the current performance.
- Guide the Compiler that your loops can be vectorised.
- Explicitly vectorize code by using intrinsics available for different processor families (for example ARM Neon)
- Leverage solutions like Halide Language to easily vectorise code across different platforms
If you found the section above useful, there is more
Thanks for reading, In the original article published on Medium I have also talked about
- Caching and Memory locality
- Temporal and spatial locality
- CPU level parallelism
- Reducing instructions
- Loop unrolling
- Division vs multiplication
- Reducing branching
Closing notes for readers
Most developers would want to write optimized algorithms. The amount of optimizations needed is different for different use-cases and we should prioritize our time and efforts based on the cost-benefit tradeoff.
I like my code run slow — Said no one ever!
If you find your algorithms to be slower than required, follow the simple framework of
- Benchmark — Benchmark your code. Don’t start without this!
- Breakdown — Breakdown the benchmarks to smaller components to isolate costly part of code. Profiling can be really helpful here!
- Optimise — Optimise the part of code that will lead to meaningful increase, start with low hanging fruits!
Want to Connect?
Find me on Twitter or LinkedIn!
References
If you find this interesting, you can read more related articles from the past: