
Launching an AWS MySQL server and importing data from csv files (for free!)
Since a sizable portion of my cohort decided to work on the same set of data from Kaggle, I decided to migrate it to a MySQL server on AWS so that:
- I could take advantage of AWS’s free tier services on RDS (for hosting various SQL databases) to host my data and run the querying and
- I have a shareable endpoint that can allow multiple users to access the database at any time
I went with the MySQL engine out of habit, but this will work for other engines as well (such as PostgreSQL/SQLite). You’ll just need to tweak some of the steps below.
- On the AWS dashboard, under the Services tab, click on RDS.

- On this next page, click on Instances on the side panel, then Launch DB Instance.

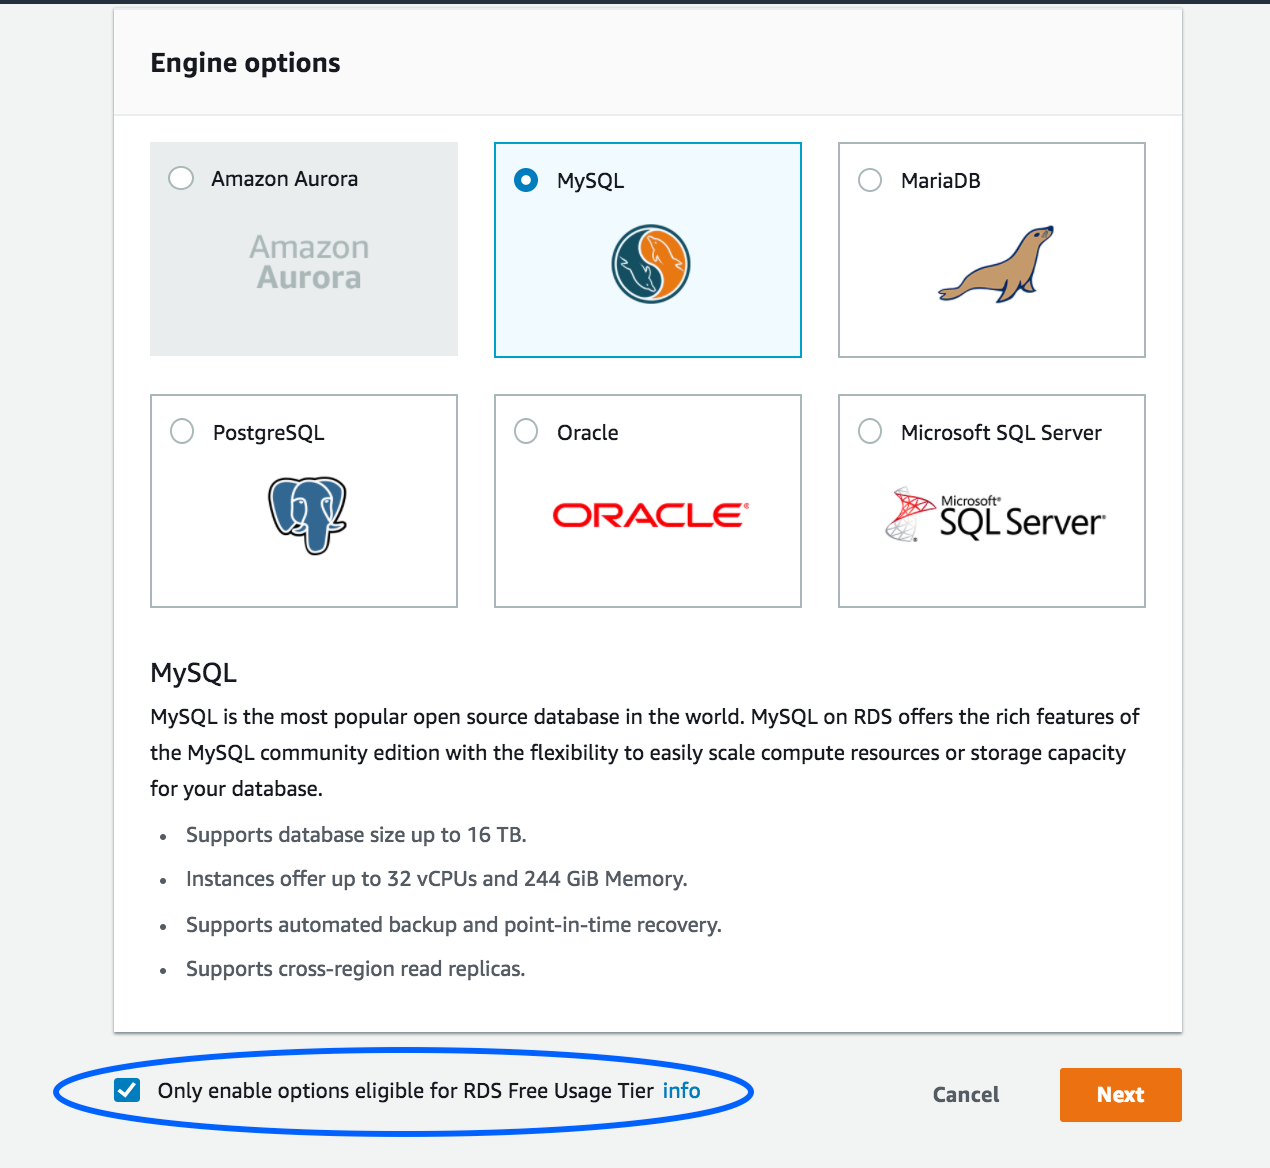
- Select your preferred engine, but make sure to click on the check box below where it says “Only enable options eligible for RDS Free Usage Tier” , and click next. (Unless you’re a baller, in which case you should follow my separate guide where I talk about how to live like a true baller).
- On this next page, scroll all the way down to the Settings section, leaving the rest untouched unless you know what you’re doing. The other options are mostly greyed out if you went with the free tier option.
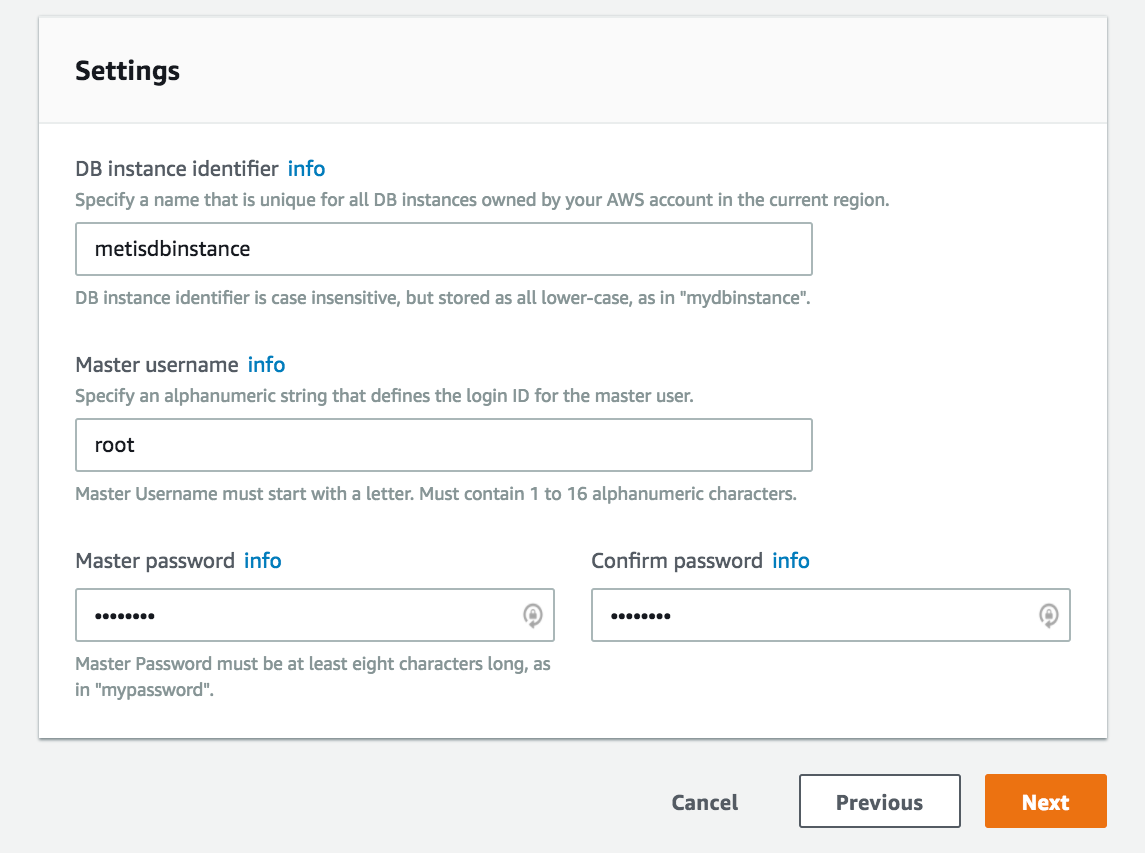
For the field DB instance identifier , enter a name for this database instance. This is not the name of the database where your tables are stored. This is the entire instance of your server where multiple databases will be stored. In this case, I name it metisdbinstance because I plan to store multiple databases for different projects.
Set a master username and password combination which will be used to log in to your server. This username/password can be shared with others, but you can later create additional users with different levels of permissions.
NEXT
- On the next window, the first thing you want to pay attention to is Network and Security.

Virtual Private Cloud: Select Default VPC.
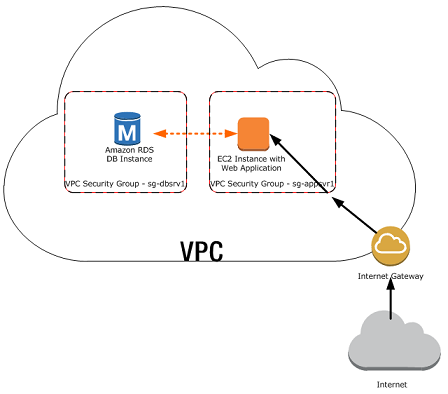
A VPC is a cloud server where your services are hosted on. All AWS accounts are allocated a default VPC, and if you’ve already used their other services (such as launching an EC2 server like we did in class) it’s likely already running within that same default VPC.
Subnet : Again, select default. This is a subsegment of your VPC (segmented by IP address ranges)
Public accessibility: Short answer — Yes.
Long answer, if you want to be extra secure, you can make this private, in which case only the services (such as your EC2 server) running within the same VPC (everything inside the cloud in the diagram above) can interact with it. Since we have already set up an EC2 before, our Jupyter Notebooks we run inside that server can connect to it. However, this means you cannot share your database with anyone else outside your VPC, including from your personal computer.
Availability Zone: No Preference
VPC Security Options: Create new
- Under the Database Options section

Database name: This is the name of your database. In my case I named it instacartdb because it’s where I’ll be storing all the Instacart data from Kaggle.
Port: 3306 is the default port for MySQL databases. Lets keep it that way.
Leave everything else as is, and on the bottom, click Launch DB Instance. On the next page, click View DB Instance.
Congratulations, you’ve set up a SQL database on the cloud! But one more thing..
Scroll down the page and under Security Groups, click on the security group that’s been attached to your RDS.

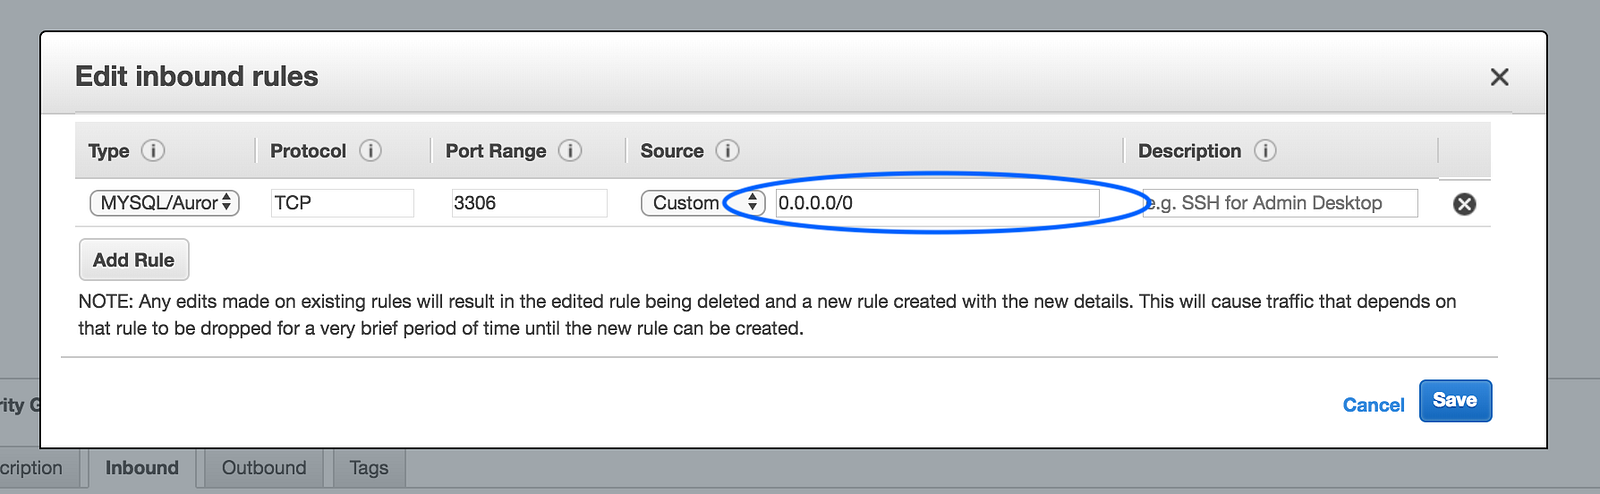
On the next page, click on the Inbound tab on the bottom, and then edit.
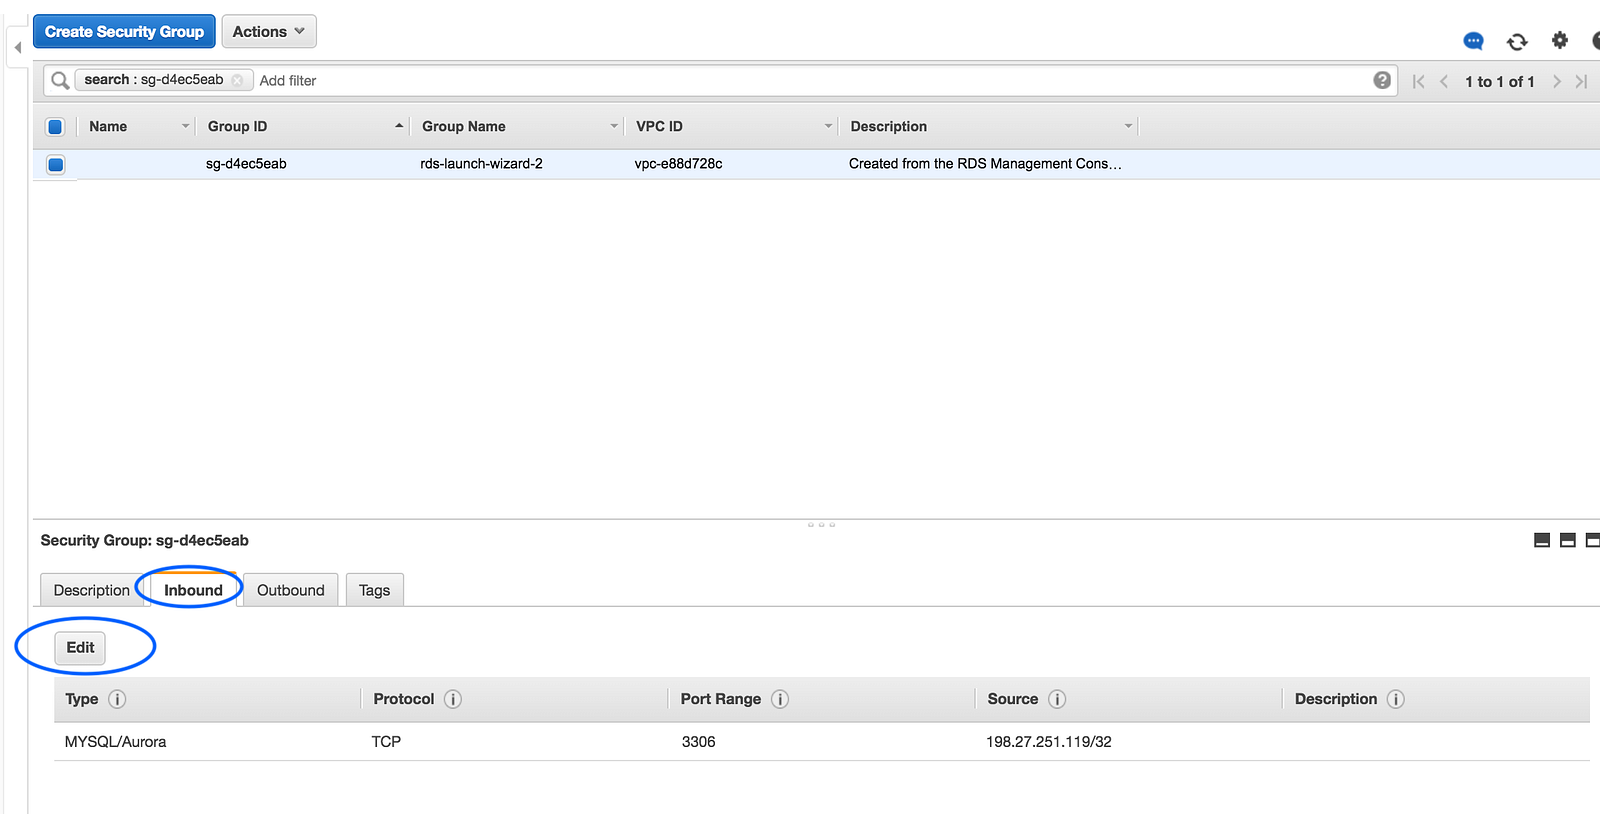
This step will allow you to configure what IP addresses are allowed to connect to your database. This is especially important if your database was made publicly accessible in the previous step, because you want to limit what IP addresses can access the public endpoint.
In my case though, I have public data that I want to share with anyone, so I’m changing changing the Source IP to 0.0.0.0/0, which basically bestows friends AND foes access.
Generally though, you want to make this more secure because even if it’s password protected, you’re still exposed to hackers/DDOS attacks. Because I’m on the free tier, the server will automatically shut down if it is subject to a DDOS attack, but otherwise, it is possible to incur an expensive bill if someone decides to overrun your server with requests.
Click Save.
Finally, go back to the instance page of your RDS server, and look for the Endpoint. If it hasn’t showed up yet, that’s because your instance is still initializing. Give it a few more minutes and it should show up.

This URL is how your access point to the database.
Connecting to your database
In your terminal, let’s install all the dependencies we need.
pip install -c anaconda mysql-connector-pythonpip install mysql-connector
Next inside your Jupyter Notebook, we’ll import the dependencies
import pandas as pd
import mysql.connector
from sqlalchemy import create_engine
Next we want to establish a connection to the database. Replace all the values in the brackets with actual values. Remember that PORT is 3306.
engine = create_engine(
'mysql+mysqlconnector://[USERNAME]:[[PASSWORD]@[](mailto:pokemon1@metisdbinstance.cyjtcanl7pse.us-west-2.rds.amazonaws.com)URL_ENDPOINT]:[PORT]/[DATABASE_NAME]', echo=False)
Next we want to create a table with the proper column names, type, and index. Make sure the column names match up exactly as the column headers in your CSV files, or else you could run into some issues. Additionally, notice I’ve set aisle_id as the primary key. This is important for indexing when you JOIN tables.
query = '''
CREATE TABLE `instacartdb`.`aisles` (
  `aisle_id` INT NOT NULL,
  `aisle` INT(11) NULL DEFAULT NULL,
  PRIMARY KEY (`aisle_id`),
  UNIQUE INDEX `aisle_id_UNIQUE` (`aisle_id` ASC));
'''
# Open engine connection
con = engine.connect()

# Perform query: rs
rs = con.execute(query)
In the example above, I only have one additional column besides the primary key, but I have an example of a more complicated table below:
CREATE TABLE `instacartdb`.`products` (
  `product_id` INT NOT NULL,
  `product_name` VARCHAR(300) NULL DEFAULT NULL,
  `aisle_id` INT(11) NULL DEFAULT NULL,
  `department_id` INT(11) NULL DEFAULT NULL,
  PRIMARY KEY (`product_id`),
  UNIQUE INDEX `product_id_UNIQUE` (`product_id` ASC));
Note product_name is a long string name, so it’s set as VARCHAR(300), meaning it’s a string that can go up to 300 characters in length. If you set the value too low and your dataset happens to have a value exceeding that length, the data will get truncated. This won’t produce an error, but it will generate a warning to let you know.
Next, we want to import the csv file as a pandas DataFrame.
data = pd.read_csv('./PATH/TO/YOUR/FILENAME.csv')
Lastly, if the dataframe and the SQL table is aligned, the following line will import the CSV into the database, as table name aisles.
data.to_sql(name='aisles', con=engine, if_exists = 'replace', index=False)
Rinse and repeat these steps with as many CSV files as you have, and that’s all! Your dataset is ready to go!
Manually deploy apps, like PHP sites, on AWS server is quite difficult and time taking, especially if you don’t have sysadmin experience. A better method to do it is using Cloudways PHP website hosting, where you don’t have to setup and configure the AWS server manually. You don’t have to manage it manually either.