
Create Facebook Chat Bot with ASP.NET CORE 2.0 and Api.ai

Kenan BegićBlockedUnblockFollowFollowing
Mar 19
This tutorial will explain how to use ASP.NET Core 2.0 with natural language understanding such as API.AI and its use for creating Facebook ChatBot. Also this tutorial could be made with other technologies such as Node.js (ASP.NET Core 2.0 replacement) or Using Microsoft Luis API (Api.ai replacement), but intention here is to explain how to connect all those services for creating our chat bot. Also this may be only top of the iceberg of possibilities that are available with mix of those technologies. We could also incorporate our database with business logic and data to present result to our customers such as price of articles in our PC store or daily menu in our restaurant.
Also just to mention we will use ngrok for securing our connection to our localhost computer and it will help us to test our Facebook webhook because Facebook needs Secure connection to be made to our webhook.
1. Creating ASP.NET Core 2.0 start project
First things first, we are going to setup basic ASP.NET Core 2.0 project with MVC pattern. So lets start creating the basic app. First, you will need Visual Studio 2017. Fire it up and go to File -> New Project.

Top 4 Bot Tutorials:
After that choose Visual C# ASP.NET Core Web Application and name your project as you wish.

Next step is to choose our framework and project template. For framework choose ASP.NET Core 2.0 and for template choose Web Application (Model-View-Controller) and we are ready to go.

This basic project consists of one controller (Home) and few actions like Index,About, Contact and Error. All those actions are GET actions that return its corresponding views.
2. Installing ApiAiSDK
Our project is intended to use Api.ai api with C# support. The way we could add this library to our web project is to right click to our solution and to add it through NuGet Packages manager.

And in Browse tab search for apiai. After results pop out choose ApiAiSKD and install it to our web project.

Also this step is available through NuGet manager console. If we are installing it through console we should type next:
Install-Package ApiAiSDK -Version 1.6.5
Also don’t foget to choose our web project. Next step will be to connect our application with our Facebook app and messenger webhook. But first we will create some methods in our project which will communicate with our Facebook messenger webhook.
3. Creating webhook GET and POST action in Home controller
In this step we will create our webhook GET and POST actions. GET action will be used for validating our webserver application with Facebook webhook and POST action will be used to recieve user messages and reply to them frr webserver application. Lets create our GET method. It will look like this.
[HttpGet]public string Webhook([FromQuery(Name = "hub.mode")] string mode, [FromQuery(Name = "hub.challenge")] string challenge, [FromQuery(Name = "hub.verify_token")] string verify_token){ if (verify_token.Equals("my_token_is_great")) { return challenge; } else { return ""; }}
If we take a look at our action it consists of 3 input strings that are passed from Facebook app to our controller method. Those string are: mode, challenge, verify_token. Most important input string is verify_token.
verify_token represents string that is sent from Facebook to our webserver webhook (in our case controller action) and if it is correct we return challenge string as response to that request. To clarify the values that are passed to our method take a look at next breakpoint:

Json that we recieve consists of mentioned three fields. We then compare the verify_tokenvalue to our verify token and then return challenge value as response of our Webhook GET method. That value is then picked up by Facebook app and verified. Next thing that we will do is to create our POST Webhook method taht will recieve our user messages. Our POST method looks like this:
[HttpPost]
public void Webhook() {
 var json = (dynamic) null;
 try {
   using(StreamReader sr = new StreamReader(this.Request.Body)) {
   json = sr.ReadToEnd();
 }

dynamic data = JsonConvert.DeserializeObject(json);

postToFB((string) data.entry[0].messaging[0].sender.id, (string) data.entry[0].messaging[0].message.text);
 } catch (Exception ex) {
  return;
 }
}
This method create dynamic object called json and read Request.Body from our request that we recieve from Facebook messenger after user send message to us. After we recieve this message we read input stream and deserialize data to dynamic object. For deserializing we have used Newtonsoft.Json package that is installed with Api.ai SDK package. After that we use method postToFB that will post answer message to user after we have recieved question message from user on messenger.
Json that is recieved as body in request from Facebook Messenger App looks like this:
{
   {
      "object":"page",
      "entry":[
         {
            "id":"xxxxxxxxxxxxxxx",
            "time":xxxxxxxxxxxxxxxxxx,
            "messaging":[
               {
                  "sender":{
                     "id":" xxxxxxxxxxxxxxxxxx "
                  },
                  "recipient":{
                     "id":" xxxxxxxxxxxxxxxxxx "
                  },
                  "timestamp":xxxxxxxxxxxxxxxxxx,
                  "message":{
                     "mid":" xxxxxxxxxxxxxxxxxx ",
                     "seq":6148,
                     "text":"Hi!"
                  }
               }
            ]
         }
      ]
   }
}
Value that we will post back is sender.id and along with our answer from Api.ai. Here how the postToFB method look like.
public void postToFB(string recipientId, string messageText) {
 //Post to ApiAi
 string messageTextAnswer = postApiAi(messageText);
 string postParameters = string.Format("access_token={0}&recipient={1}&message={2}", fbToken, "{ id:" + recipientId + "}", "{ text:\"" + messageTextAnswer + "\"}");

//Response from ApiAI or answer to FB question from user post it to FB back.
var client = new HttpClient();
client.PostAsync(postUrl, new StringContent(postParameters, Encoding.UTF8, "application/json"));
}
In postToFB method we create our answer from ApiAi and format our parameters that will be posted back to our Facebook messenger app via GraphApi. For that we use HttpClient and send response to our user. For GraphApi authorization we use tokens and for that have next variables:
private string fbToken = "xxxxxxxxxxxxxxxxxx";
private string postUrl = "[https://graph.facebook.com/v2.6/me/messages](https://graph.facebook.com/v2.6/me/messages)";
First is our facebook token that will be use to authenticate in graph api and post response message to our user. Second postUrl is url of facebok graph api.
Third string is our ApiAi token that will be used to authenticate us for passing user message from facebook messenger and getting our response from ApiAi and passing that message to user. No lets dive into postApiAI method.
private string apiAiToken = "xxxxxxxxxxxxxxxxxxxxxxxxxxxxx";

public String postApiAi(string messageText){ var config = new AIConfiguration(apiAiToken, SupportedLanguage.English); apiAi = new ApiAi(config); var response = apiAi.TextRequest(messageText); return response.Result.Fulfillment.Speech;}
postApiAi method is used to answer the question that user sends from Facebook messenger to our webserver. Lets say user sends us „Hi“ to our facebook messenger app. That message is passed to our webhook and deserialized from Request.Body. After we deserialize message we send that message to ApiAi and seek the answer from our intelligent agent on ApiAi. Our Agent respond to message and that response is sent to our user with HttpClient.PostAsync.
Here we have almost finished our tutorial but we need few more steps to include and next step is using ngrok to secure our connection to Facebook. It is must because Facebook needs HTTPS to connect with our webhook.
4. Using NGROK to secure and tunnel our localhost
Download ngrok from https://ngrok.com/download . After download is finished open ZIP archive and unzip it to your desktop. After you unzip it RUN your visual studio application and check what port is used to access our localhost application. Then open ngrok.exe that you have extracted and type next:
ngrok http -host-header=”localhost:54799" 54799
54799 is port through our application is accessed. After you hit enter you will get next response from ngrok:

Don’t close that window as we will need it to verify our Facebook webhook. Next steps will explain creating our Facebook app, page and webhook URL.
5. Creating Facebook app
Our first step consists of creating Facebook app that is foundation for everything. This could be not only facebook but viber, skype, telegram and other Public accounts that allow us to interact with our user through chatbot application. For now we will stick only with Facebook. If you have not already created your Facebook developer account you can follow these steps to create one:
https://developers.facebook.com/docs/apps/register/
After you create your developer account visit this url for creating your new APP:
https://developers.facebook.com/apps/
Click on Add a New App button and fill next screen:

After you create new app click on it from same menu and you will be redirected to app dashbboard.
6. Creating facebook page
Go to Settings->Advanced and in App Page click button Create new Page or you can visit this url to create page:
https://www.facebook.com/business/learn/set-up-facebook-page
If you have already page then you can skip this step and go to step 7.
7. Add Messenger platform to your app
After you have created your page successfully its time to add Messenger platform to your app. Go to your app settings and under “Product Settings” add a product. Select “Messenger”.

After you add messenger product click on it on left menu and generate token that will be used in our viual studio project to authenticate our graph api calls.

Paste generated token to our visual studio fbToken variable.

After you have added Messenger to your facebook app you can now add webhook which represent URL of your webserver that will process incoming user messages. Those messages can be anything from text to speech and images to location or video.
8. Setting up Facebook webhook
Go to your Messenger Product and scroll to Webhooks section.

Then click on Setup Webhooks and next screen will appear:
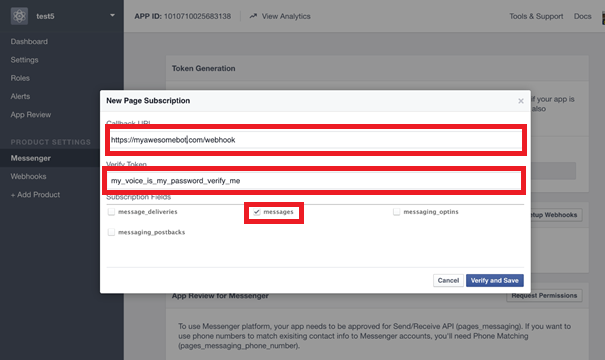
This screen has 3 fields. First field is callback URL that represent in our case Controller GET action for verifying our webhook and POST action that will be called whenever we recieve message from our user. So here we will just put HTTPS URL that we have created with our NGROK tool in step 4 and it will be like this:
Second field is verify token that is used for verification of our controller webhook GET method. This token we have specified in step 3 Webhook GET method and it is my_token_is_great.
if (verify_token.Equals("my_token_is_great")){ return challenge;}
Third field is subscription fields messages checkbox. After that just click Verify and Save button. If it is successful it will close dialog window as our verification is done and Facebook messenger application can reach our webhook GET and POST methods. To edit our webhook just click in left menu Webhooks and Edit subscription.

Last step is to select page to subscribe our webhook after page message event occurs. Select page that we have created in step 6.

Our facebook configuration is over. Next chapter will explain how to create ApiAI account to answer our user messages sent from Facebook messenger on our app page.
9. Creating our Api.ai Agent
This step explains how to create our Agent on ApiAi service. Sign up for free and create your account. Then go to api.ai and enter console.

After that create your agent.

After you create your agent you can create new intent that will be used to answer welcome message from our user. Create and save intent like next one.

Save your intent and go to Agent you have created and check your Developer access token.


Copy that Developer access token and paste it to our Visual Studio solution into variable apiAiToken.
private string apiAiToken = " xxxxxxxxxxxxxxxxxx";

10. Testing our agent
Our agent should be trained to answer welcome messages from our user. When user say Hi our agent answer with messages that we have provided in Welcome intent.

11. Sending messages from Facebook messenger and answering with trained api.ai agent
Now after everything is finished let’s try to talk with our agent. Start up your visual stuio application and generate ngrok HTTPS URL if you haven’t done yet. This is explained in step 4. Edit the Facebook webhook URL to send messages to new created HTTPS URL from ngrok. This is explained in step 8. Open up your android/ios/web messenger app and find your Facebook page and type
„Hi“
This is the answer that we get from our intelligent chatbot:

12. References
13. Contact
Conact me at:
Don’t forget to give us your 👏 !


