
Automating a Web Application using Testsigma's NLP Grammar
The article explains how a sample web application like the OrangeHRM (an HR and Leave Management System) can be automated using the NLP based Test Automation tool, Testsigma.

Let us try the following:
- Navigate to the OrangeHRM website
- Enter the Username(Admin) the Username field
- Enter the Password(admin123) in the Password field
- Click on Login
When you create a trial account with Testsigma, you will have a default Project named, "Testsigma" with a few samples. You may create a new Test Case in the existing Project or create a new Project and add test cases to this.
Now click on Add Test Steps to start writing the Test Steps for each of the 4 steps that we need to perform.
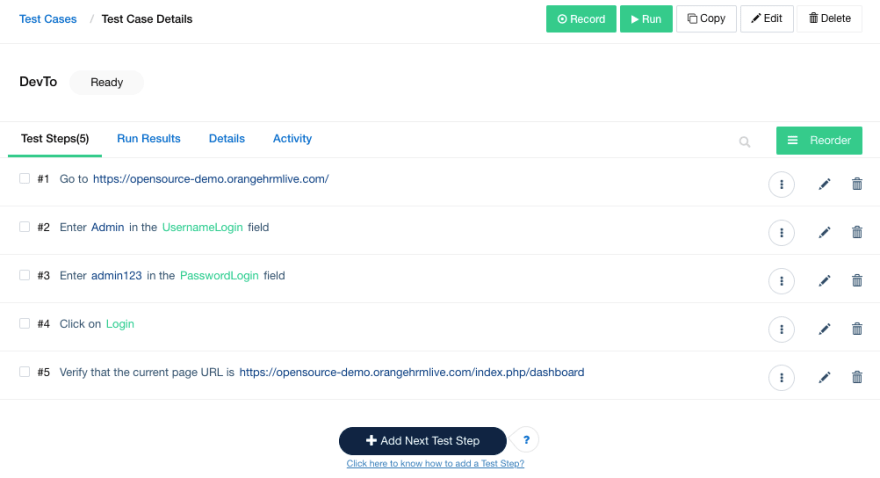
Step 1: Navigate to the application
The first step is quite easy. Just type/copy and paste the URL of the application you wish to automate in the Go To field and hit Start!

The first Test Step will automatically be added.

Step 2: Enter the Username
Now, to test the login scenario of this application. We will start by entering the Username.
Start typing, "Enter" and a list of grammar suggestions will appear.
From the list, choose the NLP grammar, “Enter test data in the ui identifier field” since this closely relates to what we need to perform.

We see 2 keywords in the grammar; a test data and a ui identifier. 'Test data' are inputs we provide like your Name, or the Username in this example, etc.
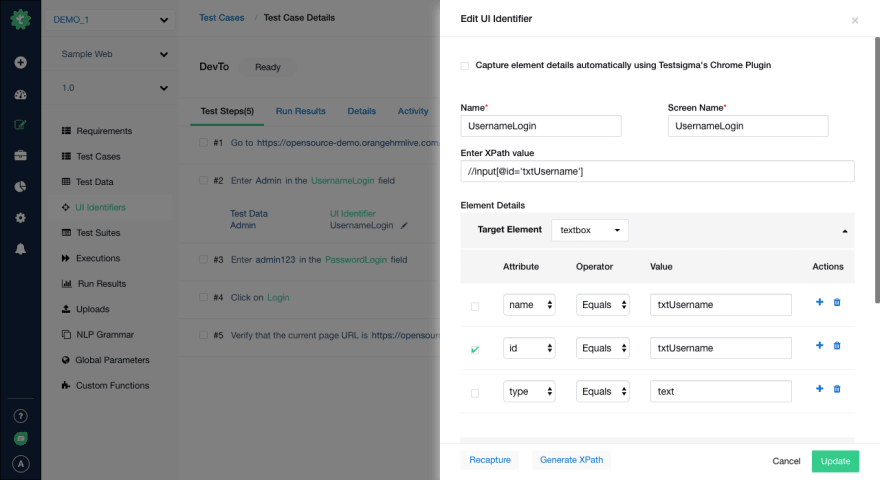
A 'ui identifier' is the path we use to “identify” an element(the Username field) anywhere on the website or the web page so as to perform any action on that element on the web page.
Now, you only need to replace the test data part with the value, “Admin”. Also, replace the ui identifier part with some meaningful variable like ‘UsernameLogin’. We will assign the unique ui identifier/path of the Username field to this variable.

You may as well skip this part and continue to add the Test Steps and later edit the ui identifier values. This is particularly useful if you are performing Test Automation in-sprint.
Let's assign the ui identifier its value right away. If you are familiar with creating xpaths, you may manually create and store the ui identifier value or you could use Testsigma’s Chrome extension that will automatically identify and store the exact path of the Username field for you.
Here’s how you do this using the Chrome extension.
Now, click 'Create and Continue' to continue adding next Test Steps.
Step 3: Enter the Password
Now, enter the Password in the Password field. Use the same NLP grammar as the Username, “Enter test data in the ui identifier field”.
Replace test data with admin123 and replace ui identifier with some variable say, ‘PasswordforLogin’. i.e, “Enter admin123 in the PasswordforLogin field”.
Like before, you may either use the Chrome extension to get the ui identifier value of the ui identifier, ‘PasswordforLogin’ or you could try entering the ui identifier value manually by inspecting the Password field element.
Click on Create and Continue.
Step 4: Perform a click operation
Now, let's see how we perform the click operation to perform Login. There’s no need to enter a test data value in this case, right? It’s just clicking on the Login button.
So, the NLP grammar is just “Click on ui identifier”. Replace the ui identifier with a name say, "Login" and assign its ui identifier value like we did previously.
Click on Create.
Step 5: Verify something
Here’s a bonus step! Let us also verify if some text is displayed in the page or not.
Click on Add Next Step. You just need to use the grammar, “Verify that the current page URL is test data”. You may try other NLP grammar suggestions too. Replace test data with your expected value.
To know what grammar to use, just refer the NLP grammar link at the left pane of the tool or refer the Help section(a ? symbol right next to the Test Steps) for the examples related to an action to be performed like Enter or Click.
Executing the Test Steps
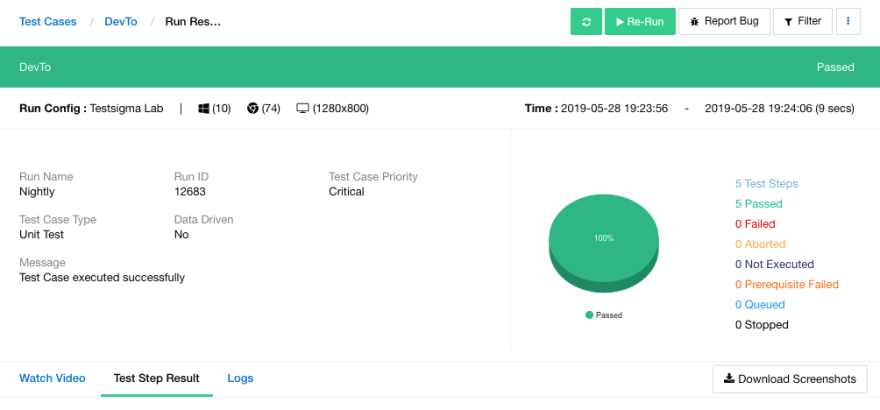
Now, let’s run these 5 Test Steps. Just click on Run at the top right of the Test Steps page for a real quick execution of this test case and click Create and Run.
Once the test is run, check the Run Results. You will see the details of the execution with detailed test logs, screenshots and videos.
If you’d like to learn more about this in detail, create a free trial account with Testsigma for 30 days and see if it works for you.