
How to implement Amazon SNS email subscription on Gatsby website
I had difficulty implementing Amazon Simple Notification Service email subscription on one of my Gatsby websites. Yes you've read it well 😊, Gatsby , a React-based framework that helps you quickly build and deploy super fast lightweight websites.
In this post I will share, through a demo project, how you can easily implement this feature in your Gatsby website.
Prerequisites
- You need an AWS account
Configure Amazon SNS
- Open AWS console and Sign In
- In Services menu, choose Simple Notification Service
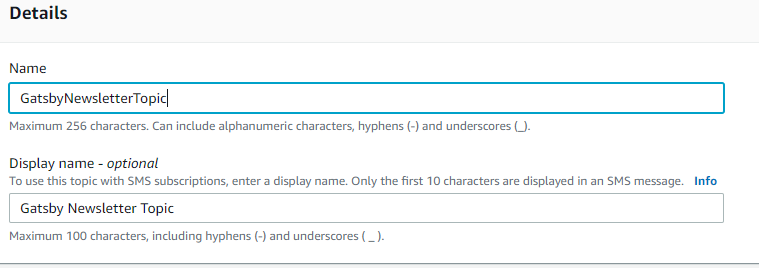
- On SNS page, choose Create Topic

- Give a Name (here it's : GatsbyNewsletterTopic)
- Give a Display name (here : Gatsby Newsletter Topic)
- Leave optional configurations and hit Create topic
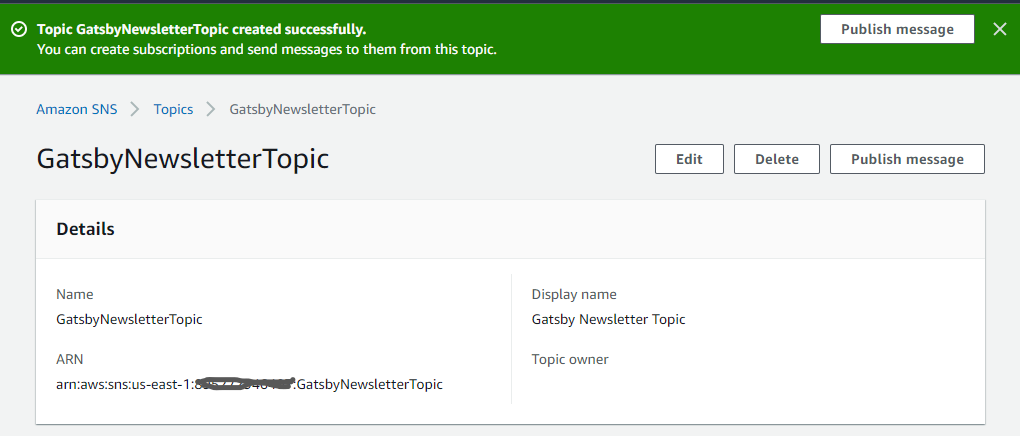
- Note the ARN (here, arn:aws:sns:us-east-1:...:GatsbyNewsletterTopic)
Create a AWS programmatic user for aws-sdk
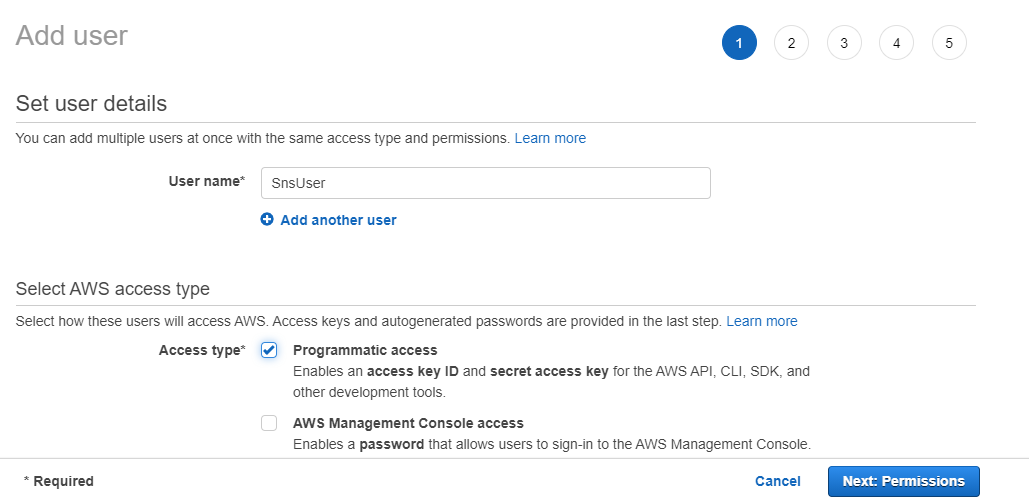
- In the same AWS console with the same signed In user for above sns topic, choose IAM in Services menu
- Choose Users in the IAM Dashboard and clic on Add user
- Give the user name (here : SnsUser)
- Select : programmatic access and clic Next permission
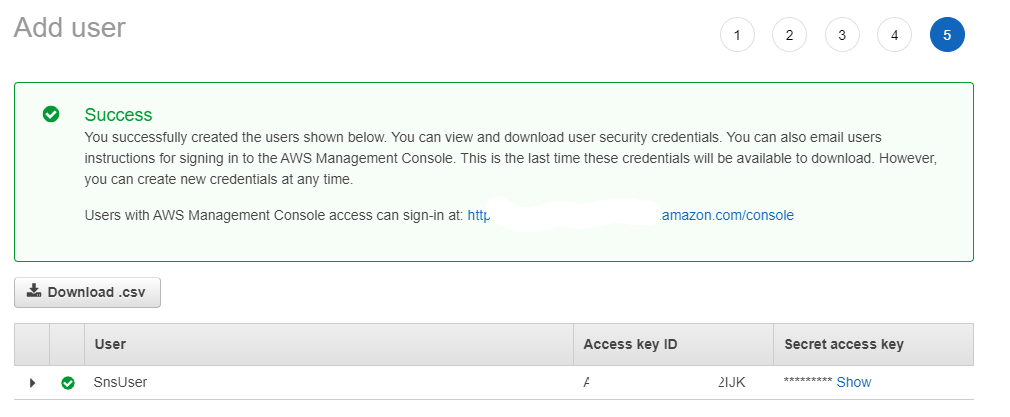
- In the Set permissions tab, select Attach existing policies directly
- In the Policies table, search for AmazonSNSFullAccess and check it
- Then hit Next - Next - create.
- Copy or download the created user's cridentials (Access key ID and Secret Access key) for next steps.
Setting up the Gatsby website project
Now that we've created the sns subscription endpoint and the according user on AWS, we are going to setup our project.
-
Create a new project :
gatsby new my-gatsby-project https://github.com/gatsbyjs/gatsby-starter-default -
In the root of the project, type
gatsby developto run -
Open the browser and type :
http://localhost:8000

Create Subscription component
- In the component folder, create : subscribeform.js file
- Install aws-sdk in the gatsby project
npm install -save aws-sdk - Install Formik and Yup schema builder
npm install formik yup - Copy and paste the below code snipet
import React from "react"
import { useFormik } from "formik"
import * as Yup from "yup"
export default function SubscribeForm() {
    const formik = useFormik({
    initialValues: {
      email: "",
    },
    validationSchema: Yup.object({
      email: Yup.string().email().required(),
    }),
    onSubmit(values, { resetForm }) {
      const { email } = values
    },
  })
  return (
    <form onSubmit={formik.handleSubmit}>
      <input
        type="email"
        name="email"
        placeholder="Your email"
        onChange={formik.handleChange}
        value={formik.values.email}
      />
      {formik.errors.email ? (
        <span className="errorText">{formik.errors.email}</span>
      ) : null}
      <input type="submit" value="Subscribe" />
    </form>
  )
}
- Add subscribeform.js component in the index page, index.js must look like this :
import React from "react"
import { Link } from "gatsby"

import Layout from "../components/layout"
import Image from "../components/image"
import SEO from "../components/seo"
import SubscribeForm from "../components/subscribeform"

const IndexPage = () => (
  <Layout>
    <SEO title="Home" />
    <h1>Hi people</h1>
    <p>Welcome to your new Gatsby site.</p>
    <p>Now go build something great.</p>
    <div style={{ maxWidth: `300px`, marginBottom: `1.45rem` }}>
      <Image />
    </div>
    <div style={{ maxWidth: `300px`, marginBottom: `1.45rem` }}>
      <SubscribeForm />
    </div>
    <Link to="/page-2/">Go to page 2</Link> <br />
    <Link to="/using-typescript/">Go to "Using TypeScript"</Link>
  </Layout>
)

export default IndexPage
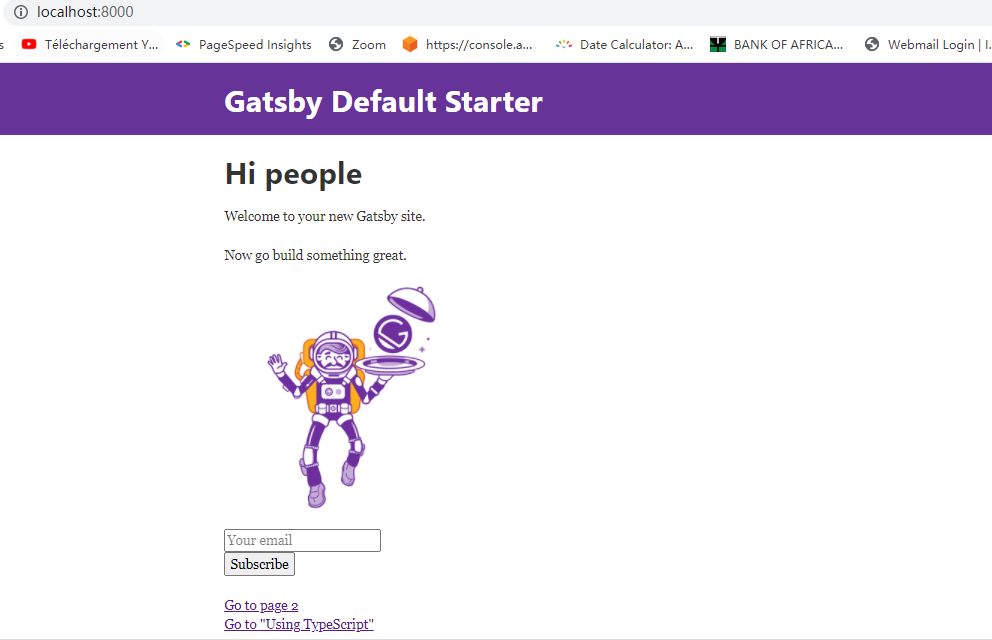
- Our webpage should have this look : note the email input and the subscribe button
Add subscription method
So far, everything works well as expected, but if you clic on subscribe button, nothing happens 🤣, yes, because we haven't done anything so great, everbody who've gone through Gatsby tutorials could have done what we did! Let's add some codes to our subscribeform.js.
- Add a config.json file in the root for AWS cridentials, it should look like this:
{
    "accessKeyId": "secret",
    "secretAccessKey": "secret",
    "region": "secret"
}
Nota bene : You must replace "secret" with the corresponding accessKeyId , secretAccessKey and region values you've got in the Create a AWS programmatic user for aws-sdk section.
Warning : It is not a best practice to put app cridentials in a project, I'll have a post for how to do that, but for this subscription purpose, we'll not follow this best practice 🤦♂️. Let's move on!
- In the subscribeform.js , under the last import instruction, add the following lines:
import AWS from "aws-sdk"

const AWSConf = require('../../config.json');
AWS.config.update(AWSConf);
- In the onSubmit() method add the following instructions after const {email}=values line :
var params = {
        Protocol: "EMAIL" /* required */,
        TopicArn: "yourArn" /* required */,
        Endpoint: email,
      }

      var subscribePromise = new AWS.SNS({ apiVersion: "2010-03-31" })
        .subscribe(params)
        .promise()

      subscribePromise
        .then(function (data) {
          resetForm() //reset the form
        })
        .catch(function (err) {
          console.error(err, err.stack)
        })
Nota bene : In the TopicArn: "yourArn" instruction, replace yourArn by the ARN generated through Configure Amazon SNS section.
Voilà! You've done the great thing 👍.
- The subscribeform.js code should look like this :
import React from "react"
import { useFormik } from "formik"
import * as Yup from "yup"
import AWS from "aws-sdk"

const AWSConf = require('../../config.json');
AWS.config.update(AWSConf);

export default function SubscribeForm() {
    const formik = useFormik({
    initialValues: {
      email: "",
    },
    validationSchema: Yup.object({
      email: Yup.string().email().required(),
    }),

    onSubmit(values, { resetForm }) {
      const { email } = values
      var params = {
        Protocol: "EMAIL" /* required */,
        TopicArn: "yourArn" /* required */,
        Endpoint: email,
      }

      var subscribePromise = new AWS.SNS({ apiVersion: "2010-03-31" })
        .subscribe(params)
        .promise()

      subscribePromise
        .then(function (data) {
          resetForm()  //reset the form
        })
        .catch(function (err) {
          console.error(err, err.stack)
        })

    },
  })

  return (
    <form onSubmit={formik.handleSubmit}>
      <input
        type="email"
        name="email"
        placeholder="Your email"
        onChange={formik.handleChange}
        value={formik.values.email}
      />
      {formik.errors.email ? (
        <span className="errorText">{formik.errors.email}</span>
      ) : null}
      <input type="submit" value="Subscribe" />
    </form>
  )
}
- Refresh the browser and put a valid email address then submit. The input field will be automatically reset on success, and a Subscription Confirmation email will be sent to the provided email address.

Conclusion
Well done! You have implemented an Amazon SNS email newsletter subscription in your Gatsby website.
You can find the source code here .
Wilson Koffi K.
Want more dev tips, visit my blog here