
JavaScript Map() Method Explained by Going On a Hike
If you have ever climbed a mountain, then you can understand JavaScript’s map method, which is one of JavaScript’s higher-order functions.
I will admit it: I have slipped into the terrible habit of strictly using for loops any time I need to iterate through an array. Occasionally, I might throw a forEach() in there, but mostly, I have been sacrificing concise code for yet another for() loop.
So, I wanted to refresh myself on some of JavaScript’s higher-order functions. I began investigating map(), and realized that I wasn’t using it because I did not understand its different pieces.
After a little investigation, I realized that you can visualize the functionality of the map method() by comparing it to a hike up a mountain. I’ll explain in a bit.
Here’s a quick summary of the map() method.
map() takes each element from an original array, transforms it with a function that you specify, and adds the result to a new array in the same order.
Sure, you could use a for loop to do this. But using map() will allow you to write less code and make your code more readable.
Before you read the rest of the tutorial, you just need to understand for loops. You can check out my guide to for loops here if you need a refresher.
How the heck does this relate to hiking?
Let’s say that there is a popular mountain that everyone likes to climb, White Mountain. (That is basically the most stereotypical hike-able mountain name I can think of).

When each person hikes the mountain, they undergo a distinct transformation. At the bottom, they are well-fed, hydrated and full of energy. But by the time hikers get to the top, they are hungry, dehydrated and tired.
The map method works the same way.

It takes each element, modifies it in the way you specify, and adds the results to a 2nd array.
The Basics of the Map() Method
Let’s use an example. Let’s say we have 5 hikers that are going to the top of White Mountain. To symbolize those 5 hikers, we will use an array with 5 numbers
to signify their energy levels (out of 100).
let startHike= [95, 83, 92, 98, 94];
By the time these hikers get to the top of the mountain, 50% of their energy will be drained. In code terms, this means we need to create another array to store their new energy levels.
If we used a for loop, it would look like this:
    let startHike= [96, 84, 92, 98, 94];
    let summit = [];

    for(let i=0;  i<startHike.length; i++){

        let hikerEnergy=starthike[i];

        let halfEnergy= hikerEnergy/2

        summit.push(halfEnergy);
    }

    //final result of summit: [48,42,46,49,47]
Instead, we can use the map() method to do all of this in three lines of code and half the number of variables.

Here is what the code looks like:
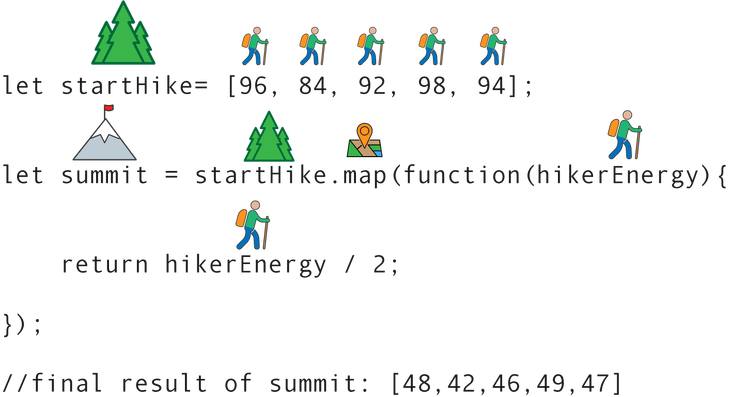
    let startHike= [96, 84, 92, 98, 94];

    let summit = startHike.map(function(hikerEnergy){
         return hikerEnergy / 2;
    });

    //final result of summit: [48,42,46,49,47]
Woah! That is a lot at once. Here is a diagram that shows how that code block connects to the diagram above.
Still a lot at once, I am guessing? Here is an explanation of each part, since it is kind of out of order compared to the logic of for loops.
startHike = our array that stores the energy levels of the 5 hikers at the start of the hike.
summit= the array that stores the energy levels when they reach the top of the mountain, which is the final product in this case.
.map() = the map method for arrays, which will iterate through each item in the startHike array.
function(hikerEnergy) = a callback that uses an argument, hikerEnergy, for each element in the startHike array
return = the item that is added to the summit array that corresponds to each element in the startHike array
In this case, we name the array that we are filling at the beginning of line 2: summit. This may seem somewhat confusing. In the for loop used above, we did not add any elements to the summit array until the last line.
Now, we have split up the act of calling the summit variable from the addition of new elements. We call summit in line 2, but add the new elements in line 3.
Also, just like a for loop, the original array remains unchanged. You are simply adding the modified items to a new array, summit.
Example #2: Using An Array Full of Objects
Of course, you usually will not be using a one dimensional array full of numbers. You will probably also encounter an array full of objects. That is where the map() function becomes even more useful.
Let’s assume you still have 5 hikers. Each one is symbolized by an object with a name and a hydration level, out of 100.
    let startHike= [
     {name:"dave", water: 86},
     {name:"andrea", water: 56},
     {name:"maria", water: 42},
     {name:"nico", water: 60},
     {name:"will", water: 36},
    ];
You want to remove all the names of these hikers so that you can run a scientific study on their hydration levels. So, your final array needs to just have the starting water amount, and no name.
In this case, the map() method will help us store the water value for each item.

We will just need to look at the one key/value pair, and move the value into a new array.
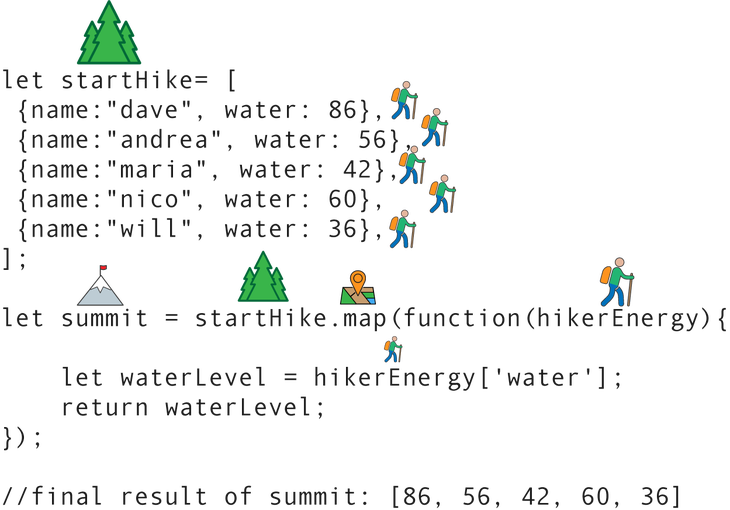
    let startHike= [
     {name:"dave", water: 86},
     {name:"andrea", water: 56},
     {name:"maria", water: 42},
     {name:"nico", water: 60},
     {name:"will", water: 36}
    ];

    let summit = startHike.map(function(hikerEnergy){
      let waterLevel = hikerEnergy['water'];
      return waterLevel;
    });

    //final result of summit: [86, 56, 42, 60, 36]
Here is the visualized version.
Although this may seem easy right now, it quickly becomes important when you have complex, multidimensional arrays, and you do not want to start introducing for loops.
Also, React developers tend to use map() instead of for loops. So if you are planning on learning React, you already have a head start.
Get More Visualized Tutorials
If you enjoyed this tutorial, you will probably enjoy the rest of my tutorials on basic web development concepts. Check out the CodeAnalogies blog for the latest.
for me am out of words, just to say, lots of appreciation to you @kevin kononenko
Thanks Lubega! Did you leave another comment?
yea, on another article
Great visualization; definitely good for visual learners. Keep up the goof work!
Nice, Kevin. I could see this being really helpful to beginner students.
Thanks Jeff!