
Write better Kotlin: Getting Started with Anko for Android
Ever since Kotlin became an officially-supported language for Android development earlier this year, the number of Android apps developed in Kotlin has been on the rise. A recent Android Developers blog post claimed that “the number of apps on Google Play using Kotlin has more than doubled” in the past six months.
While Kotlin does remove much of the verbosity and complexity typically associated with Java, no programming language is perfect. If you’ve made the switch to Kotlin, then chances are you’re still writing boilerplate — just less of it.
In this article, I’m going to show how to create Android applications in fewer lines of less Kotlin code, using the helpers, extension functions, and other handy features provided by the Anko library.
By the end of this article, you’ll know how to use the Anko library to build layouts, manage multiple threads, launch Activities, and perform other common Android tasks in more concise, efficient Kotlin code.
Adding Anko to Your Project
Anko was originally designed as a single library. As the project grew, adding Anko as a dependency began to have a significant impact on the size of the APK (Android Application Package).
Today, Anko is split across several modules:
● Commons: helps you perform the most common Android tasks, including displaying dialogues and launching new Activities.
● Layouts: provides a Domain Specific Language (DSL) for defining Android layouts.
● SQLite: a query DSL and parser that makes it easier to interact with SQLite databases.
● Coroutines: supplies utilities based on the kotlinx.coroutines library.
This article is going to focus on Anko Commons and Anko Layouts, because these two libraries provide functionality that’ll be useful for pretty much any Android project.
To minimize the size of your final APK, it’s best practice to add the minimum project dependencies required to deliver your app’s functionality. Throughout this article, I’ll be showing you how to add the specific dependencies for each of the features we’re discussing. However, if you do need to add the entire Anko library to your project, you can use the following:
dependencies {
  compile "org.jetbrains.anko:anko:0.10.2"
  implementation fileTree(dir: 'libs', include: ['*.jar'])
…
…
...
Performing Common Tasks in Less Code, with Anko Commons
Anko Commons provides a collection of helpers for some of the most common Android development tasks, including starting a new Activity and displaying alerts such as: snackbars, toasts, and progress dialogues.
You can add Anko Commons to your project via its module-level build.gradle file:
dependencies {

//Add the following two lines//

   compile "org.jetbrains.anko:anko-commons:0.10.2"
   compile "org.jetbrains.anko:anko-design:0.10.2"
…
…
...
Displaying Dialogues and Alerts
Android supports a range of dialogues, but building them often feels clunky and verbose. For example:
Snackbar.make(view, "Hello World", Snackbar.LENGTH_LONG).show();
That’s a lot of code just to say “Hello World!” More code also means more opportunities for error — there’s nothing quite like spending ages trying to work out why a dialogue isn’t appearing on screen only to realize that you forgot to call the .show() method.
Anko Commons lets you create the same snackbar in less code, without a .show() method in sight!
longSnackbar(view, "Hello World")
Anko Commons provides helper functions for a range of dialogues. Let’s take a look at how you’d use these various helpers in your projects.
Since we’ll be working with snackbars, we also need to add the Design Support Library as a project dependency, as it contains Android’s snackbar implementation:
dependencies {
   compile "org.jetbrains.anko:anko-commons:0.10.2"
   compile "org.jetbrains.anko:anko-design:0.10.2"

//Add the following//

   compile "com.android.support:design:26.1.0"

Here’s the layout I’m going to use:

<?xml version="1.0" encoding="utf-8"?>

<android.support.design.widget.CoordinatorLayout
   xmlns:android="http://schemas.android.com/apk/res/android"
   xmlns:app="http://schemas.android.com/apk/res-auto"
   android:layout_width="match_parent"
   android:layout_height="match_parent"
   android:id="@+id/coordinatorLayout">

<LinearLayout
   android:orientation="vertical"
   android:layout_width="match_parent"
   android:layout_height="match_parent">

   <Button
       android:id="@+id/button"
       android:layout_width="wrap_content"
       android:layout_height="wrap_content"

//I’ll be re-purposing this button throughout this article, by changing its text label//

       android:text="Toast" />

   <Button
       android:id="@+id/longToast"
       android:layout_width="wrap_content"
       android:layout_height="wrap_content"

   	android:text="Long Toast" />


   <Button
       android:id="@+id/snackbar"
       android:layout_width="wrap_content"
       android:layout_height="wrap_content"

       android:text="Snackbar" />

   <Button
       android:id="@+id/longsnackbar"
   	android:layout_width="wrap_content"
       android:layout_height="wrap_content"
       android:text="Long Snackbar" />

</LinearLayout>

</android.support.design.widget.CoordinatorLayout>
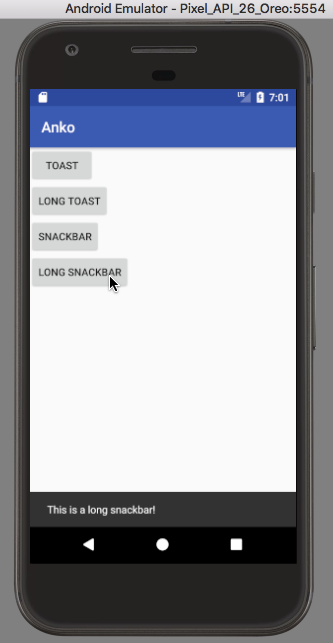
Now, let’s use Anko Commons to create two of Android’s most commonly-used dialogues: toasts and snackbars.
import android.support.v7.app.AppCompatActivity
import android.os.Bundle
import org.jetbrains.anko.*
import kotlinx.android.synthetic.main.activity_main.*
import org.jetbrains.anko.design.snackbar
import org.jetbrains.anko.design.longSnackbar

class MainActivity : AppCompatActivity() {

   override fun onCreate(savedInstanceState: Bundle?) {
       super.onCreate(savedInstanceState)
       setContentView(R.layout.activity_main)
    button.setOnClickListener {

//Create a toast using the “toast” helper//

           toast("This is a toast!")}

//Create a toast with the Toast.LENGTH_LONG duration//

           longToast.setOnClickListener {
               longToast("This is a long toast!")}

               snackbar.setOnClickListener {

//Create a snackbar//

                   snackbar(coordinatorLayout, "This is a snackbar!")}
                   longsnackbar.setOnClickListener {

///Create a snackbar with the Snackbar.LENGTH_LONG duration//

                       longSnackbar(coordinatorLayout, "This is a long snackbar!")}

                       }
               	}
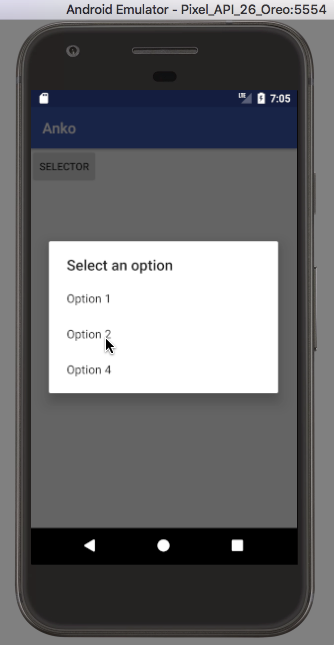
Anko Commons also provides a ‘selector’ helper, which displays a list of clickable items.
import android.support.v7.app.AppCompatActivity
import android.os.Bundle
import org.jetbrains.anko.*
import kotlinx.android.synthetic.main.activity_main.*

class MainActivity : AppCompatActivity() {

   override fun onCreate(savedInstanceState: Bundle?) {
       super.onCreate(savedInstanceState)
       setContentView(R.layout.activity_main)
       button.setOnClickListener {
       	val options = listOf("Option 1","Option 2","Option 4")
           selector("Select an option", options) { dialogInterface, i ->
               toast("You selected ${options[i]}")
       	}

   	}
   }
}
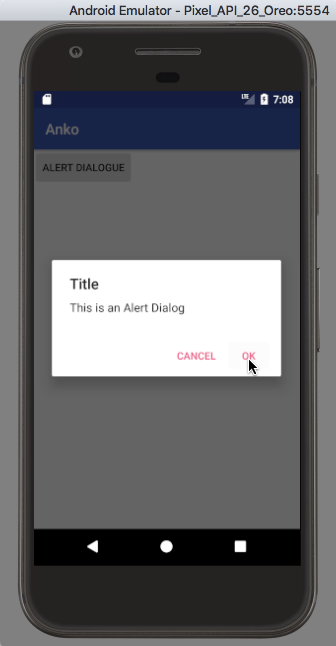
If you only need to display a couple of clickable items, then you may want to use the standard alert() dialogue instead. Simply create an alert() block of code and then specify the UI elements that you want to include in this alert. In the following example, I’m opting for the classic ‘OK/Cancel’ button combo.
import android.support.v7.app.AppCompatActivity
import android.os.Bundle
import org.jetbrains.anko.*
import kotlinx.android.synthetic.main.activity_main.*

class MainActivity : AppCompatActivity() {

   override fun onCreate(savedInstanceState: Bundle?) {
       super.onCreate(savedInstanceState)
       setContentView(R.layout.activity_main)
       button.setOnClickListener {

       	//Display the alert dialogue//

           alert(message = "This is an Alert Dialog", title = "Title") {

//Add an ‘OK’ button that displays a toast when tapped//

           	okButton { toast("You clicked OK") }

//Add a ‘Cancel’ button that displays a toast when tapped//

               cancelButton { toast("You clicked Cancel") }

//Note that you do need to call .show() on an alert dialogue//

       	}.show()

   	}
   }
}
Finally, Anko Commons provides helpers for the following progress dialogues:
● Indeterminate. Displays a cyclic animation that doesn’t indicate the amount of progress being made. You should use indeterminate dialogues when you can’t accurately gauge how long an operation will take or when you don’t need to display this information to the user. For example, if the operation is likely to be completed in milliseconds, then your users probably don’t need a countdown!
● Determinate. Displays a progress bar running from 0% to 100%. You should use a determinate dialogue when a) you can measure how much progress is being made and b) displaying this information would improve the user experience.
You can display a determinate progress dialogue, using the following:
class MainActivity : AppCompatActivity() {

   override fun onCreate(savedInstanceState: Bundle?) {
       super.onCreate(savedInstanceState)
       setContentView(R.layout.activity_main)
       button.setOnClickListener {
        progressDialog("Download in progress", "Downloading...")

       	}

   	}
   }

To transform this determinate dialogue into an indeterminate dialogue, simply replace the progressDialog line with the following:
indeterminateProgressDialog("This a progress dialog").show()

Intent Helper Functions
The majority of Android applications consist of multiple screens. Sooner or later, you’ll need to move the user from Activity A to Activity B. Typically, this involves creating an Intent object that describes the Activity you want to start and then passing that Intent to the startActivity() method.
Even in the best case scenario where you don’t need to pass any special flags or parameters, this still requires you to write multiple lines of code:
val intent = Intent(this, SecondActivity::class.java)
startActivity(intent)

Using Anko Commons, you can launch a new Activity in a single line:

startActivity(intentFor<SecondActivity>())
Concurrency Made Simple
When developing an Android application, it’s crucial that your application never blocks Android’s main UI thread. Try to perform any kind of intensive or long-running operations on the UI thread: in the best case scenario, your app’s UI is going to freeze until the operation completes and in the worst case scenario, your app may even crash.
There are several ways that you can move work off Android’s main thread, but AsyncTask is one of the easiest methods. It provides a ready-made worker thread. However, implementing AsyncTask is still a multi-step process that requires you to define doInBackground() and onPreExecute() and then update your UI by passing the results from doInBackgtound to onPostExecute().
Once the background task is complete, there’s a further complication — you can only interact with Android UI components from the main thread. Before you can update your app’s UI with the results of any work performed on the background thread, you’ll need to switch back to the main thread.
Anko Commons makes working with AsyncTask much more straightforward by providing the following:
● A doAsync function that you can use to schedule the work that should be performed on a background thread.
● A uiThread that you can use to switch back to Android’s main UI thread.
doAsync {

//The task you want to perform on the background thread//

…
...
…

//Switch to the main UI thread//

  uiThread {

//The code you want to run on the UI thread//

          toast("Done!")
  }
}
Anko Commons also helps you avoid memory leaks caused by AsyncTask maintaining a reference to an Activity, which can prevent that Activity from being garbage collected. In contrast, Anko Commons’ uiThread function only holds a WeakReference to a Context, so it won’t stand in the way of Activities getting garbage collected.
A DSL That’s Optimized for Android Layouts
In Android, you can either define your layouts programatically using Java or declaratively using XML. Both methods have their drawbacks:
● Programmatically: defining your application's behaviour and its appearance in the same file tends to result in code that’s more difficult to read, maintain, and re-use. If you need to tweak your layout at a later date, chances are you’re going to have to touch previously-tested code, which is something you should avoid wherever possible.
● Declaratively: defining your layouts in XML requires lots of boilerplate code, to the point where you might find yourself writing exactly the same blocks of XML across multiple layouts. Inflating XML at runtime also requires CPU and battery power, which might even be noticeable when your app is installed on more budget-friendly devices.
Anko Layouts offers a third option: a domain-specific language (DSL) that lets you embed layouts in your source code. These layouts are dynamic and type-safe. Because you’re not inflating XML at runtime, you aren’t wasting battery or CPU. Plus, there’s the sheer convenience of defining every part of your application in the same language and location.
If you’re worried about mixing application logic and layout code, Android Layouts provides an interface that lets you extract layout code into a separate class. I’ll be showing you how to extract layout code in the following section, so don’t worry about this too much for now.
Before you start using the Anko Layouts DSL, there are two notable drawbacks you need to be aware of. First, Android Studio’s built-in ‘Preview’ feature cannot display layouts that are defined in the Anko Layouts DSL. While there is a plugin that adds a DSL Preview to earlier versions of Android Studio, I couldn't get this plugin to work with Android Studio 3.0 — an issue that seems to have persisted since the 3.0 alpha releases.
The other major drawback is that Anko Layouts doesn’t currently support ConstraintLayout. If you do need to use ConstraintLayout, then one potential workaround is to define the ConstraintLayout portions of your UI in XML and then include() this XML file in your DSL layout.
For example:
include<View>(R.layout.activity_main {
To use Anko Layouts in your project, you need to add the following dependencies:
dependencies {
   compile "org.jetbrains.anko:anko-sdk25:0.10.2"
   compile "org.jetbrains.anko:anko-appcompat-v7:0.10.2"
   compile "org.jetbrains.anko:anko-sdk25-coroutines:0.10.2"
   compile "org.jetbrains.anko:anko-appcompat-v7-coroutines:0.10.2"
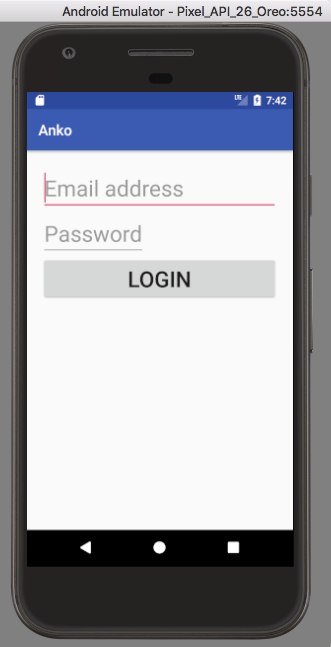
You’re then ready to start building layouts in this DSL:
import android.support.v7.app.AppCompatActivity
import android.os.Bundle
import org.jetbrains.anko.*
import org.jetbrains.anko.sdk25.coroutines.onClick


class MainActivity : AppCompatActivity() {

//Anko Layouts doesn’t require an explicit call to setContentView()//

   override fun onCreate(savedInstanceState: Bundle?) {
       super.onCreate(savedInstanceState)

//Define a LinearLayout.VERTICAL orientation, using the verticalLayout expression. LinearLayouts are horizontal by default, so if you wanted to use a horizontal LinearLayout, then you’d simply need to define a LinearLayout *without* an orientation//

   	verticalLayout {
       	padding = dip(20)

//“editText” (and “button”) are extension functions that construct the View instances, and then add them to the parent//

       	editText {

           	//Here, we’re using “hintResource” with a string. If you were inserting text into the layout directly, then you’d need to use “hint,” so the following line would: hint = "Email address"//

               hintResource = (R.string.email)
           	textSize = 30f

//Specify the LayoutParams for each View, using a lparams() block//

           }.lparams(width = matchParent) {
       	}
       	editText {
               hintResource = (R.string.password)
           	textSize = 30f
           }.lparams(width = wrapContent) {

       	}

           button(R.string.login) {
           	textSize = 30f

//In the following line, “ctx” stands for “context.”

           	onClick { ctx.toast("You're logged in!") }
       	}
   	}

   }
}
Extracting Your Layout Code
Defining your layout and your application code in the same location can be a time-saver because you don’t have to keep physically switching between files or mentally switching between languages. However, muddling up application and layout code does tend to result in code that’s more difficult to read, maintain, and re-use.
The AnkoComponent interface gives you a way of separating your layout code from your application code, even when it’s defined in the same file. In the following code, I’m extracting the previous layout into a separate MainActivityLayout class:
import android.support.v7.app.AppCompatActivity
import android.os.Bundle
import org.jetbrains.anko.*
import org.jetbrains.anko.sdk25.coroutines.onClick


class MainActivity : AppCompatActivity() {

  override fun onCreate(savedInstanceState: Bundle?) {
      super.onCreate(savedInstanceState)

//Extract the layout and set it to MainActivity, using setContentView//

      MainActivityLayout().setContentView(this)
  }


  class MainActivityLayout : AnkoComponent<MainActivity> {

//The UI provided by createView() is returned to the owner activity; in this instance that’s MainActivity//

  	override fun createView(ui: AnkoContext<MainActivity>) = with(ui) {
          verticalLayout {
          	padding = dip(20)
          	editText {

                  //You can also write the following line as hint = "Email address"//

                  hintResource = (R.string.email)
                  textSize = 30f


              }.lparams(width = matchParent) {
          	}
              editText {
                  hintResource = (R.string.password)
                  textSize = 30f
              }.lparams(width = wrapContent) {

          	}

              button(R.string.login) {
                  textSize = 30f
                onClick { ctx.toast("You're logged in!") }
          	}
      	}

  	}
  }
}
Conclusion
In this tutorial, I showed you how to set up and use two parts of the Anko project: Anko Commons and Anko Layouts. If you’re interested in learning more about this project, you can find more information over at the Anko project’s GitHub page.
Hi…Appreciate.Your tricks are useful :)
Well, I’d like to translate a Kotlin Book for my Students in my country. Do you have any pdf to teach Kotlin completely?? If you have please send it to me.
mr.homoro@gmail.com
Hi, great article, do you have plans on writing about kotlin coroutines?