
Modern Backend Developer in 2018
Web development today is completely different from what it was a few years ago; there are lots of different things that can easily baffle anyone entering into the web development. It was one of the reasons that we decided to make these step by step visual guides demonstrating the bigger picture and to give anyone a clear idea about what they have to follow to be in certain roles in web development.
About a week ago, we had a post titled Modern Frontend Developer in 2018 in which we promised to release the updated roadmaps for Backend and DevOps. Holding up to that promise, this article is about modern backend developer. If you haven’t checked the frontend developer roadmap already, go ahead and give it a look.
Before today, backend roadmap was just a flat out recommendation of technologies with no clear directions of the order in which it should have been followed. We have redrawn it just like frontend with step by step guides to give you a better idea.
We are still working on the DevOps and will hopefully release it by the next week. We will publish an article on that also, but here is the link to the repository for you to watch the updates.

Random image for article’s thumbnail — Please ignore 🙉
Without further ado, let’s get started. You can find the detailed roadmap in the image below, however I am also going to explain each step in the description below.
Let’s break it down and explain each step in the section below.
Before we start, although we haven’t listed the knowledge of HTML/CSS in the roadmaps above, it is recommended that you get at-least some understanding and know how to write some basic HTML/CSS.
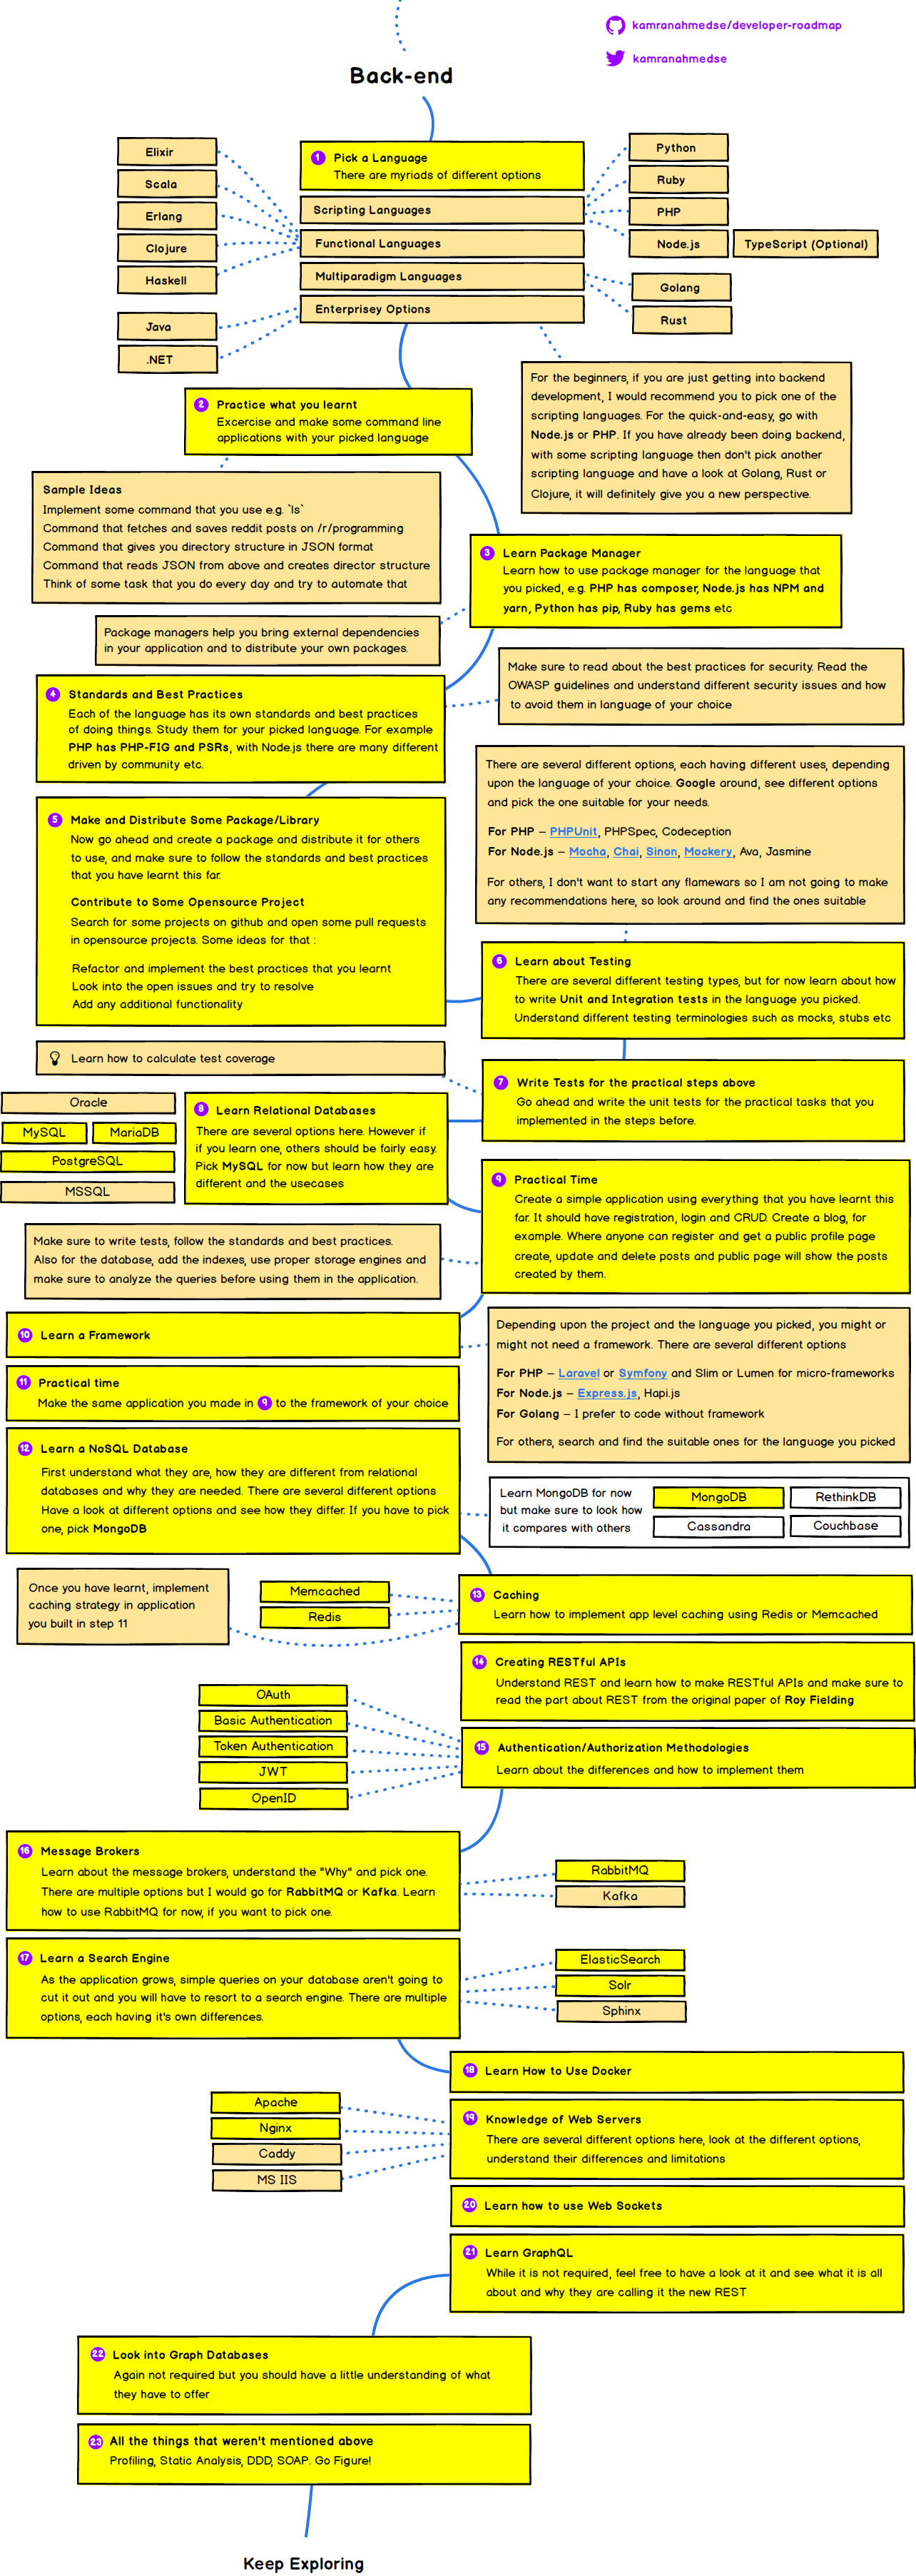
Step 1– Learn a Language
There are myriads of options when it comes to picking a language. I have broken them down into categories to make it easier for you to decide. For the beginners who are just getting into the backend development, I would recommend you to pick any of the scripting languages because they have a lot of demand and it would allow you to get up to speed quickly. If you have some frontend knowledge, you might find Node.js to be quite easier plus there is a big job market for that.
If you have already been doing backend development and know some scripting language, I would recommend you to not pick another scripting language and pick something from the “Functional” or “Multiparadigm” section. For example if you have been doing PHP or Node.js already, don’t go for Python or Ruby, instead give Erlang or Golang a try. It will definitely help stretch your thinking and open your mind to new horizons.
Step 2 — Practice what you have Learnt
There is no better way to learn than practice. Once you have picked your language and have got the basic understanding of the concepts, bring them to use. Make as many small applications as you can. Here are just a few ideas to get you started
- Implement some command that you find yourself using in the bash e.g. try to implement the functionality of
ls - Write a command that fetches and saves reddit posts on
/r/programmingin the form of JSON file - Write a command that gives you a directory structure in JSON format e.g.
jsonify dir-nameto give you a JSON file with the structure inside thedir-name - Write a command that reads JSON from above step and creates directory structure
- Think of some task that you do every day and try to automate that
Step 3 — Learn Package Manager
Once you have understood the basics of the language and have made some example applications, learn how to use package manager for the language that you picked. Package managers help you use external libraries in your applications and to distribute your libraries for others to use.
If you picked PHP you will have to learn Composer, Node.js has NPM or Yarn, Python has Pip and Ruby has RubyGems. Whatever your choice was, go ahead and learn how to use its package manager.
Step 4 — Standards and Best Practices
Each of the language has its own standards and best practices of doing things. Study them for your picked language. For example PHP has PHP-FIG and PSRs. With Node.js there are many different community driven guidelines and same for other languages.
Step 5 — Security
Make sure to read about the best practices for security. Read the OWASP guidelines and understand different security issues and how to avoid them in language of your choice.
Step 6 — Practice
Now that you know the basics of language, standards and best practices, security and how to use package manger. Now go ahead and create a package and distribute it for others to use, and make sure to follow the standards and best practices that you have learnt this far. For example if you picked PHP, you will be releasing it on Packagist, if you picked Node.js you will be releasing it on Npm registry and so on.
Once you are done with that, search for some projects on Github and open some pull requests in some projects. Some ideas for that:
- Refactor and implement the best practices that you learnt
- Look into the open issues and try to resolve
- Add any additional functionality
Step 7 — Learn about Testing
There are several different testing types for testing. Get the understanding of what these types are their purpose. But for now learn about how to write Unit Tests and Integration tests in your applications. Also, understand different testing terminologies such as mocks, stubs etc
Step 8 — Practical
For the practice, go ahead and write the unit tests for the practical tasks that you have done this far, especially what you made in Step 6.
Also learn and calculate the coverage for the tests that you wrote.
Step 9 — Learn about the Relational Databases
Learn how to persist your data in a relational database. Before you go and pick the tool to learn, understand the different database terminologies e.g. keys, indexes, normalization, tuples etc.
There are several options here. However if you learn one, others should be fairly easy. The ones that you would want to learn are MySQL, MariaDB (which is mostly same and is the fork of MySQL) and PostgreSQL. Pick MySQL to start with.
Step 10 — Practical Time
Its time to bring everything that you have learnt this far, to use.
Create a simple application using everything that you have learnt this far. Just pick any idea, maybe create a simple blogging application and implement the below features in it
- User Accounts — Registration and Login
- Registered user can create blog posts
- User should be able to view all the blog posts that he created
- They should be able to delete their blog posts
- Make sure that user can only see his personal blog posts and not from others
- Write the unit/integration tests for the application
- You should apply indexes for the queries. Analyze the queries to make sure that indexes are being used
Step 11 — Learn a Framework
Depending upon the project and the language you picked, you may or may not need a framework. Each language has several different options, go ahead and look what options are available for the language of your choice and pick the relevant one.
If you picked PHP, I would recommend you to go with Laravel or Symfony and for the micro-frameworks, go with Lumen or Slim. If you picked Node.js, there are several different options but the prominent one is Express.js
Step 12 — Practical Time
For the practical of this step, convert the application that you made in Step 10 , to use the framework that you picked. Also make sure to port everything including the tests.
Step 13 — Learn a NoSQL Database
First understand what they are, how they are different from relational databases and why they are needed. There are several different options, research a little have a look and compare them for the features and differences. Some of the common options that you can pick from are MongoDB, Cassandra, RethinkDB and Couchbase. If you have to pick one, go with MongoDB.
Step 14 — Caching
Learn how to implement app level caching in your applications. Understand how to use Redis or Memcached and implement caching in the application that you built in Step 12.
Step 15 — Creating RESTful APIs
Understand REST and learn how to make RESTful APIs and make sure to read the part about REST from the original paper of Roy Fielding. And make sure that you are able to fight someone if they say REST is only for the HTTP APIs.
Step 16 — Learn about Different Auth Methods
Learn about different Authentication and authorization methodologies. You should know what they are, how they are different and when to prefer one over the other
- OAuth — Open Authentication
- Basic Authentication
- Token Authentication
- JWT — JSON Web Tokens
- OpenID
Step 17 — Message Brokers
Learn about the message brokers and understand when and why to use them. There are multiple options but the prominent ones are RabbitMQ and Kafka. Learn how to use RabbitMQ for now, if you want to pick one.
Step 18 — Search Engines
As the application grows, simple queries on your relational or NoSQL database aren’t going to cut it out and you will have to resort to a search engine. There are multiple options, each having it’s own differences.
Step 19 — Learn how to use Docker
Docker can facilitate you greatly in your development, whether it is replicating the same environment as production, keeping your OS clean or expediting your coding, testing or deployment. I am going to leave the answer to “how it is going to help me” for you to search. In this step, go ahead and learn how to use Docker.
Step 20 — Knowledge of Web Servers
If you have come this far, you probably had to tackle with servers in the steps before. This step is mainly about finding out the differences between different web servers, knowing the limitations and different available configuration options and how to write applications best utilizing these limitations.
Step 21 — Learn how to use Web Sockets
While not required, it is beneficial to have this knowledge in your toolbelt. Learn how to write real-time web applications with web-sockets and make some sample application with it. You can use it in the blog application that you made above to implement real-time updates on the blog posts listing.
Step 22 — Learn GraphQL
Learn how to make APIs with GraphQL. Understand how it is different from REST and why is it being called REST 2.0.
Step 23 — Look into Graph Databases
Graph models represent a very flexible way of handling relationships in your data, and graph databases provide fast and efficient storage, retrieval and querying for it. Learn how to use Neo4j or OrientDB.
Step 24 — Keep Exploring
Once you start learning and practicing, you will definitely be coming across the things that we did not cover in this roadmap. Just keep an open-mind and a healthy appetite for learning new things.
And remember the key is to practicing as much as you can. It will look scarier in the beginning and you might feel like you are not grasping anything but that is normal and over time you will feel that you are getting better.
And with that, this post comes to an end. Feel free to befriend me on twitter or say hi by email. Also don’t forget to watch the repository for the future updates. Stay tuned!
I love this! Thanks so much Adnan.
Thank you. It is a very usefull post Adnan.
It explains very well the different layer and “level” a good backend developer should and will master in his career !
nice, very very usefull post. thanks a lot Adnan