
Step by Step Complete Firebase Authentication in Angular 2

complete authentication in Angular using Firebase
Firebase Authentication provides backend services, easy-to-use SDKs, and ready-made UI libraries to authenticate users to your app. It supports authentication using passwords, phone numbers, popular federated identity providers like Google, Facebook and Twitter, Github and more.
This is part 1. It was getting too long so I had to split it into 2 parts.
Through out this course, i’ll be referring to Angular 2 as simply Angular . Note that Angular 1 is also being referred to as AngularJS . That being said.
In this tutorial, I’ll be taking you through how to easily handle authentication in your Angular application using the following Sign-in methods:
- Regular Email/Password
- Github
- Gmail
Generally Speaking (oh Sorry, Coding)
Follow these steps in creating your new Angular app. We’ll be using angular-cli. Alternatively, you can skip this step and clone the starter version of the app in my github repository
$ ng new angular2-authentication-firebase$ cd angular2-authentication-firebase$ ng serve
$ npm install --save font-awesome angular2-fontawesome
In the above code, we created a new Angular app using angular-cli. We moved into the directory and we served the application using the ng serve command. Also, we pulled in FontAwesome library so we can take advantage of its icons.
After this step, if your browser does not automatically open, visit http://localhost:4200
Include bootstrap and fontawesome in your app by adding the the following lines to your src/styles.css file:
@import "~bootstrap/dist/css/bootstrap.min.css";@import "~font-awesome/css/font-awesome.css";
Clone the starter repository and get started
I have created a starter Angular 2 application, clone it here. It has the following pre-installed. Final version is found here
- A Login component and a Dashboard component with their html and css written.
- Bootstrap’s html and css.
- Fontawesome — for the social icons
Run the command:
npm install
It looks like this:


Login component and Dashboard component pages
Lets Add Authentication
Create a firebase app. Visit firebase.google.com and click Sign In. Then click Go to Console.
Click Add a project and you’ll see the image below, fill accordingly like so:

Creating a project on firebase.google.com
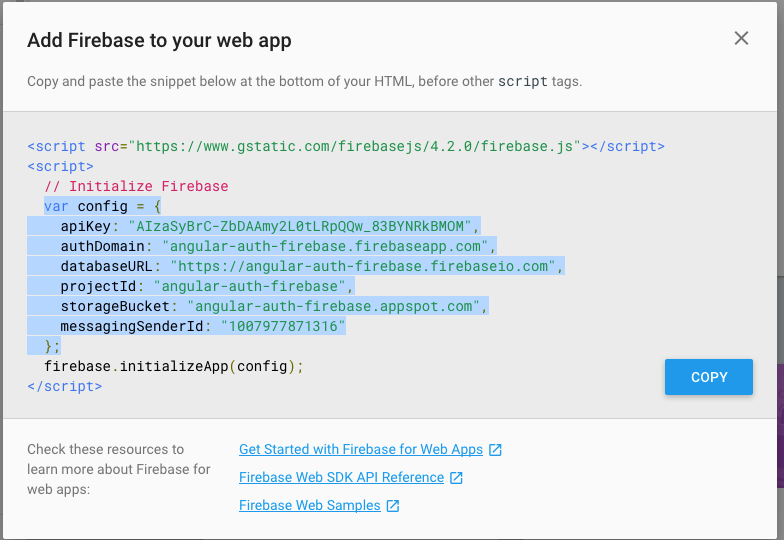
Once in your dashboard, click Add Firebase to your web app and copy the configuration settings, just as highlighted in the image below:

Run the command below in your terminal to pull in angularfire2 for your authentication:
$ npm install angularfire2 firebase --save
Go to src/environments/environments.ts and paste the configuration just like the code below:
// src/environments/environments.ts
export const environment = { production: false, firebase: { apiKey: "<Your_API_KEY_HERE>", authDomain: "AUTH-DOMAIN-HERE", databaseURL: "DATABASE-URL-HERE", projectId: "PROJECT-ID-HERE", storageBucket: "STORAGE-BUCKET-HERE", messagingSenderId: "MESSAGING-SENDER-ID-HERE" };};
Go to app.module.ts and import the AngularFireModule, AngularFireDatabaseModule and AngularFireAuth modules. Also import the environment configuration.
Also add them to imports under NgModule decorator like so:
// src/app/app.modules.ts
import { BrowserModule } from '@angular/platform-browser';import { NgModule } from '@angular/core';
import { AppRoutes } from "./app.routes";
import { AppComponent } from './app.component';import { LoginComponent } from './views/login/login.component';import { DashboardComponent } from './views/dashboard/dashboard.component';
import { environment } from '../environments/environment';import { AngularFireModule } from 'angularfire2';import { AngularFireDatabaseModule } from 'angularfire2/database';import { AngularFireAuthModule } from 'angularfire2/auth';
@NgModule({ declarations: [AppComponent, LoginComponent, DashboardComponent], imports: [BrowserModule, AppRoutes, AngularFireModule.initializeApp(environment.firebase, 'angular-auth-firebase'), AngularFireDatabaseModule, AngularFireAuthModule], providers: [], bootstrap: [AppComponent]})export class AppModule { }
Lets create an auth service to implement the authentication. We create services so that it can be accessible and used by all our components whenever and where ever they are located. Using angular cli, we do this:
$ ng generate service services/auth
This creates auth.service.ts inside src/app/services folder. Import it in your modules. Then we add it to providers in our app.module.ts.
// src/app/services/app.module.ts
import { BrowserModule } from '@angular/platform-browser';import { NgModule } from '@angular/core';
import { AppRoutes } from "./app.routes";
import { AppComponent } from './app.component';import { LoginComponent } from './views/login/login.component';import { DashboardComponent } from './views/dashboard/dashboard.component';
import { environment } from '../environments/environment';import { AngularFireModule } from 'angularfire2';import { AngularFireDatabaseModule } from 'angularfire2/database';import { AngularFireAuthModule } from 'angularfire2/auth';
import { AuthService } from './services/auth.service';
@NgModule({ declarations: [AppComponent, LoginComponent, DashboardComponent], imports: [BrowserModule, AppRoutes, AngularFireModule.initializeApp(environment.firebase, 'angular-auth-firebase'), AngularFireDatabaseModule, AngularFireAuthModule], providers: [AuthService], bootstrap: [AppComponent]})export class AppModule { }
In the auth.service.ts file, import AngularFireAuth, firebase and Observable. Create an observable user variable, inject FirebaseAuth in the constructor and create sign in methods. Your auth.service.ts becomes:
// src/app/services/auth.service.ts
import { Injectable } from '@angular/core';import { Router } from "@angular/router";
import { AngularFireAuth } from 'angularfire2/auth';import * as firebase from 'firebase/app';import { Observable } from 'rxjs/Observable';
@Injectable()export class AuthService { private user: Observable<firebase.User>;
constructor(private _firebaseAuth: AngularFireAuth, private router: Router) { this.user = _firebaseAuth.authState; }
}
Sign In With Twitter
Go to Firebase Console. Click Authentication menu item by the right. Click Sign-In Method and choose Twitter. Enable it.
Go to dev.twitter.com/apps and create an app. Fill in the information, including valid URL where your application will be hosted.
Click on the Keys and Access Token tab. Copy the Consumer Key (API Key) and Consumer Secret (API Secret) then paste in your Firebase console. Save.

When you hit Save, it generates a link for you. Copy the link from your firebase console. Go to Settings tab on your Twitter Developer dashboard and paste the link in the Callback URL Field. This is very important (see images below).


Copy link from firebase console to twitter callback URL
Add the signInWithTwitter() function in your auth service like so:
// ...auth.service.ts
... signInWithTwitter() { return this._firebaseAuth.auth.signInWithPopup( new firebase.auth.TwitterAuthProvider() ) }...
In your app/views/login.ts, import the AuthService, inject it in the constructor and implement Twitter Login
// src/app/views/login/login.component.ts
import { Injectable } from '@angular/core';
import { AngularFireAuth } from 'angularfire2/auth';import * as firebase from 'firebase/app';import { Observable } from 'rxjs/Observable';
@Injectable()export class AuthService { private user: Observable<firebase.User>;
constructor(private _firebaseAuth: AngularFireAuth) { this.user = _firebaseAuth.authState; }
signInWithTwitter() { return this._firebaseAuth.auth.signInWithPopup( new firebase.auth.TwitterAuthProvider() ) }
}
Add the click function in your login html file. Open the login.component.html and add the click function. See snippet below:
<button type="button" class="btn btn-block" (click)="signInWithTwitter()"> <i class="fa fa-twitter" aria-hidden="true"></i> Login with Twitter</button>
Go to your app on the web and click Login with Twitter button. It will ask you to Authorize the app or login with your twitter credentials then take you to Dashboard page.

Authorize twitter app and login to dashboard
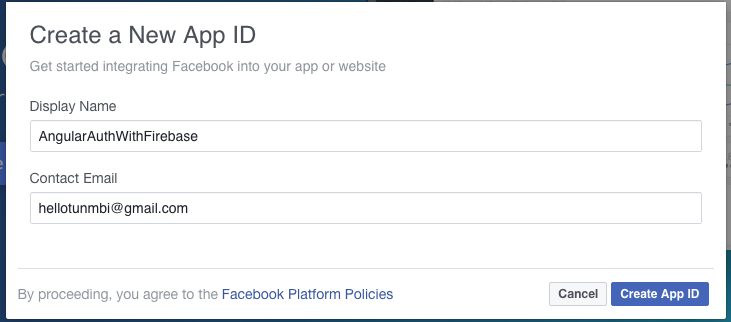
2. Sign In With Facebook
For authentication using Facebook, visit developer.facebook.com and login with your facebook credentials. Create/Add a new app. Type in the Display name and Create App ID
Click Settings at the side menu. Copy the App ID, show the App secret and copy it as well. Go to your firebase console. Under Sign-in methods, Enable facebook and enter the app id and app secret.
Now, lets add signInWithFacebook() function to our login component and login html.
// login.component.ts
... signInWithFacebook() { this.authService.signInWithFacebook() .then((res) => { this.router.navigate(['dashboard']) }) .catch((err) => console.log(err)); }...
In our login html file, lets add all the logins once and for all. Our html becomes:
// login.component.html
...<div class="form-group"> <button type="buton" class="btn btn-block" (click)="signInWithFacebook()"> <i class="fa fa-facebook" aria-hidden="true"></i> Login with Facebook </button>
<button type="button" class="btn btn-block" (click)="signInWithTwitter()"> <i class="fa fa-twitter" aria-hidden="true"></i> Login with Twitter </button>
<button type="button" class="btn btn-block" (click)="signInWithGithub()"> <i class="fa fa-github" aria-hidden="true"></i> Login with Github </button>
<button type="button" class="btn btn-block" (click)="signInWithGoogle()"> <i class="fa fa-google" aria-hidden="true"></i> Login with Google </button></div> ...
Sign In With Google
For Google account sign-in, Enable Google authentication in your firebase console and click Save

Lets add the function to our auth.service.ts file like so:
// src/app/services/auth.service.ts
...
signInWithGoogle() { return this._firebaseAuth.auth.signInWithPopup( new firebase.auth.GoogleAuthProvider() ) }
...
It is important to add the following functions: isLoggedIn() and Logout(). isLoggedIn() will return a boolean type if user is logged in. This will ensure that certain pages and displays are available only to authorized users.
logout() function, when called, logs the current user out. Its also essential to protect the application once the user is done making use of the application.
Complete auth.service file looks like this:
import { Injectable } from '@angular/core';import { Router } from "@angular/router";
import { AngularFireAuth } from 'angularfire2/auth';import * as firebase from 'firebase/app';import { Observable } from 'rxjs/Observable';
@Injectable()export class AuthService { private user: Observable<firebase.User>; private userDetails: firebase.User = null;
constructor(private _firebaseAuth: AngularFireAuth, private router: Router) { this.user = _firebaseAuth.authState;
this.user.subscribe( (user) => { if (user) { this.userDetails = user; console.log(this.userDetails); } else { this.userDetails = null; } } ); }
signInWithTwitter() { return this._firebaseAuth.auth.signInWithPopup( new firebase.auth.TwitterAuthProvider() ) }
signInWithFacebook() { return this._firebaseAuth.auth.signInWithPopup( new firebase.auth.FacebookAuthProvider() ) }
signInWithGoogle() { return this._firebaseAuth.auth.signInWithPopup( new firebase.auth.GoogleAuthProvider() ) }
isLoggedIn() { if (this.userDetails == null ) { return false; } else { return true; } }
logout() { this._firebaseAuth.auth.signOut() .then((res) => this.router.navigate(['/'])); }}
logout() { this._firebaseAuth.auth.signOut() .then((res) => this.router.navigate(['/'])); }}