
Part 2 — Complete Step-by-Step Firebase Authentication in Angular 2
This is a follow up article to A Complete Step by Step Firebase Authentication in Angular 2, which entails:
- Adding starting up an Angular (2) application.
- Adding authentication
- Twitter authentication
- Facebook authentication
- Gmail authentication
Part 2 will walk you through the following:
- Safeguarding the dashboard page and other protected pages
- Adding Logout functionality
- Authentication with GitHub accounts
- Regular sign up/login
Note, you can find the complete code on GitHub.
Let's Get Started!
Adding Logout Functionality
We implemented the logout functionality in our auth.service.ts file. Let's add the button on our Navigation and add click event that triggers the Logout function already in auth.service:
// dashboard.component.html...

<div id="navbar" class="navbar-collapse collapse">

<ul class="nav navbar-nav">

<li class="active"><a>Home</a></li>

<li><a>About</a></li>

<li><a>Contact</a></li>

</ul>

<ul class="nav navbar-nav navbar-right">

<li><a href="" (click)="authService.logout()">Logout</a></li>

</ul>

...
Safeguarding the Dashboard page
The dashboard page needs to be accessed only by authenticated users. The steps here will guide you in protecting other pages that require authentication. Since this is just a demo, we have just one protected page — the dashboard.
What Angular uses in protecting pages is called Navigation Route Guards, and there are five of them. Here they are and the scenarios where they are used:
CanActivate — used to decide if the route can be activated
CanActivateChild — used to decide if a route child can be activated
CanDeactivate — used to decide if a route can be deactivated
CanLoad — used to decide if children can be loaded. Used for lazy loading
Resolve — used to perform route data retrieval before route activation
More details about these route guards can be found in the Angular documentation.
The route guard that serves our purpose is the CanActivate guard and that's what we will be using.
Adding guard to Dashboard page
- Run
ng generate service services/auth-guardin the terminal to generate the AuthGuard and place it in the services folder. - Since services are not provisioned in the app module, we need to import it and add to providers under @NgModule decorator in app.module.ts file.
- Open
app.routes.tsand import AuthGuard from ‘./services/auth-guard.service’. - Add
canActivate: [AuthGuard]to dashboard path.
Here’s our AuthGuard Class
// services/auth-guard.service.ts

import { AuthService } from './auth.service';import { Injectable } from '@angular/core';import { Router, CanActivate } from '@angular/router';

@Injectable()export class AuthGuard implements CanActivate {

constructor(private router: Router, private authService: AuthService) { }

canActivate() {

if ( this.authService.isLoggedIn() ) {

return true;

}

this.router.navigate(['/']);

return false;

}
}
Here we create the AuthGuard functionality by importing the CanActivate class, adding router (because we need it to redirect users if they are not logged in), and adding AuthService to check authentication.
If you go to http://localhost:4200/dashboard without being logged in, you will be kicked out and redirected to the login page.
Authentication with GitHub Account
This is as easy as the other steps. But first, register your app as a developer on GitHub. You will be provided with OAuth Client ID and Client Secret.
Go to your Firebase Dashboard > Develop > Sign-in Methods and click GitHub. Clicking Enable allows you to enter the IDs:

Registering your app with Github
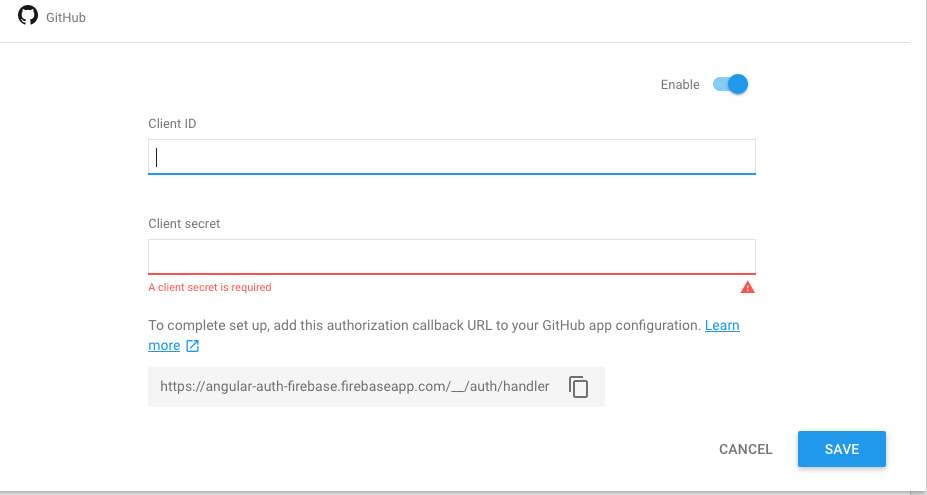
Enabling GitHub signin in Firebase Dashboard
Add click event to the ‘Login with GitHub’ button on the Login page.
We edit this in the login/login.component.html file like so:
// login/login.component.html

...

<button type="button" class="btn btn-block (click)="signInWithGithub()"> <i class="fa fa-github" aria-hidden="true"></i>Login with Github</button>

...
Create GitHub signin function
In the login/login.component.ts file, we add the function to handle click event. Here:
// login/login.component.ts

...signInWithGithub() {

this.authService.signInWithGithub() .then((res) => { this.router.navigate(['dashboard']) }) .catch((err) => console.log(err)); }...
Add GitHub Signin to AuthService
From the above code, we are calling signInWithGithub() from the authService, so we will need to go create that function:
// services/auth.service.ts

...signInWithGithub() { return this._firebaseAuth.auth.signInWithPopup( new firebase.auth.GithubAuthProvider() )}
...
Bingo! We are done with that. Didn’t I tell you it's easy? Now you can login with your GitHub account.
Regular Sign In with Email and Password
Firebase API now allows us to create a user with email/password and sign them in with just one form. To prepare our application for this, we do the following:
Add name, method and ngForm attributes tags to <form> tag in login.component.ts file to make it:
<form name="userform" method="post" #formCtrl="ngForm">
Import FormsModule and add it to Imports in app.module.ts . This will allow us [(ngModel)] in our login form.
// app.module.ts...import { FormsModule } from '@angular/forms';


...

imports: [BrowserModule, AppRoutes, FormsModule, AngularFireModule.initializeApp(environment.firebase, 'angular-auth-firebase'), AngularFireDatabaseModule, AngularFireAuthModule],

...

Add `ngModel` to the username and password input fields in `login.component.html`.

// login/login.component.html

...<div class="form-group"> <label for="exampleInputEmail1">Email address</label> <input type="email" class="form-control" [(ngModel)]="user.email" placeholder="Email" required></div>

<div class="form-group"> <label for="exampleInputPassword1">Password</label> <input type="password" class="form-control" [(ngModel)]="user.password" placeholder="Password" required></div>...
Disable button when input fields are empty. Do this on the Login with Email button.
// login/login.component.html...<div class="form-group"> <button type="buton" class="btn btn-primary btn-block" style="margin-bottom: 20px" (click)="signInWithEmail()" [disabled]="formCtrl.form.invalid">

Login with Email </button></div>...
In our login.component.ts, we will bind user inputs to user objects so we can pass it to the EmailAuthProvider function.
We add this just below export class LoginComponent implements OnInit {.
user = { email: '', password: ''};
Next, we create signInWithEmail function. This function will call the signInRegular function from our AuthService, passing the email and password as parameters. Here:
// login.component.ts

...signInWithEmail() { this.authService.signInRegular(this.user.email, this.user.password) .then((res) => { console.log(res); this.router.navigate(['dashboard']); }) .catch((err) => console.log('error: ' + err));}...
Now, let’s create the signInRegular function in our AuthService class.
// auth.service.ts

...signInRegular(email, password) {

const credential = firebase.auth.EmailAuthProvider.credential( email, password );

return this._firebaseAuth.auth.createUserWithEmailAndPassword(email, password)

}...
All fine and dandy!
A Quick Recap
In this Part 2 ( Part 1 can be found here) series of authenticating your Angular app with Firebase, we implemented the following:
- Safeguarding the dashboard page
- Authentication using GitHub login
- Authentication using Regular email/password
- Added Logout functionality
Thank you for following along until this stage. If you encounter any challenge or have better ways of achieving this, feel free to drop a comment.