
How to Deploy Angular Application to Heroku
It always "seems" easy until you try it. I encountered a series of challenges deploying Angular 4 recently, despite having deployed other apps to Heroku, but I finally pulled through. I am writing to explain in detail how I did it.
This article will show you guides on deploying your Angular 2/4 apps easily to Heroku, more importantly, avoiding common pitfalls.
This is not a tutorial to help you learn Angular. It will be assumed you have completed development and are ready to deploy. However, we’ll set up a basic Angular project from scratch and deploy. This tutorial will cover:
- Creating a basic Angular project
- Setting up automatic deployment from GitHub to Heroku
- Deploying Angular apps on a Heroku server
Set up Your Angular Application
Make use of the Angular CLI and set up a new project by running:
ng new demo-deploy
From this, our application will be named demo-deploy. Allow a few minutes to set up the new project and install npm packages.
Launch Application
Change your directory into a new project and launch it using the commands below. This will open in new browser on port 4200 by default, i.e. http://localhost:4200.
cd demo-deployng serve

Angular app greets you, welcome!
Our basic Angular app is ready and running locally. Let's push to GitHub.
Create its GitHub Repo and Push
Here, we’ll be creating a fresh GitHub repository and pushing our app to it.
- Log in to GitHub and create a new repository. No need to initialize repository with README.
- Open a new tab in your terminal/CMD or hit Ctrl+C to stop running the app. Then, run the following commands:
git remote add <new_github_repository_url>git add .git commit -m "initial commit"git push -u origin master
Now our app is on GitHub.
Set up Automatic Depoloyment from GitHub to Heroku
The advantage of this step is that once you push a change to your GitHub repository, it automatically pushes the change to your codebase on Heroku, which then takes effect live on the web. This means you’ll only have to push your changes to GitHub and its done.
If you dont have an account yet, create one on Heroku. It's free. Log in to your dashboard and create a new app.

create a new app on heroku

Click Create app
In the Deploy menu, under Deployment method, select GitHub. If you have not done this already, it will ask you to log into your GitHub account so it can connect to it.
Enter the name of the GitHub repository and click Search. Once the repo is shown below, click Connect. Viola!

Uh, wait. Two more simple steps.
-
Under Automatic Deploys, select the master branch and click Enable Automatic Deploys.
-
Under Manual Deploys, click Deploy Branch. This is to push our fresh code to Heroku.

Okay, we’re done with this stage, really. It might take a little while, but it will show you a successfully deployed message once done, like so:
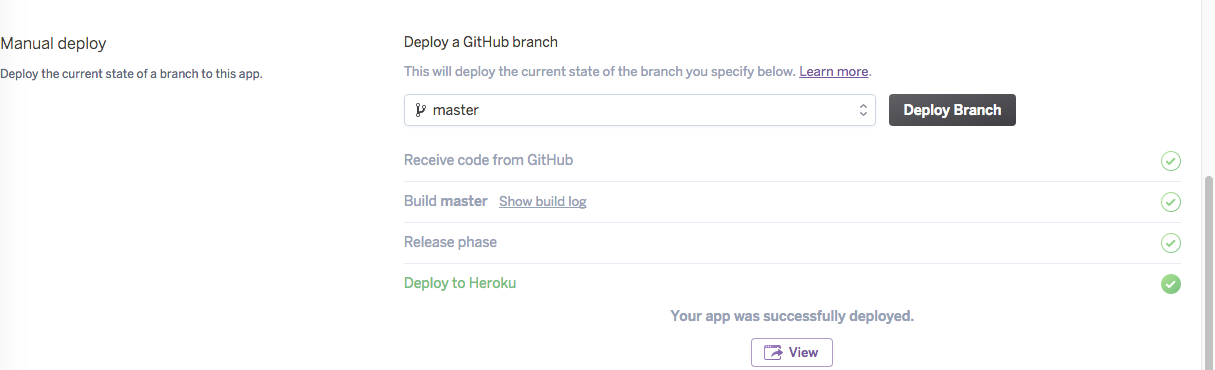

If you click View, a new tab will be opened, but your app will not display. The next series of steps will guide you on configuring and spinning up your Angular app.
Configure Your Angular App to Deploy Properly on Heroku
The following are production-ready steps to easily and properly deploy your app without hitches.
Ensure you have the latest version of Angular CLI and Angular Compiler CLI.
Install them into your application by running this command in your terminal:
npm install @angular/cli@latest @angular/compiler-cli --save-dev
In your package.json, copy
"@angular/cli”: “1.4.9”,"@angular/compiler-cli": "^4.4.6",
from devDependencies to dependencies
Create postinstall script in package.json
Under “scripts,” add a postinstall command, like so:
"postinstall": "ng build --aot -prod"
This tells Heroku to build the application using Ahead Of Time (AOT) compiler and make it production-ready. This will create a dist folder where all HTML and JavaScript converted versions of our app will be launched from.
Add Node and NPM engines
You will need to add the Node and NPM engines that Heroku will use to run your application. Preferably, it should be same version you have on your machine. So, run node -v and npm -v to get the correct version and include it in your package.json file, like so:
Copy typescript to dependencies.
Copy "typescript": "~2.3.3" from devDependencies to dependencies to also inform Heroku what typescript version to use.
Install Enhanced Resolve 3.3.0
Run the command npm install enhanced-resolve@3.3.0 --save-dev
Install Server to run your app
Locally, we'll run ng serve from terminal to run our app on a local browser. We will need to set up an Express server that will run our production ready app (from dist folder created) to ensure lightweight and fast loading.
Install Express server by running:
npm install express --save
Create a server.js file in the root of the application and paste the following code.
Change start command
In package.json, change the “start” command to node server.js so it becomes:
"start": "node server.js"
Here’s what the complete package.json looks like. Yours may contain more, depending on your application-specific packages.
Push changes to GitHub:
git add .git commit -m "updates to deploy to heroku"git push
At this point, your application on Heroku will automatically take the changes from GitHub and update itself.
Also, it’ll look into your package.json and install packages.
It will run the postinstall and then node server.js to spin up your application.
You can check the Activity tab and open Build log to see how it actually runs.
You should not run into any issues. I followed these steps while writing this post!
Viola!! Our Angular app is ready and LIVE!

Thank you for following through until this stage!
You can follow me on Twitter, or here on Medium.
Say cheese! Comment below if you've encountered any issues or want to suggest better ways.