
Install OpenCV 4 on your Raspberry Pi
Today I’m going to show you how to compile and install OpenCV 4 on your Raspberry Pi.
OpenCV 4 was officially released on November 20th, 2018.
This blog post was updated subsequently on November 28th to accommodate the changes to the install (previously these instructions linked to the alpha release source code).
It is also possible to pip install OpenCV as well! As of this update however, PyPi does not contain precompiled OpenCV 4 binaries which can be installed via pip.
Therefore, if you want OpenCV 4 then you’ll need to compile from source.
To learn how to install OpenCV 4 on your Raspberry Pi, just follow this tutorial!
In this blog post, we’re going to install OpenCV 4 on your Raspberry Pi. OpenCV 4 has a goal of reducing bloat, adding optimizations, and updating the deep learning module.
_ Note: _ There are many install guides on my blog. Before you begin, be sure to check out the available install tutorials on my OpenCV installation guides page.
First we’ll cover assumptions that go along with this tutorial.
From there, we’ll walk through 7 steps to compile and install OpenCV 4 on your Raspberry Pi. Compiling from source allows us to have full control over the compile and build. It also allows us to grab the latest code — something that pip and apt-get don’t offer.
Finally, we’ll test our OpenCV 4 install on our Raspberry Pi with a fun project.
Let’s get started.
Assumptions
In this tutorial, I am going to assume that you already own a Raspberry Pi 3 B or the newer Raspberry Pi 3 B+ with Raspbian Stretch installed.
If you don’t already have the Raspbian Stretch OS, you’ll need to upgrade your OS to take advantage of Raspbian Stretch’s new features.
To upgrade your Raspberry Pi 3 to Raspbian Stretch, you may download it here and follow these upgrade instructions (or these for the NOOBS route which is recommended for beginners). The former instructions take approximately 10 minutes to download via a torrent client and about 10 minutes to flash the SD card with Etcher or another tool. At that point you can power up and proceed to the next section.
Assuming that your OS is up to date, you’ll need one of the following for the remainder of this post:
- Physical access to your Raspberry Pi 3 so that you can open up a terminal and execute commands
- Remote access via SSH or VNC.
I’ll be doing the majority of this tutorial via SSH, but as long as you have access to a terminal, you can easily follow along.
_ Can’t SSH? _ If you see your Pi on your network, but can’t ssh to it, you may need to enable SSH. This can easily be done via the Raspberry Pi desktop preferences menu (you’ll need an HDMI cable and a keyboard/mouse) or running sudo service ssh start from the command line of your Pi.
After you’ve changed the setting and rebooted, you can test SSH directly on the Pi with the localhost address. Open a terminal and type ssh pi@127.0.0.1 to see if it is working. To SSH from another computer you’ll need the Pi’s IP address — you could figure it out by looking at your router’s clients page or by running ifconfig on the Pi itself.
_ Keyboard layout giving you problems? _ Change your keyboard layout by going to the Raspberry Pi desktop preferences menu. I use the standard US Keyboard layout, but you’ll want to select the one appropriate for you.
Step #1: Expand filesystem on your Raspberry Pi
To get the OpenCV 4 party started, fire up your Raspberry Pi and open an SSH connection (alternatively use the Raspbian desktop with a keyboard + mouse and launch a terminal).
Are you using a brand new install of Raspbian Stretch?
If so, the first thing you should do is expand your filesystem to include all available space on your micro-SD card:
Install OpenCV 4 on your Raspberry Pi
And then select the “Advanced Options” menu item:
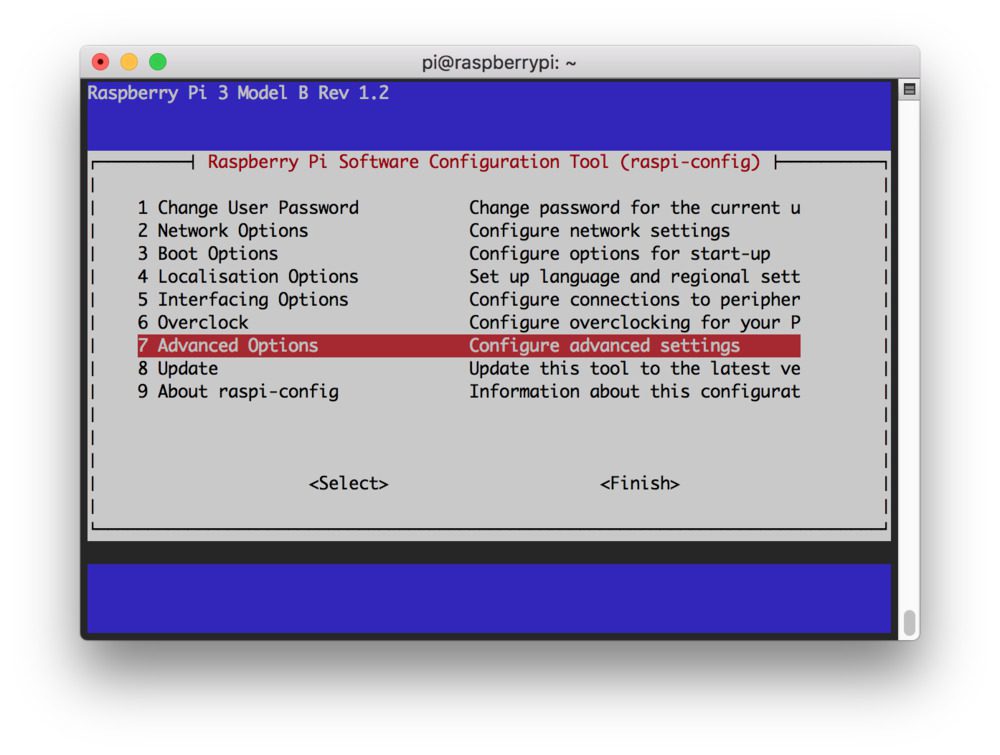
Figure 1: Selecting the “Advanced Options” from the raspi-config menu to expand the Raspbian file system on your Raspberry Pi is important before installing OpenCV 4. Next we’ll actually expand the filesystem.
Followed by selecting “Expand filesystem”:
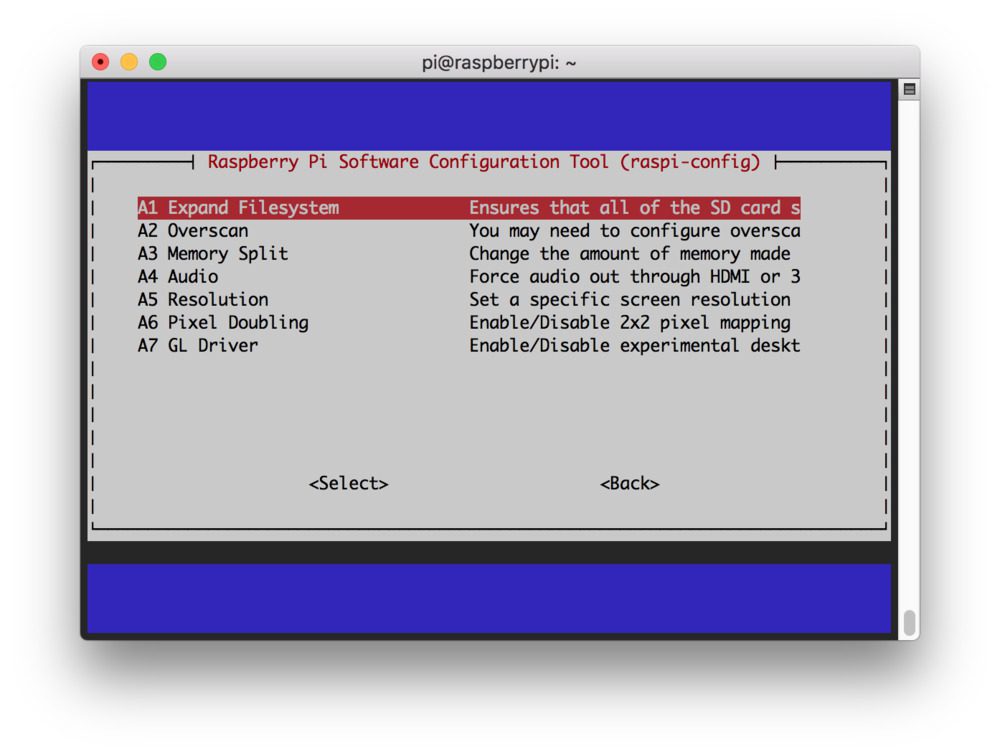
Figure 2: The Raspberry Pi “Expand Filesystem” menu allows us to take advantage of our entire flash memory card. This will give us space necessary to install OpenCV 4 and other packages.
Once prompted, you should select the first option, _ “A1. Expand File System” _, _ hit Enter _ on your keyboard, arrow down to the _ “<Finish>” _ button, and then reboot your Pi — you may be prompted to reboot, but if you aren’t you can execute:
Install OpenCV 4 on your Raspberry Pi
After rebooting, your file system should have been expanded to include all available space on your micro-SD card. You can verify that the disk has been expanded by executing df -h and examining the output:
Install OpenCV 4 on your Raspberry Pi
$ df -h Filesystem Size Used Avail Use% Mounted on /dev/root 30G 4.2G 24G 15% / devtmpfs 434M 0 434M 0% /dev tmpfs 438M 0 438M 0% /dev/shm tmpfs 438M 12M 427M 3% /run tmpfs 5.0M 4.0K 5.0M 1% /run/lock tmpfs 438M 0 438M 0% /sys/fs/cgroup /dev/mmcblk0p1 42M 21M 21M 51% /boot tmpfs 88M 0 88M 0% /run/user/1000
| |
Filesystem Size Used Avail Use% Mounted on
/dev/root 30G 4.2G 24G 15% /
devtmpfs 434M 0 434M 0% /dev
tmpfs 438M 0 438M 0% /dev/shm
tmpfs 438M 12M 427M 3% /run
tmpfs 5.0M 4.0K 5.0M 1% /run/lock
tmpfs 438M 0 438M 0% /sys/fs/cgroup
/dev/mmcblk0p1 42M 21M 21M 51% /boot
tmpfs 88M 0 88M 0% /run/user/1000
|
As you can see, my Raspbian filesystem has been expanded to include all 32GB of the micro-SD card.
However, even with my filesystem expanded, I have already used 15% of my 32GB card.
If you are using an 8GB card you may be using close to 50% of the available space, so one simple thing to do is to delete both LibreOffice and Wolfram engine to free up some space on your Pi:
Install OpenCV 4 on your Raspberry Pi
$ sudo apt-get purge wolfram-engine $ sudo apt-get purge libreoffice* $ sudo apt-get clean $ sudo apt-get autoremove
| |
$ sudo apt-get purge wolfram-engine
$ sudo apt-get purge libreoffice*
$ sudo apt-get autoremove
|
After removing the Wolfram Engine and LibreOffice, you can reclaim almost 1GB!
Step #2: Install OpenCV 4 dependencies on your Raspberry Pi
From there, let’s update our system:
Install OpenCV 4 on your Raspberry Pi
$ sudo apt-get update && sudo apt-get upgrade
| |
$ sudo apt-get update && sudo apt-get upgrade
|
And then let’s install developer tools including CMake:
Install OpenCV 4 on your Raspberry Pi
$ sudo apt-get install build-essential cmake unzip pkg-config
| |
$ sudo apt-get install build-essential cmake unzip pkg-config
|
Next, let’s install a selection of image and video libraries — these are critical to being able to work with image and video files:
Install OpenCV 4 on your Raspberry Pi
$ sudo apt-get install libjpeg-dev libpng-dev libtiff-dev $ sudo apt-get install libavcodec-dev libavformat-dev libswscale-dev libv4l-dev $ sudo apt-get install libxvidcore-dev libx264-dev
| |
$ sudo apt-get install libjpeg-dev libpng-dev libtiff-dev
$ sudo apt-get install libavcodec-dev libavformat-dev libswscale-dev libv4l-dev
$ sudo apt-get install libxvidcore-dev libx264-dev
|
From there, let’s install GTK, our GUI backend:
Install OpenCV 4 on your Raspberry Pi
$ sudo apt-get install libgtk-3-dev
| |
$ sudo apt-get install libgtk-3-dev
|
And now let’s install a package which may reduce pesky GTK warnings:
Install OpenCV 4 on your Raspberry Pi
$ sudo apt-get install libcanberra-gtk*
| |
$ sudo apt-get install libcanberra-gtk*
|
The asterisk will grab the ARM specific GTK.
Followed by installing two packages which contain numerical optimizations for OpenCV:
Install OpenCV 4 on your Raspberry Pi
$ sudo apt-get install libatlas-base-dev gfortran
| |
$ sudo apt-get install libatlas-base-dev gfortran
|
And finally, let’s install the Python 3 development headers:
Install OpenCV 4 on your Raspberry Pi
$ sudo apt-get install python3-dev
| |
$ sudo apt-get install python3-dev
|
Once you have all of these prerequisites installed you can move on to the next step.
Step #3: Download OpenCV 4 for your Raspberry Pi
Our next step is to download OpenCV.
Let’s navigate to our home folder and download both opencv and opencv_contrib. The contrib repo contains extra modules and functions which we frequently use here on the PyImageSearch blog. ** You should be installing the OpenCV library with the additional contrib modules as well.**
When you’re ready, just follow along to download both the opencv and opencv_contrib code:
Install OpenCV 4 on your Raspberry Pi
$ cd ~ $ wget -O opencv.zip https://github.com/opencv/opencv/archive/4.0.0.zip $ wget -O opencv_contrib.zip https://github.com/opencv/opencv_contrib/archive/4.0.0.zip
| |
$ wget -O opencv.zip https://github.com/opencv/opencv/archive/4.0.0.zip
$ wget -O opencv_contrib.zip https://github.com/opencv/opencv_contrib/archive/4.0.0.zip
|
From there, let’s unzip the archives:
Install OpenCV 4 on your Raspberry Pi
$ unzip opencv.zip $ unzip opencv_contrib.zip
| |
$ unzip opencv_contrib.zip
|
I also like to rename the directories:
Install OpenCV 4 on your Raspberry Pi
$ mv opencv-4.0.0 opencv $ mv opencv_contrib-4.0.0 opencv_contrib
| |
$ mv opencv_contrib-4.0.0 opencv_contrib
|
If you skip renaming the directories, don’t forget to update the CMake paths.
Now that opencv and opencv_contrib are downloaded and ready to go, let’s set up our environment.
Step #4: Configure your Python 3 virtual environment for OpenCV 4
Let’s grab and install pip, a Python Package Manager.
To install pip, simply enter the following in your terminal:
Install OpenCV 4 on your Raspberry Pi
$ wget https://bootstrap.pypa.io/get-pip.py $ sudo python3 get-pip.py
| |
$ wget https://bootstrap.pypa.io/get-pip.py
$ sudo python3 get-pip.py
|
Make use of virtual environments for Python development
If you aren’t familiar with virtual environments, please take a moment look at this article on RealPython or read the first half of the this blog post on PyImageSearch.
Virtual environments will allow you to run different versions of Python software in isolation on your system. Today we’ll be setting up just one environment, but you could easily have an environment for each project.
Let’s go ahead and install virtualenv and virtualenvwrapper now — they allow for Python virtual environments:
Install OpenCV 4 on your Raspberry Pi
$ sudo pip install virtualenv virtualenvwrapper $ sudo rm -rf ~/get-pip.py ~/.cache/pip
| |
$ sudo pip install virtualenv virtualenvwrapper
$ sudo rm -rf ~/get-pip.py ~/.cache/pip
|
To finish the install of these tools, we need to update our ~/.profile file (similar to .bashrc or .bash_profile ).
Using a terminal text editor such as vi / vim or nano , add the following lines to your ~/.profile :
Install OpenCV 4 on your Raspberry Pi
virtualenv and virtualenvwrapper export WORKON_HOME=$HOME/.virtualenvs export VIRTUALENVWRAPPER_PYTHON=/usr/bin/python3 source /usr/local/bin/virtualenvwrapper.sh
| |
virtualenv and virtualenvwrapper
export WORKON_HOME=$HOME/.virtualenvs
export VIRTUALENVWRAPPER_PYTHON=/usr/bin/python3
source /usr/local/bin/virtualenvwrapper.sh
|
Alternatively, you can append the lines directly via bash commands:
Install OpenCV 4 on your Raspberry Pi
$ echo -e "\n# virtualenv and virtualenvwrapper" >> ~/.profile $ echo "export WORKON_HOME=$HOME/.virtualenvs" >> ~/.profile $ echo "export VIRTUALENVWRAPPER_PYTHON=/usr/bin/python3" >> ~/.profile $ echo "source /usr/local/bin/virtualenvwrapper.sh" >> ~/.profile
| |
$ echo -e "\n# virtualenv and virtualenvwrapper" >> ~/.profile
$ echo "export WORKON_HOME=$HOME/.virtualenvs" >> ~/.profile
$ echo "export VIRTUALENVWRAPPER_PYTHON=/usr/bin/python3" >> ~/.profile
$ echo "source /usr/local/bin/virtualenvwrapper.sh" >> ~/.profile
|
Next, source the ~/.profile file:
Install OpenCV 4 on your Raspberry Pi
Create a virtual environment to hold OpenCV 4 and additional packages
Now you’re at the point where you can create your OpenCV 4 + Python 3 virtual environment on your Raspberry Pi:
Install OpenCV 4 on your Raspberry Pi
$ mkvirtualenv cv -p python3
| |
$ mkvirtualenv cv -p python3
|
This line simply creates a Python 3 virtual environment named cv .
You can (and should) name your environment(s) whatever you’d like — I like to keep them short and sweet while also providing enough information so I’ll remember what they are for. For example, I like to name my environments like this:
- py3cv4
- py3cv3
- py2cv2
- etc.
Let’s verify that we’re in the cv environment by using the workon command:
Install OpenCV 4 on your Raspberry Pi
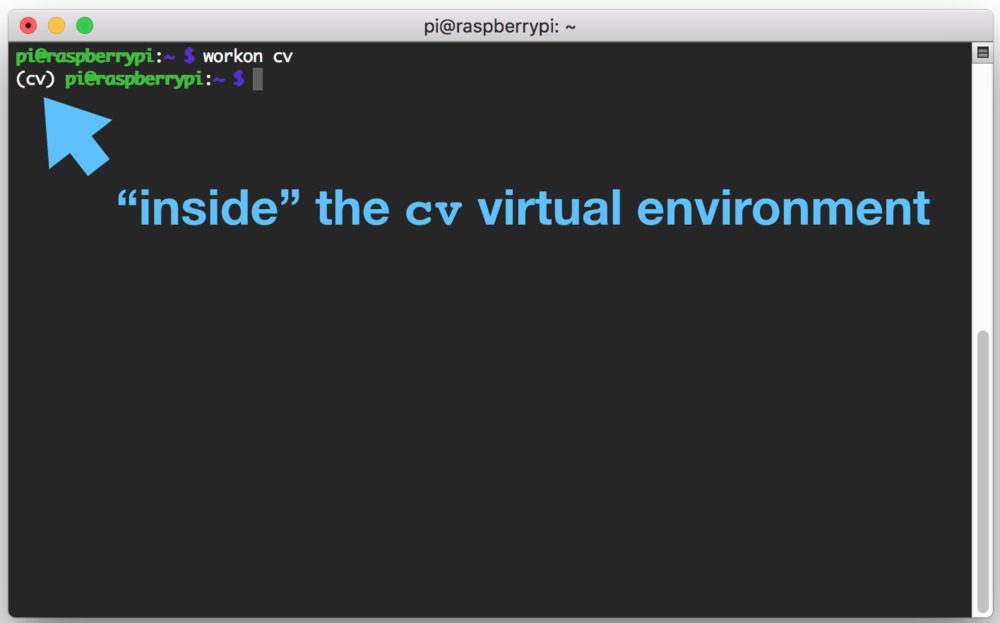
Figure 3: The workon command is part of the virtualenvwrapper package and allows us to easily activate virtual environments. Here I’m activating the cv environment which we’ll install OpenCV 4 into on our Raspberry Pi.
Install NumPy
The first Python package and only OpenCV prerequisite we’ll install is NumPy:
Install OpenCV 4 on your Raspberry Pi
We can now prepare OpenCV 4 for compilation on our Raspberry Pi.
Step #5: CMake and compile OpenCV 4 for your Raspberry Pi
For this step, we’re going to setup our compile with CMake followed by running make to actually compile OpenCV. This is the most time-consuming step of today’s blog post.
Navigate back to your OpenCV repo and create + enter a build directory:
Install OpenCV 4 on your Raspberry Pi
$ cd ~/opencv $ mkdir build $ cd build
| |
|
Run CMake for OpenCV 4
Now let’s run CMake to configure the OpenCV 4 build:
Install OpenCV 4 on your Raspberry Pi
$ cmake -D CMAKE_BUILD_TYPE=RELEASE \ -D CMAKE_INSTALL_PREFIX=/usr/local \ -D OPENCV_EXTRA_MODULES_PATH=~/opencv_contrib/modules \ -D ENABLE_NEON=ON \ -D ENABLE_VFPV3=ON \ -D BUILD_TESTS=OFF \ -D OPENCV_ENABLE_NONFREE=ON \ -D INSTALL_PYTHON_EXAMPLES=OFF \ -D BUILD_EXAMPLES=OFF ..
| |
$ cmake -D CMAKE_BUILD_TYPE=RELEASE \
-D CMAKE_INSTALL_PREFIX=/usr/local \
-D OPENCV_EXTRA_MODULES_PATH=~/opencv_contrib/modules \
-D OPENCV_ENABLE_NONFREE=ON \
-D INSTALL_PYTHON_EXAMPLES=OFF \
|
_ Update 2018-11-27: Notice the -D OPENCV_ENABLE_NONFREE=ON flag. Setting this flag with OpenCV 4 ensures that you’ll have access to SIFT/SURF and other patented algorithms._
Be sure to update the above command to use the correct OPENCV_EXTRA_MODULES_PATH path. If you’re following along with this tutorial exactly you should not need to update the path.
Once CMake is finished, it’s important that you inspect the output. Your output should look similar to mine below:
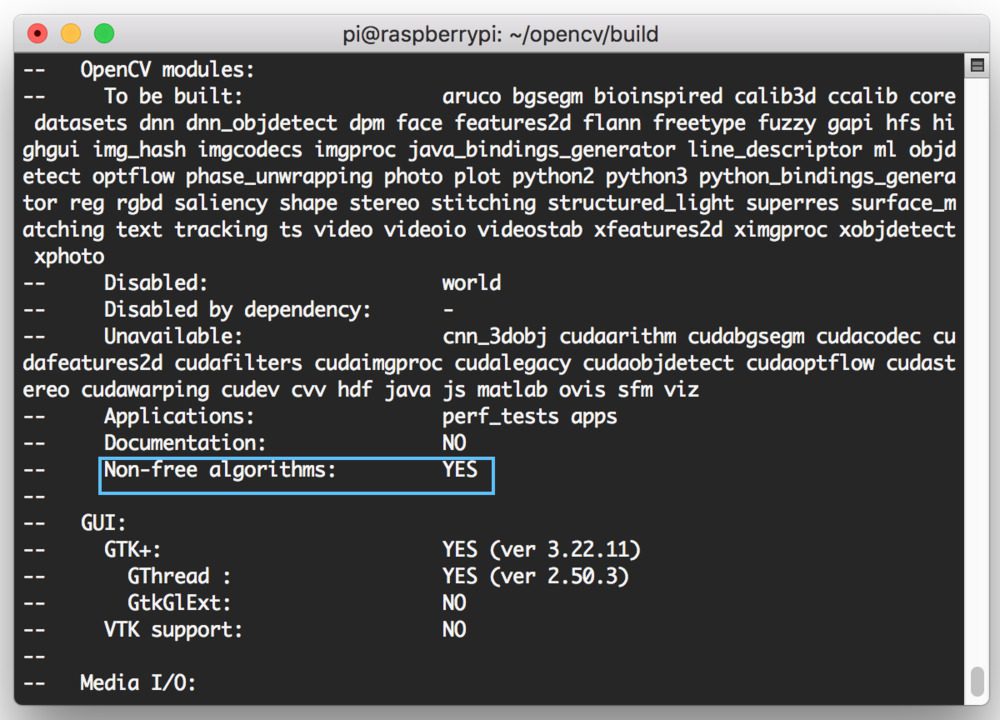
Figure 4: Ensure that “Non-free algorithms” is set to “YES”. This will allow you to use patented algorithms such as SIFT/SURF for educational purposes.
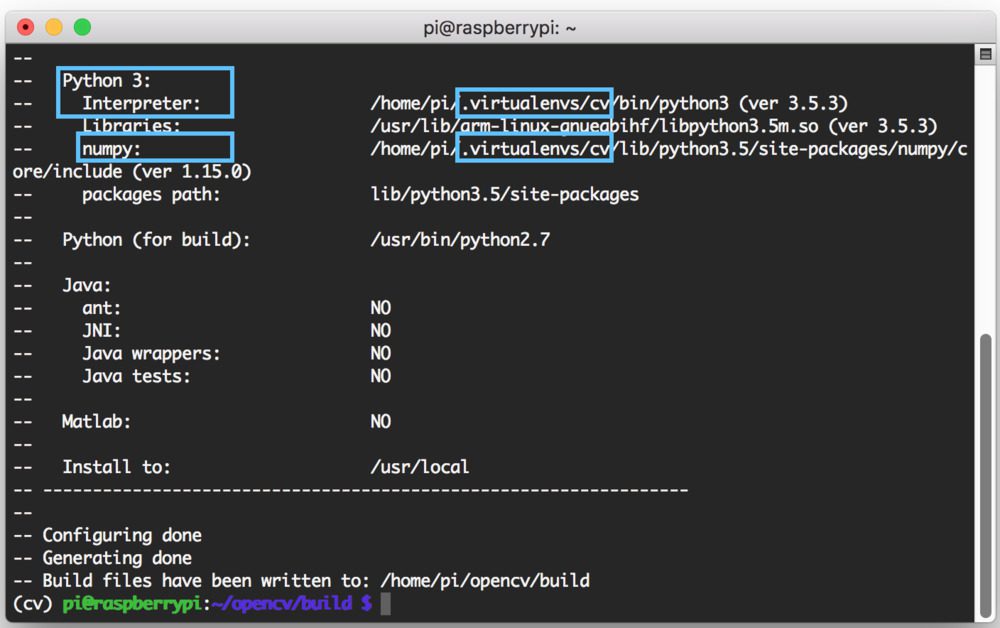
Figure 5: The CMake command allows us to generate build files for compiling OpenCV 4 on the Raspberry Pi. Since we’re using virtual environments, you should inspect the output to make sure that the compile will use the proper interpreter and NumPy.
Take a second now to ensure that the Interpreter points to the correct Python 3 binary. Also check that numpy points to our NumPy package which is installed inside the virtual environment.
Increase the SWAP on the Raspberry Pi
Before you begin the compile I would suggest _ increasing your swap space _. This will enable you to compile OpenCV with _ all four cores _ of the Raspberry Pi without the compile hanging due to memory exhausting.
Open up your /etc/dphys-swapfile file:
Install OpenCV 4 on your Raspberry Pi
$ sudo nano /etc/dphys-swapfile
| |
$ sudo nano /etc/dphys-swapfile
|
…and then edit the CONF_SWAPSIZE variable:
Install OpenCV 4 on your Raspberry Pi
set size to absolute value, leaving empty (default) then uses computed value # you most likely don't want this, unless you have an special disk situation # CONF_SWAPSIZE=100 CONF_SWAPSIZE=2048
| |
set size to absolute value, leaving empty (default) then uses computed value
you most likely don't want this, unless you have an special disk situation
|
Notice that I’m increasing the swap from 100MB to 2048MB.
_ If you do not perform this step it’s very likely that your Pi will hang. _
From there, restart the swap service:
Install OpenCV 4 on your Raspberry Pi
$ sudo /etc/init.d/dphys-swapfile stop $ sudo /etc/init.d/dphys-swapfile start
| |
$ sudo /etc/init.d/dphys-swapfile stop
$ sudo /etc/init.d/dphys-swapfile start
|
_ Note: Increasing swap size is a great way to burn out your Raspberry Pi microSD card. Flash-based storage have limited number of writes you can perform until the card is essentially unable to hold the 1’s and 0’s anymore. We’ll only be enabling large swap for a short period of time, so it’s not a big deal. Regardless, be sure to backup your .img file after installing OpenCV + Python just in case your card dies unexpectedly early. You can read more about large swap sizes corrupting memory cards on this page._
Compile OpenCV 4
Now we’re ready to compile OpenCV 4:
Install OpenCV 4 on your Raspberry Pi
_ Note: In the make command above, the -j4 argument specifies that I have 4 cores for compilation. If you have compile errors or your Raspberry Pi hangs/freezes you can try without the -j4 switch which can eliminate race conditions._
Here you can see OpenCV 4 has compiled without any errors:
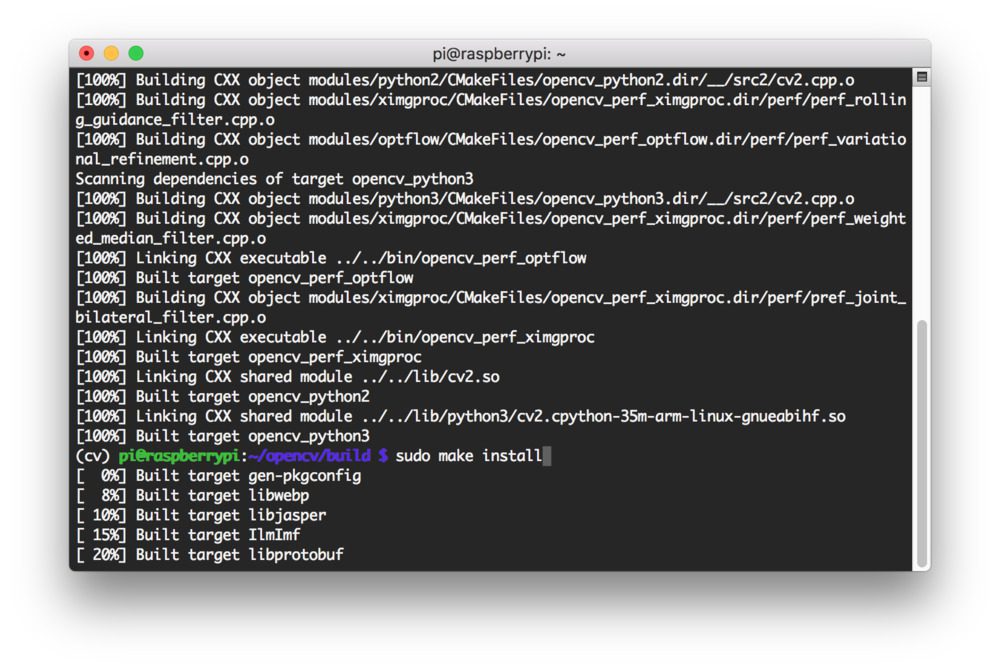
Figure 6: I’ve compiled OpenCV 4 on my Raspberry Pi successfully (the make command has reached 100%). So now I’ll issue the sudo make install command.
And from there, let’s install OpenCV 4 with two additional commands:
Install OpenCV 4 on your Raspberry Pi
$ sudo make install $ sudo ldconfig
| |
|
_ Don’t forget to go back _ to your /etc/dphys-swapfile file and:
- Reset CONF_SWAPSIZE to 100MB.
- Restart the swap service.
Step #6: Link OpenCV 4 into your Python 3 virtual environment
Let’s create a symbolic link from the OpenCV install in the system site-packages directory to our virtual environment:
Install OpenCV 4 on your Raspberry Pi
$ cd ~/.virtualenvs/cv/lib/python3.5/site-packages/ $ ln -s /usr/local/python/cv2/python-3.5/cv2.cpython-35m-arm-linux-gnueabihf.so cv2.so $ cd ~
| |
$ cd ~/.virtualenvs/cv/lib/python3.5/site-packages/
$ ln -s /usr/local/python/cv2/python-3.5/cv2.cpython-35m-arm-linux-gnueabihf.so cv2.so
|
I cannot stress this step enough — this step is critical. If you don’t create a symbolic link, you won’t be able to import OpenCV in your scripts. Also, ensure that the paths and filenames in the above commands are correct for your Raspberry Pi. I suggest tab-completion.
Step #7: Test your OpenCV 4 install on your Raspberry Pi
Let’s do a quick sanity test to see if OpenCV 4 is ready to go.
Open a terminal and perform the following:
Install OpenCV 4 on your Raspberry Pi
$ workon cv $ python >>> import cv2 >>> cv2.__version__ '4.0.0' >>> exit()
| |
|
The first command activates our virtual environment. Then we run the Python interpreter associated with the environment.
If you see that you have version 4.0.0 installed, then you’re now fully armed and dangerous + ready to perform computer vision and image processing.
A Raspberry Pi + OpenCV 4 project to get your feet wet
A while back, I was working hard on responding to PyImageSearch readers via comments, emails, and Twitter/Facebook/LinkedIn. I make a point of responding to as many incoming questions and comments as I can.
It was 4:30 in the afternoon and I was cranking away at the keyboard in a “flow” state.
But while I was typing away, something triggered in my brain that I was thirsty. Very thirsty.
So I took a quick break from the keyboard and went to the fridge to grab a tasty beer ?.
WTF?
All my beers were gone!
Who stole my beer?!
I grabbed some water instead and went back to the computer. I closed all correspondence windows and fired up a code editor/IDE (I like PyCharm).
I started tapping away at the keyboard again and sipping some water.
What was I building?
I was building a security cam with my Raspberry Pi which will catch people leaving/entering my apartment and opening/closing my fridge. I’ll catch that SOB stealing my beer next time!
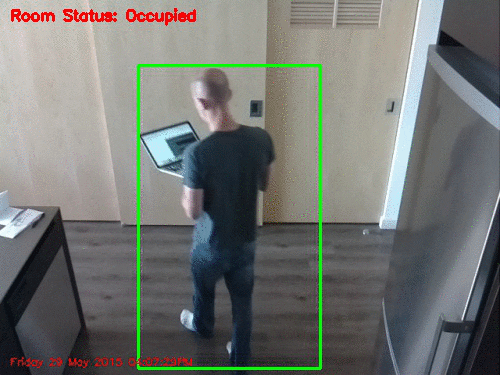
Figure 7: Examples of the Raspberry Pi home surveillance system detecting motion in video frames and uploading them to my personal Dropbox account.
If you want to learn how to build a security camera with your Raspberry Pi and OpenCV 4, then I suggest you read the original blog post.
This project is relatively simple and will accomplish the following:
- Detects motion via background subtraction.
- Uploads images of intruders and other motion to Dropbox so you can review events later. All images are timestamped so you’ll know when someone was in view of your Raspberry Pi security camera.
Or if you’re savvy and want to grab the code right now, you can be up and running in a few moments after you paste your Dropbox API key in the config file.
To download this project, scroll to the _ “Downloads” _ section of this blog post and fill out the form.
You can download the zip to your ~/Downloads folder and then fire up a terminal:
Install OpenCV 4 on your Raspberry Pi
$ cd ~/Downloads $ scp pi-home-surveillance.zip pi@192.168.1.119:~ # replace IP with your Pi's IP $ ssh pi@192.168.1.119 # replace with your Pi's IP
| |
$ scp pi-home-surveillance.zip pi@192.168.1.119:~ # replace IP with your Pi's IP
$ ssh pi@192.168.1.119 # replace with your Pi's IP
|
Once your SSH connection is established let’s install a couple packages, namely the Dropbox API:
Install OpenCV 4 on your Raspberry Pi
$ workon cv $ pip install dropbox $ pip install imutils $ pip install "picamera[array]"
| |
$ pip install "picamera[array]"
|
From there, unzip the files and change working directory:
Install OpenCV 4 on your Raspberry Pi
$ cd ~ $ unzip pi-home-surveillance.zip $ cd pi-home-surveillance
| |
$ unzip pi-home-surveillance.zip
$ cd pi-home-surveillance
|
You’ll be presented with a directory structure that looks like this:
Install OpenCV 4 on your Raspberry Pi
$ tree --dirsfirst . ├── pyimagesearch │ ├── __init__.py │ └── tempimage.py ├── conf.json └── pi_surveillance.py 1 directory, 6 files
| |
|
Before you’ll be able to deploy the project, you need to edit the config file, conf.json . Let’s quickly inspect it in our terminal using the nano text editor (or vim / emacs if you prefer):
Install OpenCV 4 on your Raspberry Pi
You’ll be presented with a JSON dictionary that looks like this:
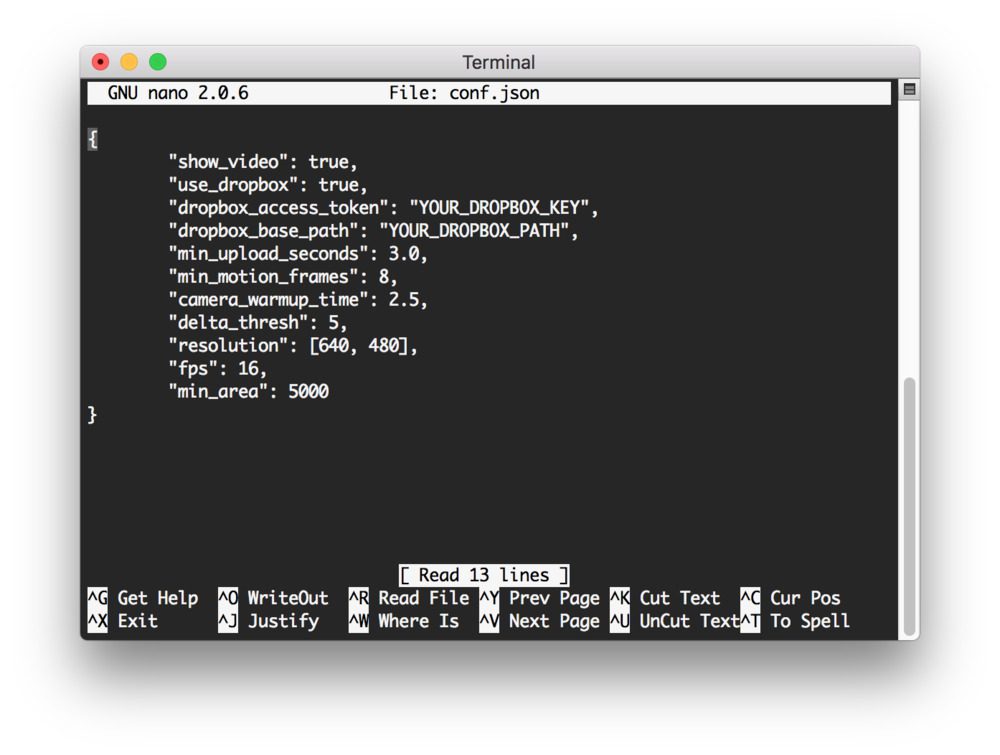
Figure 8: The Raspberry Pi security camera configuration file. An API key must be pasted in, and a base path must be configured. For headless mode, “show_video” should be set to “false”.
At this point it is important to edit the configuration file with your API key and Path. To find your API key, you can create an app on the app creation page. Once you have an app created, the API key may be generated under the OAuth section of the app’s page on the App Console (simply click the “Generate” button and copy/paste the key into the configuration file). The Path needs to be a valid path in your Dropbox file structure.
_ Note: _ Don’t share your API key with anyone unless you trust them!
For testing, you can leave "show_video": true and connect an HDMI screen + keyboard/mouse to your Pi. Eventually you’ll want to set the value to false and have your Pi run headless with few cables connected to it so you can hide it in the inconspicuously.
Once you get your project working, you can monitor the Dropbox folder in your web browser (you might need to refresh to check for images), or if you are syncing the folder to your laptop/desktop, you can monitor the folder there.
I highly recommend that you read the entire blog post as well.
Happy hacking with your Raspberry Pi and OpenCV 4!
Troubleshooting and Frequently Asked Questions (FAQ)
Did you encounter an error installing OpenCV 4 on your Raspberry Pi?
Don’t throw the little gadget across the room yet. The first time you install OpenCV on your Raspberry Pi, it can be very frustrating and the last thing I want for you to do is to end the learning process here.
If you really get stuck, don’t forget that the _ QuickStart Bundle _ of Practical Python and OpenCV + Case Studies comes with Raspberry Pi images which are pre-configured and ready to go. Images for RPi 3B/3B+ and RPi Zero W are included. These images can save you hours and days (yes it took me about 6 days to set up the RPi Zero W) of frustration.
If you have your heart set on figuring this out on your own, I’ve put together a short list of frequently asked questions (FAQs) and I suggest that you familiarize yourself with them.
_ Q. _ How do I flash an operating system on to my Raspberry Pi memory card?
_ A. _ I recommend that you:
- Grab a 16GB or 32GB memory card.
- Flash Raspbian Stretch with Etcher to the card. Etcher is supported by all 3 major OSes.
- Insert the card into your Raspberry Pi and begin with “Assumptions” and “Step 1” in this blog post.
_ Q. _ Can I use Python 2.7?
_ A. _ I don’t recommend using Python 2.7 as it’s rapidly approaching its end of life. Python 3 is the standard now. But if you insist…
Here’s how to get up and running with Python 2.7:
How to install OpenCV 4 on Ubuntu
$ sudo apt-get install python2.7 python2.7-dev
| |
$ sudo apt-get install python2.7 python2.7-dev
|
Then, before you create your virtual environment in Step #4 , first install pip for Python 2.7:
How to install OpenCV 4 on Ubuntu
$ sudo python2.7 get-pip.py
| |
$ sudo python2.7 get-pip.py
|
Also in Step #4 : when you create your virtual environment, simply use the relevant Python version flag:
How to install OpenCV 4 on Ubuntu
$ mkvirtualenv cv -p python2.7
| |
$ mkvirtualenv cv -p python2.7
|
From there everything should be the same.
_ Q. _ Can I just pip to install OpenCV 4?
_ A. _ In the future, yes. Currently you’ll need to compile from source until piwheels has an OpenCV 4 binary available.
_ Q. _ Why can’t I just apt-get install OpenCV?
_ A. _ Avoid this “solution” at all costs even though it might work. First, this method likely won’t install OpenCV 4 for a while. Secondly, apt-get doesn’t play nice with virtual environments and you won’t have control over your compile and build.
_ Q. _ The mkvirtualenv and workon commands yield a “command not found error”. I’m not sure what to do next.
_ A. _ There a number of reasons why you would be seeing this error message, all of come from to Step #4:
- First, ensure you have installed virtualenv and virtualenvwrapper properly using the pip package manager. Verify by running pip freeze , and ensure that you see both virtualenv and virtualenvwrapper in the list of installed packages.
- Your ~/.profile file may have mistakes. View the contents of your ~/.profile file to see the proper export and source commands are present (check Step #4 for the commands that should be appended to ~/.profile ).
- You might have forgotten to source your ~/.profile . Make sure you run source ~/.profile after editing it to ensure you have access to the mkvirtualenv and workon commands.
_ Q. _ When I open a new terminal, logout, or reboot my Raspberry Pi, I cannot execute the mkvirtualenv or workon commands.
_ A. _ If you’re on the Raspbian desktop, this will likely occur. The default profile that is loaded when you launch a terminal, for some reason, doesn’t source the ~/.profile file. Please refer to #2 from the previous question. Over SSH, you probably won’t run into this.
_ Q. _When I try to import OpenCV, I encounter this message: Import Error: No module named cv2 .
_ A. _ There are several reasons this could be happening and unfortunately, it is hard to diagnose. I recommend the following suggestions to help diagnose and resolve the error:
- Ensure your cv virtual environment is active by using the workon cv command. If this command gives you an error, then verify that virtualenv and virtualenvwrapper are properly installed.
- Try investigating the contents of the site-packages directory in your cv virtual environment. You can find the site-packages directory in ~/.virtualenvs/cv/lib/python3.5/site-packages/ depending on your Python version. Make sure (1) there is a cv2 sym-link directory in the site-packages directory and (2) it’s properly sym-linked.
- Be sure to check the site-packages (and even dist-packages ) directory for the system install of Python located in /usr/local/python/ , respectively. Ideally, you should have a cv2 directory there.
- As a last resort, check in your build/lib directory of your OpenCV build. There should be a cv2 directory there (if both cmake and make executed without error). If the cv2 directory is present, manually copy it into /usr/local/python and then link the .so file to the site-packages directory for the cv virtual environment.
_ Q: __ _Why do I encounter a message about “Non-free modules” not being installed? How can I get the OpenCV non-free modules?
_ A: _New in OpenCV 4, a special CMake flag must be set to obtain the non-free modules. Refer to Step #5 above and pay attention to the flag in the CMake command.
_ Q. _ What if my question isn’t listed here?
_ A. _Please leave a comment below or send me an email. If you post a comment below, just be aware that code doesn’t format well in the comment form and I may have to respond to you via email instead.
Summary
Today we installed OpenCV 4 on our Raspberry Pi.
Compiling from source was paramount so that we could obtain OpenCV 4 since it isn’t possible yet to install OpenCV 4 via pip.
We then tested our install and deployed a Raspberry Pi as a security camera. This security camera will detect motion via background subtraction and upload pictures of intruders to Dropbox. You can read the full Raspberry Pi + home surveillance post here.
To stay up to date with PyImageSearch, be sure to drop your email in the form below!
You have to install the open CV that was up on your Raspberry it was the new operating system on it. I was able to have the all aspire perfection that was on https://edubirdie.org/ this has the all details that was on the code mentor and report about the freelancer. I can make the all enterprise report that was officially released on this that has the affection up on the all generation.