
Send push notification from rails to an ionic app
Why
Setting up push notification is hard. Especially when it comes to hybrid apps. It seems easy at first glance but the more you try to do something specific the more impossible it seems. I myself have a hard time everytime I have to implement push notification for an app, doesn’t matter what it’s built on. Which is why I have decided to document it. I have just finished implementing push notification on Jarme App and this post will reflect that process and use the same toolset.
Ready? Let’s go…..
Tools
We will use rails app as the backend api server and rpush gem to send push notifications from server. On the client, we will have a shiny ionic app that uses phonegap-push-plugin. For now, we will only focus on android and use google’s FCM platform but I do intend to write up another post for iOS setup in the near future. I wrote this post on a linux machine but I’ll expect you to have a *nix OS since most of the commands in this post will probably require a *nix environment.
I will walk you through each and every step starting from creating our app till receiving push notifications on device. However, I will assume you’re somewhat familiar with Rails, Angular/Ionic2+ and terminal in general and of course, feel free to ask if anything doesn’t make sense or seems confusing or doesn’t work the way it should.
Ground Work
For most of you, skip this step since you probably already have a rails api along with an ionic app up and running. However, it may be worth just skimming through the setup we are going to lay out so that you can make sure your apps also have the required packages/plugins with compatible versions.
I like to keep my apps organized in folders so usually, I have one folder that contains all related tools for the app : api app, mobile app, web app etc. So, let’s do that first; let’s creatively name our app pushme and give it a nice folder structure :
cd ~
mkdir pushme
cd pushme
mkdir api
mkdir mobile
Basically, we’re going for a structure that looks like :
pushme
    |- api
        |- pushme
            |- ..... all our rails code
    |- mobile
        |- pushme
            |- ..... all our ionic code
Let’s setup a fresh new rails app. I’m assuming you have ruby environment setup with rails gem installed on your machine so open a terminal and just run the following commands and it will scaffold a brand new rails app for you :
cd ~/pushme/api/
rails new pushme
Now simply navigate inside the newly created folder and fire up the rails app :
You should now be able to see a jolly little Welcome Aboard page if you go to this url http://localhost:3000/ in your browser. So, this will be the home for our backend api.
Now, let’s quickly setup our ionic app, again, assuming you already have nodejs, android sdk, cordova and ionic cli setup on your machine (if not, please follow this guide). Open up a new terminal window and run the following commands :
cd ~/pushme/mobile/
ionic start pushme tabs
We now have a hot and fresh ionic project that has a tabs layout off the cooker. To see what that means, navigate inside the project folder and run the app :
You should now be able to see a Welcome to ionic page on http://localhost:8100/ url in your browser. With that out of the way, from here on, we’re ready to work on actual feature development.
Setup Google FCM project
For this part, you’ll need a google account. Follow these steps to get your firebase project setup and get the required data for our next steps :
- Go to firebase console and login with your google account.
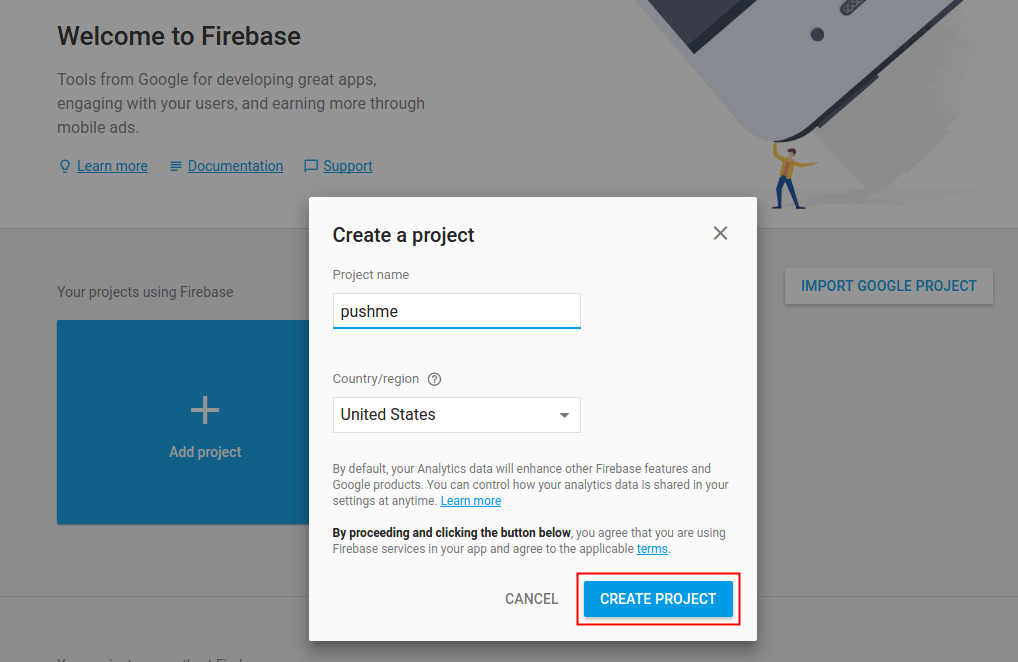
- Press Add project, set your preferred name and server region and press CREATE PROJECT. I have named my project
pushme. It looks something like the image below at the time of writing this post.
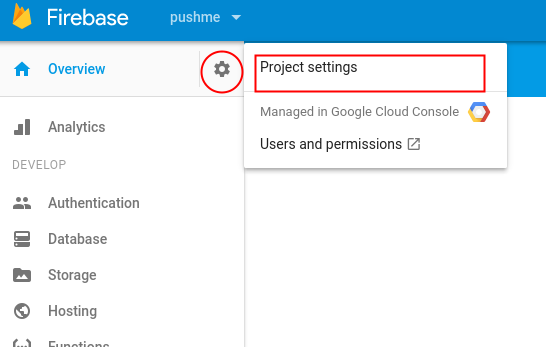
- You will then be redirected to the project page. From your project page, go to the project settings page.
- On the settings page, go to Cloud Messaging tab. You will find a Server Key and a Sender ID. We will need these two keys in the later stages.

I will be removing my project once I’m done writing this post so I’ll just show sensitive keys on the post but make sure you have your keys safe and secure.
Setup Push and Device Plugins
In order to send push notification to a device, we need a unique key from our mobile device called registrationId. The phonegap-plugin-push plugin allows us to retrieve that with a nice api. Once retrieve, we will send and store it on our api server for later use.
To make things easy, ionic has a bunch of packages under @ionic-native namespace that bridges ionic with various phonegap/cordova plugins and provides us an intuitive typescript compatible api. Let’s install the following cordova plugins and ionic native npm packages :
ionic cordova plugin add cordova-plugin-device
ionic cordova plugin add phonegap-plugin-push --variable SENDER_ID=710571851300
npm i @ionic-native/push @ionic-native/device --save
In the second command SENDER_ID variable make sure you replace the 710571851300 with your project’s SENDER_ID that we got from our firebase project.
Now we need to register the ionic-native services in our src/app/app.module.ts file in order to use them within our app so let’s adjust the file like this :
....other imports.....
import { Push } from '@ionic-native/push';
import { Device } from '@ionic-native/device';
.....
    providers: [
        ...other providers,
        Device,
        Push,
To keep things modular we will extract the entire notifications feature into it’s own service provider. The following command will generate a service provider placeholder for us and register that in the app.module.ts file as well.
ionic g provider notification
The above command will generate a new file in src/providers/notification/notification.ts. Let’s open it up and inject our new push and device plugins into the provider. These are the changes :
import { Device } from '@ionic-native/device';
import { Push, PushObject, PushOptions } from '@ionic-native/push';
import { Injectable } from '@angular/core';
import { Http, Headers, RequestOptions } from '@angular/http';
......
....
export class NotificationProvider {
    constructor (
        public http: Http,
        public push: Push,
        public device: Device
    ) { }

    init () {
        const options: PushOptions = {
            android: {
                senderID: '710571851300'
            }
        };

        const pushObject: PushObject = this.push.init(options);

        pushObject.on('registration').subscribe((registration: any) => {
            console.log(registration);
        });
    }
Notice we’re importing { Http, Headers, RequestOptions } and injecting Http in the constructor but never using it. Don’t worry, we will use these in the later steps.
Now we’re gonna inject this new provider into our src/app/app.component.ts file and initialize it :
import { TabsPage } from '../pages/tabs/tabs';
import { NotificationProvider } from '../providers/notification/notification';

........
constructor(
    platform: Platform,
    statusBar: StatusBar,
    splashScreen: SplashScreen,
    noti: NotificationProvider
) {
    platform.ready().then(() => {
        // Okay, so the platform is ready and our plugins are available.
        // Here you can do any higher level native things you might need.
        statusBar.styleDefault();
        splashScreen.hide();
        noti.init();
    });
}
If you’ve followed along the above steps, you’ll notice that we’re running our app in the browser and cordova Device and Push plugin’s features are only available on an actual mobile device or emulator. So in order to move forward, we need to run our app on an emulator or an actual device. I’ve turned on developer mode on my phone and connected it to my machine. Let’s stop our already running ionic app using Ctrl+c. The following commands will install and run the app on the connected device :
ionic cordova platform add android
ionic cordova run android --device
If all goes well, you should now see the ionic app running on your phone with all it’s glory. Our next step is to take the registrationId from our device and store it on our rails server. So let’s equip our rails api to facilitate that.
Device Registration On Rails
Rails can be lightning fast and super intuitive when setting up trivial features like basic CRUD and luckily that’s what we need for the first part of this section.
We will setup a device resource that can save a device identified by it’s uuid and store the registrationId of that device.
Quite straight forward, so let’s get to it. Go back to the terminal window where we had our rails app running. Then run the following commands that will scaffold the route, model, controller, migrations and the tests for our device resource :
rails g scaffold device model:string uuid:string token:text platform:string
# migrate your database to add the device table
rake db:migrate
Now we can simply make post request to http://localhost:3000/devices.json with uuid, model, platform and token parameters and rails will save it in the database and return a json response to our call. However, by default, rails has CSRF verification setup for api calls but since we’re not too concerned about security at the moment, let’s turned that off for now so that we can get going with our ionic app. Open up the rails app’s app/controllers/devices_controller.rb file and add the following line right before the before_action hook :
class DevicesController < ApplicationController
  protect_from_forgery with: :null_session
We’re now ready to test the api calls.
Send Device Data to Rails
Let’s go back to our ionic app and open src/providers/notification/notification.ts file to add the following code :
...........
    pushObject.on('registration').subscribe((registration: any) => {
        this.saveToken(registration.registrationId);
    });
}

saveToken (token) {
    // build the headers for our api call to make sure we send json data type to our api
    const headers = new Headers();
    headers.append("Accept", 'application/json');
    headers.append('Content-Type', 'application/json' );
    const options = new RequestOptions({ headers });

    // this is our payload for the POST request to server
    const device = {
        platform: this.device.platform,
        model: this.device.model,
        uuid: this.device.uuid,
        token
    };
    const url = "http://localhost:3000/devices.json";

    this.http.post(url, {device}, options)
        .subscribe(data => {
            console.log('token saved');
        }, error => {
            console.log('error saving token', error);
        });
}
Let’s rebuild and rerun our app on the device : ionic cordova run android --device.
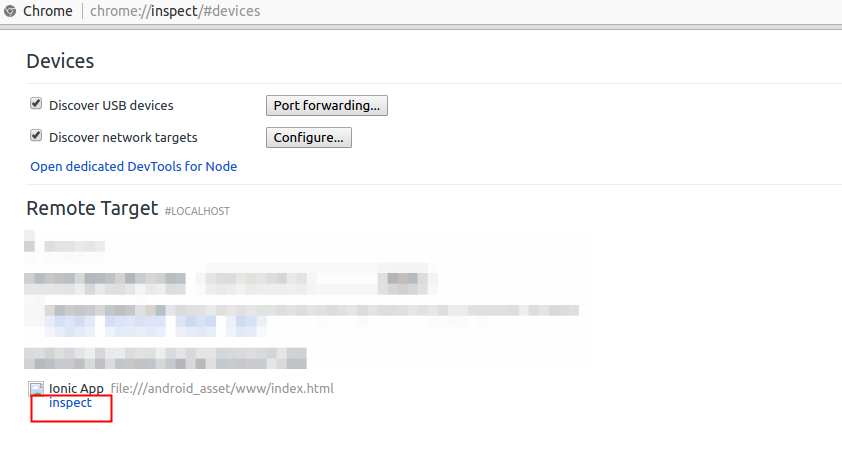
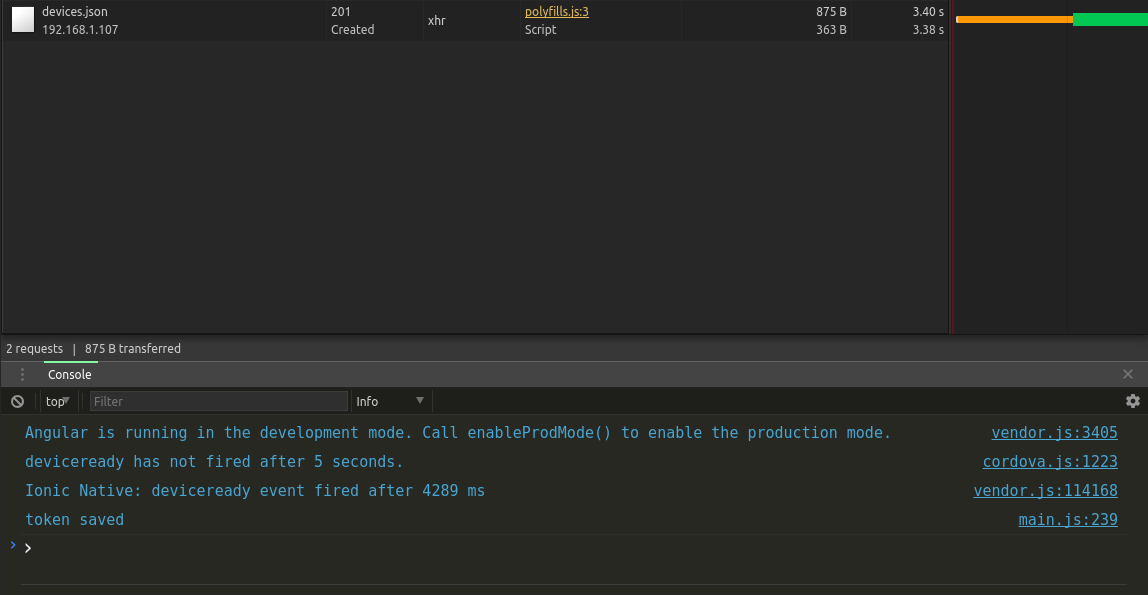
When we run the above code on our device, there will be slight bit of problem with the http call. In order to see what’s broken here, open up chrome browser and go to chrome://inspect. You will see your device and app under the Remote Target section on that page. Click the inspect button to open up developer’s console.
You should see an error message like this in the console Failed to load resource: net::ERR_CONNECTION_REFUSED. Since the app is running on an actual device, localhost:3000 is trying to find that server within your phone and obviously there is no server running on port 3000 on our phone.
To fix this, we need to use our computer’s local network ip address as our api endpoint. If you run ifconfig in your terminal and look at the output, you should find a line that looks like the content in the red square in the image below. 192.168.1.107 is the local ip of my machine here.
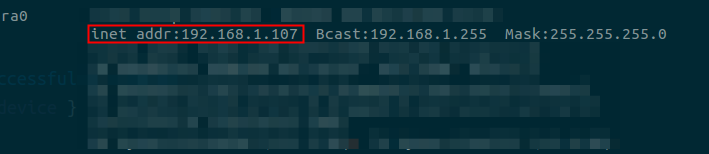
So let’s replace our api url const url = "http://localhost:3000/devices.json"; with this const url = "http://192.168.1.107:3000/devices.json";. Again, this is my local ip so when you’re following along this, make sure you use your local ip that you found from the ifconfig command.
However, this will still fail to make the call since our rails app is bound to localhost but not our local ip of the host machine which is why any calls made to our local ip never really reaches our rails app. To fix that, let’s stop our rails using Ctrl+c and restart it with this command rails s -b 192.168.1.107 which binds our server with the local ip instead of localhost.
Let’s rebuild our ionic app and ionic cordova run android --device check the console to make sure our http call is going through.
Send Notification Using Rpush
We’re almost there. All there is left to be done is to hook up Rpush gem with our rails app and send notifications to the devices that are registered in our database. They have very detailed documentation that should help you get setup but I’ll walk you through it anyways.
First, open your Gemfile and add gem 'rpush' to it. Now from the terminal, within your rails app dir, run the following commands :
bundle
bundle exec rpush init
rake db:migrate
This installs rpush, initialize rpush with all it’s config suitable for rails environment and create the necessary db tables.
Next, we need to save our FCM auth key as an rpush app entry in our db. Now I’m not sure if this is the right place for this bit of code but it seems to work. Open up config/initializers/rpush.rb file and add the following lines of code at the end of the file :
# initializer file may run multiple times but we don't wanna register the app multiple times so first check if it already exists in db and create new one only if it doesn't.
if (!Rpush::Gcm::App.find_by_name("pushme_droid"))
    app = Rpush::Gcm::App.new
    # let's name this one pushme_droid
    app.name = "pushme_droid"
    # FCM auth key from firebase project
    app.auth_key = "AAAApXFh_iQ:APA91bGX2hv2usndpXYzW-HICrgBMWLeN3MMaka5UVuuHPc69NZ8Uj1eGkbm6RMtDe199b9xNfXY_297eCGOtWC3VsVeBVbhKKpHYDk3vi-4ofJHL2BX7ucVIx8zu61FeO5hHzItu4sX"
    app.connections = 1
    # save our app in db
    app.save!
end
Notice the value of the app.auth_key variable, this is the string we retrieved from our FCM project settings page from Server Key. Make sure you use your own key instead of mine.
Since we updated an initializer, we will need to restart the rails app. First turn it off, then restart it the same way as before rails s -b 192.168.1.107.
That’s it, I promise. We now have everything we need to send notification to our device. To demo it, we will setup a new endpoint and whenever that route is called we will send a notification to all our registered devices.
Start by creating a new file in app/controllers/notification_controller.rb and add the following code in it :
class NotificationController < ApplicationController
  def notify
        #get all devices registered in our db and loop through each of them
    Device.all.each do |device|
      n = Rpush::Gcm::Notification.new
            # use the pushme_droid app we previously registered in our initializer file to send the notification
      n.app = Rpush::Gcm::App.find_by_name("pushme_droid")
      n.registration_ids = [device.token]

            # parameter for the notification
      n.notification = {
        body: 'Just wanted to tell you that you are beautiful!',
           	title: 'Hey this is rpush from rails!',
           	sound: 'default'
       	}
            #save notification entry in the db
      n.save!
    end

        # send all notifications stored in db
        Rpush.push

    render json: {sent: true}, status: :ok
  end
end
Then we will register a new route in config/routes.rb file :
Rails.application.routes.draw do
  resources :devices
  get '/notification/notify' => 'notification#notify'
  .........
Oh one last thing before we can see the magic trick we have worked on so far. cordova-plugin-push has this weird bug that when the app is in foreground it won’t show the notification and instead fire an in app event. So, to actually see the notification in our device, let’s close our app first.
You Ready For It?
Ok, now simply go to this url in your browser - http://192.168.1.107:3000/notification/notify. èt voila You will get that sweet tu-dung sound on your phone and see something like this
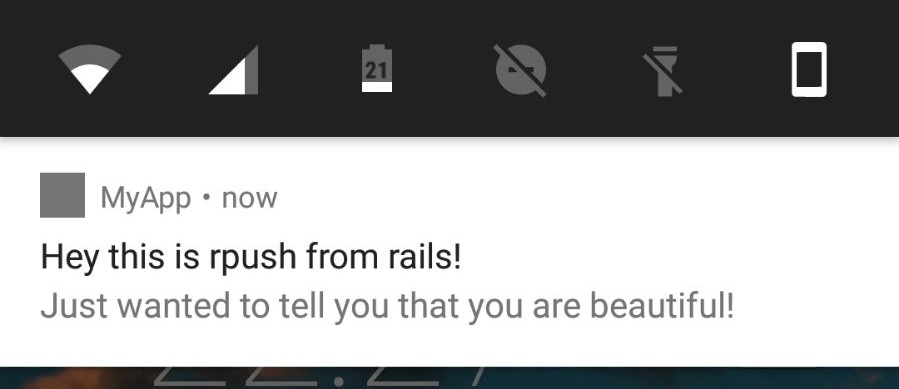
Beautiful, isn’t it?
Source Code
What’s the point of this long post if I don’t have some source code to show for, right? So here you go : Rails App | Ionic App
Wrap Up
There are numerous parameters that you can use to make the notification look nice and you can find most of those in the rpush/fcm documentation. Feel free to play with those.
While we do have a working mobile app and an api server that can communicate with each other and send push notifications, this is quite useless. It was a very quick and small demo to show how this can be achieved, now it’s your turn to go ahead and build something useful or integrate push notification within your existing app.
I will try to write up a post that builds from this base and shows an actual use case for this feature. Till then, show me what you’re building….