
The Easiest Guide to Getting Started with MQTT
MQTT is a lightweight publish-subscribe mode messaging protocol designed for IoT applications in low-bandwidth and unstable network environments. It is widely used in IoT, Mobile Internet, Intelligent Hardware, Internet of Vehicles, Power Energy and so on.
This article will show readers how to get started with the MQTT protocol through demonstrations. Beginners of the IoT and MQTT can use this article to understand MQTT-related concepts more simply and quickly start developing MQTT services and applications.
MQTT Connection
Before using the MQTT protocol to communicate, the client needs to create an MQTT connection to connect to the broker.
MQTT Client
Any application or device running the MQTT client library is an MQTT client. For example, an instant messaging APP that uses MQTT is a client, various sensors that use MQTT to report data are a client, and various MQTT testing tools are also a client.
Currently, there are mature open-source MQTT client libraries for all programming languages. We have selected popular MQTT client SDKs in various programming languages and provided code examples to help you quickly understand the use of MQTT clients.
Or you can visit our MQTT Client Programming blog series to learn how to use MQTT in PHP, Node.js, Python, Golang, Node.js, and other programming languages.
In this demonstration, we will use the MQTT client provided by MQTT X that supports browser access: [http://www.emqx.io/online-mqtt-client](http://www.emqx.io/online -mqtt-client). MQTT X also provides a desktop client and a command line tool.
MQTT Broker
The MQTT Broker handles client connection, disconnection, subscription, and unsubscription requests, and routing messages. A powerful MQTT broker can support massive connections and a million-level message throughput, helping IoT service providers focus on business and quickly create a reliable MQTT application.
Developers can create an MQTT broker through private deployment or a fully managed cloud service. Or use a free public broker for testing.
- Private deployment
EMQX is the most scalable open-source MQTT broker for IoT, IIoT, and connected vehicles. You can run the following Docker command to install EMQX.
docker run -d --name emqx -p 1883:1883 -p 8083:8083 -p 8084:8084 -p 8883:8883 -p 18083:18083 emqx/emqx
- Fully managed cloud service
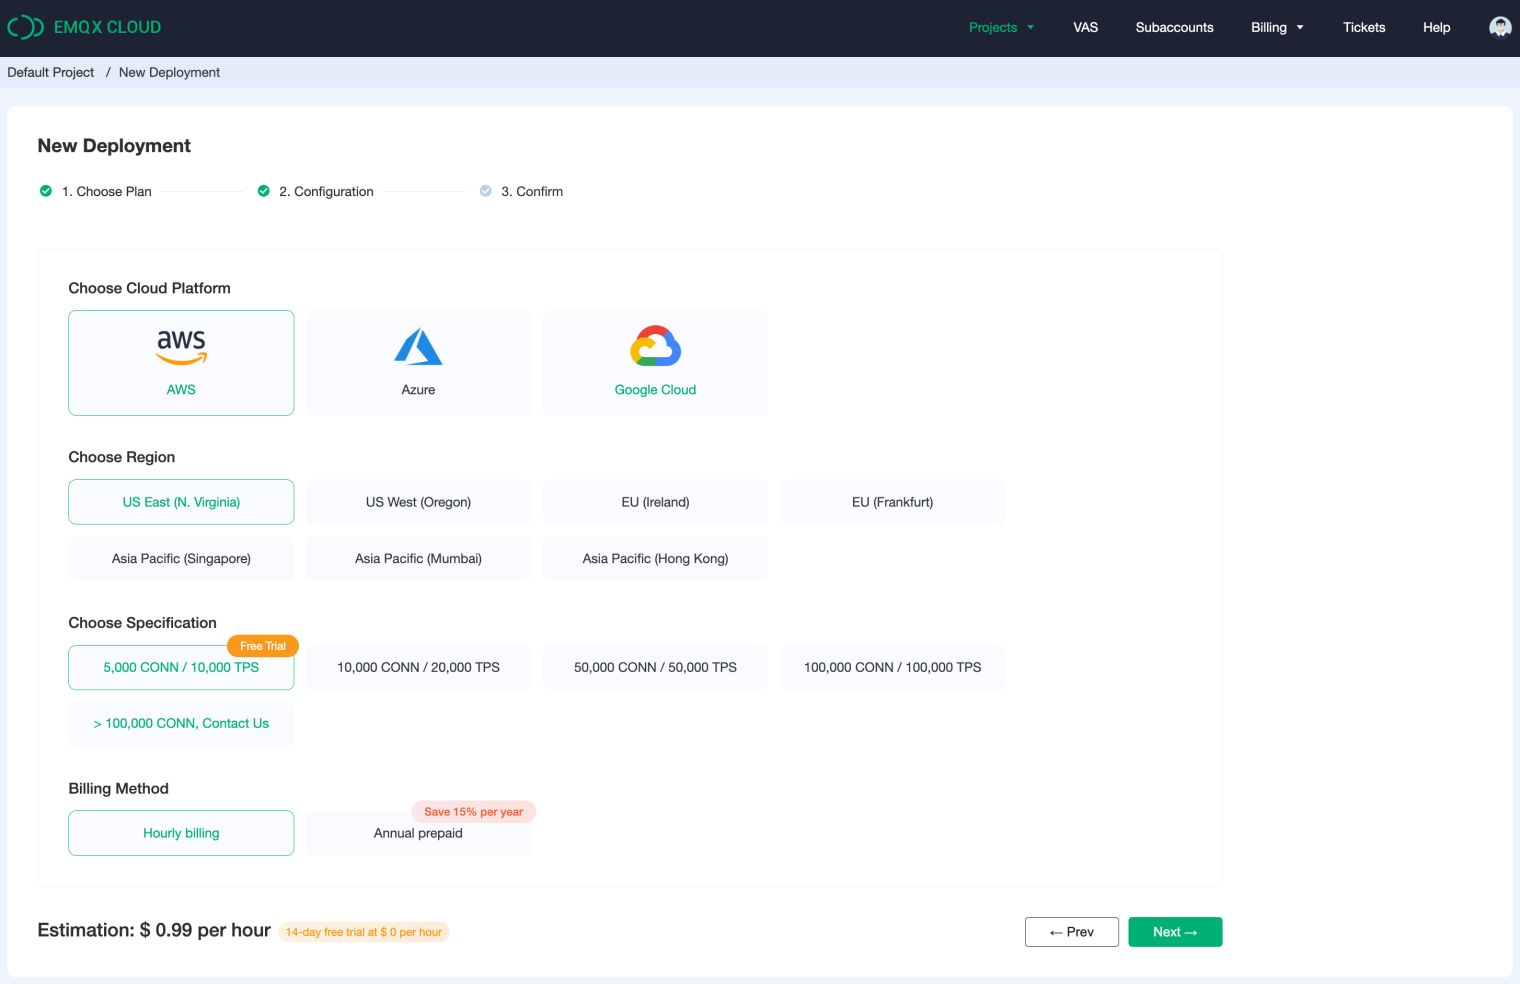
The fully managed cloud service is the easiest way to start an MQTT service. As shown below, EMQX Cloud starts in minutes and runs in 17 regions across AWS, Google Cloud, and Microsoft Azure.
In this demonstration, we will use the public MQTT broker provided by EMQ, created based on the fully managed MQTT cloud service - EMQX Cloud. The server information is as follows.
- Broker:
broker.emqx.io - TCP Port:
1883 - WebSocket Port:
8083
Create a Connection
Next, we will create an MQTT connection. Go to http://www.emqx.io/online-mqtt-client with your browser and click on the New Connection button in the middle of the page and you will see the following page.
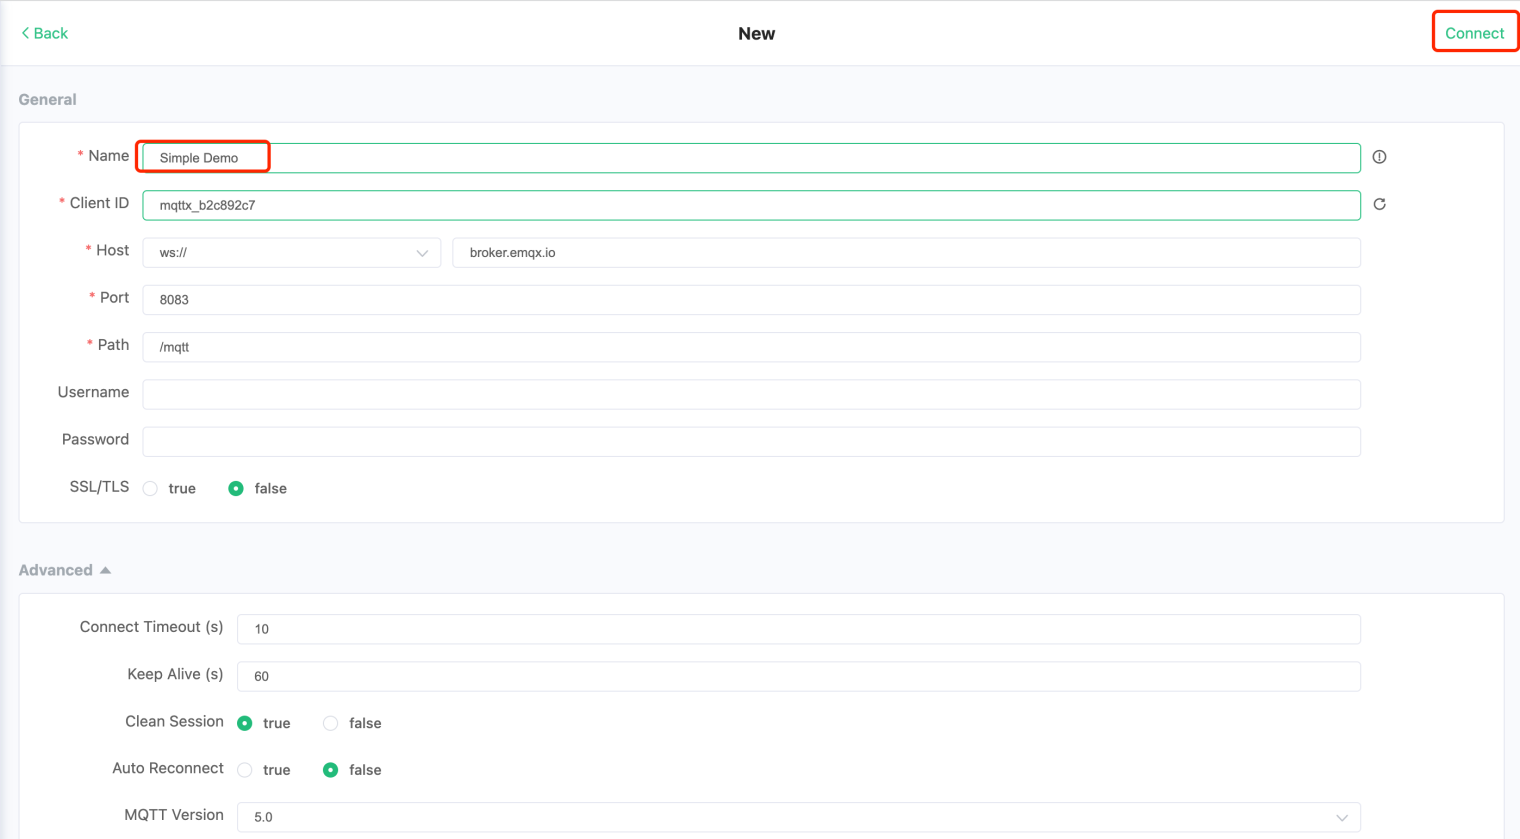
The connection parameters are as follows.
-
Name : The name of the connection, this parameter is not available when connecting using code.
-
Client ID : The broker uses the Client ID to identify the client, and each client connecting to the broker must have a unique Client ID.
-
Host : The server address and connection protocol. The protocols include MQTT based on TCP, MQTT based on SSL/TLS, MQTT based on WebSocket, and MQTT based on encrypted WebSocket. The online tool used for the demo runs on a browser, so only the
wsorwssprotocol can be used. -
Port : MQTT broker port.
-
Path : It is required when selecting
wsorwssprotocol, the EMQX defaults to/mqtt. -
Username,Password : MQTT protocol supports username/password authentication. Enabling authentication can effectively prevent illegal client connections.
-
Connect Timeout : If the connection is unsuccessful within this time, it will not continue to try.
-
Keep Alive : When no packet is sent, the client sends a heartbeat packet periodically according to the KeepAlive period. For more details, please visit the blog What is the MQTT Keep Alive parameter for?。
-
Clean Session
-
Clean Session is set to false, meaning a persistent session is created. When the client is disconnected, the session still keeps and saves the offline message until the session times out.
-
Clean Session is set to true, which means that a new temporary session is created, and the session is automatically destroyed when the client is disconnected.
-
-
Auto Reconnect : If Auto Reconnect is set to true, the client will automatically reconnect when the connection is disconnected due to poor network conditions.
-
MQTT Version : 5.0 is recommended. For more MQTT 5.0 details, please refer to the MQTT 5.0 Explore blog series.
We enter Simple Demo in Name and click the Connect button in the upper right corner to create an MQTT connection. The following indicates that the connection is established successfully.
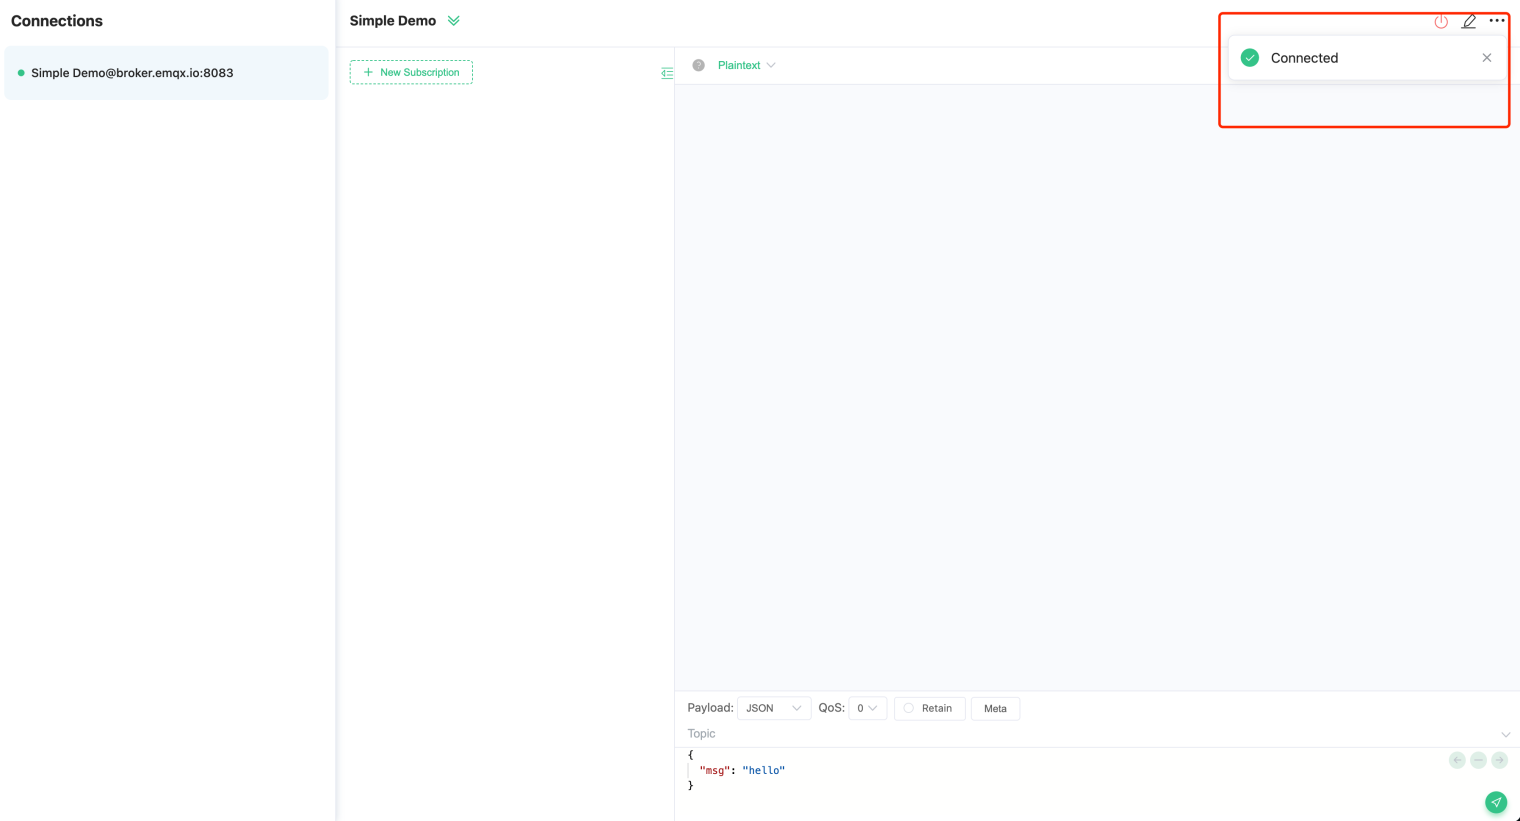
Once the connection is successful, the client can publish messages. Next, we need to understand the Publish-subscribe pattern first.
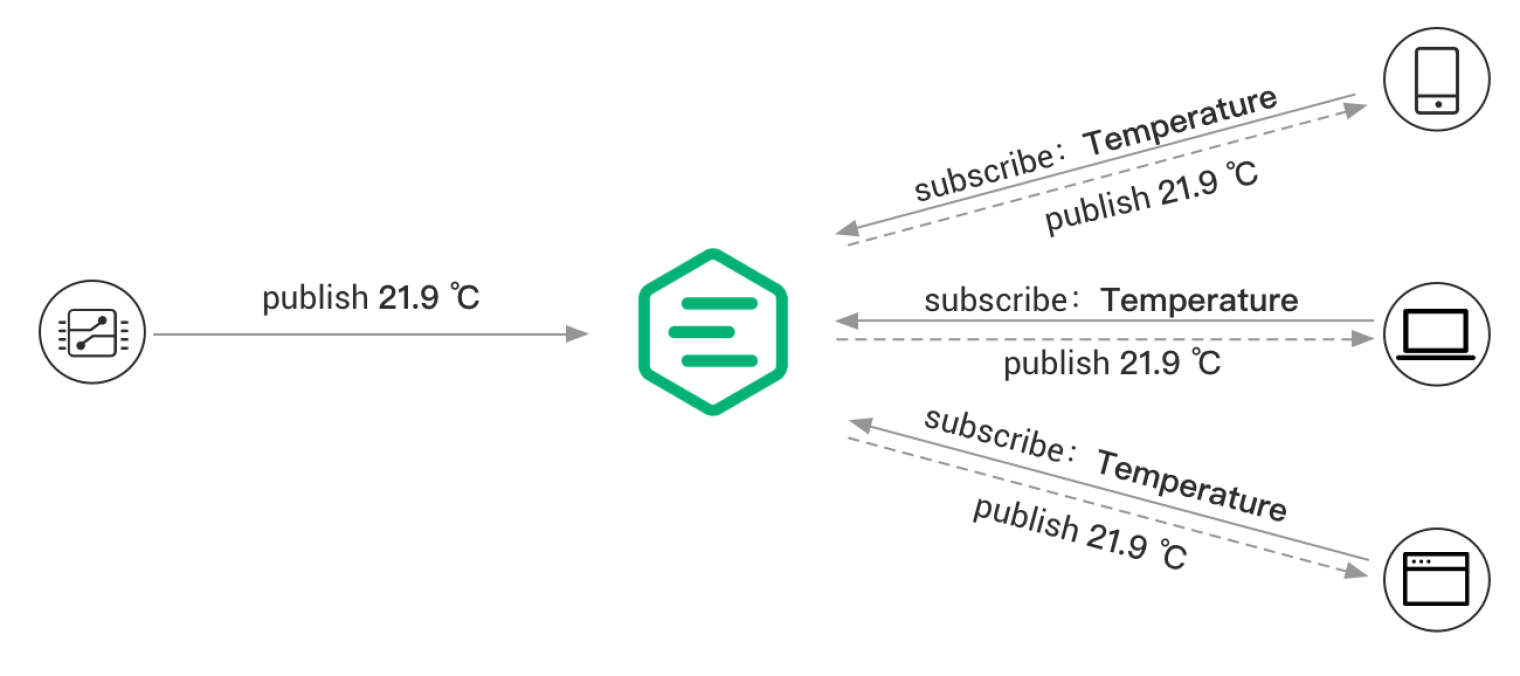
The publish-subscribe pattern differs from the client-server pattern in that it separates the client that sends messages (publisher) from the client that receives messages (subscriber). Publishers and subscribers do not need to establish a direct connection, and the MQTT server is responsible for routing and distributing all messages.
The following diagram shows the MQTT publish/subscribe process. The temperature sensor connects to the MQTT server as a client and publishes temperature data to a topic (e.g., Temperature), and the server receives the message and forwards it to the client subscribed to the Temperature topic.
Topic
The MQTT protocol routes messages based on topic. The topic distinguishes the hierarchy by slash /, which is similar to URL paths, for example:
chat/room/1

sensor/10/temperature

sensor/+/temperature
MQTT topic supports the wildcard of + and # .
-
+: indicates a single level of wildcards, such asa/+matchinga/xora/y. -
#: indicates multiple levels of wildcards, such asa/#matchinga/x,a/b/c/d.
For more details on MQTT topics, please check the blog Understanding MQTT Topics & Wildcards by Case.
Quality of Service (QoS)
MQTT provides three kinds of Quality of Service and guarantees messaging reliability in different network environments.
- QoS 0: The message is delivered at most once. If the client is not available currently, it will lose this message.
- QoS 1: The message is delivered at least once.
- QoS 2: The message is delivered only once.
For more details on MQTT QoS, please check the blog Introduction to MQTT QoS (Quality of Service).
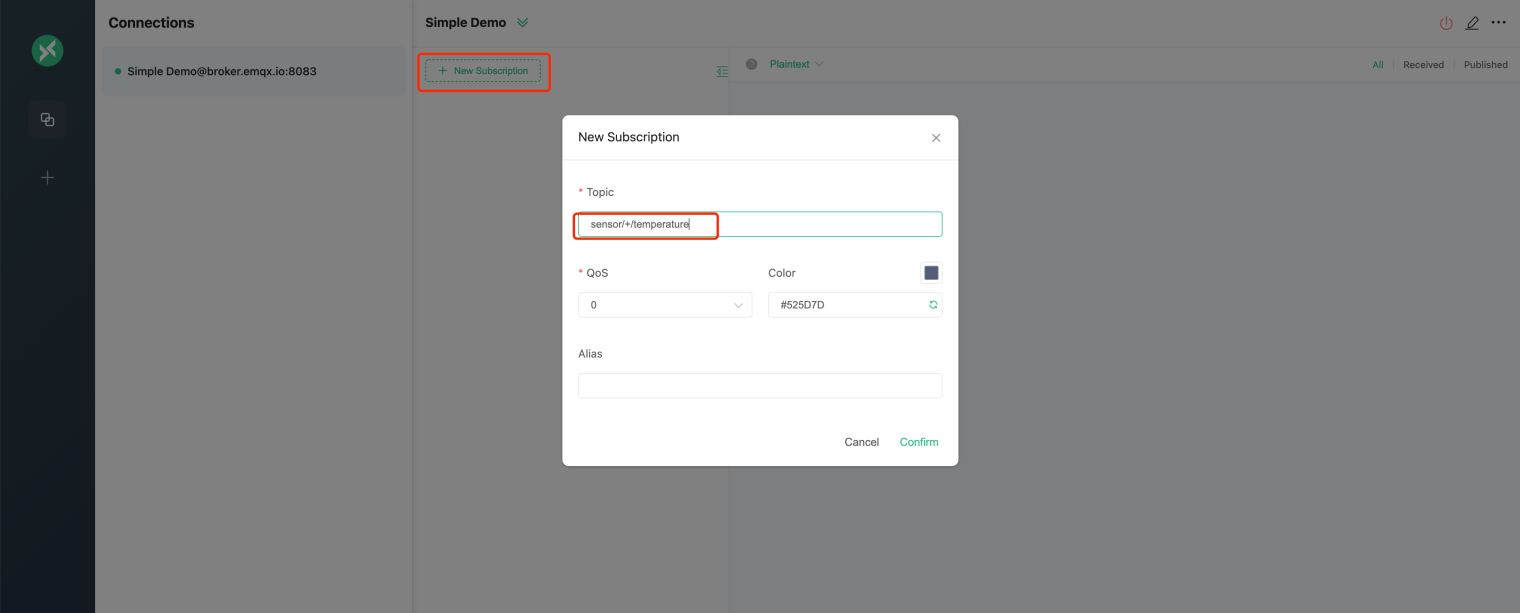
Next, we subscribe to the wildcard topic sensor/+/temperature in the Simple Demo connection created earlier, which will receive the temperature data reported by all sensors.
As shown below, click the New Subscription button and enter the topic sensor/+/temperature in the Topic field in the pop-up box, keeping the default QoS at 0.
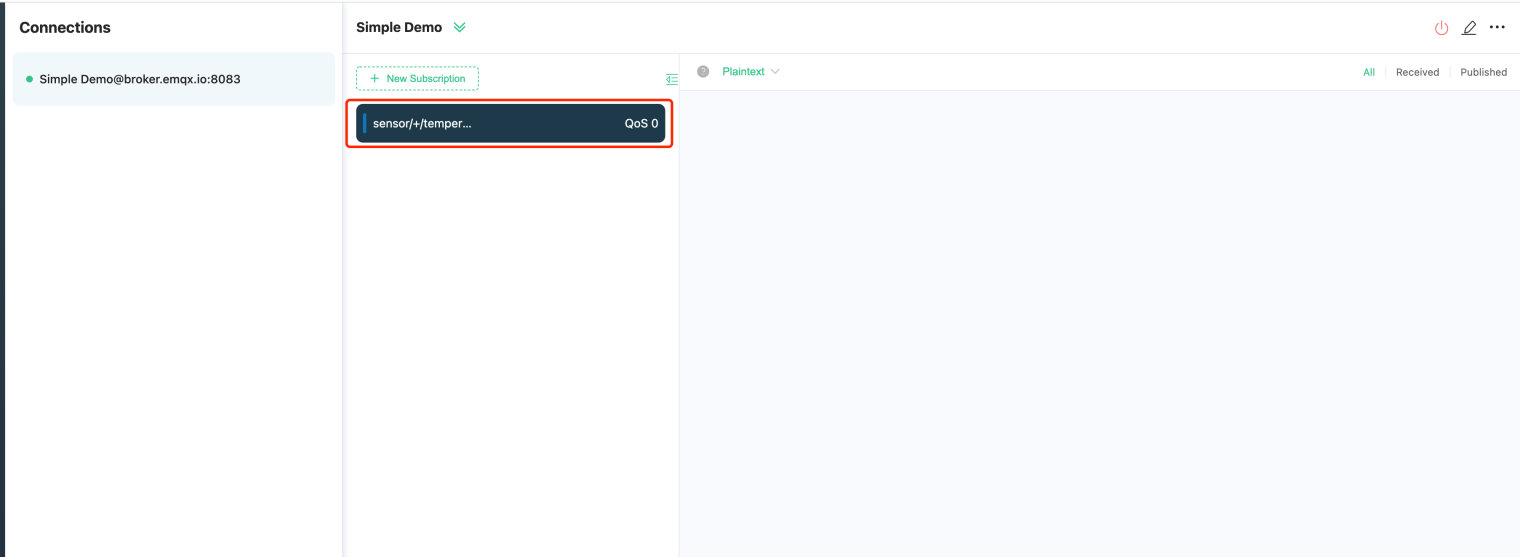
Once the subscription is successful, you will see an additional record in the middle of the subscription list.
Publish
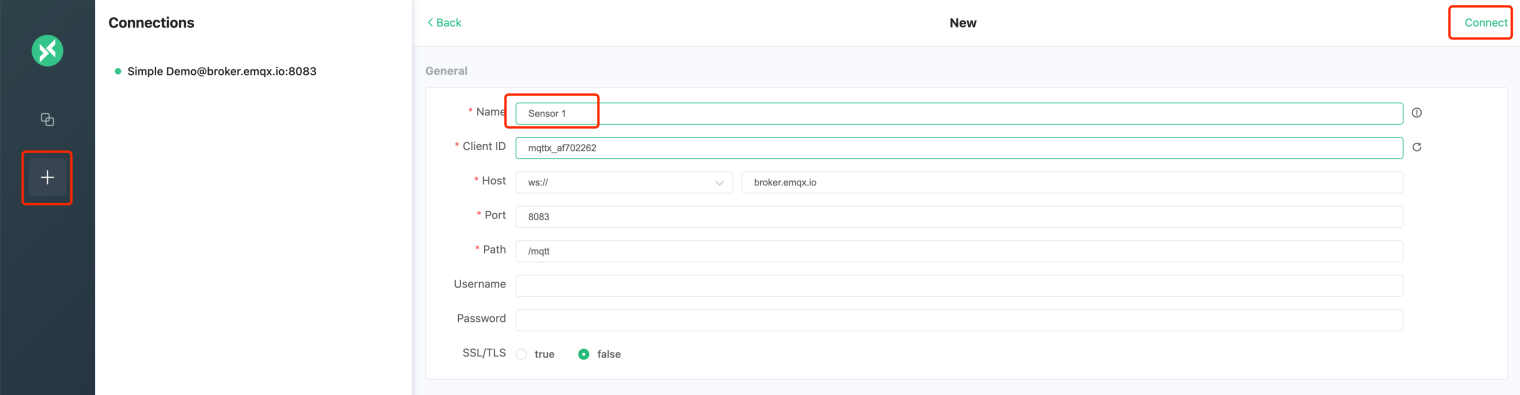
Next, we click the + button on the left menu to create two connections, Sensor 1 and Sensor 2 respectively, to simulate two temperature sensors.
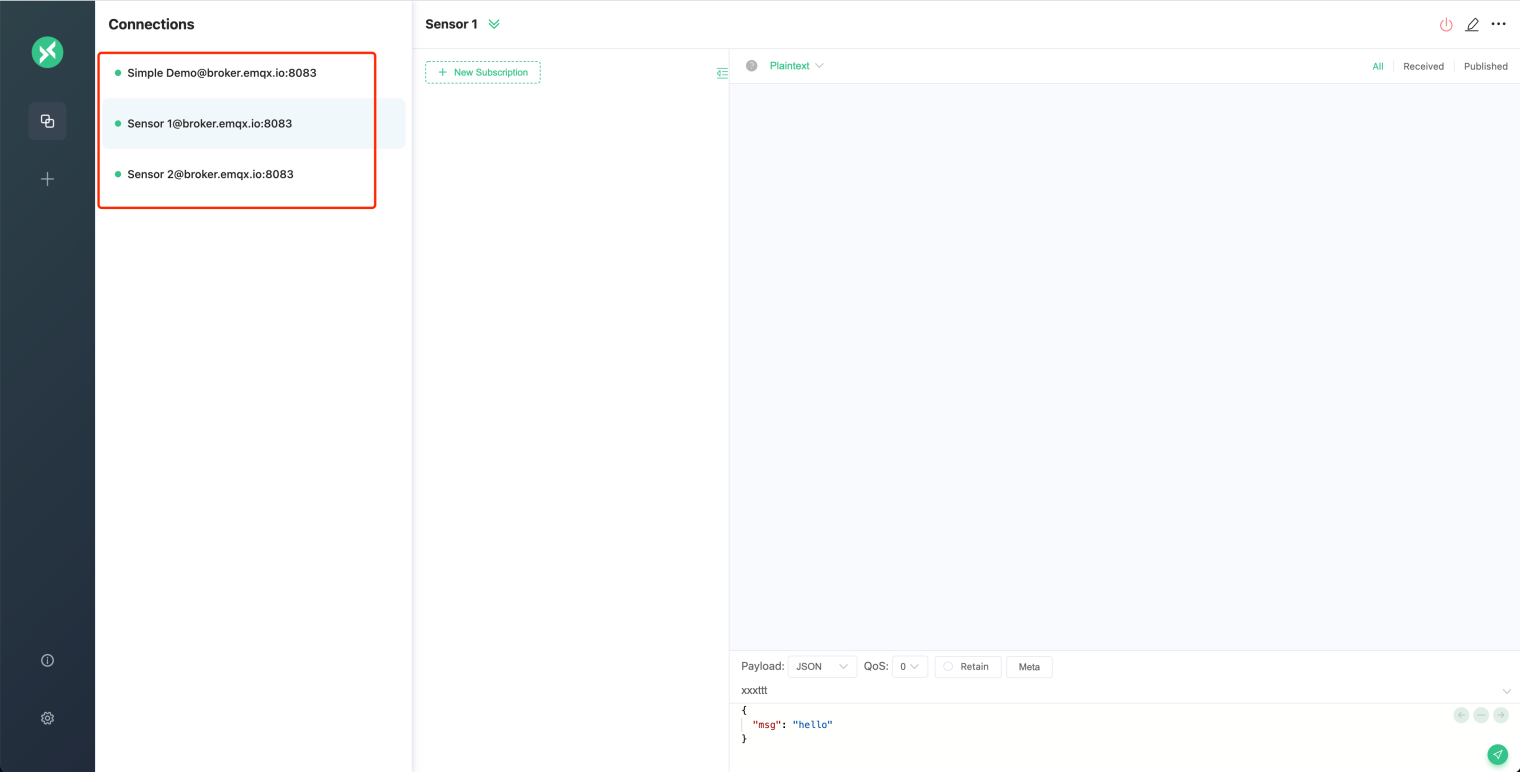
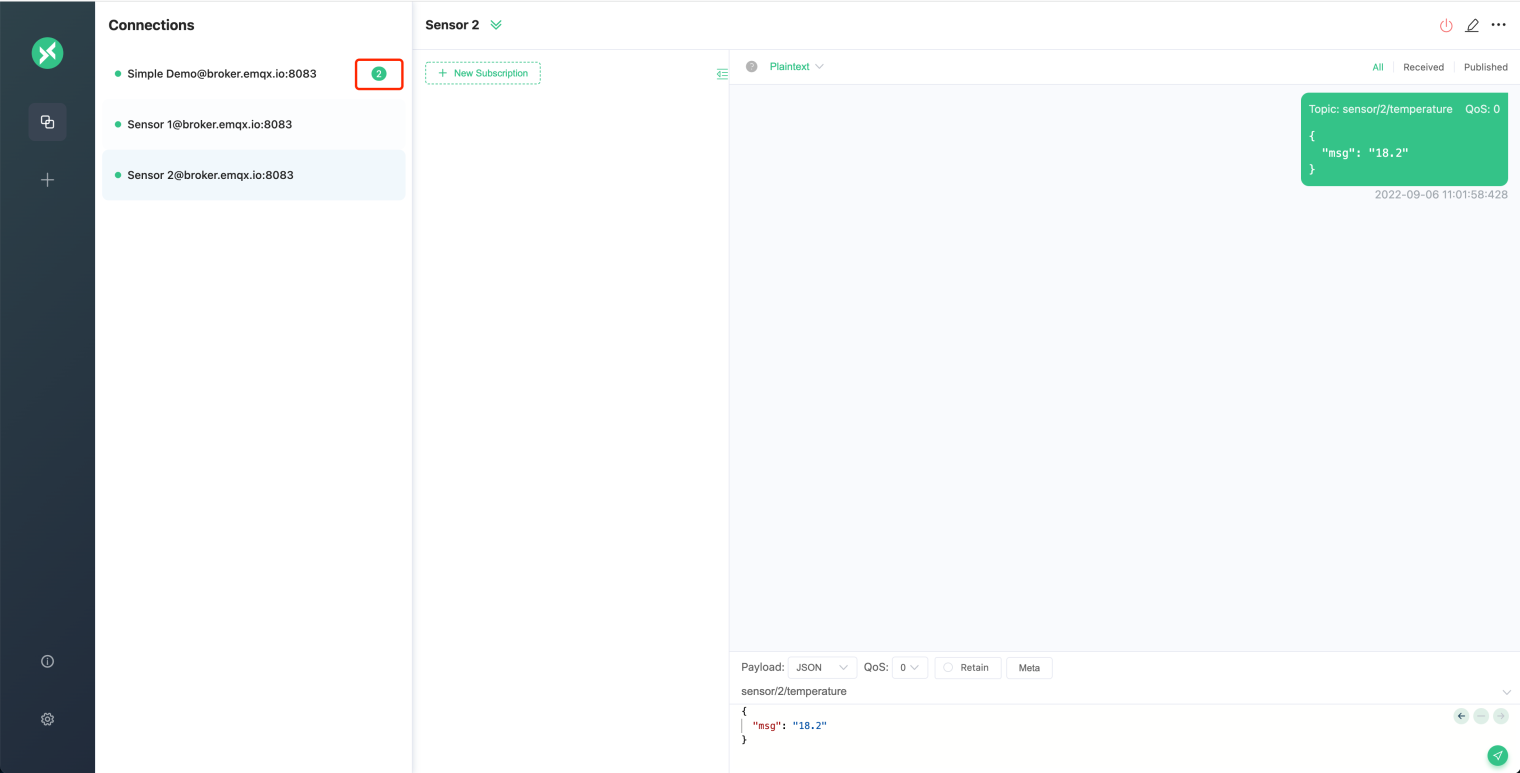
Once the connection is created, you will see three connections and the online status dots to the left of the connections will all be green.
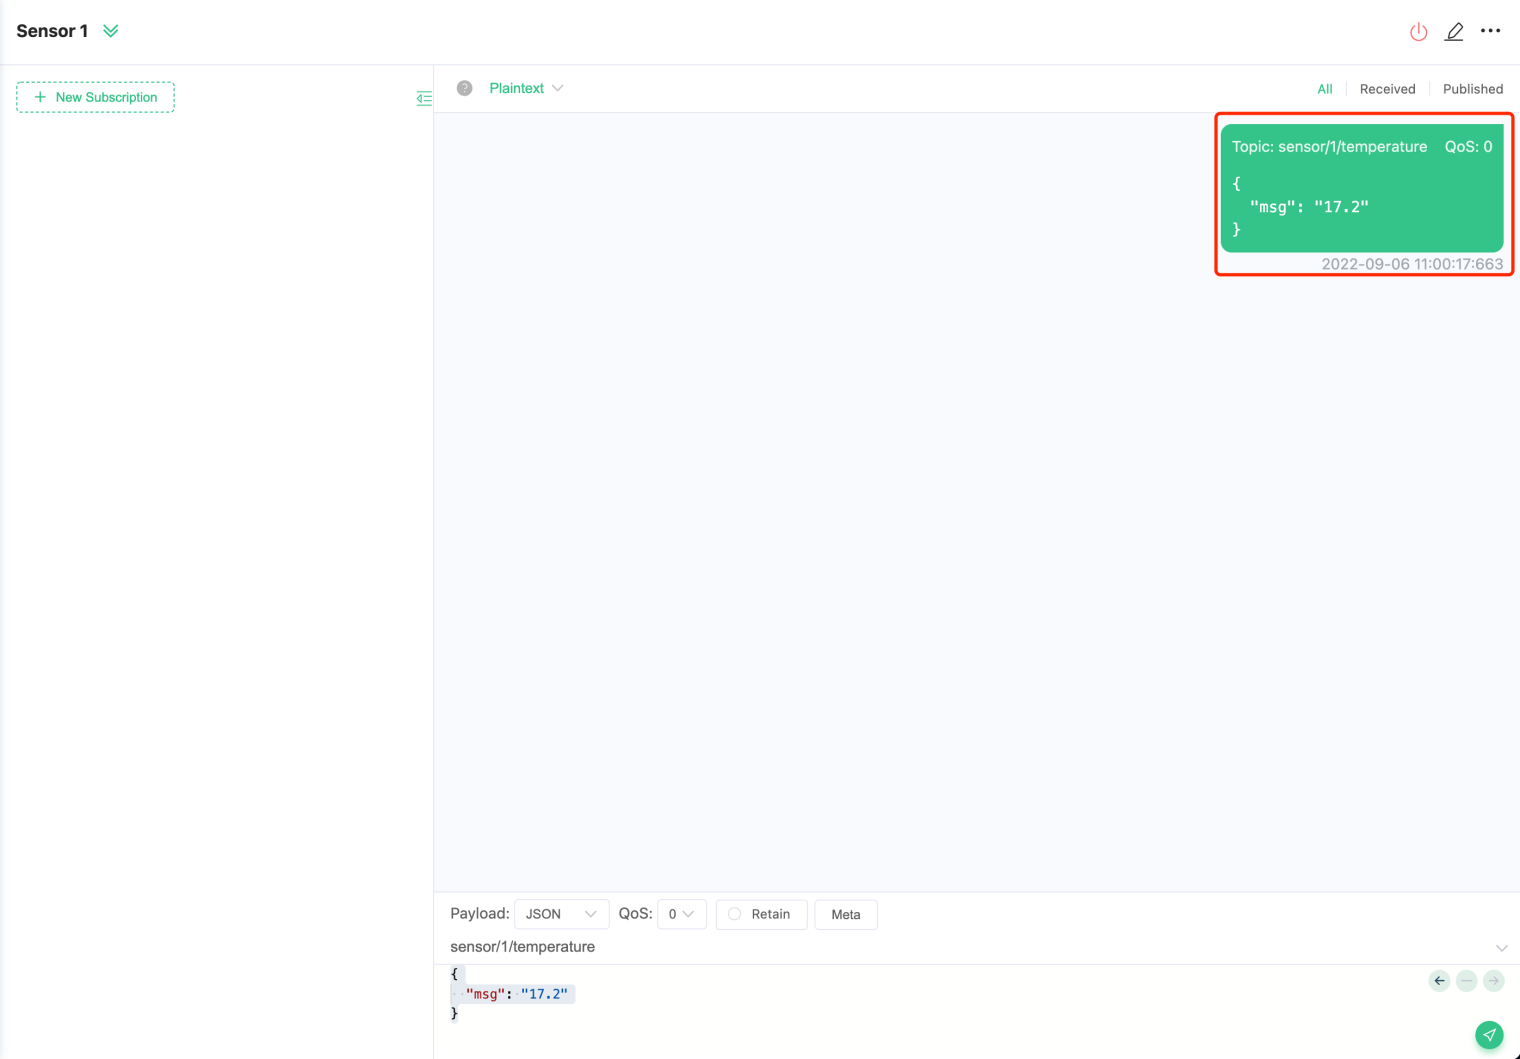
Select the Sensor 1 connection, enter the publish topic sensor/1/temperature in the bottom left part of the page, enter the following JSON format message in the message box, and click the publish button at the bottom right to send the message.
{
  "msg": "17.2"
}

The message is sent successfully as follows.
Using the same steps, publish the following JSON message to the sensor/2/temperature topic in the Sensor 2 connection.
{
  "msg": "18.2"
}
You will see two new messages for the Simple Demo connection.
Click on the Simple Demo connection and you will see two messages sent by the two sensors.

MQTT Features Demonstration
Retained Message
When the MQTT client publishes a message to the server, Retained Message flag can be set. The Retained Message resides on the message server, and subsequent subscribers can still receive the message when they subscribe to the topic.
As shown below, we are sending two messages to the retained_message topic in the Sensor 1 connection with the Retain option checked.
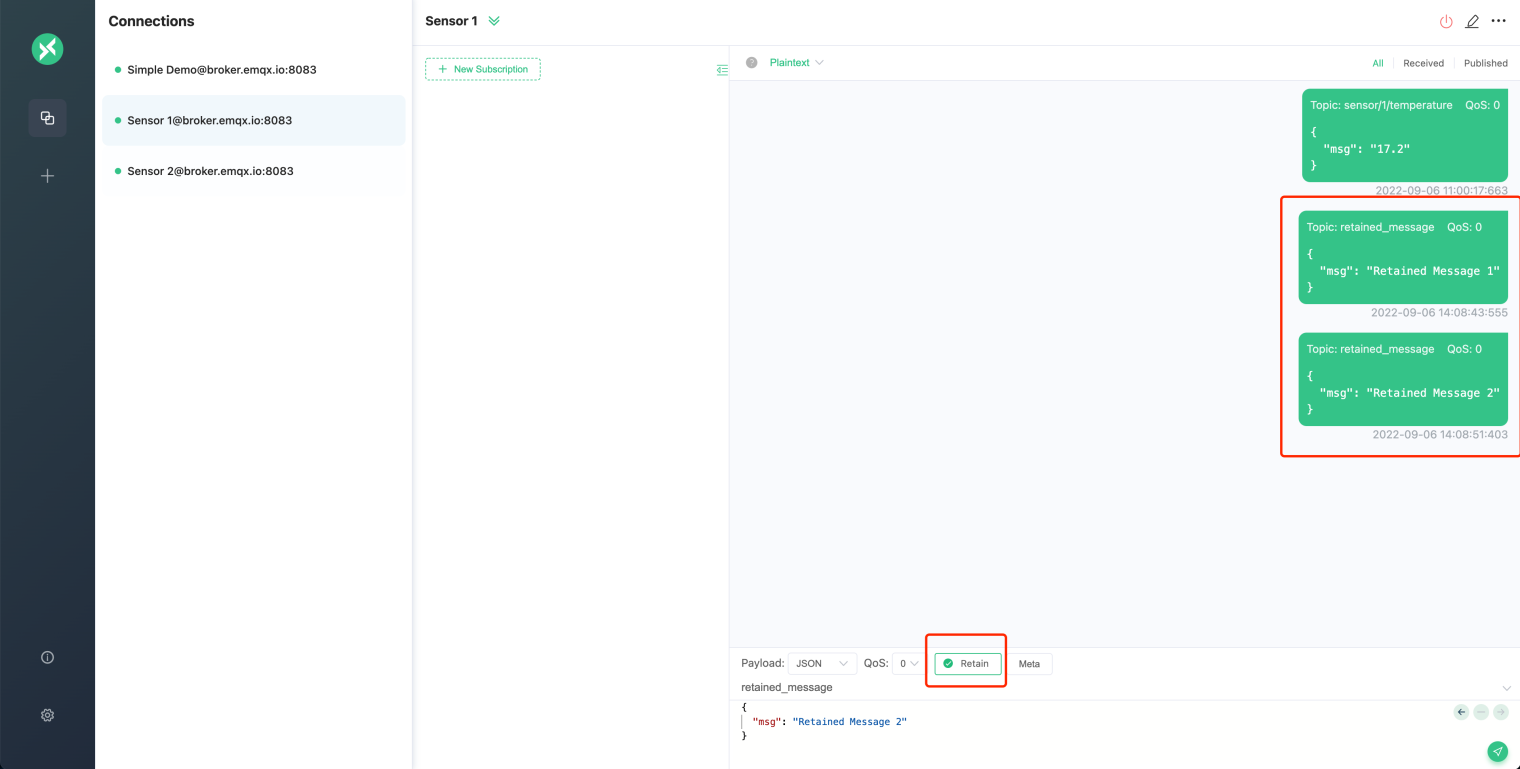
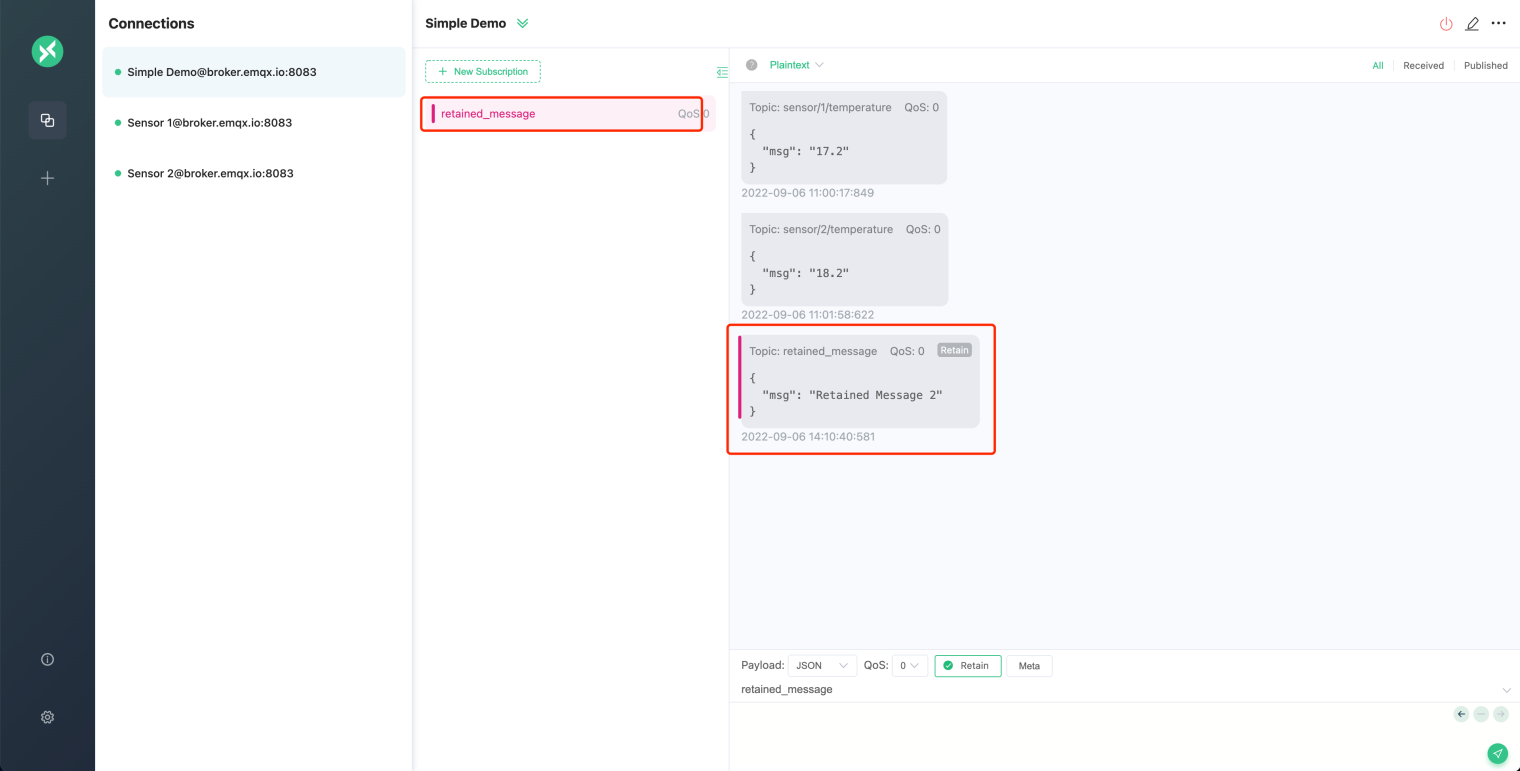
Then, we subscribe to the retained_message topic in the Simple Demo connection. After the subscription is successful, the second retained message sent by Sensor 1 will be received, which shows that the server will only keep the last retained message for a topic.
Clean Session
In general, an MQTT client can only receive messages published by other clients when it is online. If the client is offline and then online, it will not receive messages during the offline period.
However, if the client connects with Clean Session set to false and goes online again with the same Client ID, then the message server will keep a certain amount of offline messages for the client and send them to the client when it comes online again.
The public MQTT server used for this demonstration is set to keep offline messages for 5 minutes and the maximum number of messages is 1000 (no QoS 0 messages).
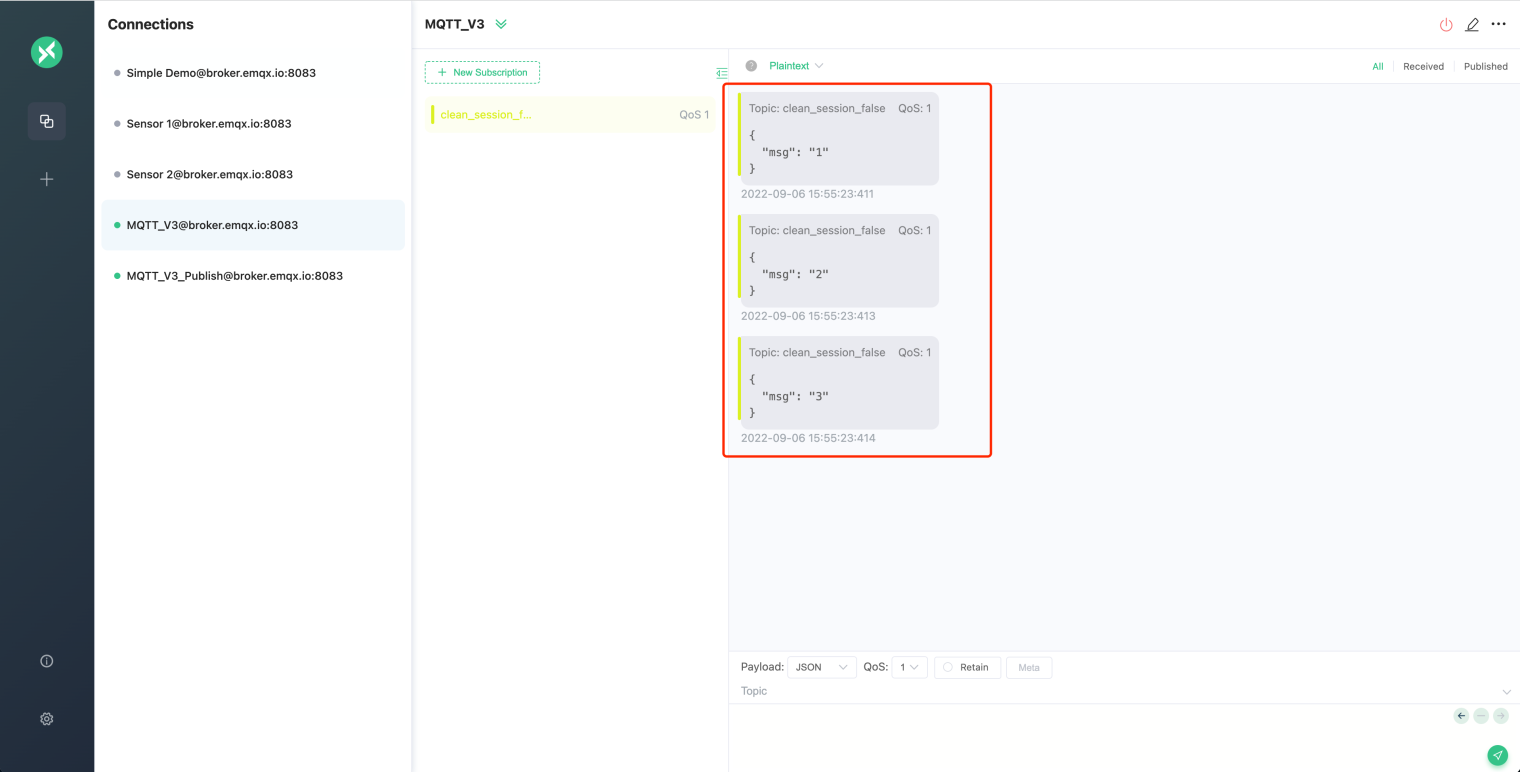
Next, we create an MQTT 3.1.1 connection and demonstrate the clean session with QoS 1.
MQTT 5 uses Clean Start and Session Expiry Interval to improve Clean Session. For details, please refer to the blog Clean Start and Session Expiry Interval.
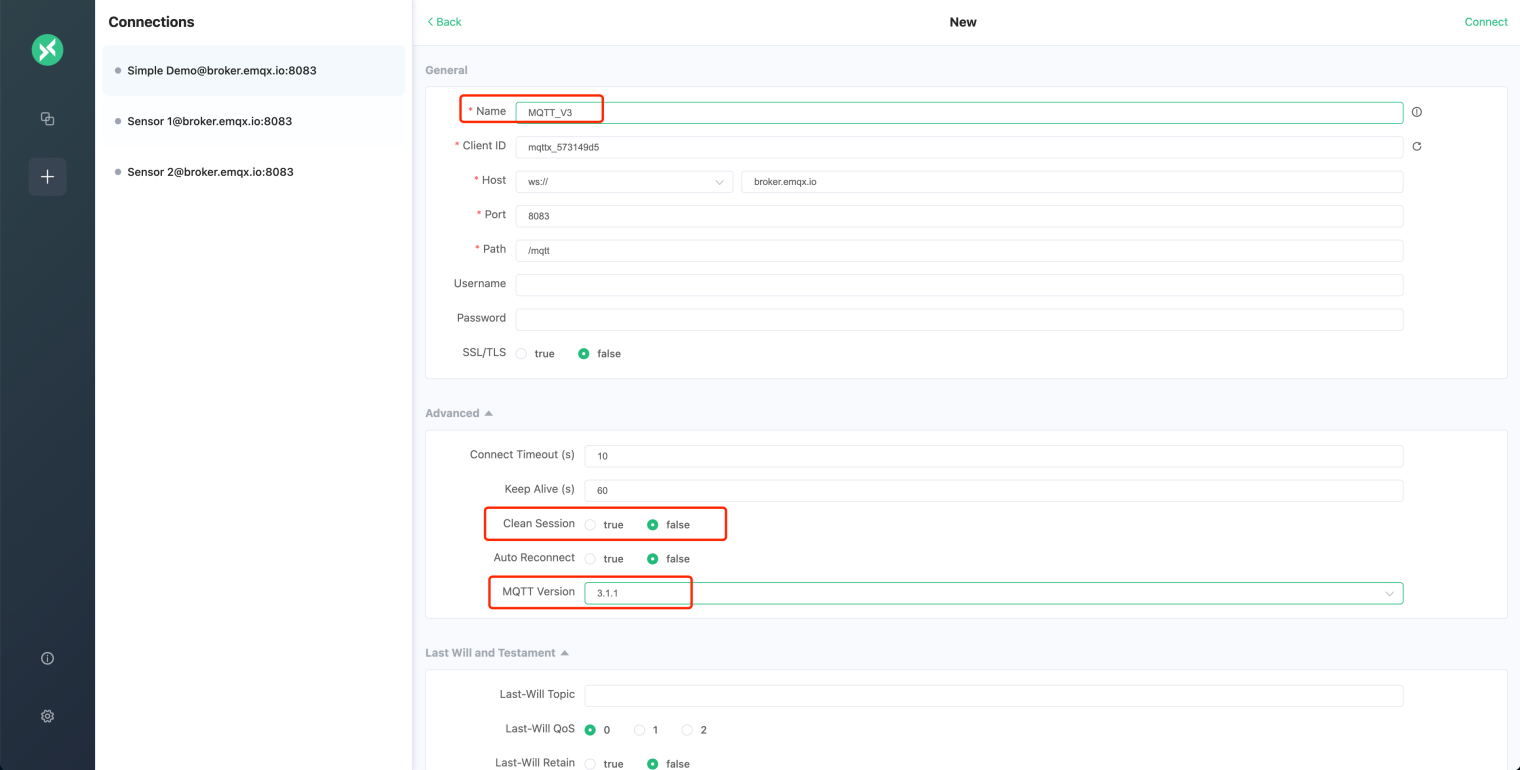
Create a connection named MQTT V3, set Clean Session to false, and choose MQTT version 3.1.1.
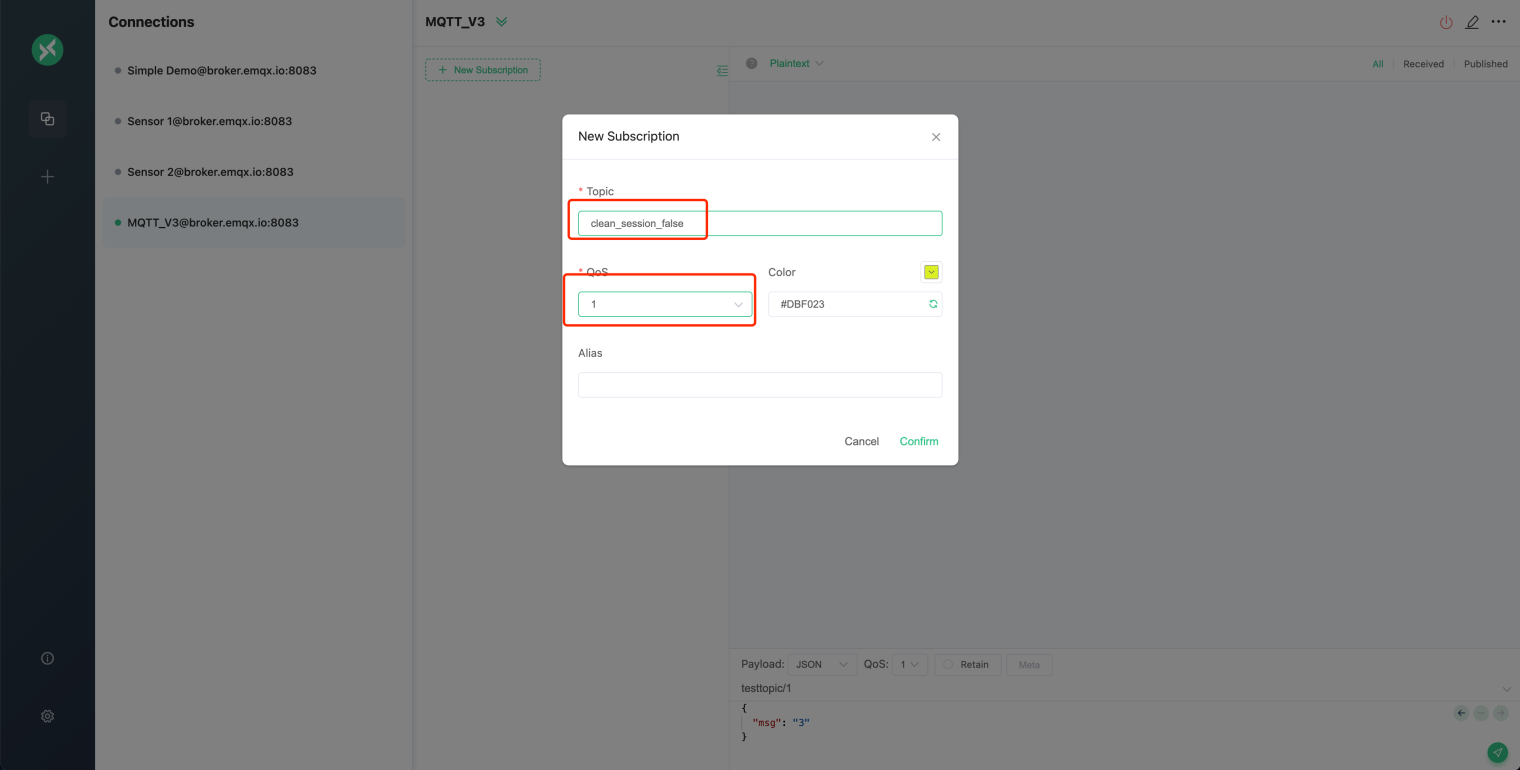
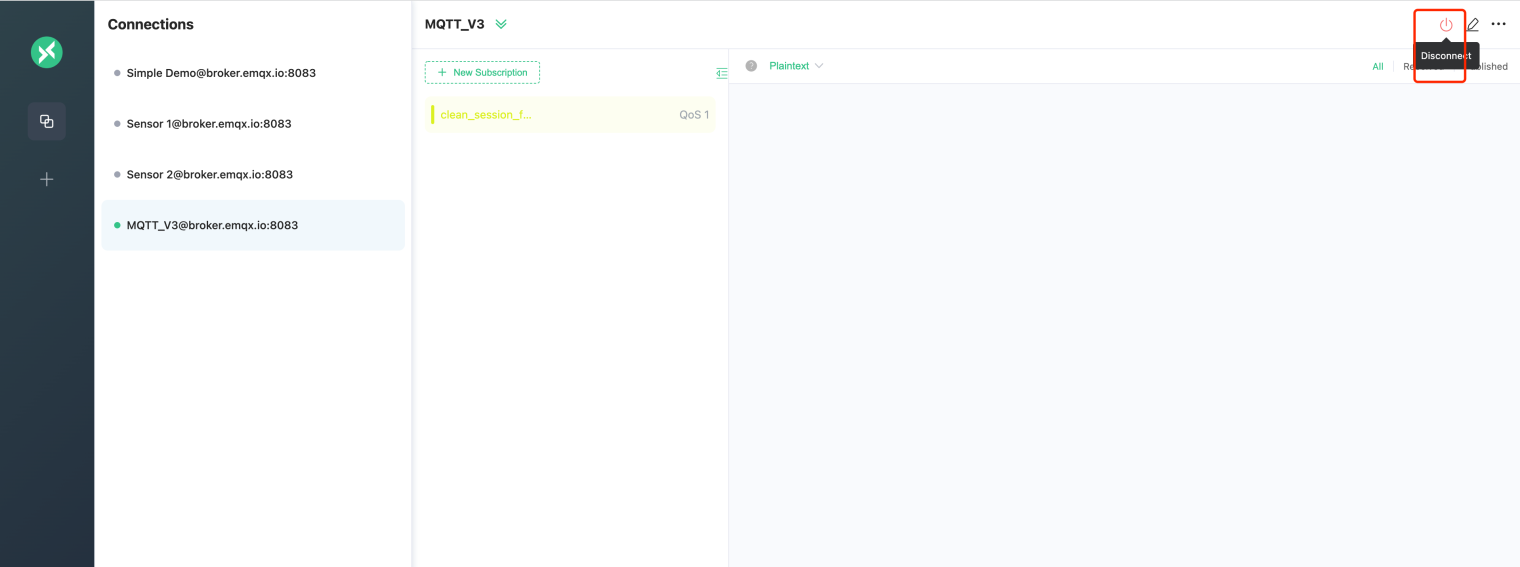
Subscribe to clean_session_false topic after successful connection, and set QoS to 1.
After the successful subscription, click the Disconnect button in the upper right corner.
Next, create a connection named MQTT_V3_Publish, and the MQTT version is also set to 3.1.1. After the successful connection, publish three messages to the clean_session_false topic.
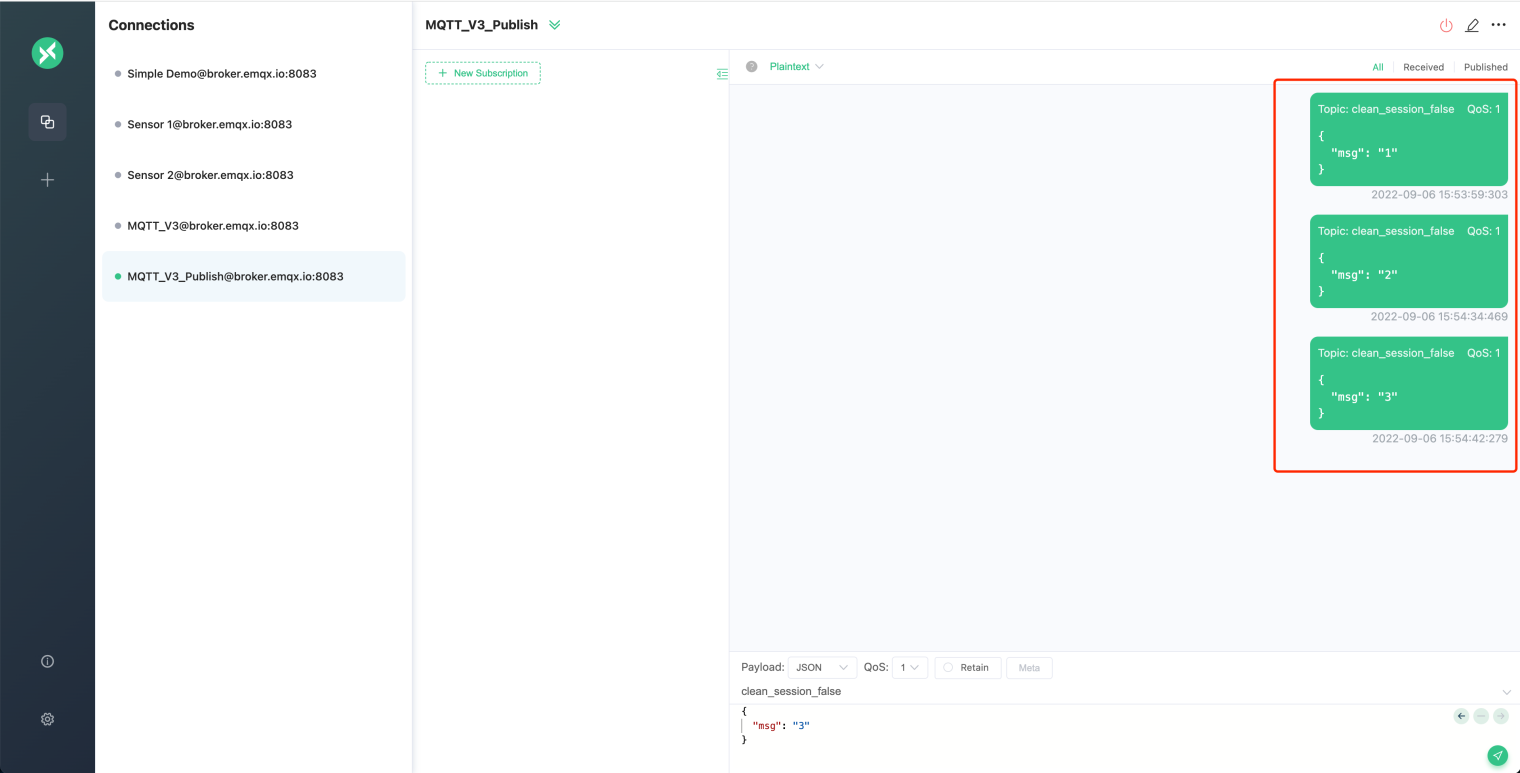
Then select the MQTT_V3 connection, click the connect button to connect to the server, and you will receive three offline messages.
Last Will
When the MQTT client makes a CONNECT request to the server, it can set whether to send the flag of Will Message , as well as the Topic and Payload.
When the MQTT client is abnormally offline (the DISCONNECT message is not sent to the server before the client disconnects), the MQTT server will publish a will message.
For more details on MQTT Last Will, please check the blog Use of MQTT Will Message.
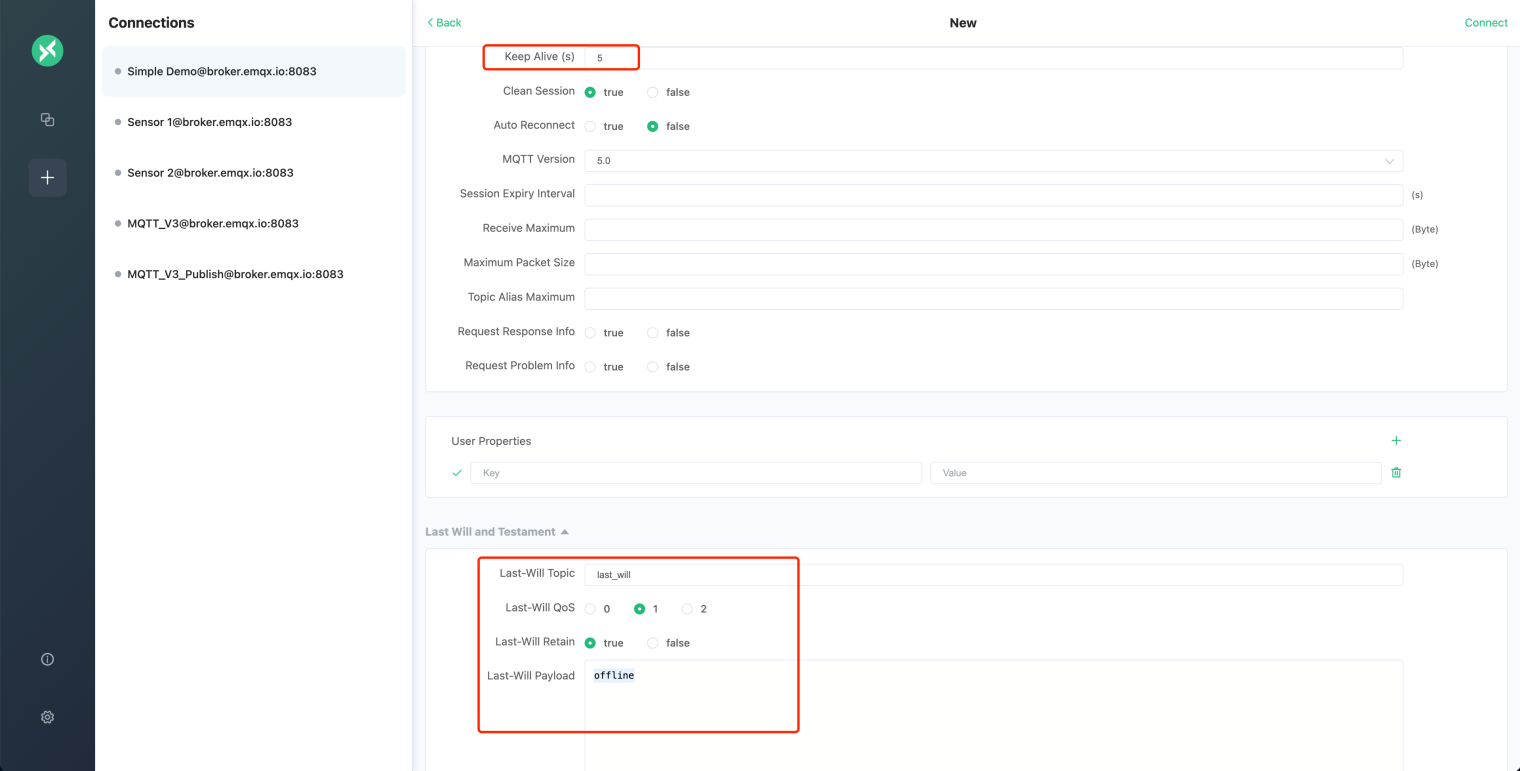
As follows, we create a connection named Last Will.
- To see the effect quickly, we set Keep Alive to 5 seconds.
- Set Last-Will Topic to
last_will. - Set Last-Will QoS to
1. - Set Last-Will Retain to
true. - Set Last-Will Payload to
offline.
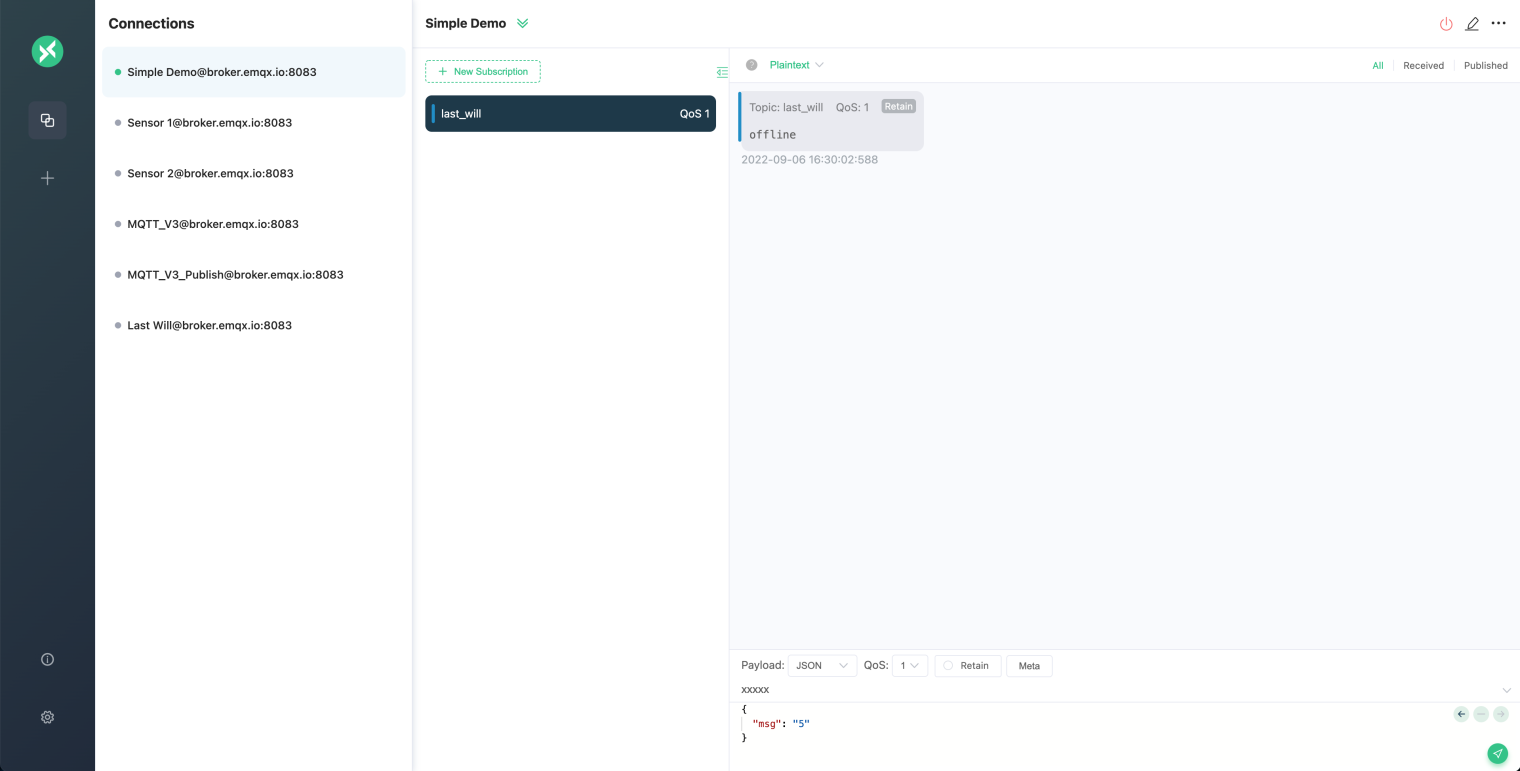
After the connection is successful, we disconnect the computer network for more than 5 seconds (simulating an abnormal client disconnection), and then turn on the network again.
Then start the Simple Demo connection, and subscribe to the last_will topic, you will receive the will message set by the Last Will connection.
At this point, we have finished explaining and demonstrating the basic concepts of MQTT and its usage process, so readers can try their hand at using the MQTT protocol based on what they have learned in this article.
Next, readers can check out the MQTT Client Programming blog series provided by EMQ to learn how to use MQTT in Java, Python, PHP, Node.js, and other programming languages. Start MQTT application and service development, and explore more advanced applications of MQTT.
Originally published at https://www.emqx.com.