
How to Use MQTT in the React Project
React (also known as React.js or ReactJS) is an open-source, front end, JavaScript library for building user interfaces or UI components. It is maintained by Facebook and a community of individual developers and companies. React can be used as a base in the development of single-page or mobile applications. However, React is only concerned with rendering data to the DOM, and so creating React applications usually requires the use of additional libraries for state management and routing. Redux and React Router are respective examples of such libraries.
This article mainly introduces how to use MQTT in the React project for implementing connect, subscribe, messaging and unsubscribe, etc., between the client and MQTT broker.
Project Initialisation
New Project
Reference link: https://reactjs.org/docs/getting-started.html
Creating new React applications with Create React App
npx create-react-app react-mqtt-test
If you need to use TypeScript, simply add the --template typescript parameter at the end of the command line
npx create-react-app react-mqtt-test --template typescript
Then add the TypeScript type library required in the React project
npm install --save typescript @types/node @types/react @types/react-dom @types/jest
# or
yarn add typescript @types/node @types/react @types/react-dom @types/jest
The use of TypeScript will not be the focus of the examples in this article, but if you wish to use it, you can add TypeScript features after referring to the creation example and the full code examples.
Import via CDN
<script crossorigin src="https://unpkg.com/react@16/umd/react.production.min.js"></script>
<script crossorigin src="https://unpkg.com/react-dom@16/umd/react-dom.production.min.js"></script>
Install the MQTT Client Library
As React is a JavaScript library, it is possible to use MQTT.js as the MQTT client library.
The following methods 2, 3 are more suitable for referencing projects created by React via CDN links.
Installation via the command line, either using the npm or yarn command (one or the other)
npm install mqtt --save
# or
yarn add mqtt
Import via CDN
<script src="https://unpkg.com/mqtt/dist/mqtt.min.js"></script>
Download to the local and then import using the relative path
<script src="/your/path/to/mqtt.min.js"></script>
The Use of MQTT
Connect the MQTT Broker
This article will use the free public MQTT broker which is provided by EMQX. This service is based on EMQX's MQTT IoT cloud platform to create. The server access information is as follows.
- Broker: broker.emqx.io
- TCP Port: 1883
- Websocket Port: 8083
Connect
const [client, setClient] = useState(null);
const mqttConnect = (host, mqttOption) => {
  setConnectStatus('Connecting');
  setClient(mqtt.connect(host, mqttOption));
};
useEffect(() => {
  if (client) {
    console.log(client)
    client.on('connect', () => {
      setConnectStatus('Connected');
    });
    client.on('error', (err) => {
      console.error('Connection error: ', err);
      client.end();
    });
    client.on('reconnect', () => {
      setConnectStatus('Reconnecting');
    });
    client.on('message', (topic, message) => {
      const payload = { topic, message: message.toString() };
      setPayload(payload);
    });
  }
}, [client]);
const mqttSub = (subscription) => {
  if (client) {
    const { topic, qos } = subscription;
    client.subscribe(topic, { qos }, (error) => {
      if (error) {
        console.log('Subscribe to topics error', error)
        return
      }
      setIsSub(true)
    });
  }
};
const mqttUnSub = (subscription) => {
  if (client) {
    const { topic } = subscription;
    client.unsubscribe(topic, error => {
      if (error) {
        console.log('Unsubscribe error', error)
        return
      }
      setIsSub(false);
    });
  }
};
Publish
const mqttPublish = (context) => {
  if (client) {
    const { topic, qos, payload } = context;
    client.publish(topic, payload, { qos }, error => {
      if (error) {
        console.log('Publish error: ', error);
      }
    });
  }
}
Disconnect
const mqttDisconnect = () => {
  if (client) {
    client.end(() => {
      setConnectStatus('Connect');
    });
  }
}
Test
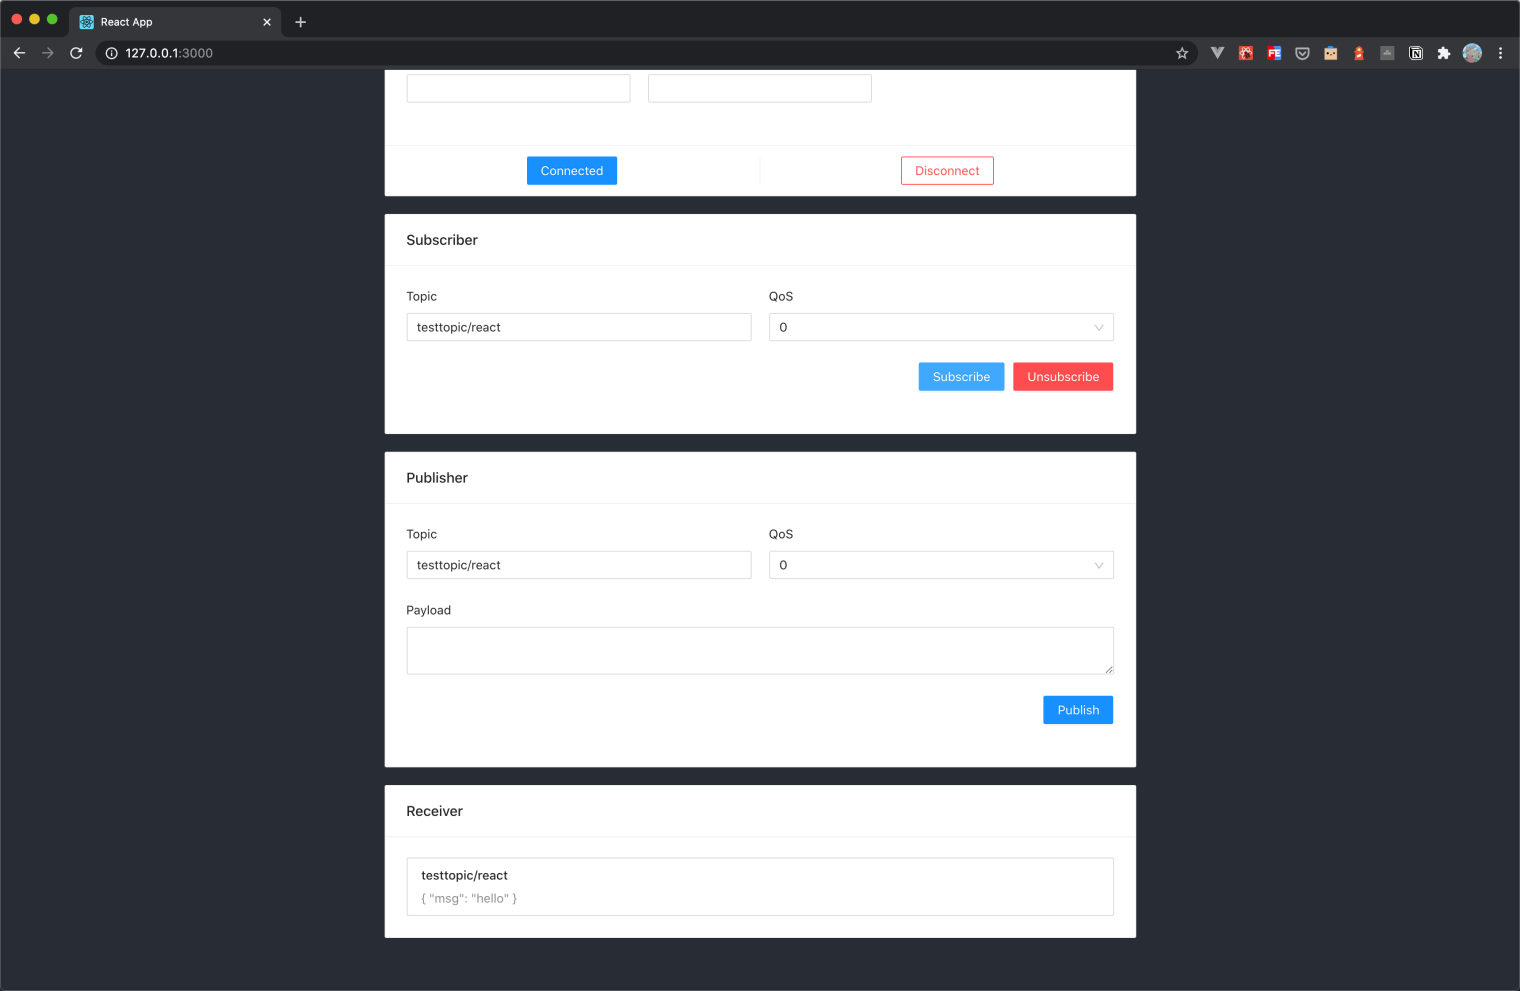
We have written the following simple browser application using React with the ability to create connections, subscribe to topics, send and receive messages, unsubscribe, and disconnect.
The complete project example code: https://github.com/emqx/MQTT-Client-Examples/tree/master/mqtt-client-React。
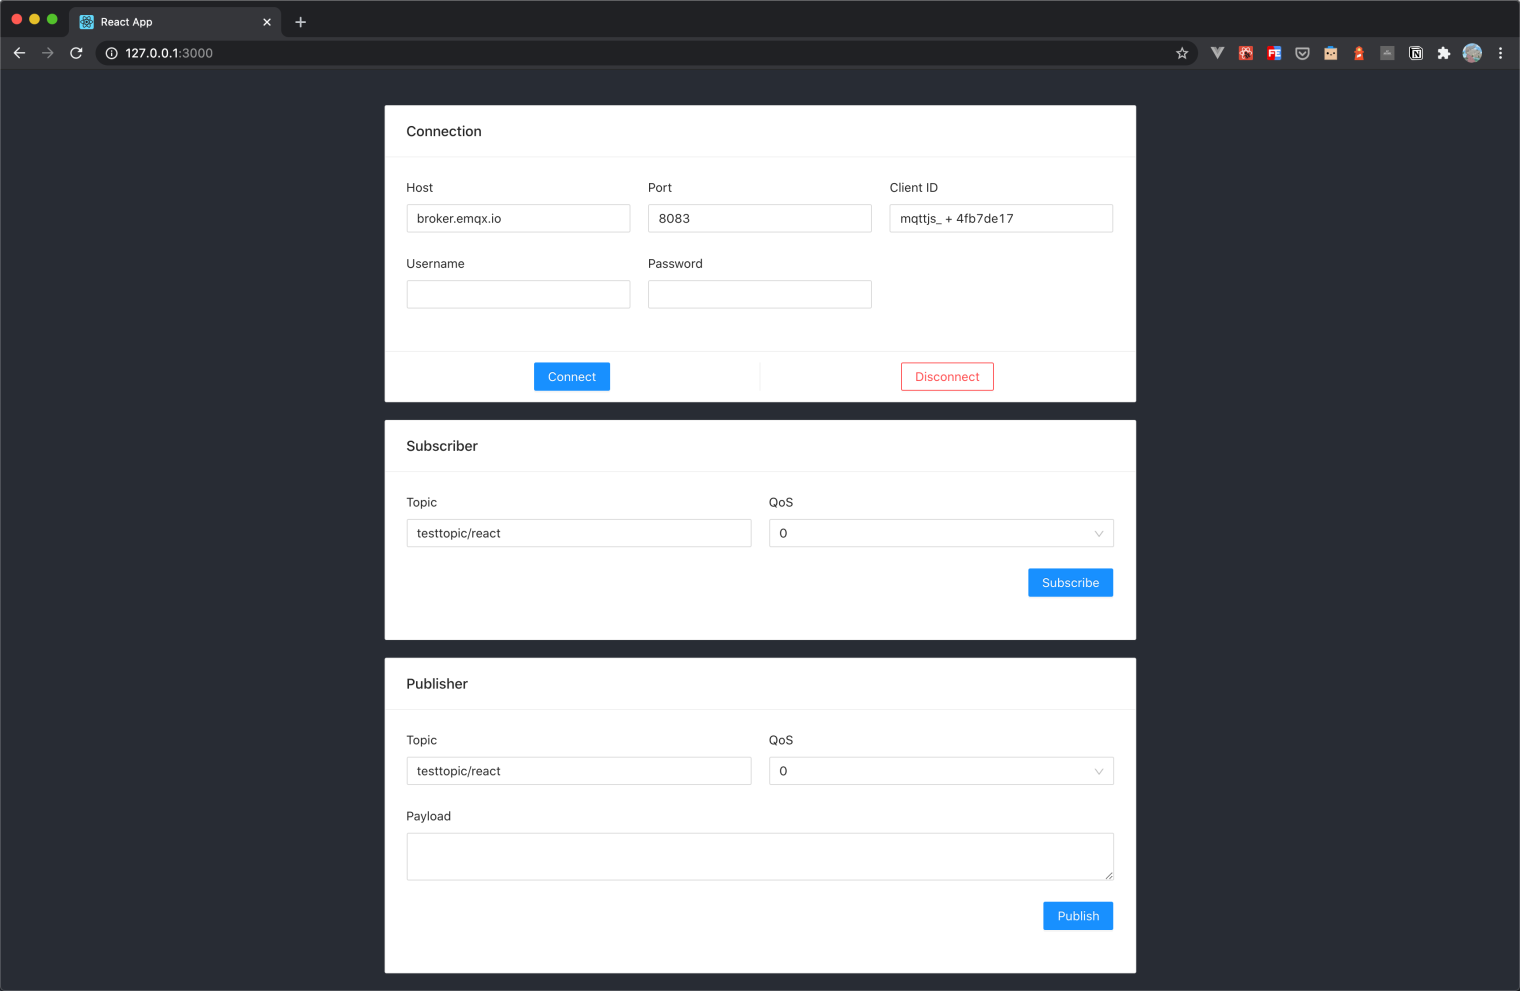
Use MQTT 5.0 client tool - MQTT X as another client to test sending and receiving messages.
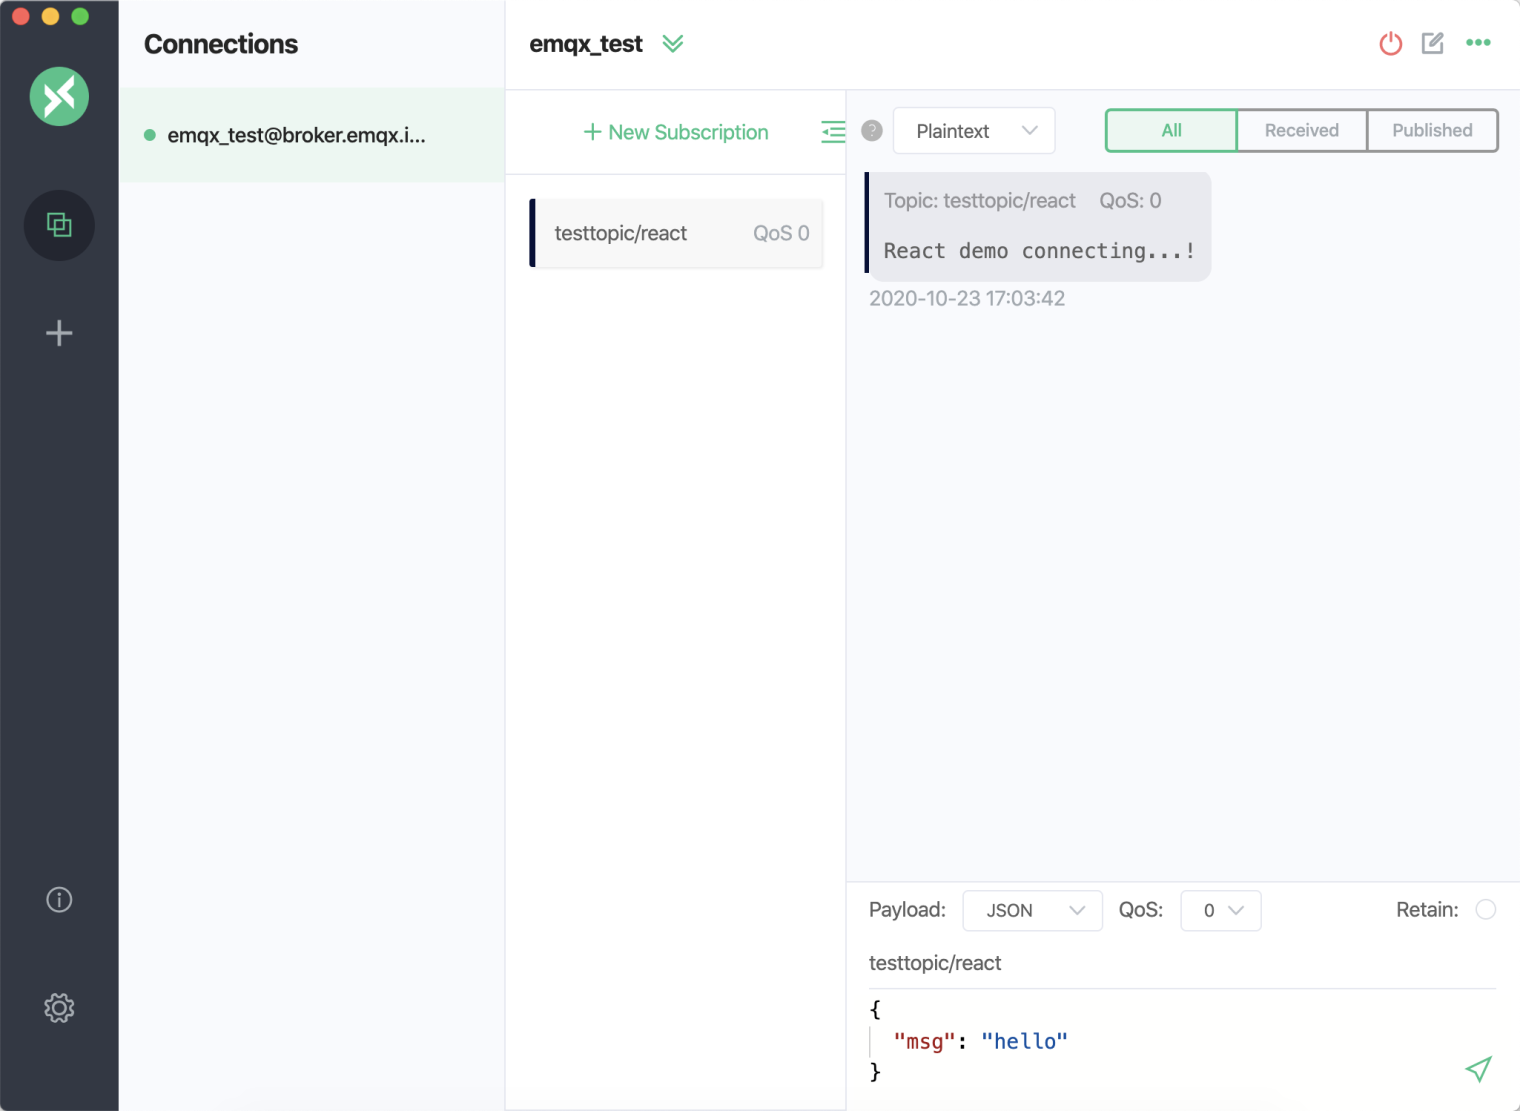
You can see that MQTT X can receive messages from the browser side normally, as can be seen when sending a message to the topic using MQTT X.
In summary, we have implemented the creation of an MQTT connection in the React project, and simulated subscribing, sending and receiving messages, unsubscribing and disconnecting between the client and MQTT broker.
In this article, we use React v16.13.1, so the Hook Component feature will be used as example code to demonstrate, or if required, you can refer to the ClassMqtt component in the full example code to use the Class Component feature for project building.
Originally published at https://www.emqx.com.
MQTT is a lightweight messaging protocol that is commonly used for connecting IoT devices. It can also be used in web applications to send real-time messages between the server and client. To use MQTT in a React project, you can make use of the MQTT.js library. This library provides a simple and easy-to-use API for connecting to an MQTT broker and publishing and subscribing to topics.
To use MQTT in your React project, you need to follow these steps:
Install MQTT.js library using npm package manager.
Import MQTT.js library in your React component.
Connect to an MQTT broker using the connect() method of the MQTT.js library.
Subscribe to a topic using the subscribe() method.
Publish a message using the publish() method.
As an example, the following link (https://www.prismaimaging.com/invest/) shows how MQTT can be used in a real-world scenario for monitoring the temperature of a wine cellar. In this example, MQTT is used to send temperature data from sensors in the wine cellar to a server. The server then processes the data and sends alerts to the user if the temperature goes above or below a certain threshold. The user can also view the temperature data in real-time using a web application built with React.