
Reusable, Restricted Routes with Redux, React, and React Router v4
This episode brought to you by the letter 'R'
Oftentimes, we need to hide certain parts of our web apps from users who aren't properly authenticated. The hidden content might be something the user hasn't paid for, like movies on Netflix, or it might be content that is impossible to display without knowing who the user is, like a profile page.
Sometimes we'll even restrict content because the user is logged in. It wouldn't make sense to go to the login page if we are already logged in, would it?
In complex applications, we might restrict content based on tiered authorization levels. A basic user shouldn't have access to the admin panel, but an admin should be able to view everything. In even more complex applications, we could restrict content based on an a set of access permissions. A designer might be allowed to edit code, and an engineer might not be allowed to edit designs.
All of these restrictions are based on the authentication state of our application. If we're using Redux, that state should be in our application's Redux store. Wouldn't it be cool if we could make our application automatically restrict users from accessing content based on the authorization state in our Redux store?
#CodeGoals
We want to make React components that act like React Router's <Route /> component but are connected to our Redux store and redirect users to a safe place if they try to access restricted content.
By the end of the post, we'll be able to write JSX code like this:
<Router>
  ...
  <AuthRestrictedRoute path="/protected" component={Protected}/>
  <NoAuthRestrictedRoute path="/login" component={Login}/>
  ...
</Router>
Where the Protected component located at /protected in <AuthRestrictedRoute /> is only available to users who are logged in. Conversely the Login component at /login in <NoAuthRestrictedRoute /> is only available to users who are not logged in. I'll cover the more advanced cases like admin levels and feature based authorization in future blog posts, but those posts will be based on the code we write in this tutorial.
What You Know
To get the most out of this tutorial, you should have some basic familiarity with React, Redux, and React Router v4.
React Training has an example of authentication with React Router v4, but I highly recommend checking out Tyler McGinnis's tutorial on building that example. His video is especially helpful, and we'll follow a similar path but with the addition of redux
To learn the basics of Redux with React, take a read over this tutorial by Miguel Moreno. The concepts we'll use here are connect, mapStateToProps, and mapDispatchToProps.
TL;DR
The final code from this tutorial is available on my GitHub page. Feel free to fork it and, if you find any bugs, make a pull request!
Setup
Fire up create-react-app to create a new project folder called redux-restricted-routes:
create-react-app redux-restricted-routes
cd redux-restricted-routes
If you haven't used create-react-app before, install it with npm install -g create-react-app.
Once we're in the project, we should be able to run
yarn start
If you see the default 'Create React App' screen in your web browser, you're on the right track!

Lets Route!
Now it's time to add in some routes. Lets use yarn to add react-router-dom:
yarn add react-router-dom
This package handles routing for browser projects, but most of the code we use here today will apply to React Native and React VR projects as well.
Before we start routing, we'll need to make some components to route to. Make a file called src/components/pages.js and add these five components:
// src/components/pages.js

import React from 'react'

export const Home = () => <h3>Home</h3>
export const Public = () => <h3>Public</h3>
export const Protected = () => <h3>Protected</h3>
export const Login = () => <h3>Login</h3>
export const Logout = () => <h3>Logout</h3>
To use the router, we'll need to provide the BrowserRouter (as Router) component from react-router at the root of our app. We'll set up routes to our pages using the Route component, and add Links to navigate to them. Go ahead and replace the contents of src/App.js with a basic routing component:
// src/App.js

import React from 'react'
import {BrowserRouter as Router, Route, Link} from 'react-router-dom'
import {Home, Public, Protected, Login, Logout} from './components/pages'

export default function App() {
  return (
      <Router>
        <div style={{ padding: '20px' }}>
          <ul>
            <li><Link to="/">Home</Link></li>
            <li><Link to="/public">Public Page</Link></li>
            <li><Link to="/protected">Protected Page</Link></li>
            <li><Link to="/login">Login Page</Link></li>
            <li><Link to="/logout">Logout Page</Link></li>
          </ul>
          <Route exact={true} path="/" component={Home}/>
          <Route path="/public" component={Public}/>
          <Route path="/protected" component={Protected}/>
          <Route path="/login" component={Login}/>
          <Route path="/logout" component={Logout}/>
        </div>
      </Router>
  )
}
Now, let's head over to the browser and we'll see that we can route between our simple pages!
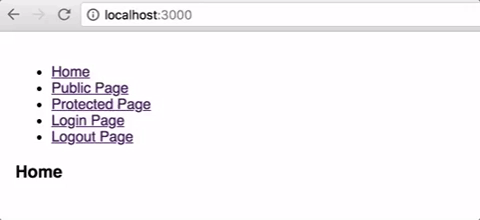
The Login and Logout pages don't actually log us in or out, but we'll be able to fix that after we add Redux.
Initializing Redux
Redux is a simple but powerful state management tool that we will use to manage our logged in/out state. Go ahead and add Redux to the project with:
yarn add redux
In the src folder, let's create a directory called redux and a file called actions.js in the new folder. Then, let's add these two action types to the actions.js file:
// src/redux/actions.js

// Action Types
export const LOG_IN_USER = 'LOG_IN_USER'
export const LOG_OUT_USER = 'LOG_OUT_USER'
Since the only state we care about is whether the user is logged in or not, these are the only actions we'll need.
To make things easier for our future selves, let's make some action creator functions to facilitate the logging in/out process and add them to the src/redux/actions.js file:
// src/redux/actions.js

// Action Types
export const LOG_IN_USER = 'LOG_IN_USER'
export const LOG_OUT_USER = 'LOG_OUT_USER'

// Action Creators
export function logInUser() {
  return { type: LOG_IN_USER }
}
export function logOutUser() {
  return { type: LOG_OUT_USER }
}
In order to handle those actions, we'll need a reducer. Next to your actions.js file in src/redux, create a reducers.js file with this auth reducer:
// src/redux/reducers.js

import {LOG_IN_USER, LOG_OUT_USER} from './actions'

// Reducer for handling auth actions
export function authReducer(state = { isAuthed: false }, action) {
  switch (action.type) {
    case LOG_IN_USER:
      return {
        ...state,
        isAuthed: true
      }
    case LOG_OUT_USER:
      return {
        ...state,
        isAuthed: false
      }
    default:
      return state
  }
}
All this reducer does is update the isAuthed part of our state when it sees the LOG_IN_USER and LOG_OUT_USER actions.
Finally, let's use this reducer to make a store. Create a store.js file in the src/redux folder and initialize the store with our reducer:
// src/redux/store.js

import {combineReducers, createStore} from 'redux'
import {authReducer} from './reducers'

const reducers = combineReducers({
  auth: authReducer,
})

const store = createStore(reducers)

export default store
This file uses the createStore methods of redux to make a Redux store out of our auth reducer. Using the combineReducers function is overkill here, but in your future apps, you'll probably have more than one reducer.
We'll export this store so that we can connect it to redux with the react-redux package.
Connecting Redux to React
Luckily for us, the react-redux npm package will do all the heavy lifting we need to make our React app aware of our Redux store. Add this package to the project by running:
yarn add react-redux
This package gives us the Provider component that lets components within our app access our store. Add the Provider inside your App component:
// src/App.js

import React from 'react'
import {BrowserRouter as Router, Route, Link} from 'react-router-dom'
import {Home, Public, Protected, Login, Logout} from './components/pages'
import {Provider} from 'react-redux' // Don't forget the import!
import store from './redux/store' // Import store too

export default function App() {
  return (
    <Provider store={store}> {/* <- Here */}
      <Router>
        <div style={{ padding: '20px' }}>
          <ul>
            <li><Link to="/">Home</Link></li>
            <li><Link to="/public">Public Page</Link></li>
            <li><Link to="/protected">Protected Page</Link></li>
            <li><Link to="/login">Login Page</Link></li>
            <li><Link to="/logout">Logout Page</Link></li>
          </ul>
          <Route exact={true} path="/" component={Home}/>
          <Route path="/public" component={Public}/>
          <Route path="/protected" component={Protected}/>
          <Route path="/login" component={Login}/>
          <Route path="/logout" component={Logout}/>
        </div>
      </Router>
    </Provider>
  )
}
Nothing should change about the way the app looks, but so long as your project still compiles, you're on the right track.
Now let's get some indication of our logged in status. Make a src/components folder then create a file called AuthIndicator.js with this JSX component:
// src/components/AuthIndicator.js

import React from 'react'

const AuthIndicator = ({isAuthed}) =>(
  isAuthed
    ? <p>Welcome! You are logged in</p>
    : <p>You are not logged in. Please log in to view protected content</p>
)
This component just takes one prop and tells us whether we are logged in or not. In order to connect this component to our Redux store, we use react-redux's connect method, which can accept a mapStateToProps function. This function lets us decide how we want to tell our component about changes in the Redux store, and has the added benefit of preventing re-renders if the portion of state we pass to our component hasn't changed.
// src/components/AuthIndicator.js

import React from 'react'
import {connect} from 'react-redux'

const AuthIndicator = ({isAuthed}) =>(
  isAuthed
    ? <p>Welcome! You are logged in</p>
    : <p>You are not logged in. Please log in to view protected content</p>
)

const mapAuthStateToProps = ({auth: { isAuthed }}) => ({isAuthed})

export default connect(mapAuthStateToProps)(AuthIndicator)
Now that our AuthIndicator knows about our Redux store, let's add it to the app:
// src/App.js

import React from 'react'
import {BrowserRouter as Router, Route, Link} from 'react-router-dom'
import {Home, Public, Protected, Login, Logout} from './components/pages'
import {Provider} from 'react-redux'
import store from './redux/store'
import AuthIndicator from './components/AuthIndicator' // Don't forget the import!

export default function App() {
  return (
    <Provider store={store}>
      <Router>
        <div style={{ padding: '20px' }}>
          <AuthIndicator /> {/* <- Here */}
          <ul>
            <li><Link to="/">Home</Link></li>
            <li><Link to="/public">Public Page</Link></li>
            <li><Link to="/protected">Protected Page</Link></li>
            <li><Link to="/login">Login Page</Link></li>
            <li><Link to="/logout">Logout Page</Link></li>
          </ul>
          <Route exact={true} path="/" component={Home}/>
          <Route path="/public" component={Public}/>
          <Route path="/protected" component={Protected}/>
          <Route path="/login" component={Login}/>
          <Route path="/logout" component={Logout}/>
        </div>
      </Router>
    </Provider>
  )
}
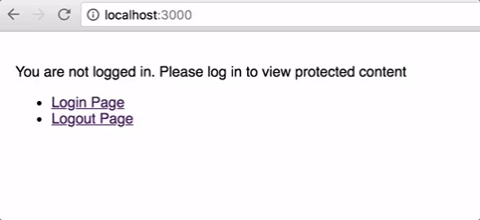
Checking out our browser, we see a wonderful un-welcome message:

Perfect! The app knows that we aren't logged in. Lets add a way to change that.
We're going to add some complexity to the Login and Logout pages, so lets remove them from src/components/pages.js and build them in their own files.
Create a src/components/Login.js file with this functional Login component:
// src/components/Login.js

import React from 'react'
import {connect} from 'react-redux'
import {logInUser} from '../redux/actions'

// A functional component that requires a logInUser function as a parameter
const Login = ({ logInUser }) => (
  <div>
    <h3>Login</h3>
    <button onClick={logInUser}>Log in</button>
  </div>
)

// Gives the login button ability to dispatch to store
export default connect(null, {logInUser})(Login)
Notice that the Login component requires a single prop, the logInUser function, and it receives that prop from the connect method's second argument (generally called mapDispatchToProps). Also note that we are passing null as the first argument to connect (generally called mapStateToProps) because our Login component doesn't care about the state of the application.
While we're at it, let's create a Logout component in a new src/components/Logout.js file:
// src/components/Logout.js

import React from 'react'
import {connect} from 'react-redux'
import {logOutUser} from '../redux/actions'

// A functional component that requires a logOutUser function as a parameter
const Logout = ({ logOutUser }) => (
  <div>
    <h3>Logout</h3>
    <button onClick={logOutUser}>Log out</button>
  </div>
)

// Gives the logout button the ability to dispatch to store
export default connect(null, {logOutUser})(Logout)
You'll probably notice that this component is very similar to the Login component. The major difference is that instead of accepting a logInUser prop, it acceptsa logOutUser prop.
Lets add our new components to our App in /src/App.js:
// src/App.js

import React from 'react'
import {BrowserRouter as Router, Route, Link} from 'react-router-dom'
import {Home, Public, Protected} from './components/pages' // Remove Login, Logout
import {Provider} from 'react-redux'
import store from './redux/store'
import AuthIndicator from './components/AuthIndicator'
import Login from './components/Login' // Add import to new file
import Logout from './components/Logout' // Add import to new file

export default function App() {
  return (
    <Provider store={store}>
      <Router>
        <div style={{ padding: '20px' }}>
          <AuthIndicator />
          <ul>
            <li><Link to="/">Home</Link></li>
            <li><Link to="/public">Public Page</Link></li>
            <li><Link to="/protected">Protected Page</Link></li>
            <li><Link to="/login">Login Page</Link></li>
            <li><Link to="/logout">Logout Page</Link></li>
          </ul>
          <Route exact={true} path="/" component={Home}/>
          <Route path="/public" component={Public}/>
          <Route path="/protected" component={Protected}/>
          <Route path="/login" component={Login}/>
          <Route path="/logout" component={Logout}/>
        </div>
      </Router>
    </Provider>
  )
}
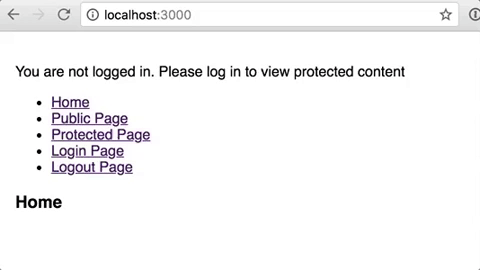
Now head to your web browser and see if our authentication is working:
Awesome! Our AuthIndicator is showing us whether or not we are logged in, and our Login and Logout components let us log in and log out. In a real app, this sign in process would probably involve verifying a token with your server, but this simplified version is enough for our routing purposes.
One glaring flaw is that we can go to the /logout and /protected pages even if we aren't logged in... let's change that.
Router, meet Redux
Finally, what we've all been waiting for! It's time to hook up our Router to Redux.
Let's create a "Switch" component that either renders a provided component or redirects the user. We'll use react-router-dom's Redirect component which, when rendered, simply redirects the user to the to route, much like a 304 redirect code from a server. Lets put that component in a new file called src/restrictedRouteMaker.js:
// src/restrictedRouteMaker.js

import React from 'react'
import {Redirect} from 'react-router-dom'

// HOC to either render the given component or redirects based on the `restricted` prop
const RedirectSwitch = ({ component: Component, restricted, redirectPath, ...rest }) => (
  restricted
    ? <Redirect to={redirectPath}/>
    : <Component {...rest}/>
)
This is a Higher Order Component (HOC) that accepts a component to conditionally render as one of its props. If the restricted prop is true, we render the Redirect and thus redirect the user. If restricted is false, we render the Component without any changes. We could use this new component in a Route component like this:
<Route path="/protected"
  render={props => (
    <RedirectSwitch restricted={isAuthed} redirectPath="/login" component={Protected} {...props}/>
  )}
/>
We're telling the Route component that if our user goes to the /protected route, we should render a RedirectSwitch that is restricted based on some isAuthed variable and redirect users to the /login route if they are are restricted or render the Protected if they are not.
And we would be done! But wait, the title said Reusable Routes. Oh. That code definitely isn't reusable. And we would have to figure out where to get isAuthed anyways. Hmm.
Lets break this down into a few more straightforward steps to see if we can make this a nice reusable component.
First we can see that our RedirectSwitch component requires at least three props: component, restricted, and redirectPath. These props will come from three different places. On the outermost layer, the API of our end component should be the same as Route, so the user can provide the component prop there. The restricted prop should be calculated from our state, so we'll want to use React-Redux's connect method and mapStateToProps. Finally, we can make our restricted routes more reusable if we inject the redirectPath prop with an HOC so the end user doesn't need to pass it every time.
The ...rest prop is just passed along to the Component as a spread operator, and it allows the user to pass props all the way from the Route to the rendered Component.
Let's make the HOC to inject the redirectPath. We can wrap the RedirectSwitch component in another HOC to do just that:
// src/restrictedRouteMaker.js

// ...

// Adds `redirectPath` as an HOC injected prop to a RedirectSwitch
const addRedirectPathToSwitch = (redirectPath) => (props) => (
  <RedirectSwitch redirectPath={redirectPath} {...props}/>
)
The output of this HOC gives a RedirectSwitch that always redirects to the same place. For example, we could make a LoginRestrictedSwitch component that redirects to /login like this:
const LoginRedirectSwitch = addRedirectPathToSwitch('/login')
Next, let's use connect to calculate our restricted prop from our state. We need to make a mapStateToProps function, so using our LoginRedirectSwitch as an example, we could do:
const mapStateToAuthProps = ({auth: { isAuthed }}) => ({ restricted: isAuthed })
const ConnectedLoginRedirectSwitch = connect(mapStateToAuthProps)(LoginRedirectSwitch)
This takes the auth.isAuthed part of state and passes it into our switch component as the restricted prop. Your state might have a JWT or some other indication of whether or not the user is authenticated and authorized, but however you calculate could go into this mapStateToProps function.
Finally, let's wrap our connected switch inside a route element:
// src/restrictedRouteMaker.js

// ...
import {Route, Redirect} from 'react-router-dom'

// ...
const makeSwitchRoute = (SwitchComponent) => ({ path, component: RenderComponent, ...rest }) => (
  <Route path={path} {...rest} render={props => <SwitchComponent component={RenderComponent} {...props}/>}/>
)
This HOC allows us to take our ConnectedLoginRedirectSwitch component and nest it inside a React Router Route component so that the switch gets rendered when the Route's path is matched. We could use it like this:
const AuthRestrictedRoute = makeSwitchRoute(ConnectedLoginRedirectSwitch)
// ...
  <AuthRestrictedRoute path="/protected" component={Protected} />
// ...
This component will match the /protected route and render the Protected component just like a normal Route if the user is logged in, and if they are not, it will redirect them to the /login route. Also, it's reusable! We could put another AuthRestrictedRoute right next to it:
const AuthRestrictedRoute = makeSwitchRoute(ConnectedLoginRedirectSwitch)
// ...
  <AuthRestrictedRoute path="/protected" component={Protected} />
  <AuthRestrictedRoute path="/secret" component={Secret} />
// ...
Both routes are restricted to users that are logged in, and both will redirect to the /login page if the user tries to access the route before logging in. Cool, right?
But we had to go through a lot of hoops to set up the AuthRestrictedRoute component. Could we make it easier by wrapping it all in one function?
Streamlining with Compose
We can work our way from RedirectSwitch to AuthRestrictedRoute with each of the functions we wrote previously to build out this wrapper function:
const restrictedRouteMaker = () => {
  const LoginRedirectSwitch = addRedirectPathToSwitch('/login')
  const mapStateToProps = ({auth: { isAuthed }}) => ({ restricted: isAuthed })
  const ConnectedLoginRedirectSwitch = connect(mapStateToProps)(LoginRedirectSwitch)
  const AuthRestrictedRoute = makeSwitchRoute(ConnectedLoginRedirectSwitch)

  return AuthRestrictedRoute
}
This would work if we only wanted to make the AuthRestrictedRoute component, but we're interested in generalizing the process.
There are really only two unique values that we need to make a RestrictedRoute component: the redirectPath and the mapStateToProps, so let's make our factory function accept those two values as parameters:
const restrictedRouteMaker = (redirectPath, mapStateToRestricted) => {
  const LoginRedirectSwitch = addRedirectPathToSwitch('/login')
  const mapStateToProps = ({auth: { isAuthed }}) => ({ restricted: isAuthed })
  const ConnectedLoginRedirectSwitch = connect(mapStateToProps)(LoginRedirectSwitch)
  const AuthRestrictedRoute = makeSwitchRoute(ConnectedLoginRedirectSwitch)

  return AuthRestrictedRoute
}
Now, let's use those parameters to make a generalized restrictedRouteMaker:
const restrictedRouteMaker = (redirectPath, mapStateToRestricted) => {
  const RedirectSwitchWithPath = addRedirectPathToSwitch(redirectPath)
  const ConnectedRedirectSwitchWithPath = connect(mapStateToRestricted)(RedirectSwitchWithPath)
  return makeSwitchRoute(ConnectedRedirectSwitchWithPath)
}
And we could use this function to make our AuthRestrictedRoute:
const AuthRestrictedRoute = restrictedRouteMaker('/login', ({auth: { isAuthed }}) => ({ restricted: isAuthed }))
Or we could build a route that is only available to people who aren't authed:
const NoAuthRestrictedRoute = restrictedRouteMaker('/', ({auth: { isAuthed }}) => ({ restricted: !isAuthed }))
We could even build a route that isn't available Jim who sits at the desk down the hall:
const NoJimRoute = restrictedRouteMaker('/somewhere', ({user: { email }}) => ({ restricted: email === 'jim@company.com' }))
But we can do even better! Notice that the restrictedRouteMaker is just a series of functions called with the result of the previous function. That's exactly what the compose function from Redux was made for. It's a method that takes a series of functions and returns a function that calls them on each other from right to left, exposing the rightmost function as the input to the returned function. Let's add a composed version of restrictedRouteMaker to our src/restrictedRouteMaker.js file:
// src/restrictedRouteMaker.js

// ...
import {connect, Provider} from 'react-redux'
import {compose} from 'redux'

// ...

const restrictedRouteMaker = (redirectPath, mapStateToRestricted) => compose(
  makeSwitchRoute,
  connect(mapStateToRestricted),
  addRedirectPathToSwitch
)(redirectPath)
Note that the redirectPath gets passed to the compose on the outside because we need to pass it to addRedirectPathToSwitch to trigger the composition.
Here's the entire restrictedRouteMaker.js file:
// src/restrictedRouteMaker.js

import React from 'react'
import {connect, Provider} from 'react-redux'
import {compose} from 'redux'
import {Route, Redirect} from 'react-router-dom'

// HOC to either render the given component or redirect based on the `restricted` prop
const RedirectSwitch = ({ component: Component, restricted, redirectPath, ...rest }) => (
  restricted
    ? <Redirect to={redirectPath}/>
    : <Component {...rest}/>
)

// Adds `redirectPath` as an HOC injected prop to a RedirectSwitch
const addRedirectPathToSwitch = (redirectPath) => (props) => (
  <RedirectSwitch redirectPath={redirectPath} {...props}/>
)

// Component factory to wrap SwitchComponent inside a react-router Route
const makeSwitchRoute = (SwitchComponent) => ({ path, component: RenderComponent, ...rest }) => (
  <Route path={path} {...rest} render={props => <SwitchComponent component={RenderComponent} {...props}/>}/>
)

// Wraps all our other components in a HOC factory function
export default (redirectPath, mapStateToRestricted) => compose(
  makeSwitchRoute,
  connect(mapStateToRestricted),
  addRedirectPathToSwitch
)(redirectPath)
Using Our Route Factory
Now we can use our route factory to make some restricted routes! Back in App.js, let's make two restricted routes, one for authed routes and one for non-authed routes:
// src/App.js

// ...
import restrictedRouteMaker from './restrictedRouteMaker'

// Create route with auth restriction that redirects to /login
const mapStateToAuthProps = ({auth: { isAuthed }}) => ({ restricted: !isAuthed })
const AuthRestrictedRoute = restrictedRouteMaker('/login', mapStateToAuthProps)

// Create route with no-auth restriction that redirects to /
const mapStateToNoAuthProps = ({auth: { isAuthed }}) => ({ restricted: isAuthed })
const NoAuthRestrictedRoute = restrictedRouteMaker('/', mapStateToNoAuthProps)

// ...
Now, let's use our routes to fix the permissions on our Login, Protected and Logout pages:
// src/App.js

import React from 'react'
import {BrowserRouter as Router, Route, Link} from 'react-router-dom'
import {Home, Public, Protected} from './components/pages' // Remove Login, Logout
import {Provider} from 'react-redux'
import store from './redux/store'
import AuthIndicator from './components/AuthIndicator'
import Login from './components/Login' // Add import to new file
import Logout from './components/Logout' // Add import to new file
import restrictedRouteMaker from './restrictedRouteMaker'

// Create route with auth restriction that redirects to /login
const mapStateToAuthProps = ({auth: { isAuthed }}) => ({ restricted: !isAuthed })
const AuthRestrictedRoute = restrictedRouteMaker('/login', mapStateToAuthProps)

// Create route with no-auth restriction that redirects to home
const mapStateToNoAuthProps = ({auth: { isAuthed }}) => ({ restricted: isAuthed })
const NoAuthRestrictedRoute = restrictedRouteMaker('/', mapStateToNoAuthProps)

export default function App() {
  return (
    <Provider store={store}>
      <Router>
        <div style={{ padding: '20px' }}>
          <AuthIndicator />
          <ul>
            <li><Link to="/">Home</Link></li>
            <li><Link to="/public">Public Page</Link></li>
            <li><Link to="/protected">Protected Page</Link></li>
            <li><Link to="/login">Login Page</Link></li>
            <li><Link to="/logout">Logout Page</Link></li>
          </ul>
          <Route exact={true} path="/" component={Home}/>
          <Route path="/public" component={Public}/>
          <AuthRestrictedRoute path="/protected" component={Protected}/>
          <NoAuthRestrictedRoute path="/login" component={Login}/>
          <AuthRestrictedRoute path="/logout" component={Logout}/>
        </div>
      </Router>
    </Provider>
  )
}
If we head over to the browser we'll see that if we try to go to the Protected or Logout pages before logging in, we get redirected to the Login page! And conversely, if we try to go to the Login page when we're already logged in, we get redirected to the Home page. These new routes sit right beside regular, unrestricted Routes and behave the same with the addition of our restrictions. Sweet.
Conclusion
By making a higher order component factory that connects our routes to our Redux store, we're able to restrict access to parts of our app based directly on our redux state. As we just saw, this is super useful for authentication, but it can easily be extended to other restrictions. What if you want to make a route restricted for a users who haven't complimented your hair? That's as simple as:
const mapStateToComplimentProps = ({user: { hasComplimentedMyHair }}) => ({ restricted: !hasComplimentedMyHair })
const HairComplimentRestrictedRoute = restrictedRouteMaker('/not-fabulous', mapStateToComplimentProps)
// ...
  <HairComplimentRestrictedRoute path="/fabulous" component={SuperMegaDiscount} />
// ...
The possibilities are endless. Now go restrict your users with confidence!
Originally posted on github.com/elliotaplant
Great tutorial! Looking forward to your next article on admin access and feature-based authorization.