
Express vs Rails: Framework Comparison using a Simple Game API
I've been exploring quick ways to make an API using Express or Ruby on Rails. Both frameworks are popular and I've heard that they're both easy to learn for beginners and great for rapid development. Besides those broad generalities, I'm more familiar with JavaScript, but would Node.js's asynchronous approach seem unnatural to me? Similarly, how would the "magic" of Rails affect my decision? How might one choose one over the other?
A side-by-side comparison of these two frameworks (and languages) would be excellent. To make the comparison fun, I decided to port a simple web-based game (named Pegger) to each framework. I gave myself two constraints when porting the API:
- Use conventions encouraged by the framework.
- Use only what is offered "out of the box."
I also focused on web development. That means unit testing and database access are out of scope for this comparison.
Source Code
If you want to look at all of the code, the source code is available on GitHub:
- Pegger in Java (the original version)
- Pegger in Express.js
- Pegger in Ruby on Rails
Install Required Software
Before we can use Express or Rails, we need Node.js and Ruby. Both languages recommend using a version manager to do this.
The following instructions should work on Linux or Mac OS. For Windows, you may just want to use the downloadable installers provided on Node.js and Ruby's homepages.
The steps to install Node's version manager (NVM) and Ruby's version manager (RVM) are very similar.
Express: Installation with NVM
$ curl -o- https://raw.githubusercontent.com/creationix/nvm/v0.31.0/install.sh | bash
$ . ~/.bash_profile
$ nvm install 4.3.1
$ nvm use 4.3.1
$ npm install express-generator -g
NVM, NPM, Node, and Express are now ready to use.
Rails: Install Ruby with RVM
$ gpg --keyserver hkp://keys.gnupg.net --recv-keys 409B6B1796C275462A1703113804BB82D39DC0E3
$ curl -L https://get.rvm.io | bash -s stable
$ source ~/.rvm/scripts/rvm
$ rvm requirements
$ rvm install ruby
$ rvm use ruby --default
$ rvm rubygems current
$ gem install rails
RVM, Ruby, and Rails are now ready to use.
Create a Project
Both Express and Rails provide a "generator" that allows you to generate an empty project with all of the typical directories and files in place so you don't have to write them yourself.
Here's how to use the respective generators:
Express: Generate a Project
$ express pegger-node-express
$ cd pegger-node-express
$ npm install
These commands generate a new project and install all of the project's dependencies.
Rails: Generate a Project
$ rails new pegger-ruby-rails --skip-test-unit
The Rails generator automatically installs dependencies when the project is created, so only one command is needed. If you want to write unit tests, remove the --skip-test-unit parameter.
Note: In this comparison, we are only using dependencies introduced by the project generators. If you decide to add more dependencies, both Node and Ruby have similar tools for managing them. See NPM or Bundler, respectively, for more information.
Start the Server
We haven't introduced any of our own code yet, but from this point on, you can start your server using the following commands (make sure you have cd'd into your project directory). Once running, you can view your project in a browser at http://localhost:3000.
Express: Start Server
$ npm start
Rails: Start Server
$ rails server
Add Static Content
Static content is the files that won't change because of user interaction with our app. That's all of our HTML, CSS, JavaScript, and images. Both Express and Rails provide two ways to share static content:
- Place the files in a "public" directory, or
- Place the files in a "views" or "assets" directory
Public Files
Both Express and Rails projects have a subdirectory named ./public. If you put a file in this directory, the server will provide it "as is" to your browser. For example, if we place the HTML for the game board in ./public/partials/board.html, then we can view it in our browser by navigating to http://localhost:3000/partials/board.html.
Since Pegger is written as a Single Page App (SPA), all of the static content can be placed in ./public and the game will work just fine.
However, there are other ways that static content can be accessed in Express and Rails. Let's explore those a bit.
Express: View Templates
In addition to plain HTML, Express can also use a template engine to create views, with the default engine being Jade. Using templates to create HTML can reduce the amount of typing you have to do and lets you create reusable components.
I converted the index.html file for Pegger to Jade and placed it in ./views/index.jade. The .jade extension is how Express knows to treat the file as a Jade template. Here's a snippet of index.jade:
body(ng-controller='PeggerCtrl')
  .container
    .header
      ul.nav.nav-pills.pull-right
        li.active
          a(href='#/play') Play
        li
          a(href='https://github.com/egillespie/pegger-node-express', target='_blank') GitHub
Here's the HTML that is produced:
<body ng-controller="PeggerCtrl">
  <div class="container">
    <div class="header">
      <ul class="nav nav-pills pull-right">
        <li class="active">
          <a href="#/play">Play</a>
        </li>
        <li>
          <a href="https://github.com/egillespie/pegger-node-express" target="_blank">GitHub</a>
        </li>
      </ul>
      ...
    </div>
  </div>
</body>
In order to use a view template, you have to tell Express which template to use for a given URL. This is accomplished by defining routes that map URLs to your code.
There are many ways to define routes and we'll be using them to define our game API, but right now let's focus on how http://localhost:3000 will load the HTML from our index.jade template.
First, in app.js you will find the following two lines:
var routes = require('./routes/index');
app.use('/', routes);
The first line is a common way to load another JavaScript file in Node. The .js extension is optional when using require(), so the first line is really loading a file named ./routes/index.js.
The second line tells Express that any HTTP request with the path '/' should use the routes defined in ./routes/index.js.
To get the full picture, let's take a look at ./routes/index.js:
var express = require('express');
var router = express.Router();

/* GET home page. */
router.get('/', function(req, res, next) {
  res.render('index', { title: 'Express' });
});

module.exports = router;
The call to router.get('/', ...) registers the path / and provides a JavaScript function that Express will call anytime a GET request is made to the URL with that path.
The subsequent call to res.render('index', ...) tells Express to render a view named "index". Since Express knows about Jade templates and all templates are expected to exist in ./views, Express will render index.jade when this function is called.
Express supports more than just HTML and Jade templates. You can also use the Express generator to enable EJS (Embedded JavaScript) or Handlebars templates.
Rails: View Templates
Rails also lets you use view templates. The default template engine in Rails is Embedded Ruby (ERB), which lets you insert bits of Ruby code into your HTML files.
The following snippet of HTML and ERB shows how to display the current year in the footer of your pages:
<footer>
<p>© <%= Date.today.year %></p>
</footer>
Similar to Express, Rails must be told which URLs correspond to which views. Like we did in Express, we need to define a route, a method for any code we want to run, and a template.
Fortunately, the Rails generator can write some of this code for us. If we want to add a route from / to a view named "home", we run the following command from our project directory:
$ rails generate controller Static home
This created a new controller named "Static" with a single view named "home". It also added a route for us—but if you inspect this file, you can see that it chose the path 'static/home' instead of '/'.
To fix this, let's change ./config/routes.rb. Replace the line get 'static/home' with root 'static#home'. The top of the file will look like this:
Rails.application.routes.draw do
  root 'static#home'
If we replace the contents of our view (./app/views/static/home.html.erb) with the HTML for our game, we'll be able to see the intro screen for Pegger.
Now let's look at the "Static" controller, ./app/controllers/static_controller.rb. Here's what it looks like:
class StaticController < ApplicationController
  def home
  end
end
There's not much to it, is there? This is typical of views that don't need any code to support them. Unlike Express, Rails uses a naming convention to match home.html.erb to the home method in StaticController.
Like Express, you don't have to use the default template engine. If you prefer the terse syntax of Jade, for example, you can use Slim templates, which are very similar in appearance.
Rails: CSS and JavaScript Assets
Rails also has built-in support for CSS and JavaScript pre-processing. This is helpful when you want to use SCSS or CoffeeScript (which are the default languages used by the Rails generator, by the way).
If you want to write SCSS, place your styles in ./app/assets/stylesheets and make sure they have the .scss extension (e.g. static.scss). If you want to use CoffeeScript, put your code in ./app/assets/javascripts and use the .coffee extension (e.g. static.coffee).
Rails goes one step further and provides a way to easily generate the HTML markup to include your CSS and JavaScript files. In a Single Page App this is particularly useful because you only have to add two lines to the <head> of home.html.erb to include all current and future scripts in your app:
<head>
  ...
  <%= stylesheet_link_tag "application" %>
  <%= javascript_include_tag "application" %>
</head>
Data Modeling
We're really close to writing some game logic, but first, let's create the data types we'll need.
Below is a top-down view of the game. The brown area is the game board, the colored circles are movable pegs, and the white circles are empty positions where pegs can be moved.
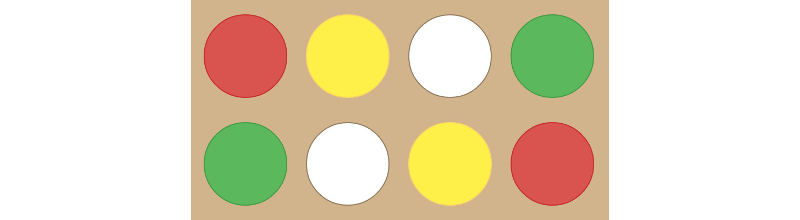
As far as data we need to track, there's a game with six pegs and each peg has a position. There is also information that needs to be tracked for the sake of enforcing the rules of the game. For example, one rule prevents undoing the move that your opponent just made. This means the peg that was last moved also needs to be saved.
If we took a JSON snapshot of the game, it would look like this:
{
    "gameId": 1,
    "lastPegMoved": {
        "pegId": 1,
        "type": "red",
        "position": {
            "row": 1,
            "column": 1
        }
    },
    "gameOver": false,
    "pegs": [ /* 6 pegs go here */ ]
}
Let's recreate this structure in JavaScript and Ruby. Yep, this ends up being a language comparison more than a framework comparison, but we'll be using these data structures a lot so it's a worthwhile comparison to make.
Classes in JavaScript
If most of your experience in programming is with an object-oriented language, then you might find JavaScript's approach a little... peculiar. Don't let that deter you, though. JavaScript does let you create well-defined data structures using inheritance and other OO features. The syntax is just different.
Why don't I just show you what I mean? Below is one way to create a Position class in JavaScript. In the pegger-node-express project, this code is in ./routes/games/position.js.
function Peg(pegId, type, position) {
  this.pegId = pegId;
  this.type = type;
  this.position = position;
};

Peg.neutral = function(peg) {
  return peg.type !== 'red' && peg.type !== 'green';
};

module.exports = Peg;
Observation 1: No Prototypes
A seasoned JavaScript developer might notice that I'm not using a prototype for the neutral() function. If you don't know what a prototype is, don't worry. Practically it means call this:
Peg.neutral(peg)
Instead of this:
peg.neutral()
Why did I write it this way? When a browser sends peg JSON to our web server, Express does not have the context to know that the JSON is actually a Peg. In the example above, the neutral() method will accept any object with a type property. This avoids the need to translate JSON to our Peg class.
If this seems dirty to you, there are other ways to solve this problem. In fact, you'll see one such approach in the section "Taking Turns" down below. Just keep in mind that this problem exists in both Express and Rails, so it shouldn't influence which framework you choose.
Observation 2: module.exports
The last line of the file is not typical JavaScript, it's something unique to Node. It tells Node which functionality in peg.js can be exposed to other code in our project.
By exporting the entire Peg it means that we can do this:
var Peg = require('./peg.js');
var peg = new Peg(pegId, type, position);
If you want to see other examples of classes, look at Game and Position.
Classes in Ruby
The Rails generator provides a handy-dandy way to model our data, if we're using a database. Let's try it out so you can see what I mean.
$ rails generate model Peg pegId type position
This creates a database migration script and a Ruby class. This is a great feature of Rails. If your app will connect to a database, this is a good tool to keep in mind.
Pegger does not use a database, but we can use the generated Ruby class as a starting point. Here's what ./app/models/peg.rb looks like when created by the generator:
class Peg < ActiveRecord::Base
end
Wow, so Rails is doing so much magic in this class that it's actually not very helpful when we don't want our data in the database. Let's remove the < ActiveRecord::Base to disassociate Peg from the database. Then we'll add the properties by hand. It'll look like this:
class Peg
  def initialize pegId, type, position
    @pegId = pegId
    @type = type
    @position = position
  end

  attr_reader :pegId, :type, :position

  def neutral?
    return @type != :red && @type != :green
  end
end
This looks quite different from Peg in the Node project. Here are the familiar class keyword and an initialize method that sets properties provided by the constructor.
Ruby also provides a one-line way to provide accessors for those properties via attr_reader. Just supply symbols (e.g. :pegId) for the properties you want to access and you're good to go.
You'll also see that neutral? is an instance method and I'm using symbols for the type instead of strings. These choices let us flex the Ruby language a bit, but are really only useful because of the different approach to convert JSON to a Peg, as you'll see below.
For more complicated examples of Ruby classes, including writing factory methods and overriding the == operator, look at Game and Position.
Let's Make a Game!
Now that we have a skeleton web app, static content, and basic data types, it's finally time to write some game logic!
Fortunately, Pegger is a simple game. When a game is started, the pegs are arranged. Two players then take turns moving pegs using a small set of rules. The game ends when a player is able to move the green pegs or the red pegs next to each other.
As an HTTP API, there will be three actions:
- Create a game using
POST /games - Look up a game using
GET /games/{gameId} - Move a peg by using
PUT /games/{gameId}/peg/{pegId}and provide JSON of the moving peg and its new position in the request body.
Let's focus on creating and retrieving games first.
Express: Creating and Fetching a Game
Before we start, we need to create a new file where our game routes will be located. Let's use ./routes/games/gameroutes.js. To make these routes known to Express, add the following lines to app.js:
var games = require('./routes/games/gameroutes');
app.use('/games', games);
All routes defined in gameroutes.js will now be associated with the path prefix /games. The next step is to start writing code... but where?
Express is not prescriptive about how you organize your code. Let's separate the HTTP code, game logic, and data access. HTTP code will go in gameroutes.js, game logic will go in gameoperator.js, and data access will go gamerepository.js.
Organizing our files like this lets us see how Node's asynchronous I/O (i.e. data access) affects the way we structure our code. I'm talking about callbacks, and if you haven't had to use them before, they might take some getting used to.
A callback is a function that gets called when another function completes. Callbacks allow us to avoid waiting for a function to complete before the next line of code executes.
By using callbacks, our routes will call the game operator and provide callbacks that get executed after the operator does its job. Similarly, the game operator will access data using our game repository and provide callbacks that are used when the data access is complete.
Another thing worth mentioning about callbacks is that the first argument is typically an error object and all subsequent arguments are data. If the error is not null then the callback knows a problem occurred, otherwise it can assume success was achieved.
Here's how the create and fetch game routes —located in gameroutes.js— provide callbacks to the game operator:
var express = require('express');
var router = express.Router();
var GameOperator = require('./gameoperator.js');

/* Create new game. */
router.post('/', (req, res, next) => {
  GameOperator.startGame((err, game) => {
    if (err) {
      res.status(500).json({message: err.message});
    } else {
      res.status(201).location('/games/' + game.gameId).json(game);
    }
  });
});

/* Get a game. */
router.get('/:gameId', (req, res, next) => {
  var gameId = parseInt(req.params.gameId, 10);
  GameOperator.lookForGame(gameId, (err, game) => {
    if (err) {
      res.status(404).json({message: err.message});
    } else {
      res.json(game);
    }
  });
});
In the call to router.post() you can see that GameOperator.startGame() is called and a function is provided that will create an HTTP 500 response if an error occurs. Otherwise, an HTTP 201 response will be created and the JSON for the new game will be provided. A similar approach is taken when retrieving a game, and you can also see how URL parameters are accessed.
Now let's take a look at the methods we're calling in gameoperator.js:
var Game = require('./game.js');
var Position = require('./position.js');
var GameRepository = require('./gamerepository.js');
var PegRepository = require('./pegrepository.js')

module.exports = {
  lookForGame: (gameId, callback) => {
    GameRepository.getById(gameId, callback);
  },

  startGame: (callback) => {
    GameRepository.nextGameId((err, gameId) => {
      if (err) {
        callback(err);
      } else {
        GameRepository.save(Game.start(gameId), callback);
      }
    });
  }
};
Looking up a game is pretty straightforward: call the game repository and pass the callback along. Starting a game is different, though. Because there are two calls to the game repository and those functions are presumably asynchronous, we first acquire the next game ID and then, only if that call is successful, do we save the game. To pull this off, we write a new callback that does its thing and then delegates to the callback provided by our game routes.
The last piece is the repository. Here's what gamerepository.js looks like:
var REPO = REPO || {};

module.exports = {
  nextGameId: (callback) => {
    callback(null, REPO.length);
  },

  save: (game, callback) => {
    if (REPO[game.gameId]) {
      callback(new Error('Game ID ' + game.gameId + ' already exists.'));
    } else {
      REPO[game.gameId] = game;
      callback(null, game);
    }
  },

  getById: (gameId, callback) => {
    if (REPO[gameId]) {
      callback(null, REPO[gameId]);
    } else {
      callback(new Error('Game ID ' + gameId + ' does not exist.'));
    }
  },

  update: (game, callback) => {
    if (REPO[game.gameId]) {
      REPO[game.gameId] = game;
      callback(null, game);
    } else {
      callback(new Error('Game ID ' + game.gameId + ' does not exist.'));
    }
  }
};
Since the repository doesn't do anything besides access data, it simply invokes a callback when it's done and supplies either an Error or the requested data.
Rails: Creating and Fetching a Game
To get started with our API in Ruby on Rails, let's use the Rails generator:
$ rails generate controller Games create show
This generates games_controller.rb and adds lines to routes.rb.
I chose to name the methods create and show because the Rails Routing Guide recommends using create for HTTP POST requests and show for HTTP GET requests of individual objects. Sticking with these naming conventions means that we can replace these two lines in routes.rb:
get 'buds/create'
get 'buds/show'
With this:
resources :games, only: [:show, :create]
Now a POST to /games will call GamesController.create() and a GET to /games/:gameId will call GamesController.show().
In our Express project, we had four files responsible for various aspects of our game. In our Rails project, we'll have two. The game controller will handle all of our HTTP concerns and the Game class will do the rest. The main reason Game takes on so many responsibilities is because Rails wants the data models to be responsible for data access.
Let's write games_controller.rb and make some observations:
class GamesController < ApplicationController
  def create
    game = start_game
    render json: game, status: :created, location: game_url(id: game.gameId)
  rescue => e
    render json: {:message => e.message}, status: :internal_server_error
  end

  def show
    game = Game.find_by_id params[:id].to_i
    render json: game, status: :ok
  rescue => e
    render json: {:message => e.message}, status: :not_found
  end

private

  def start_game
    game = Game.start
    game.save
    return game
  end
end
Clearly, we are not using callbacks. Instead, the controller performs all of the necessary operations sequentially and catches exceptions to handle errors.
There are also two conveniences offered by Rails that we are using:
- Symbols such as
:createdand:not_foundinstead of numeric HTTP status codes. - Helper methods like
game_url()that produce URLs for us.
Since game.rb is doing so much, it's got a lot more code than most of the other files in our game. Here are some of the important pieces:
require 'position'
require 'peg'

class Game
  @@games = []

  COLUMNS=4
  ROWS=2

  class << self
    def start
      gameId = next_id
      new gameId, nil, [
        Peg.new(1, :red, Position.new(1, 1)),
        Peg.new(2, :red, Position.new(2, 4)),
        Peg.new(3, :green, Position.new(1, 4)),
        Peg.new(4, :green, Position.new(2, 1)),
        Peg.new(5, :yellow, Position.new(1, 2)),
        Peg.new(6, :yellow, Position.new(2, 3))
      ]
    end

    def next_id
      return @@games.length
    end

    def find_by_id gameId
      game = @@games[gameId]
      if !game
        raise "Game ID #{gameId} does not exist."
      end
      return game
    end

    private :new
  end

  def initialize gameId, lastPegMoved, pegs
    @gameId = gameId
    @lastPegMoved = lastPegMoved
    @pegs = pegs
    calculate_game_over
  end

  attr_reader :gameId, :lastPegMoved, :pegs, :gameOver

  def getPeg pegId
    @pegs.each do |peg|
      if peg.pegId == pegId
        return peg
      end
    end
    return nil
  end

  def save
    @@games[@gameId] = self
  end

private

  def calculate_game_over
    pegs.each do |peg|
      if !peg.neutral?
        pegs.each do |testPeg|
          if peg.pegId != testPeg.pegId && peg.type == testPeg.type && peg.position.adjacent_to?(testPeg.position)
            @gameOver = true
            return
          end
        end
      end
    end
    @gameOver = false
  end
end
There aren't many surprises here. If this class was tied to a database, we would not need most of the code here because the base class that we removed earlier in this article would provide it for us. You can also see how to write class methods and raise exceptions.
Taking Turns
Now that we can create and locate games, we just need to provide a way to take turns playing the game!
This only requires that we implement a single HTTP PUT, but that method will handle most of the game's rules. Enforcing the game rules will look a lot like data validation. Since the PUT method also accepts a JSON representation of the moved peg, it will be the first time we have to translate JSON into usable data.
Express: Updating a Peg
A nicety of Node is how easy it is to use JSON. Take a look at our new route for moving pegs in gameroutes.js:
/* Move a peg. */
router.put('/:gameId/pegs/:pegId', (req, res, next) => {
  var gameId = parseInt(req.params.gameId, 10);
  var pegId = parseInt(req.params.pegId, 10);
  var peg = req.body;

  if (!pegId) {
    res.status(400).end();
  } else if (pegId !== peg.pegId) {
    res.status(409).end();
  } else {
    GameOperator.lookForGame(gameId, (err, game) => {
      if (err) {
        res.status(404).json({message: err.message});
      } else {
        GameOperator.movePeg(game, peg, (err, game) => {
          if (err) {
            res.status(422).json({message: err.message});
          } else {
            res.status(303).location('/games/' + game.gameId).end();
          }
        });
      }
    });
  }
});
We can start accessing properties of the peg in fewer strokes than we can parse IDs from the URL. We also make heavy use of HTTP status codes as we validate the request, look up the game, and move the peg. When we're done, we use a redirect to refresh the client's game state.
This is all HTTP request validation, though. Let's see how the peg movement is validated in gameoperator.js:
var Game = require('./game.js');
var Position = require('./position.js');
var GameRepository = require('./gamerepository.js');
var PegRepository = require('./pegrepository.js')

function validateMove(game, pegWithNewPosition, callback) {
  if (game.gameOver) {
    callback(new Error('The game is over. No additional pegs may be moved.'));
    return;
  }

  PegRepository.getById(game.gameId, pegWithNewPosition.pegId, (err, pegWithOldPosition) => {
    if (err) {
      callback(err);
      return;
    } else if (pegWithOldPosition.type !== pegWithNewPosition.type) {
      callback(new Error('The peg type cannot be changed.'));
      return;
    }

    var fromPosition = pegWithOldPosition.position;
    var toPosition = pegWithNewPosition.position;
    if (toPosition.column < 1 || toPosition.column > Game.COLUMNS) {
      callback(new Error('The peg cannot be moved to that column.'));
      return;
    } else if (toPosition.row < 1 || toPosition.row > Game.ROWS) {
      callback(new Error('The peg cannot be moved to that row.'));
      return;
    } else if (Position.equals(toPosition, fromPosition)) {
      callback(new Error('The peg must be moved.'));
      return;
    } else if (toPosition.column !== fromPosition.column && toPosition.row !== fromPosition.row) {
      callback(new Error('The peg cannot be moved diagonally.'));
      return;
    } else if (Math.abs(toPosition.column - fromPosition.column) > 2) {
      callback(new Error('That location is too far away.'));
      return;
    } else if (Math.abs(toPosition.column - fromPosition.column) == 2) {
      var foundMiddlePeg = false;
      var middleColumn = (toPosition.column + fromPosition.column) / 2;
      for (var i = 0; i < game.pegs.length; i++) {
        var peg = game.pegs[i];
        var position = peg.position;
        if (position.row === toPosition.row && position.column == middleColumn) {
          foundMiddlePeg = true;
          break;
        }
      }
      if (!foundMiddlePeg) {
        callback(new Error('The peg cannot jump an empty space.'));
        return;
      }
    }

    for (var i = 0; i < game.pegs.length; i++) {
      var peg = game.pegs[i];
      if (Position.equals(toPosition, peg.position)) {
        callback(new Error('Another peg is in that position.'));
        return;
      }
    }

    if (game.lastPegMoved) {
      var lastPegMoved = game.lastPegMoved;
      if (lastPegMoved.pegId === pegWithNewPosition.pegId && Position.equals(lastPegMoved.position, toPosition)) {
        callback(new Error('This peg cannot be returned to its previous location.'));
        return;
      }
    }

    callback();
  });
}

module.exports = {
  // ... create and fetch game left out of this snippet

  movePeg: (game, pegWithNewPosition, callback) => {
    var err = validateMove(game, pegWithNewPosition, (err) => {
      if (err) {
        callback(err);
      } else {
        Game.movePeg(game, pegWithNewPosition);
        GameRepository.update(game, callback);
      }
    });
  }
};
What's interesting about the validation is that return is called after every callback. This is because callbacks do not stop the flow of execution like raising an exception will. If the code finds a problem, there's no need to run any more validation so we explicitly exit the function after calling the callback.
The other aspect of moving a peg is looking up the peg. We can accomplish this by introducing a new repository unique to pegs that will find the game and then get the right peg. Here's what pegrepository.js looks like:
var Game = require('./game.js');
var GameRepository = require('./gamerepository.js');

module.exports = {
  getById: (gameId, pegId, callback) => {
    GameRepository.getById(gameId, (err, game) => {
      if (err) {
        callback(err);
      } else {
        var peg = Game.getPeg(game, pegId);
        if (peg) {
          callback(null, peg);
        } else {
          callback(new Error('Peg ID ' + pegId + ' does not exist.'));
        }
      }
    });
  }
};
Rails: Updating a Peg
In Rails we will use a new controller for moving pegs, and yes, we'll start with the generator:
$ rails generate controller Pegs update
Now let's update routes.rb. Remove the line get 'pegs/update' and change the games resources to look like this:
resources :games, only: [:show, :create] do
  resources :pegs, only: [:update]
end
An HTTP PUT request to /games/:gameId/pegs/:id will now call PegsController.update(). Let's see what that method looks like in pegs_controller.rb:
class PegsController < ApplicationController
  before_filter :parse_request

  def update
    game_id = Integer(params[:game_id]) rescue nil
    peg_id = Integer(params[:id]) rescue nil

    if !peg_id
      render nothing: true, status: :bad_request
      return
    elsif peg_id != @peg.pegId
      render nothing: true, status: :conflict
      return
    end

    begin
      game = Game.find_by_id game_id
    rescue => e
      render json: {:message => e.message}, status: :not_found
      return
    end

    game.movePeg @peg
    game.save
    render nothing: true, status: :see_other, location: game_url(id: game_id)
  rescue => e
    render json: {:message => e.message}, status: :unprocessable_entity
  end

private

  def parse_request
    request_body = request.body.read
    if request_body.blank?
      @peg = nil
    else
      json = JSON.parse request_body, object_class: OpenStruct
      @peg = Peg.new(json.pegId, json.type.to_sym, Position.new(json.position.row, json.position.column))
    end
  end
end
There are many similarities between this method and the corresponding function in our Express app, with one exception: we are using a filter to convert the request body from JSON to a Peg object. Even if we used class methods instead of instance methods (like we did in the Express version), we would still need to parse the request body into an object with accessible properties.
Wow, now that we can move pegs around, you'll see that a game goes until the red or green pegs are next to each other and then the validation will prevent any more turns from being taken. That means our work is done here!
Game Over!
It's time to make some observations based on this comparison. Instead of a list of pros and cons, I'm going to focus on how my time was spent in each port, what challenges I faced, and how my background influenced both.
Learning Curve
As a seasoned web developer, I'm pretty familiar with client-side JavaScript. So learning Node and Express was a breeze. It took very little time to feel productive writing an API in Express. I did, however, spend a lot of time confusing myself with callbacks. In fact, I very nearly broke my second constraint so I could avoid debugging them.
With many years of Java development behind me, I was much more comfortable reading and writing Ruby. I still spent most of my time poring over documentation to learn the right syntax to do what I want. I also made heavy use of the Rails generator. Ultimately, I spent much more time learning than coding.
All in all, it took me roughly 10% more time to port the game to Rails.
Unexpected Challenges
I spent way too much time thinking about how to organize the files in my Express project. Unlike Rails, Express does not have an opinion about naming conventions or where files should be placed relative to each other. If I found myself bouncing between Node projects, deciphering project structure would get old quick. On the other hand, the sheer number of directories in the Rails project is a little intimidating, but at least that structure is consistent from one Rails project to the next.
Another area of difficulty I ran into that surprised me was Rails' rather disappointing support for deserializing JSON. It took a while to arrive at the parse_request solution and it forced me to acknowledge that Rails does a lot for you, but it doesn't do everything.
Recommendations
If you're considering Express or Rails, try them both out. You'll have to learn something, so think about which framework will have the smaller or more enjoyable learning curve. Consider which language or framework will come most naturally to you. Lastly, don't stick with the defaults! Express and Rails are both very capable frameworks that can be extended and changed quite easily.
Thanks for playing!