
Bootstrap Framework — Best Practices
At the time of this writing, we’re at Bootstrap v4.1.1 release!
In their v5 roadmap, they’re planning to rewrite everything with PostCSS. When that happens, this guide will become deprecated. Until then, enjoy!
This guide has been updated to reflect latest changes of Bootstrap v4.1.3. There are some major changes regarding
scripts.
Introduction
At this point, I believe that everyone has heard of Bootstrap framework. It’s most popular front-end CSS framework after all. It has a couple of use cases and not everyone is using it in a proper way.
Tag along and let’s visit their official website and discuss it together from there.
On the official website, we can see two huge buttons that are popping out your eyes, right away.

Two huge buttons from official Bootstrap website
Get started
This part is obviously for those who are new to this framework and simply want to learn how everything works and how to hook it up in their fresh project.
Right off the bat, we can clearly see that we’re offered to include some CSS and JS snippets. We’re also given the option of HTML template for a quick start. The template already contains the CSS and JS snippets.
For newbies, the starter template may also be handy to learn where to include CSS and JS snippets.
Download
Here, we can see a couple of options as well. Let’s review them immediately.
- Option to download compiled CSS and JS files
If you go with this option, you’ll have the files locally. You may then decide if you want to use minified or non-minified files and include the choice in your project. This option is for prototyping and it’s good if you believe that you won’t be having internet connection while developing.
- Option to download source CSS and JS files
This option requires additional tooling… If you’re already familiar with some task runners or bundlers, the chance is you already have your own configuration. You wouldn’t want to use their tooling setup, just to be able to use the source files. You don’t want to copy/paste the source files in your project either…
- Option to include files from CDN
Not sure why this option is in downloads, but nonetheless, it’s similar to the first option, except that you’re not downloading any files. This option is the fastest way to implement Bootstrap for quick prototyping, but it does require the internet connection.
- Option to pull it with NPM
Now we’re talking! This is the right option and the only way to go if you are developing the application that will not just be a prototype but used in production.
- There’s RubyGems, Composer and NuGet option
I am not familiar with RubyGems or NuGet. Although, I believe that NuGet is dependency manager for the .NET framework? If so, this sounds like a good option. Just please do not use Composer as dependency manager for Bootstrap. That is just weird… A Composer is PHP dependency manager and Bootstrap is not back-end framework and it does not have anything to do with PHP. Use NPM instead…
With all that being said, I must mention that Bootstrap provides 3 files out of the box and it can be used for:
- Prototyping or production
- Reset (their extension of Normalize.css)
- Grid
*Note, you do not have to include whole Bootstrap Framework, just to be able to use their reset or grid. They come as separate files…
Best Practices
Now, that I’ve prepared you and explained each option that Bootstrap offers, let’s dive in deeper. I’ll assume that you are familiar with the use of SASS and that you’re already using some kind of tooling setup. We will also need NPM for this…
Personally, I’m using Webpack and I won’t be writing here how to set up your own configuration, but I will teach you how to setup your structure for proper use of Bootstrap CSS and JS. Which is the purpose of this guide…
We need to install some project dependencies…
npm init -y && npm i bootstrap jquery-slim popper.js
Typically, the structure of my project would look like this. There’s more into it, but I simplified it for this purpose.
.
├── src
│ ├── scripts
│ │ ├── app
│ │ │ └── .gitkeep
│ │ ├── vendor
│ │ │ ├── bootstrap.js
│ │ │ └── jquery.js
│ │ ├── app.js
│ │ └── vendor.js
│ ├── styles
│ │ ├── app
│ │ │ ├── _base.scss
│ │ │ └── _variables.scss
│ │ ├── vendor
│ │ │ └── bootstrap
│ │ │ ├── _core.scss
│ │ │ ├── _main.scss
│ │ │ └── _variables.scss
│ │ ├── app.scss
│ │ └── vendor.scss
│ └── index.html
├── package.json
└── webpack.config.js
Time to explain why this way and what can be achieved with this structure set up…
Let’s focus with styles directory at the beginning and after we’ll jump right on to the scripts directory.
Styles
Inside this directory, we have one directory for the app and another one for the vendor. We also have two files with the names that match these directories.
- App directory is being used for your entire application. For things like custom styles, variables, components…
- Vendor directory is being used for any dependencies that you are having within your application. In this case, it’s just a Bootstrap. The vendor directory has the sub-directory for the Bootstrap because, in a real application, we’re always going to have more dependencies. Each one should belong to its own directory.
In our app.scss file, we include Bootstrap’s core and our application specifics… So it’d look like this:
[@import](http://twitter.com/import "Twitter profile for @import") 'vendor/bootstrap/core';

[@import](http://twitter.com/import "Twitter profile for @import") 'app/variables';
[@import](http://twitter.com/import "Twitter profile for @import") 'app/base';
Take a look now at the styles/app directory. We have only two files, so there’s not much to say, but let me describe those files anyway…
- Base file is where you’re supposed to write any styling. Maybe to extend Normalize.css reset.
- Variables file is the place where you’d write your application variables.
In our vendor.scss file, we basically import any dependencies that we would have. At this point, we only have Bootstrap, so it’d look like this:
[@import](http://twitter.com/import "Twitter profile for @import") 'vendor/bootstrap/main';
Take a look now at the styles/vendor/bootstrap directory. Let me describe those files within…
- Core file, imports our custom variables files and three main files of the Bootstrap. Without these files, the framework itself wouldn’t work at all.

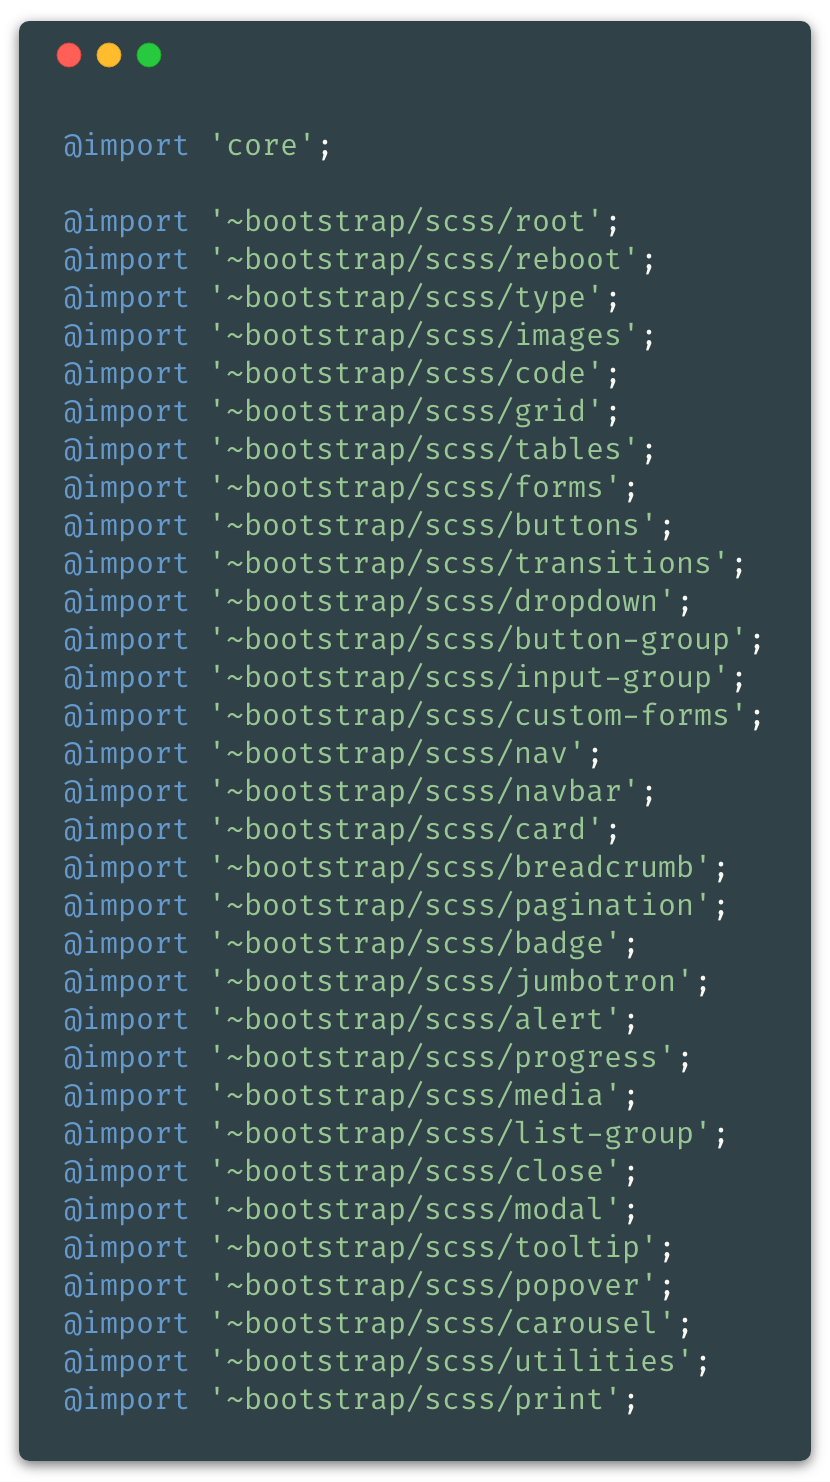
Our styles/vendor/bootstrap/_core.scss file
- The main file imports our custom core file at the top and then the rest of Bootstrap SASS files, from the node_modules directory. In the Webpack we have this tilde sign
~which points to node_modules. It’d look something like this…
You should always comment out (not delete), the lines of the components that you’re not using within your project.
Our styles/vendor/bootstrap/_main.scss file
- Variables file is empty in the beginning. In this file, you’d write any Bootstrap variables, that you’d want to override for your project.
As you know, Bootstrap has a !default flag on each variable. So any previously defined variable will be used instead of the one that Bootstrap defined.
Scripts
We want to make the scripts modular so that we include only the components that we need in our project. With Bootstrap, this is not as easy as it should be… They have documentation for this, but even after reading it, I had so much trouble with implementation.
UPDATE: The documentation link is for Bootstrap v4.0. At time of this writing, we used v4.1.1 and in v4.1.3 we no longer require
exports-loaderfor our bundler. They finally wrote their JavaScript components, a bit better. I’ll update the guide to reflect those changes, old approach will be removed from the guide.
I’ll be sharing with you how to make this work and save you plenty of time…
We’ll begin with scripts/vendor.js as this file is simply importing files from our ./vendor/ directory.

Our scripts/vendor.js file
We’re attaching jQuery to the window object. It is required, otherwise Bootstrap fails to compile, cause it does not know what jQuery is. We also need it this way, if we plan to use jQuery anywhere else within our app.

Our scripts/vendor/jquery.js file
As for the Bootstrap vendor file, we’re importing all of the modules separately. This way, you are free to comment out any components that you’re not using within your project and they will be excluded.

Our scripts/vendor/bootstrap.js file
Keep in mind that Util module is required everywhere, except Button and Popover component.
Conclusion
What do we get from this? In one short sentence:
The full power of Bootstrap throughout our entire project.
Speaking about SASS… Not only that our Bootstrap will be compiled in a separate vendor file, but by extracting Bootstrap core functionality, we are also getting access to the functions, mixins, and variables everywhere within our app.
Speaking about JS… We got the vendor into the separate file and everything is modular. We can get the minimum that we need, by excluding things we don’t use within the project.
Take a look at some examples!
SCSS Examples

We can use Bootstrap mixins within our entire app

We can use any Bootstrap variable default value and combine it
JS Example

We can instantiate any Bootstrap components within our scripts/app.js
Final Notes
Since it may be a bit hard to understand everything from the context… It might be easier to understand it better, by looking into a working example.
Take a look at my Webpack v4 Configuration on GitHub, which implements all of this logic.
Also, I’d like to mention that Bootstrap is working on some of the best practices themselves that they gathered over the years of development and use. At the moment, there’s nothing to be seen…