
next.js at Chotot
Overview
Everyday,Chợ tốt (Chotot) receives over 1 million of visits cross platforms, most of traffic comes from mobile devices. It is really important for us to develop products that can run across devices. Last year, we switched to a new stack to rebuild our products.
The technologies that we chose for our new stack are:React,Redux & NodeJS to build the new web app. React makes it easy to build web components that can be reused in other products. Redux is the main channel communicating between the Back End & Front End. NodeJS builds web server. To support SEO with this stack, we implement the “Universal Web Application” approach.
First boilerplate
Base on a starter boilerplate put together by erikras (link here) to experiment with our new web stack. However, we encountered problems in production.
problem
In production, if the traffic is high, the web server will stop responding to the client. At first, we optimized our codebase but the result was still the same. We resolved to use client-side rendering instead of server-side rendering. But the challenge is if we turn off server rendering, SEO will be affected.
solution 1
Search engines now support Javascript in their crawlers (checkhere for more detail). Our first solution was to delegate rendering page to client-side. Here is our analysis:
- SEO was affected negatively
- Our ranking dropped
The crawlers were still indexing but it was slower than using server-side rendering. So delegating all missions to client-side did not work for us.
solution 2
The next solution was to split the project into 2 and deploy it to 2 different servers. One serves users with client-side rendering. Another one serves crawlers bot from Google, Facebook, … with server-side rendering.

solution 2
This solution worked fine. However, we were also looking for another boilerplate to replace it.
Why did we want to change?
- When deploying code changes we had to deploy the new version to 2 different servers.
- The boilerplate was out of date.
- The time to rebuild code at development was too slow. It took more than 10 seconds to rebuild every single change.
- We wanted to apply new tools to have good experience for Engineers and good performance for product as well: webpack 2 with many improvements like “Tree shaking”, “dynamic import”…
next.js 2 the rescuer
After looking around some repos, we considered next.js as a potential replacement for several reasons:
- Supports server rendering natively.
- There are many small examples on integrations between next.js and other libraries or technologies (check them out here).
- The documentation is very clean and up-to-date.
- next.js takes care of all basic configs. Allowing to extend configs of webpack or babel…
I will talk about the way we applied next.js in our products including some issues and solutions. I will provide the sample at the end of this article.
redux
We choseredux to manage application states. next.js providesa redux wrapper to help integrate with it easier and more consistent (You can visithere to see example)
ExamplePage.js
Here we can see that Redux was wrapped by “next-redux-wrapper” as aHigher Order Component. To use redux, we have to wrap our component with the function ‘withRedux’.
routing
“ next.js ” provides a very clean directory structure. There is a special directory “pages”. When you put all your React components into that one, next.js automatically executes:
- code splitting
- routing
- hot code reloading and universal (server-side and client-side) rendering.
You just don’t have to worry about configurations of all that stuff, next.js will manage them.
We created 2 directories to place our React component. The first one is pages directory. The second one is components directory.
- pages : we use it for containers in redux.
- components : to store stateful & stateless component in react.
static resources
next.js also provides a static directory to serve static resources for web application. All you have to do is place all resources like: images, fonts, stylesheets, … into the ‘static’ directory. Then just use it as follows:
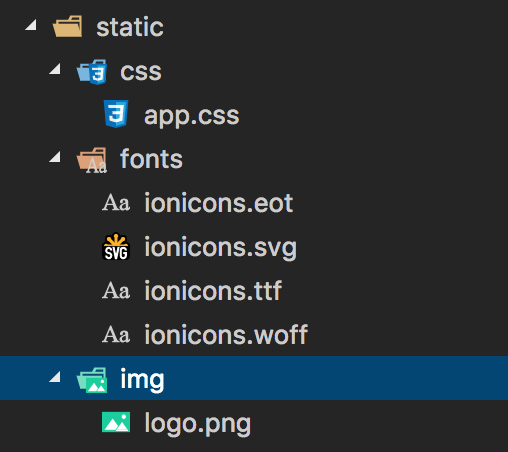
static directory
image
<img src='/static/img/logo.png' />
css
<link rel='stylesheet' href='/static/css/app.css' />
import modules
import CSSTag from '../../../components/CSSTag'
If your module contains many nested directories, this option is going to be complicated. There are many ways to solve this:
Alias config of webpack
You can use the alias feature of webpack to define alias names for your modules (You can check out how to extend webpack config in next.jshere). And then just import it as follows:
next.config.js
module.exports = {
  webpack: (config, { dev }) => {
    config.alias: {
       components_example: path.resolve(__dirname, '../components'),
    }

return config
  },
}
and use it like
import CSSTag from 'components_example/CSSTag'
But every time you add a new directory as a module container, you have to define it in your webpack config.
Add NODE_PATH to commands
You can set NODE_PATH into our commands in package.json like:
package.json
{

"scripts": {

"dev": "NODE_PATH=./ next"

}

}
By setting NODE_PATH, our current position is now at the root directory when we run command “npm run dev”. We can import as follows:
import CSSTag from 'components/CSSTag'
However, this will complicate our commands and if the commands require root path, NODE_PATH needs to be added.
babel plugins
We resolved this by using babel plugin provided by next.js. “babel-plugin-root-import” allows us to configure our root path with specified characters in .babelrc (You can learn how to customize babel confighere).
{

"presets": [

"next/babel"

],

"plugins": [

["babel-plugin-root-import", [

{

"rootPathPrefix": "@"

}

]]

]

}
The root path is “@”. So you can import module at components:
import CSSTag from '@/components/CSSTag'
CSS development
To develop CSS we use the pre-processorSass with SCSS syntax. Sass provides many functionalities (check them outhere). It allows us to
- write functions (@mixin)
- define variables
- call a function (@include)
- We can write css with module scope
To integrate SCSS with next.js , we also referenced this example.
For example:
/styles/index.scss
index.scss
/pages/index.js
index.js
problem
In production mode, when you browse your site and use “ View Page Source ” you will see styles are not minified in the html document. If our styles are large, that means the time to ship your page to the client is going to increase.

page source
solution
We usegulp andpostCSS CLI to manage CSS in production mode. The output of this step will produce an app.css file which includes all minified styles used in our web application.
The idea is each component will have a style file (*.scss). We divided the way to develop css with 2 environment.
development
We created stateless component called CSSTag to manage css at development.
CSSTag.js
and we can use it like this:
import style from '@/styles/Example.scss'

<CSSTag style={style} />
Example.js
production
We created ‘ app.scss ’ which includes all styles of web application, then we used gulp to build final css based on ‘ app.scss ’.
The final css has to meet some rules:
- contains all styles of web application
- autoprefix
- minified
app.scss
// components
@import "./variables";
@import "./ultilities";
@import "./global.scss";
@import "./components/ToolBar";

// pages
@import "./index.scss";
gulpfile.js
gulpfile.js
autoprefix with postCSS
The last step to produce final css is autoprefix. We are usingpostCSS CLI to autoprefix final css after gulp bundled it. Then includes final css to our document via “_document.js” (you can check outhere to know how to use extend document)
Here is the diagram that show the way we manage css in production mode:

production css building with gulp
Result
After completed a project with “ next.js ”, we usedlighthouse to audit our web page. Here is a result.
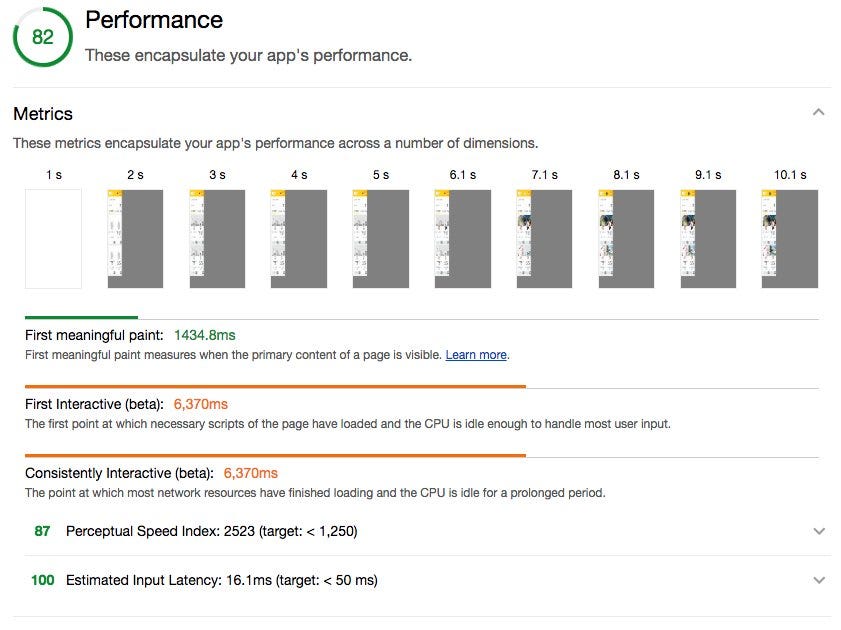
Here is a result of the old o

You can see here the Critical Rendering Path of the first result we only need 1.5s for first meaningful paint while the second result is 9.5s. We improved a lot of performance with next.js.
Demo
Here is a full demo
What’s next?
Next.js gives us a lot of benefits so far:
- Performance
- Lightweight
- Easy to use
- Well document
- Strong support from community