
End-to-End Self-Driving Car Using Behavioral Cloning
Project #3 in the Udacity Self-Driving Car Program
Project #3 in the Udacity program involves using behavioral cloning and deep neural networks to teach a car to drive in a simulator.
My code for this project is publicly available and can be found here.
If you missed my first project update, you can find it here. The second project update is here.
Why a Simulator
While driving a car in a simulator is certainly not the same as driving a car in the real world, there are many similarities. Given the current state of game graphics, images captured in a simulated environment (road, markers, landscape) are a good approximation of images that could be captured in the real world.
Of course the simulator also affords safety and ease-of-use. Data collection is much simpler, and a failed model poses no threat to life. A simulator is a great platform in which to explore and hone various model architectures. A successful model might afterwards be implemented in a real car with real cameras.
Training Data and Behavioral Cloning
The the goal of behavioral cloning is to collect data while exhibiting good behavior and then train a model to mimic that behavior with the collected data. While in a real-world setting this would involved mounting sensors on a car and driving around, in a simulator it looks more like this:

This is actually important work, but also video games….
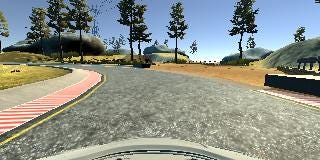
Yep, that’s right. Playing video games can help you build a self-driving car! The simulator is built in Unity, a game engine, and in-game cameras capture images as the car drives around the track. The images that were captured while I was driving (hopefully well) were later fed into a neural network to teach the model how to drive properly. Here’s an example image captured from the front-center of the car:
Each image is captured with the accompanying steering angle. The images will be fed into the network, and the network’s job will be to match the appropriate steering angle. Since tracks normally have a turn bias (in this case, left), when the images are loaded each image gets a copy that has been flipped horizontally with steering angle negated. Both the original image and the flipped copy are fed into the network, balancing out the turn bias.
I collected data for a few different scenarios. First, I drove the track in both directions a couple of times while trying to maintain ideal center-lane driving. This scenario represented the bulk of the data as it is the ideal behavior. Second, I collected some “corrective” data by driving from the edge of the road back to the center in a variety of situations. The goal of the “corrective” data is to teach the car how to get back to the center if it gets out of line. Third, I collected more data specifically for the corners and problem spots — where the car had the most trouble staying on the track. Fourth and finally, I collected data on the second available track in the simulator. This second track is quite different (both the road and the landscape) and much more difficult. It exhibits steep slopes and much sharper, more frequent turns. The goal of collecting data on this quite different track was to help the model generalize a concept of “staying on the road.”
Here’s an image from the second, harder track:

Model Architecture
The model architecture I chose is nearly identical to NVIDIA’s network for End-to-End Learning for Self Driving Cars (paper here). The model features five convolutional layers and four fully-connected layers, looking something like this:

Source: https://arxiv.org/pdf/1604.07316v1.pdf (NVIDIA paper)
Each convolutional layer and fully-connected layer has ELU activation, and a dropout layer with 30% drop-rate is implemented after each convolutional layer to help prevent overfitting in this large network.
The convolutional layers capture abstracted features from the images. These abstracted features are fed into the fully-connected layers which serve as a steering controller. More on the model’s design can be read in NVIDIA’s paper here.
Training the Model
Keras was used to build and train the model, which provided quick and simple implementation. The Adam optimizer was used, and the mean-squared-error was minimized. The model was trained in randomly-selected batches of 128 images for seven epochs, and 20% of the data was reserved for validation. In total, the model was trained using around 25,000 images.
The Results
After training, the car driven by the model was able to correctly traverse the first track. The car exhibited minimal over-correcting on the straight-aways, and it had a couple close calls with the edge of the road and the bridge. Overall, it performed well on the first track:
My car driving around track 1 in the simulator.
As for the second track, it was unable to go much of anywhere, but this is not too surprising considering the majority of the data was gathered on the simpler track. I believe this model architecture could handle driving on the second track if I were to provide it with more data (especially at problem-spots) from the second track.