
Classifying Traffic Signs
Project #2 for the Udacity Self-Driving Car Nanodegree
Project #2 for Udacity’s Self-Driving Car Nanodegree (SDCND) is about using neural networks (specifically deep convolutional networks) to classify images of traffic signs. This is an important problem for self-driving cars, for being able to classify an image of a traffic sign according to its type will allow a self-driving car to make important decisions.
If you missed my first SDCND project update, you can find it here.
The Code and the Details
The code for this project can be found on Github here. I would recommend the project’s README to audiences who are familiar with deep learning. The README will have all the juicy details.
For those less machine-learning savvy…
If you are interested in learning about deep learning and how it can be applied to image classification, I strongly recommend Machine Learning is Fun! Part 3.
I’ll try to keep the rest of this high-level for general audiences.
A High-Level Overview
To classify images using a technique known as “deep learning,” you need LOTS of data — thousands of images. This is because a neural network that employs deep learning takes in each image and learns about it. The more examples, the more to learn from, and the better the performance.
Fortunately there is a public dataset of German traffic signs that have already been correctly labeled. Yes, German traffic signs. You can get a feel for the images in the dataset in the picture below.
Example images from the dataset from the website.
The dataset contains 43 different types of traffic signs that drastically vary in image quality. All images are in color and the dataset I used had all the images scaled down to 32x32 pixels — pretty grainy. In total there were around 47,000 images.
The details of how deep neural networks work are pretty convoluted, but I’ll highlight some major points:
- “Deep” means multiple layers.
- Each layer “learns” to identify features about the images passed in.
- Stringing these layers together, the network can identify “features of features.” For example, the first layer might identify lines, and the second layer groups of lines (like triangles). Before long you have something that looks like a yield sign.
- Neural networks learn what features are relevant to classifying the data on their own using the power of math.
As more images get passed in, the network improves and gets better at classifying the signs. At the end, my network was 95% accurate. That accuracy number will vary some depending on the type of sign, by the way. Since it saw more speed signs than turning signs, it will be better at identifying speed signs.
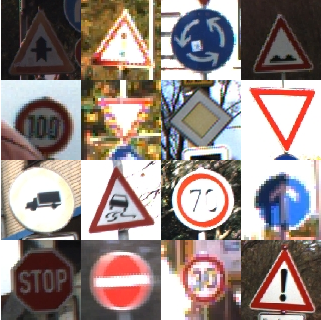
To illustrate this and test my network, I downloaded five different German traffic signs from the web. The five images, after sizing down to 32x32, are shown below.

The five downloaded images used to test my model.
I ran these five images through my network, telling it to return what kind of sign it thinks the pictures represent and the certainty of its guess (softmax probability). The following table summarizes the results.
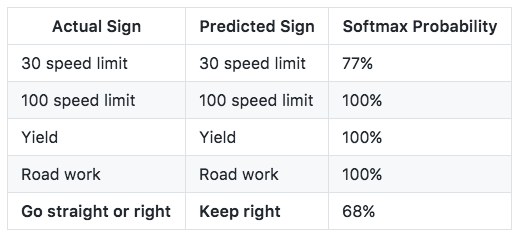
The network was able to correctly identify all but the last sign — the “go straight or left” sign. I find it somewhat comforting that the network classified the sign as “keep right,” which is at least similar.
I really enjoyed this project. It was my first real foray into neural networks and deep learning. I plan to continue posting about the future Udacity SDCND projects I complete, so if you want to get updated when those come out you can follow me on Medium.