
How to not be annoyed by tests and why they are important — Part 2
How to use your IDE to automate tests
In the previous part we spoke about why testing your software is important.
This part will be bit different from the last one. We will take a look at an IDE with some unit tests and how to automate and when to run them while you’re working on your product.
For this we will take PHPStorm from JetBrains and setup a light and easy vagrant box to run our PHP. This also applies if you work on a remote machine. However, when you take the local approach, you can still use some of these settings, as they do not differ that much.
With the new Testing Frameworks implementation, introduced for PHPStorm 2017.2 , you can execute your tests automatically after a set delay if you stop editing a file. This is pretty useful for TDD.
If you don’t like PHPStorm you can also use any file watching mechanic to auto run your tests.
Set up the requirements
If you are working on a remote machine you can skip the vagrant setup.
Install Vagrant and Oracle VM
First up we need Vagrant and Oracle VM Virtualbox. You can simply download and install them by following the install wizard.
Install PHPStorm
PHPStorm can be acquired here. If you don’t have a license, you can download the 30 day trial. But if you ask me, investing in it is worth every penny and your licence won’t run out.
With all that set, we can start setting up our IDE with automated tests.
Prepare your project
Set up Vagrant and Composer
Since we are running our tests on vagrant machine with a composer project, we need to make sure we have a composer.json , composer.lock and a Vagrantfile:
Vagrant.configure("2") do |config| config.vm.box = "puphpet/ubuntu1604-x64"
config.vm.provision "shell", inline: <<-SHELL add-apt-repository ppa:ondrej/php apt-get update apt-get install -y php7.1 php7.1-xml php7.1-mbstring php7.1-zip php7.1-curl php7.1-xdebug composer # Switch to /vagrant and install packages cd /vagrant && composer install SHELLend
In our composer.json we have simply put some project information about name, dependencies and other stuff.

Composer balloon asking for initialization
This vagrant config will install PHP7.1 and composer. Afterwards it will run composer install to install all needed components of your project. If we open PHPStorm now, we will get prompted with a small balloon on the lower right corner. It will notify us about a found composer.json, so we can initialize our namespaces with included as well as excluded paths. Simply click the Initialize button and make sure you synchronize the IDE settings with the composer.json.
Starting the vagrant box
With that set, we can start up our vagrant box. For this, we navigate the top menu Tools > Vagrant > Up. If you have installed Vagrant and Virtualbox properly, the IDE will check your Vagrantfile and start up your box.
Set up test frameworks

Set up remote interpreter for phpunit
After we started our vagrant box, we can now setup up the test frameworks we want to use. For this we navigate to File > Settings > Languages & Frameworks > Test Frameworks , click on the little + (plus) icon and will select PHPUnit by Remote Interpreter. We are not prompted to select an interpreter. If you don’t have any to select, click beside the drop down (…) and simply add a new one F rom Docker, Vagrant, VM, Remote and select Vagrant.
Define CLI interpreter for PHP

Set the CLI interpreter for PHP
To get started, we also need to define the CLI interpreter for PHP itself. This is the same interpreter, that we defined in the Test Frameworks section in our settings.
Next up we gonna set up some tests.
Writing and running tests
To run our tests, we want to create a phpunit.xml. This config file defines our test suites. If you need more information can be found at phpunit.de.
<phpunit bootstrap="./vendor/autoload.php"> <testsuites> <testsuite name="unit"> <directory>tests</directory> </testsuite> </testsuites></phpunit>
If we have provided some tests in the defined folder tests/ we can now run all the tests. Right click on the phpunit.xml and select Run ‘phpunit.xml’.
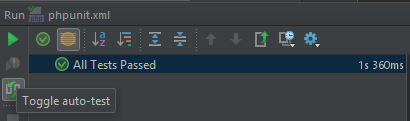
(1) Toggle to run automated tests
A new window will pop up in our IDE showing us the progress of the running tests. If everything is good we should see a similar image to this (1).
This is also were we can start our test automation.

(2) Set auto test delay
To automate the test click the small icon on the left and select your desired AutoTest Delay using the cog icon in the top. This will tell the IDE to start the previously started test again after you stopped editing a file for the set period of time (2).
Now to the next part.
How to not be annoyed by tests

(4) Hidden tests and everything is fine

(5) Hidden tests with some failed
The next cool thing is: we can minimize the the phpunit test window. This way we don’t occupy a lot of space in our IDE and can concentrate on our work — writing cool software.
If we change some code and stop editing for the defined delay. The tests will run in background and simply provide us with a nice little balloon (4, 5) telling us if they have failed or not.
Conclusion
That’s it. We have set up a project using PHPStorm and Vagrant. We ran our tests and could easily hide them from presence. This way our tests will be triggered while we develop our product, but we don’t have to do this manually.
This will just cover the unit tests for our product. There are many more which are used to fully test software, like integration tests, functional tests, end-to-end tests and so on. You have to choose for yourself to see which one of them you need to ensure your customers receive the best product they deserve.
Also keep in mind that a developer is easily annoyed by everything that keeps him from doing the thing he wants to do — coding. So, if the way you have to execute your tests takes too much time, most developers simply will skip it. Make sure to keep the 10 second rule in mind.
You can also provide a continuous integration (CI) system like Travis, Bamboo, Jenkins and many more to execute the tests to make sure your code is working all the time.