
5 Best Practices Beginner Mobile Game Developers Must Know
This article contains iOS game development tips from the author of the original Cocos2D documentation, Benjamin Encz. The tips are for people who are interested in building their own iPhone game but have not started yet, and it will go over some important concepts to help you avoid mistakes. This post is based on the Codementor office hours hosted by Benjamin.
Introduction
For those who don’t know what Cocos2D is, it is the most popular game engine on iOS and was around before Sprite Kit (the official Apple Framework), and Sprite Kit also takes a lot of ideas from Cocos2D. What is great about Cocos2D is that it is open source, and with company called Portable it is also possible to write the game on iOS and then port it to Android.

A couple of great games were also have been made by Cocos2D, a great example being Badland, which won Apple’s design prize for games. It is definitely a very popular and well-maintained game engine.
Another tool that we’re using a lot is SpriteBuilder. If you used Unity before, it is very similar to Unity but it’s for 2D games where it allows you to create great game content, to create levels, and to do all that visually without writing code for the game content part. This means when you’re building games with SpriteBuilder or Cocos2D, you’ll get a nice separation between your content (e.g. levels, menus, etc.) and your core game mechanics.
Not all of the points here are iOS-specific, but one thing you should have realized when you started game development is that it’s pretty platform-agnostic. A lot of content also apply to PC games and web games.
#1 Don’t make assumptions about the screen size
When starting out with game development, a lot of people will use constants for the screen work. In the past, the only resolution for any screen size we had was 480 x 320 on the iPhone 4. That means people could make assumptions about the size of the screen, and you could code in constants and use them to position things on the screen.
After the iPhone 5 came out with a different screen size, all of these inexperienced developers’ games needed an entire redesign for the new screen sizes.
So, now with the current state of the platform, even for iOS where we don’t have that many different devices, we have enough different devices that you definitely can’t make assumptions about how big the screen size is. We should always place things relative to the screen size and not make hard code assumptions about the screen size.
let screenWidth = 320
myButton.x = screenWidth - 50
We have constants for the screen width, and you calculate the position for an object on the screen based on that…this is usually a very bad practice. Instead, you have to think about what width to write while you basically correspond to the screen size like this:
// cocos2D example
myButton.x = self.contentSize.width - 50
In Cocos2D, for example, that would be the content size property on the scene. So each scene has a content size property, and if you, for example, have a full scene and that content size property will be the full screen size.
But it’s also possible to have your scene smaller than the full screen. Either way, if you press the button relative to that scene, then you should calculate the position based on the content size.
That’s just a very simple example where you shouldn’t use constants for width and height. Calculate the things based on scenes or whatever is relevant to your specific example.
This is really important to keep in mind. That would save you a lot of time from redesigning your game for every different devices type (e.g. iPad, iphone6, iphone5, etc). The good news is that SpriteBuilder and Cocos2D have some good support for such relative layouts. This makes things pretty easy once you start thinking about how to implement a flexible design.
Beyond that very basic rule, there is another thing to think about and that’s basically I would like to divide the things I show on the screen into two categories. One for UI components, such as buttons or the HUD (Heads-up-Display) that shows current points in the game, and the other one for actual gameplay.
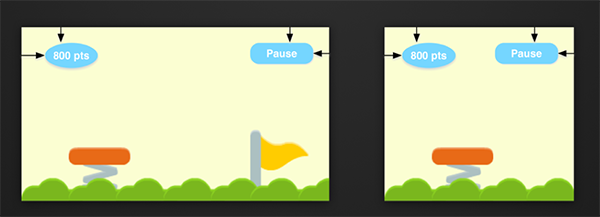
You can see two different screen sizes on the picture above. On the left we have really wide screen, and on the right we have a square one.
When you layout the scene, the UI component is always placed relative to the screen corners. So I want the buttons and the HUD to always be the top right and top left, and it doesn’t matter which screen size it’s running on. This is really important. In most cases, the best practice is to layout UI components relative to the corners. You will see that in whatever way you resize the game, it will still look pretty good.
On the other hand, how responsive your gameplay’s screen size should be really depends on the type of the game you have. In my slide’s example game, I assume it to be like kind of jump-and-run game, and what you’d do for a smaller device is show a smaller portion of the game. So it really depends on your game, but in many cases it is acceptable that the player only sees smaller fractions and it probably won’t hurt the gameplay too much.
Other problems can occur when you have like a puzzle game, for example, where you have a fix screen size. Then the approach of showing a smaller fraction won’t work. In this case, you’d have to design your game to work on the smallest screen size possible. For example, if you have 9×9 grid, you’d want to make sure that 9×9 grid works nicely on the iphone4 as it has the smallest screen size. Then, you can think about larger screen sizes like that of the iPhone6. You can think about how you can use the additional space to provide some additional information not necessary for the core gameplay. So a couple of the things you can do is display everything larger in a larger screen. You can also have some additional information on the screen about your game that is not essential for the gameplay, but is nice, and people can benefit from having the larger screen.
Typically the key takeaways are: UI components are always placed relative to the reference corners (e.g. left top, left right, bottom right, bottom left, etc). You don’t want to place them at hard-coded positions. And for the gameplay, if it’s something like a run-and-jump game, then probably just make a portion of the game invisible. If it is something like puzzle game, where the relevant gameplay has the same size (e.g. a 9×9 grid), then you want to think about solutions that work on the smallest screen size, and then how to use additional space on larger screen sizes.
#2 Separate Game Mechanics From Game Content
This is a bit abstract and is a bit more about design pattern, and this is one of the ways I suggest students to separate two really different parts of the game.
So, what are game mechanics and what is game content?
If you think about a platform of game like “jump and run”, we can control the character to jump and run on different types of blocks (e.g. Mario.) Then the game mechanics will be the gravity that applies to the player, the movement of the enemies, user input so the user can control the character, etc. All of these things are game mechanics. Game content, on the other hand, will be the all the different types of levels that you have in the game. If you build a game with 20 levels, you will have a lot of game content, but the game mechanics of each level will be the same.
If you start without thinking about game design or software design and if you start out building such a game, you will ultimately end up with a design that is not ideal.
A good way to separate these two things is to realize the following points:
Game mechanics should be modeled in code
Anything that is controlling user input and everything that is defining the gameplay, which is the same for different types of levels (e.g. the gravity, player input, how to get scores when you kill an enemy, etc.) All of these things are game mechanics and should be in code.
Everything else should not be in code. For example, if you have 20 different levels, you don’t want to have all of these levels to be modeled in code. What other people will do is they will start a prototype of the game, and they will have their game code and their level code in the same file because that is the easiest way to start off.
They create all of the level in code, and have the game mechanics in code, and when these people want to add another level to the game, what they usually do is they copy the file that has game mechanics, and the level relevant code and create a second level which also have game mechanism in there.
These people will end up with code structured like the lefthand side of this image:
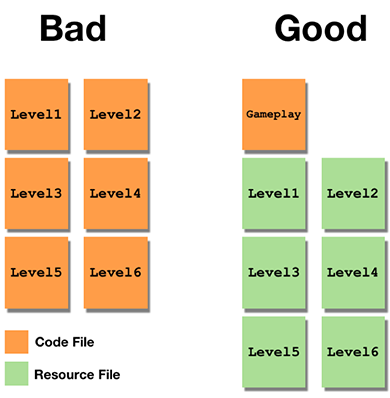
All of the levels are actually code files and not resource files, and they all have duplicate code with game mechanics in there. Every level will basically apply gravity and will know when an enemy collides with the player. This results in a lot of duplicate code, and it is one of the things you’d want to avoid in general software engineering. If you want to change one of the aspects of the gameplay (e.g. the gravity), you’d have to go through all of these level files and change all over the place.
Instead of ending up with this problem, you want to see the situation that you can see on the right side of the picture above (where all of your mechanism code are embedded into one gameplay file). If you have a really complex game, then you could typically break it up into one gameplay file and one resource file. The resource file will contain all the levels, which means it’s a collection of different positions of game objects.

For example, in the SpriteBuilder, you can place different images all over the screen to create levels. This is a level from an example game I created during a game jam. It’s basically an entire playable level, and all of these are from a resource file. It’s just a file that stores the positions of enemies and different blocks for this one level. I can create hundreds of levels and place these blocks differently, but none of these levels actually know what game mechanics are. They don’t know how the physics applied, and they don’t know what happen when the player collides with one of these enemies.
In general, I strictly separate game mechanics from the resource files. On the one hand I create levels using Sprite Builder and just layout different positions of blocks. And then in the game code, when I load one of these levels, I apply the game mechanics. For example, when I load a level, I spawn the player, and then when the player collides with the block, then I know the player should not fall on the ground. When the player collides with the enemy, I know that the game should restart. All of this happens in the code, all of the level design happens in SpriteBuilder.
Then I get to that situation where I have game mechanics only modeled once, and each level represents a different visual arrangement of different objects.
For a different type of game like a puzzle or a quiz one, your content might not be structured in a visual way, so you don’t have a level you can draw up. Instead, you have, for example, a set of different questions and answers. There is a great file type in iOS you can use to model these sort of games: “Plists”.
Plists will be another way to model your game content as resources and not in code. Instead of having one source file where you hardcode all the questions and answers of the game, you’ll have a resource file to contain those questions and answers.
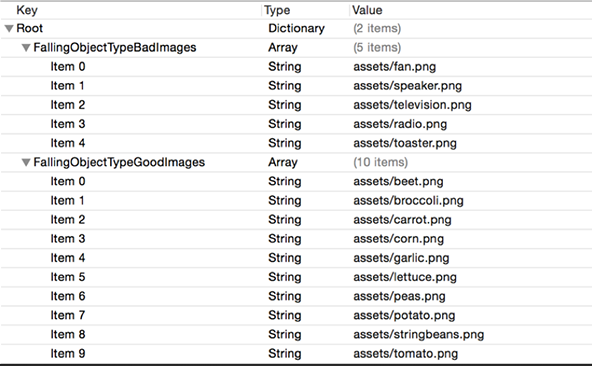
This is a game where I basically spawned objects from the top of the screen to the bottom, and the player has to collect these objects. I have two different types of objects: one a player should catch, and one a player should avoid. Instead of putting all of these things into code, I decided to take a resource file and define which asset represents good objects, and which asset represents bad objects.
The advantage of doing so is that it’s easy to change things this way. When I want to add new assets or replace them, I just have go to the resource file. I don’t have to touch the code and I don’t have to think about potential side effects. I could also have a designer or game designer on my team working entirely on these resource files without touching my code base and still changing the behavior.
That’s pretty a cool concept and also one of the things to think about pretty early. Think about these questions before you start:
- What is my game mechanic?
- What represents my game content?
- How can I separate these two.
- What is a good way to represent the content of my game?
You can use the SpriteBuilder level files, Unity level files, or structured level files using Plists.
#3 Use the update loop for time-dependent actions
The update loop is a concept for every game engine, and it’s basically like a global timer that decides how often the game is rendered to the device’s screen.
For example, in iOS when you work with Cocos2D, your entire game is drawn to the screen 60 times per second. All of this is triggered by the update loop. After everything is calculated and positioned, after every collision has been calculated, etc, it renders that current frame to the screen and does this 60 times a second.
The update loop is the internal clock for all timed actions in the game. In many games you want to have your own timed actions. For example, in a game where objects fall from the top of the screen and the player has to catch these objects, the typical thing you want to do in such a game is spawn objects every couple of seconds. Let’s say every two seconds you want to spawn a new object. One thing you want to avoid is creating a new timer to respawn these objects. What you’d probably do with any other platform if you’re not working on a game engine, is you’d create some timed object, and the timed object will fire every two seconds, and then you respawn this object.
If you are working with a game engine, you don’t want to create your own timer, but you want to integrate it with your game engine’s timer. The reason is that if your game is really complex, or if the device your game is running on is a little bit slow, the rendering speed could actually change.
You probably seen this when you play games where you don’t always run at a constant 60 frames-per-second. Sometimes they can slow down, and if that happens, then the update loop, or the clock, also slows down. This means all timed actions in your game get called less often when the frame-rate of your game drops.
If you provide your own timers, these timers will still run at the regular speed, while your game will be running at the slowed down speed. And then your actions will get out of sync. I’ve seen this happen before, so this is why I’m stressing how important it is not not use your own timer. Use the timer your game engine provides, and hook into them.
For example, in Cocos2D, there are some easy ways to do this, so it’s not really a technical challenge, but it’s just something to be aware of. If you use your own timers, you’ll risk getting your specifically timed actions to get out of sync with the core timer of the game engine’s. I’ve written up a tutorial about this topic where it shows more specific code and how to implement it in Cocos2D if you were to set up a custom timer.
#4 User composition to build complex objects with shared behavior
This is more about design pattern that really goes into code design.
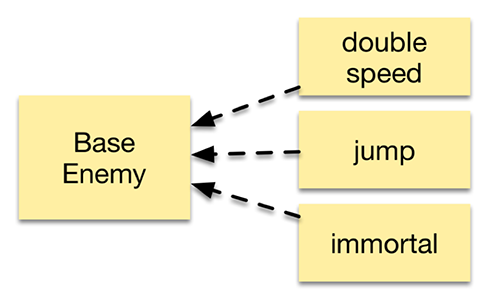
Let’s think about a game with 20 different enemy types. Let’s say we have some side scrolling game, and we have enemies with a bunch of characteristics and behave in different ways. For example, some enemies can jump, some other enemies can go into double speed mode where they move at double the usual speed, and some of them can be immortal for a certain time. So, we have a big bunch of characteristics, and each enemy type has a set of these characteristics.
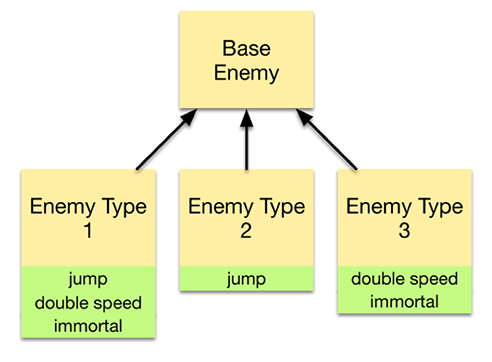
For example, here I show 3 of these enemy types. Enemy type 2 can jump, and enemy type 1 can jump, move at double speed, and be immortal. Enemy type 3 can move at double speed, be immortal, but cannot jump. If you start with a classical design pattern, you’d probably try to think what is the base enemy type and what is the shared behavior between these 20 different types. Then you’d try to create 20 of the base enemy types, create 20 subclasses of the base type, and add their own-specific characteristics onto these base-typed enemy.
You will eventually realize you’ll have a problem where get enemy type that have certain functions in common, while other functions are really not. For example, jumping is a feature shared between enemy type 1 and type 2. You can’t really think of a great inheritance structure where you can have these 20 different enemy types inherit from each other in a way that there is no duplicated function. You could try to make enemy type 1 the subclass of enemy type 2 because both of them can jump. Then, enemy type 1 can have double speed and immortal. However, this won’t work for all cases if you have 20 enemies. You’d have a big matrix of different features an enemy type can have, and you’ll realize things have become quite difficult.
A lot of people have run into this problem in game development before, and they came up with a pattern to solve that, this is called a component pattern. Instead of having hierarchies where we have subclasses of a base enemy, we can actually extract different features into entirely separate classes.
Every feature that an enemy could have would be one class (e.g. moving in double speed, jumping, becoming immortal, etc). Each of these classes will implement only one specific feature. For example, the jump feature will take the user’s input, where if a user taps the screen, the enemy will be moved up a certain direction or be applied a certain velocity. This would be encapsulated only inside the jumping class.
Now, if you want to create an enemy with 3 characteristics, you can just create one instance of this base enemy and add these different components on top. This way, you can avoid duplicate code, because you have one enemy type that can move at double speed and can jump, and you can easily create this by combining these two components. We can also use the same jump component for the second enemy type, that can jump and be immortal. Each of these features have unique code, and you don’t have to duplicate the code you’ve seen before.
let jumpComponent = JumpComponent()
let immortalityComponent = ImmortalityComponent()
let enemy = Enemy([jumpComponent, immortalityComponent])
This is how it looks like in code when you create an object using these components what we called composition.
Let’s say you want an enemy that can jump and become immortal. We will create this jump component, create the immortality component, and then as you create an enemy, you will pass these two components in.
However, there is no real silver bullet as to how to implement these components. I have a Linkedin article in the tutorial that I wrote for this talk, and it discusses in-depth different ways you can implement these components.
At any rate, as the functions of double speed, jump, and immortal get added to the enemy, they will get a reference to this enemy. Then the enemy will have some sort of public variable that can be modified by the component. For example, if you want to make the enemy jump, then that requires the jump action to have access to the velocity of enemy so you can change the vertical velocity and make the object jump.
You can typically implement this by assigning a public variable velocity to the base enemy, where the jump action gets a reference to the base enemy class and then it can change the velocity from inside. This is the most straightforward method, there also will be a complicated one listed in the reference.
let jumpComponent = JumpComponent()
let immortalityComponent = ImmortalityComponent()
let enemy = Enemy([jumpComponent, immortalityComponent])
When we use composition and components, we have three lines of code to actually create an enemy. If you have more complex game, maybe with 5 or 10 components per enemy, then it can get a little bit complicated to create different enemy types across your code base.
If you compare it to
// enemy with jump and immortality behavior
let enemy = EnemyType1()
We actually have one specific subclass for each enemy type, which makes it a lot easier to create an enemy. You can create enemy type1, or type 5, and you don’t have to know about the component that this enemy has. While the composition is actually pretty great as we don’t have duplicate code any more, we still run into a little inconvenience because of it. This is what I want to address in the best practice no.5.
#5 Use factory method to create objects that use composition
This sounds a little bit complicated, but all I am saying is there is an easier way to create enemies that are built on different composite types (e.g. jump, immortality, etc). There is a way where you don’t have to know every exact behavior you want to put into an enemy. We can just hide it behind what you can call a factory method.
func createEnemyType1 -> Enemy {
  let jumpComponent = JumpComponent()
  let immortalityComponent = ImmortalityComponent()
  let enemy = Enemy([jumpComponent, immortalityComponent])
}
func createEnemyType2 -> Enemy {
  let immortalityComponent = ImmortalityComponent()
  let enemy = Enemy([immortalityComponent]) }
This method is called createEnemyType1, and it returns an enemy. This function/method just knows about the component it needs to create a type 1 enemy. It knows it should have a jump component and an immortality component, and then it creates an enemy that has exactly these two components.
Basically, if you have 20 different types of enemies, you should create 20 methods that know how to create those enemies. So if you want to use this method in different places in code, you don’t need to remember the component and you can just call this method.
This factory pattern is actually a very old pattern, and it’s part of the very famous design pattern’s book. It’s not too complicated and you can also use in different parts of the game. Basically, whenever you want to create a complex object that takes multiple lines of codes to create, you can put that code into one of these factory methods. Then, whenever you want to create an enemy or any another type of object, the code can just call this method instead of knowing all the details about how to create these things. Overall, the factory method plays together nicely with the composition pattern.
Currently, Makeschool is the main site for Cocos2D tutorials, and we have some kind of online academy with online courses which will walk you through learning Cocos2D from scratch, and building games by SpriteBuilder and Cocos2D. We have a bunch of tutorials here, and we have a lot of documentation here. There is also a book out called “Learn SpriteBuilder”, which is an extensive book with ~500 pages and focuses on teaching SpriteBuilder and Cocos2D for game development. I’m also working on a book that will teach game development using Swift’s SpriteBuilder and Cocos2D, which would be out during March.
I’m not a fan of mobile gaming but I adore CS. And now there are different ways to get cs go skins, and you don’t actually have to buy them. What about CSGO gambling sites? It is much more interesting to play various gambling games or bet on sports using cs go skins. I think that at the very least it’s worth choosing one of the best gambling sites and giving it a try.
These are very useful tips